
Gluten egg free desserts

Life with three busy kids means my kitchen often feels like the bustling heart of our home. It’s where memories are made, messes are created, and most importantly, where we share the love through food.
As a mom, nothing brings me more joy than seeing my little ones dig into something delicious I’ve made, their faces lighting up with pure delight. But as many of you know, navigating food sensitivities and allergies can throw a wrench into even the simplest meal plans, especially when it comes to sweet treats.
I remember one particular birthday party, years ago, where my youngest, Lily, had to politely decline slice after slice of cake. Her little face showed such disappointment. She couldn’t have anything due to her gluten and egg sensitivities.
My heart ached for her. That day, I vowed to become a wizard in the kitchen, finding ways to make sure everyone felt included, especially at dessert time. It became my mission to create recipes that were not just safe but truly scrumptious for everyone, focusing on simple, nourishing ingredients.
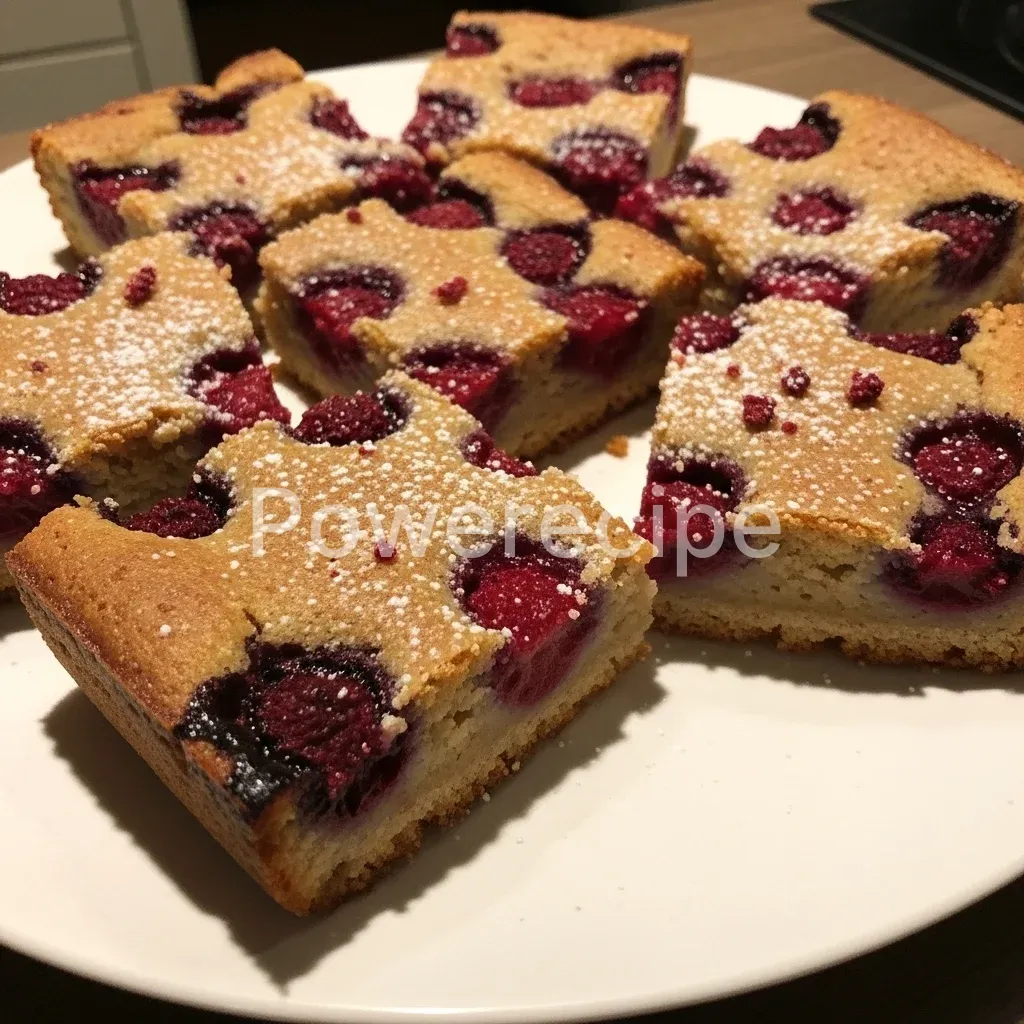
That journey led me to countless experiments, a few (okay, many) baking fails, and ultimately, to perfecting a collection of truly delightful gluten egg free desserts. Today, I’m so excited to share one of our absolute family favorites: a wonderfully moist, subtly sweet dessert that’s perfect for any occasion. It’s a game-changer for anyone dealing with similar dietary needs or simply looking for a wholesome, easy-to-make treat.
This recipe proves that you don’t need gluten or eggs to create something truly magical. Get ready to bake some love!
Why You’ll Love This Gluten Egg Free Dessert Recipe
You might wonder what makes this particular recipe stand out among other gluten egg free desserts. Honestly, it’s a combination of simplicity, incredible flavor, and its undeniable crowd-pleasing ability. First and foremost, it’s remarkably easy to make.
As a busy mom, I simply don’t have hours to spend on complicated recipes, and I bet you don’t either. This treat comes together quickly with minimal fuss, using ingredients you likely already have in your pantry.
Furthermore, the taste is absolutely divine. Many allergy-friendly desserts can sometimes taste “different” or lack the texture of their traditional counterparts. Not this one!
It boasts a wonderfully tender crumb, a rich flavor profile, and a delightful sweetness that satisfies without being overly indulgent. You won’t believe it’s free from gluten and eggs – your guests certainly won’t! This makes it perfect for sharing with friends and family, regardless of their dietary needs. Everyone can enjoy it together, fostering that beautiful sense of connection around the table.
Moreover, it offers a fantastic base for customization. You can easily adapt it with different fruits, spices, or add-ins to suit your mood or the season. This versatility means you can enjoy a new variation every time you bake it, keeping things fresh and exciting.
This recipe truly embodies my philosophy of simple, nourishing food that brings joy and connection. It’s proof that allergy-friendly baking doesn’t mean sacrificing flavor or fun.
Ingredients You’ll Need
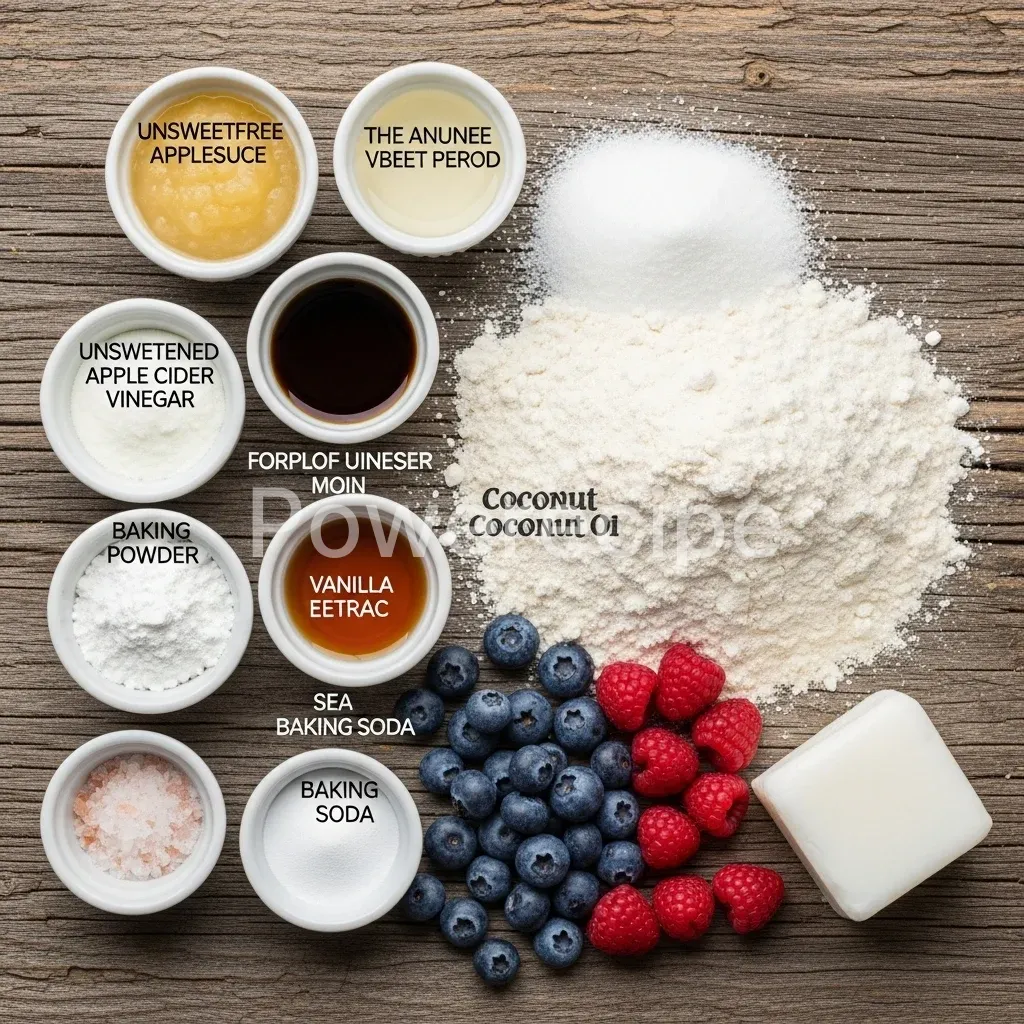
Crafting delicious gluten egg free desserts doesn’t require a specialty store trip. For this recipe, we utilize everyday staples, emphasizing wholesome goodness. Here’s what you’ll gather:
| Category | Ingredient | Quantity | Notes |
|---|---|---|---|
| Flour Blend | Gluten-free All-Purpose Flour Blend | 2 cups (240g) | Look for a blend with xanthan gum for best results. |
| Sweetener | Granulated Sugar | ¾ cup (150g) | Organic cane sugar works beautifully. |
| Leavening | Baking Powder | 1 tablespoon | Ensures a light, fluffy texture. |
| Leavening | Baking Soda | ½ teaspoon | Reacts with apple cider vinegar for lift. |
| Flavor Enhancer | Salt | ½ teaspoon | Balances sweetness and enhances flavor. |
| Liquid Base | Unsweetened Applesauce | 1 cup (240g) | Acts as an egg replacer and adds moisture. |
| Fat | Melted Coconut Oil (or neutral oil) | ½ cup (120ml) | Ensures richness and a tender crumb. |
| Liquid Acid | Apple Cider Vinegar | 1 tablespoon | Essential for activating baking soda. |
| Extract | Vanilla Extract | 1 teaspoon | Adds warmth and depth of flavor. |
| Liquid | Water (or dairy-free milk) | ½ cup (120ml) | Adjust as needed for batter consistency. |
| Optional Add-in | Fresh or Frozen Berries (optional) | 1 cup | Blueberries, raspberries, or mixed berries. |
You see? Simple ingredients, full of potential. These common items combine to create an extraordinary treat without the need for gluten or eggs. You’ll love how easily these ingredients come together to form a truly delicious dessert.
Substitutions & Variations
The beauty of this recipe for gluten egg free desserts lies in its adaptability. You can easily tweak it to suit your preferences, what you have on hand, or other dietary needs. Don’t hesitate to experiment and make it your own!
Flour Power: While I recommend a good quality gluten-free all-purpose flour blend (one that includes xanthan gum), you can experiment. If your blend doesn’t contain xanthan gum, add ½ teaspoon per cup of flour for better structure.
For a slightly different texture or to add more fiber, you could substitute up to ¼ cup of the gluten-free flour blend with almond flour or oat flour (ensure it’s certified gluten-free). Keep in mind that different flour blends absorb liquid differently, so you might need to adjust the amount of water slightly.
Sweetener Swaps: Granulated sugar works perfectly, but you have options. For a refined sugar-free version, use maple syrup or agave nectar. Replace ¾ cup of granulated sugar with ½ cup of liquid sweetener, and reduce the water in the recipe by about ¼ cup to maintain the right consistency. Coconut sugar is another excellent option; simply use it in the same quantity as granulated sugar for a deeper, caramel-like flavor.
Fat Alternatives: Melted coconut oil provides a lovely richness, but you can certainly substitute it. Any neutral-flavored oil like avocado oil, grapeseed oil, or even light olive oil will work well. For a richer, buttery flavor (if dairy is not an issue, though this recipe is inherently dairy-free), you could use melted vegan butter sticks.
Egg Replacers: This recipe uses applesauce as a primary egg replacer, which also adds moisture and natural sweetness. If you don’t have applesauce, you can use mashed ripe banana (about ½ cup), pureed pumpkin, or even a commercial egg replacer like Bob’s Red Mill Egg Replacer following package directions for two eggs. Remember that bananas or pumpkin will impart their own flavor.
Flavor Fun: This is where you can truly get creative!
- Citrus Zest: Add 1-2 teaspoons of lemon, orange, or lime zest to the batter for a bright, refreshing flavor.
- Spices: A pinch of cinnamon, nutmeg, or cardamom enhances the cozy, warm notes, especially if you’re adding fruit.
- Chocolate Lover’s Dream: Fold in ½ to ¾ cup of your favorite dairy-free chocolate chips or chunks for an indulgent twist.
- Nutty Goodness: If nuts are safe for your household, mix in ½ cup of chopped walnuts, pecans, or almonds for added crunch and flavor.
- Fruit Fantasia: Beyond berries, try chopped apples, pears, peaches, or even shredded zucchini for added moisture and nutrients. Ensure fruits are finely chopped and tossed lightly in a tablespoon of gluten-free flour before adding to prevent them from sinking to the bottom.
- Extract Experiments: Swap vanilla extract for almond extract, peppermint extract, or even a touch of rum extract for different flavor profiles.
These variations make this one of the most versatile gluten egg free desserts you’ll ever bake!
Step-by-Step Instructions
Creating this delicious gluten egg free dessert is a straightforward process, perfect for bakers of all skill levels. Follow these simple steps, and you’ll have a wonderful treat in no time!
- Prepare Your Pan: First, preheat your oven to 350°F (175°C). Lightly grease and flour (with gluten-free flour) a 9×13 inch baking pan or line it with parchment paper, leaving an overhang on the sides for easy lifting. This crucial step prevents sticking and ensures a clean release.
- Combine Dry Ingredients: In a large mixing bowl, whisk together the gluten-free all-purpose flour blend, granulated sugar, baking powder, baking soda, and salt. Whisking ensures these ingredients are thoroughly combined and evenly distributed, which is essential for proper leavening.
- Mix Wet Ingredients: In a separate medium bowl, combine the unsweetened applesauce, melted coconut oil (or chosen oil), apple cider vinegar, and vanilla extract. Whisk these wet ingredients until they are well blended. The apple cider vinegar will react with the baking soda later, creating lift.
- Combine Wet and Dry: Pour the wet ingredients into the dry ingredients. Use a spatula or wooden spoon to mix them together. Mix just until no dry streaks of flour remain. Overmixing can develop the gluten-free starches too much, leading to a tougher texture. Remember, a few small lumps are perfectly fine.
- Adjust Consistency (if needed): Slowly add the ½ cup of water (or dairy-free milk) to the batter, stirring until it reaches a thick, pourable consistency. Different gluten-free flour blends absorb liquid differently, so you might not need all of the water, or you might need a tiny bit more. You want a batter that is thick but can be easily spread.
- Fold in Add-ins (Optional): If you’re using berries or other mix-ins, gently fold them into the batter now. Tossing berries lightly in a tablespoon of gluten-free flour before adding can help prevent them from sinking to the bottom of the pan.
- Transfer to Pan: Pour the batter into your prepared baking pan. Use the spatula to spread it evenly into the corners. Gently tap the pan on the counter a couple of times to release any large air bubbles.
- Bake: Place the pan in the preheated oven. Bake for 30-35 minutes, or until a wooden skewer or toothpick inserted into the center of the dessert comes out clean. The top should be lightly golden brown.
- Cool: Once baked, remove the pan from the oven and let it cool in the pan on a wire rack for at least 15-20 minutes before attempting to slice. Cooling allows the dessert to set properly, making it easier to cut and preventing it from crumbling. For best results, let it cool completely before serving, especially if you plan to frost or top it.
- Serve and Enjoy: Slice into squares or bars and serve! This delightful gluten egg free dessert is perfect on its own or with your favorite toppings.
Following these steps will ensure you create a moist, flavorful, and perfectly textured dessert that everyone will love, regardless of their dietary needs. Enjoy the process and the delicious outcome!

Pro Tips for Success
Even with simple recipes, a few insider tips can make all the difference, transforming a good dessert into an absolutely amazing one. As Emilia, I’ve learned these tricks through many baking sessions, and I’m happy to share them so your gluten egg free desserts turn out perfectly every time.
Measure Your Flour Correctly: This is perhaps the most crucial tip for gluten-free baking. Do not scoop your flour directly from the bag with your measuring cup. Instead, spoon the gluten-free flour into your measuring cup until it’s overflowing, then level it off with the back of a knife.
This method (the “spoon and level” method) prevents you from packing in too much flour, which can lead to a dry, dense dessert. An accurately measured flour means a light, tender crumb.
Don’t Overmix the Batter: Once you combine the wet and dry ingredients, mix just until the flour streaks disappear. Overmixing develops the starches in gluten-free flour, making your dessert tough and rubbery. A few small lumps are perfectly fine and often preferred. Gentle handling keeps the texture delicate.
Use Room Temperature Ingredients (where applicable): While some ingredients like coconut oil are melted, for other components, using room temperature ingredients like applesauce can help them emulsify better with the oil and mix more smoothly into the batter. This creates a more uniform batter and ultimately a better texture.
The Power of Apple Cider Vinegar: Don’t skip the apple cider vinegar! It’s not just for flavor; it’s a vital ingredient that reacts with the baking soda, creating carbon dioxide bubbles that give this dessert its lift and airy texture. Without it, your dessert might be flat and dense. White vinegar works in a pinch, but apple cider vinegar offers a slightly milder taste.
Test for Doneness with Confidence: Baking times are always estimates. Ovens vary, and so do pan materials. Rely on the toothpick test: insert a wooden skewer or toothpick into the very center of the dessert.
It should come out clean, possibly with a few moist crumbs attached, but no wet batter. If it comes out with wet batter, continue baking in 5-minute increments until it’s done.
Cool Completely for Best Slicing: I know the smell is intoxicating, and you’ll want to dig in immediately! However, for the cleanest slices and the best texture, allow the dessert to cool completely in the pan on a wire rack. Gluten-free baked goods can be delicate when warm and firm up as they cool. Patience here pays off immensely.
Line Your Pan: Using parchment paper, especially with an overhang, makes removing the dessert from the pan incredibly easy. This eliminates any sticking worries and allows you to lift the entire slab out to cool and slice neatly on a cutting board. It’s a simple step that saves a lot of frustration!
By keeping these simple pro tips in mind, you’ll consistently bake amazing gluten egg free desserts that are not only safe for everyone but also incredibly delicious and beautifully textured.
Storage & Reheating Tips
You’ve put love into baking these wonderful gluten egg free desserts, so naturally, you want them to stay fresh and delicious for as long as possible. Here’s how to store and, if needed, reheat your creation:
Countertop Storage: If you plan to enjoy the dessert within 2-3 days, you can store it at room temperature. First, ensure it has cooled completely. Then, transfer the dessert (either whole or sliced) into an airtight container.
This prevents it from drying out and keeps it fresh. Place the container on your kitchen counter, away from direct sunlight or heat.
Refrigeration: For longer storage, or if your kitchen is particularly warm, move the airtight container to the refrigerator. When stored properly in the fridge, this dessert will remain fresh for up to 5-7 days. The cooler temperature helps preserve its texture and moisture. If you prefer to eat it warm, simply let it come to room temperature or gently warm it before serving.
Freezing for Future Enjoyment: This dessert freezes beautifully, making it an excellent option for meal prep or saving for unexpected guests.
- To Freeze Slices: Once completely cooled, cut the dessert into individual serving squares. Wrap each piece tightly in plastic wrap, then place the wrapped pieces in a freezer-safe airtight container or a heavy-duty freezer bag. Label with the date. It will keep well in the freezer for up to 2-3 months.
- To Freeze a Whole Dessert: If you baked it in parchment paper, you can lift the entire cooled dessert out of the pan. Wrap it thoroughly in plastic wrap, then an additional layer of aluminum foil. Place it back in the pan (if freezer-safe) or a sturdy container before freezing.
Thawing & Reheating:
- From Refrigerator: Simply take a slice out of the fridge and allow it to come to room temperature for about 15-20 minutes before serving.
- From Freezer: For individual slices, you can place them directly on a plate and let them thaw at room temperature for an hour or two. Alternatively, you can gently warm them in the microwave for 15-30 seconds, or in a preheated oven at 300°F (150°C) for about 5-10 minutes, until just warmed through. For a whole frozen dessert, transfer it to the refrigerator overnight to thaw, then warm gently if desired.
Proper storage ensures you always have a delightful treat ready to go, demonstrating the convenience and versatility of these fantastic gluten egg free desserts.
What to Serve With This Recipe
This delightful gluten egg free dessert is truly a star on its own, full of flavor and a wonderful texture. However, a few simple accompaniments can elevate it even further, making it feel extra special, whether for a weeknight treat or a gathering with loved ones.
A Scoop of Something Creamy: One of my favorite ways to serve this dessert is with a generous scoop of dairy-free vanilla ice cream. The cool, creamy contrast against the slightly warm, tender dessert is simply divine. Coconut milk-based or oat milk-based ice creams are excellent choices. If dairy isn’t an issue for you or your guests, a scoop of traditional vanilla bean ice cream would be equally delicious.
Fresh Fruit: Complement the flavors with a side of fresh berries or sliced fruit. A handful of fresh raspberries, blueberries, or sliced strawberries adds a burst of freshness, a touch of acidity, and vibrant color. In the fall, a side of thinly sliced apples or pears provides a lovely textural and flavor contrast.
A Simple Sauce:
- Raspberry Coulis: A quick raspberry coulis (just fresh or frozen raspberries simmered with a touch of sugar and strained) adds a beautiful tart-sweet counterpoint.
- Warm Fruit Compote: A warm berry or apple compote creates a comforting, dessert-for-breakfast vibe.
- Dairy-Free Caramel or Chocolate Sauce: A drizzle of homemade or store-bought dairy-free caramel sauce or chocolate ganache can turn this into an even more decadent experience.
A Sprinkle of Something Extra:
- Powdered Sugar: A simple dusting of powdered sugar (confectioners’ sugar) always adds an elegant touch and a subtle sweetness.
- Toasted Nuts: For those who can enjoy nuts, a sprinkle of lightly toasted chopped pecans or walnuts adds a delightful crunch and nutty flavor.
- Shredded Coconut: Toasted shredded coconut adds a tropical note and lovely texture.
Beverage Pairings:
- Coffee or Tea: A warm cup of freshly brewed coffee or a soothing herbal tea is the perfect partner for this dessert, especially during cooler months.
- Dairy-Free Milk: A cold glass of almond milk, oat milk, or soy milk makes for a comforting pairing, reminiscent of childhood treats.
No matter how you serve it, this versatile recipe provides the perfect base for creating memorable moments around the table with truly satisfying gluten egg free desserts.
FAQs About Gluten Egg Free Desserts
When diving into the world of allergy-friendly baking, especially for delicious gluten egg free desserts, questions often arise. Here are some common queries I get from fellow home cooks:
Can I make this recipe ahead of time?
Absolutely! This gluten egg free dessert is fantastic for making ahead. You can bake it a day or two in advance and store it at room temperature in an airtight container.
It often tastes even better the next day as the flavors meld and the texture settles. For longer storage, refer to the freezing tips in the ‘Storage & Reheating’ section. This convenience makes it perfect for busy schedules and entertaining.
What’s the best egg substitute for baking?
For this specific recipe, unsweetened applesauce works wonderfully as an egg substitute, providing both moisture and binding. However, many different egg replacers exist, each with slightly different properties. Flax “eggs” (1 tablespoon ground flaxseed + 3 tablespoons water, rested for 5 minutes) are excellent for binding.
Chia “eggs” work similarly. Mashed banana or pureed pumpkin also add moisture and bind well, though they impart their own distinct flavor. Commercial egg replacers are also reliable and often a great go-to for many gluten egg free desserts.
Are gluten egg free desserts always healthy?
While this recipe focuses on simple, nourishing ingredients, the term “healthy” can be subjective. Gluten egg free desserts can be made with wholesome ingredients, often incorporating fruits, whole grains (like certified gluten-free oats), and natural sweeteners, making them a more nutrient-dense option than many traditional desserts. However, like any treat, moderation is key.
They still contain sugar and fats. My focus is on creating balanced, delicious options that accommodate dietary needs without sacrificing flavor or quality.
How do I know if my gluten-free flour blend is good?
A good gluten-free all-purpose flour blend is crucial for successful gluten egg free desserts. Look for blends that specifically state “all-purpose” and ideally contain xanthan gum. Xanthan gum acts as a binder, mimicking the elasticity of gluten.
If your blend doesn’t include it, add ½ teaspoon per cup of flour. High-quality blends often contain a mix of different flours (like rice flour, tapioca starch, potato starch, and sorghum flour) to achieve a balanced texture. Experiment with a few brands to find one you love for consistent results.
Can I use different fruits in this recipe?
Absolutely! This recipe is incredibly versatile when it comes to fruit additions. While berries are a popular choice, you can easily substitute with chopped apples, pears, peaches, or even cherries.
If using fruits with high water content, like fresh peaches or very ripe berries, you might want to toss them lightly in a tablespoon of gluten-free flour before adding them to the batter. This helps prevent them from sinking to the bottom and can absorb some excess moisture, ensuring your gluten egg free desserts maintain their perfect texture.
Printgluten egg free desserts

This recipe offers a wonderfully moist, subtly sweet, and incredibly easy-to-make dessert that is naturally gluten-free and egg-free. It's designed for busy families navigating food sensitivities, ensuring everyone can enjoy a delicious treat. The dessert boasts a tender crumb, rich flavor, and is highly customizable with various fruits, spices, or chocolate, making it a versatile crowd-pleaser for any occasion.
- Prep Time: 20 minutes
- Cook Time: 35 minutes
- Total Time: 1 hour 15 minutes
- Yield: 15 servings
- Category: Dessert
- Method: Baking
- Cuisine: American
- Diet: Gluten Free, Egg Free, Dairy Free, Vegan
Ingredients
2 cups Gluten-Free All-Purpose Flour Blend
¾ cup Granulated Sugar
1 tablespoon Baking Powder
½ teaspoon Baking Soda
½ teaspoon Salt
1 cup Unsweetened Applesauce
½ cup Melted Coconut Oil
1 tablespoon Apple Cider Vinegar
1 teaspoon Vanilla Extract
½ cup Water
1 cup Fresh or Frozen Berries (optional)
Instructions
- Prepare Your Pan: Preheat your oven to 350°F (175°C). Lightly grease and flour (with gluten-free flour) a 9×13 inch baking pan or line it with parchment paper, leaving an overhang on the sides for easy lifting. This crucial step prevents sticking and ensures a clean release
- Combine Dry Ingredients: In a large mixing bowl, whisk together the gluten-free all-purpose flour blend, granulated sugar, baking powder, baking soda, and salt. Whisking ensures these ingredients are thoroughly combined and evenly distributed, which is essential for proper leavening
- Mix Wet Ingredients: In a separate medium bowl, combine the unsweetened applesauce, melted coconut oil (or chosen oil), apple cider vinegar, and vanilla extract. Whisk these wet ingredients until they are well blended. The apple cider vinegar will react with the baking soda later, creating lift
- Combine Wet and Dry: Pour the wet ingredients into the dry ingredients. Use a spatula or wooden spoon to mix them together. Mix just until no dry streaks of flour remain. Overmixing can develop the gluten-free starches too much, leading to a tougher texture. Remember, a few small lumps are perfectly fine
- Adjust Consistency (if needed): Slowly add the ½ cup of water (or dairy-free milk) to the batter, stirring until it reaches a thick, pourable consistency. Different gluten-free flour blends absorb liquid differently, so you might not need all of the water, or you might need a tiny bit more. You want a batter that is thick but can be easily spread
- Fold in Add-ins (Optional): If you're using berries or other mix-ins, gently fold them into the batter now. Tossing berries lightly in a tablespoon of gluten-free flour before adding can help prevent them from sinking to the bottom of the pa
- Transfer to Pan: Pour the batter into your prepared baking pan. Use the spatula to spread it evenly into the corners. Gently tap the pan on the counter a couple of times to release any large air bubbles
- Bake: Place the pan in the preheated oven. Bake for 30-35 minutes, or until a wooden skewer or toothpick inserted into the center of the dessert comes out clean. The top should be lightly golden brow
- Cool: Once baked, remove the pan from the oven and let it cool in the pan on a wire rack for at least 15-20 minutes before attempting to slice. Cooling allows the dessert to set properly, making it easier to cut and preventing it from crumbling. For best results, let it cool completely before serving, especially if you plan to frost or top it
- Serve and Enjoy: Slice into squares or bars and serve! This delightful gluten egg free dessert is perfect on its own or with your favorite toppings
Notes
Measure your gluten-free flour correctly using the 'spoon and level' method to prevent a dry, dense dessert.
Avoid overmixing the batter; mix just until flour streaks disappear to keep the texture delicate.
The apple cider vinegar is crucial for activating baking soda and creating a light, airy texture, so do not skip it.
Test for doneness with a toothpick inserted into the center; it should come out clean.
For cleanest slices and best texture, allow the dessert to cool completely in the pan before cutting.
Store cooled dessert in an airtight container at room temperature for 2-3 days, or in the refrigerator for 5-7 days.
This dessert freezes beautifully. Wrap individual slices tightly and freeze for up to 2-3 months. Thaw at room temperature or gently warm.


5051 Comments
Going to come back when I have more time to read carefully, the post deserves more than a quick scan, and a stop at linkpilot reinforced that, this is the kind of site that rewards a slower read which is hard to find in this fast paced corner of the internet but really worthwhile.
After reading several posts back to back the consistent voice across them is impressive, and a stop at leadbeacon continued that voice consistency, sites that maintain a single coherent voice across many pieces by potentially many writers represent serious editorial discipline and this one has clearly developed the institutional consistency needed for that.
Reading this post made me realise I had been settling for lower quality elsewhere, and a look at seobloom extended that recalibration, content that exposes how much I had been accepting in adjacent sources is content with calibrating effect on my standards and this site is performing that calibration function across topics for me reliably.
If I were to recommend a starting point for the topic this site would be near the top of my list, and a stop at learnsomethingamazing reinforced that recommendation status, the small list of starting point recommendations I keep for friends asking about topics is short and this site is now firmly on it.
Нужна CRM банкротством физ лиц? битрикс24 для БФЛ инструмент автоматизации юридического бизнеса по банкротству физических лиц. Управляйте заявками, делами клиентов, документами и сроками процедур. Система помогает организовать работу команды и контролировать каждый этап банкротства.
The use of plain language without dumbing down the topic was really well done, and a look at rankdrift continued in that same accessible style, this is something many technical writers fail at because they either confuse their readers or condescend to them but here neither problem appears at all which is impressive really.
Considered alongside other sources I have been reading this one consistently rises to the top, and a stop at seoridge maintained that top ranking, the informal ongoing comparison between sources is something I do whenever reading on a topic and this site keeps coming out near the top of those comparisons over many sessions.
Polished and informative without feeling overproduced, that is the sweet spot, and a look at seovertex hit it again, you can tell when a site has been built with care versus thrown together for the sake of having something to put online and this is clearly the former approach taken by the team.
Beyond the topic at hand this site reads as a small ongoing project of taking writing seriously, and a look at rankpoint reinforced that project quality, sites that treat publishing as an ongoing serious practice rather than as content production for traffic are sites worth supporting and this one has clearly chosen the serious approach.
Speaking from the perspective of having read widely on the topic this site offers something distinct, and a look at yournextadventure reinforced that distinctness, the rare site that contributes something genuinely original to a saturated topic is the rare site worth following carefully and this one has demonstrated that original contribution capability today.
Honestly thank you to whoever wrote this because it scratched an itch I had not quite been able to articulate, and a stop at linktower kept that satisfying feeling going, the kind of writing that meets unspoken needs is special and this site clearly has writers who understand their readers more than most do today.
Time spent here today felt productive in the way that good reading sessions sometimes do, and a stop at rankharbor extended that productive feeling across the rest of the morning, the difference between productive reading and merely passing time is real and this site is consistently on the productive side for me lately.
Pass this along to colleagues if the topic comes up, the framing here is sensible, and a stop at adlayer adds more useful angles to share, the kind of content that improves conversations rather than just feeding them is what makes a resource genuinely valuable in professional contexts going forward over time and across project boundaries too.
Felt the post had been written without looking over its shoulder, and a look at megabuy continued that confident posture, content written for its own sake rather than against imagined critics has a different quality and this site reads as written from a place of confidence rather than defensive justification of every claim.
Skipped the related products section because there was none, and a stop at leadclimb also lacked any aggressive monetisation, content that is not constantly trying to convert me into a customer or subscriber is content that has confidence in its own value and that confidence shows up as a different reading experience.
Considered as a whole this site has developed a coherent point of view that comes through in individual pieces, and a look at seoboostly continued displaying that coherence, sites with a unified perspective rather than a grab bag of takes are sites with editorial maturity and this one has clearly developed that maturity through years of work.
Bookmarking this for later, the kind of resource I want to keep nearby, and a quick look at linkripple confirmed the rest of the site is worth the same treatment, definitely going into my reference folder for the next time the topic comes up at work or in conversation with someone who asks.
Well structured and easy to read, that combination is rarer than people think, and a stop at linkburst confirmed the same standard runs across the rest of the site, definitely the kind of place I will be coming back to when this topic comes up in conversation later again over the weeks ahead.
Reading this slowly to give it the attention it deserved, and a stop at smartshoppingzone earned the same slow read, choosing to read slowly is a small act of respect for content quality and very few sites earn that respect from me but this one did so without any explicit ask which is the cleanest way.
A piece that reads like it was written for me without claiming to be written for me, and a look at leadsurge produced the same fit, when the writer audience match clicks naturally without being engineered through demographic targeting you know the writing is solid and this site has that natural fit consistently for me.
Liked the way the post handled the final paragraph, no neat bow but no abrupt cutoff either, and a stop at seostrike continued that thoughtful ending pattern, endings are hard and most blog writers either over engineer them or skip them entirely and this site has clearly figured out a sustainable middle approach.
Felt the post had been written without using a single buzzword, and a look at ranktower continued that clean vocabulary, content free of jargon and trendy phrases reads better and ages better and this site has clearly committed to a vocabulary that will not feel dated in three years which is impressive editorially.
Found a couple of useful angles in here I had not considered before reading carefully, and a quick stop at opalmeadowgoodsgallery added more, this is one of those sites where the value compounds the more you read rather than peaking at one viral post and then offering nothing else of substance afterwards which is common.
Glad the writer kept this short rather than padding it out, the points stand on their own without needing extra context, and a look at rankloom kept the same approach going, brevity is a sign of confidence in the substance and the team here clearly trusts their content to land without filler.
A particular pleasure to read this with a fresh coffee, and a look at simplystylishstore extended the pleasure across more pages, content that pairs well with quiet morning rituals is something I have come to value highly and this site has the kind of energy that fits naturally into a calm reading routine.
Picked this site to mention to a colleague who would benefit, and a look at rapidstylecorner added more material I will pass along, recommending sites to colleagues is a higher bar than recommending to friends because the professional context demands more careful curation and this site cleared the professional bar without me having to think.
Glad to find a site whose links lead somewhere worth going rather than back to itself for SEO juice, and a stop at leadpush kept that generous outbound feel, citing other peoples work with real respect rather than just for ranking signals is a sign of an honest operation worth supporting going forward.
Now adding the writer to a small mental list of voices I want to follow, and a look at adprism reinforced that follow intention, the few writers whose work I actively track are writers who have demonstrated sustained quality and this writer has clearly demonstrated that sustained quality across the pieces I have sampled here today.
Just want to acknowledge that the writing here is doing something right, and a quick visit to learnandthrive confirmed the same standards run across the broader site, recognising good work is something I try to do when I find it because the alternative is silence and silence rewards mediocrity.
Reading this prompted me to dig into a related topic later, and a stop at seoimpact provided some of the starting points for that follow up reading, content that triggers further exploration rather than satisfying curiosity completely is content with real generative energy and this site has plenty of that energy throughout it.
Took a quick scan first and then went back to read properly because the post deserved it, and a stop at leadloom kept me reading carefully too, the kind of writing that earns a slower second pass rather than getting skimmed and forgotten is something I value highly when I happen to find it.
Just enjoyed the experience without needing to think about why, and a look at megabuy kept that effortless feeling going, sometimes the best content is invisible in the sense that you forget you are reading until you reach the end and realise time has passed without you noticing it pass naturally.
A piece that demonstrated competence without performing it, and a look at leadpath maintained the same self assured but unshowy register, the gap between competence and performance of competence is one I track and this site has clearly chosen to demonstrate rather than perform which I find much more persuasive as a reader.
Now thinking I want more sites built on this kind of editorial foundation, and a stop at leadglide extended that wish into a broader hope, sites built on substance and care rather than on metrics and growth are the kind of sites I want to see more of and this one is a small example worth supporting.
Picked this for my morning read because the topic seemed worth the time, and a look at seocabin confirmed the choice was right, my morning reading slot is precious and giving it to this site felt like a good investment rather than a waste which is a higher endorsement than I usually offer for content.
Came here from another site and ended up exploring much further than I planned, and a look at linkscope only encouraged more exploration, the kind of place where one click leads to another not through manipulative design but through genuinely interesting content is rare and worth highlighting when found like this somewhere on the open internet.
Reading this slowly and letting each paragraph land before moving on, and a stop at rankgrit earned the same patient approach, content that rewards slow reading rather than speed is content with real density and the writers here are clearly producing work that benefits from the careful eye rather than the rushed scan.
Generally I am cautious about recommending sites on first encounter but this one warrants the exception, and a look at urbanchoicehub reinforced the exception making, the rare site that justifies breaking my normal cautious approach is the rare site worth flagging early and this one has prompted exactly that early flagging response from me.
A relief to read something where I did not have to fact check every claim mentally, and a look at rankpivot continued that reliable feeling, sites where I can lower my guard and trust the content are rare and this one is earning that trust paragraph by paragraph through consistent careful work behind the scenes.
High quality writing, no marketing speak and no buzzwords that mean nothing, and a stop at rankmagnet kept that going, simple direct content that actually communicates something is harder to find than it should be and this is one of the rare places that gets it right consistently across many different posts.
Reading this gave me material for a conversation I needed to have anyway, and a stop at freshvalueoutlet added even more talking points, content that connects to upcoming social or professional needs rather than just being interesting in the abstract is the kind that earns priority placement in my attention these days routinely.
Now wondering how the writers calibrated the level of detail so well, and a stop at emberridgevendorstudio continued the same calibration, the right level of detail is one of the harder editorial calls in any piece and this site has clearly developed an instinct for it through what I assume is years of careful practice publicly.
Liked that there was nothing performative about the writing, and a stop at leadrally continued that genuine quality, performative writing tries to be witnessed rather than read and the difference between performance and substance is huge for the careful reader and this site has clearly chosen substance every time clearly.
Just want to record that this site is entering my regular reading list, and a look at leadripple confirmed it deserves the spot, my regular reading list is short and well curated and adding to it requires meeting a fairly high quality bar that this site has clearly cleared without much effort apparently.
Now thinking the topic is more interesting than I had given it credit for, and a stop at rapidtrendoutlet continued that elevated interest, content that revives my curiosity about subjects I had set aside is doing genuine work in the structure of my interests and this site is providing that revivifying effect today actually.
Beyond the immediate post itself the editorial sensibility behind the site is what struck me, and a stop at seogrit continued displaying that sensibility, content that reveals editorial choices through accumulated reading is content with structural quality and this site has clearly developed an underlying approach worth identifying through multiple sessions of reading.
A genuine pleasure to find a site that publishes at a sustainable cadence rather than chasing the daily content treadmill, and a look at rankridge confirmed the careful publication rhythm, sites that prioritise quality over frequency are rare and this one has clearly chosen the slower pace which I appreciate as a reader.
Now placing this in the small category of sites whose updates I would actually want to know about, and a stop at quickshoppingcorner confirmed that placement, the difference between sites I want to follow and sites I just consume from is real and this one has crossed into the active follow category from the casual consumption side.
Reading this in the gap between work projects was a small but meaningful break, and a stop at leadlane extended that gentle reset, content that provides genuine refreshment rather than just distraction during work breaks is content with a particular kind of utility and this site fits that role for me reliably during work days.
Great work on keeping things readable, the post never drags or repeats itself which I really appreciate, and a stop at seoclimb added a bit more context that fit naturally with what was already said here, no need to read everything twice to get the point being made today.
Honest reaction is that I want to send this to a friend who would benefit from it, and a look at leadlayer added more material I will pass along too, the impulse to share is the strongest signal I have for content quality and this site is generating that impulse cleanly across multiple posts.
A piece that did not require external context to follow, and a look at linksignal maintained the same self contained quality, content that stands alone without forcing readers to chase prerequisites is more accessible and this site has clearly thought about how each piece can serve a fresh visitor rather than only existing members.
Useful reading material, the kind I can hand off to someone newer to the topic without worrying about confusing them, and a quick look at adtap confirmed the same beginner friendly tone runs throughout the site which is great for sharing with people just starting their learning journey on this particular topic.
Glad the writer did not feel compelled to cover every possible angle of the topic, focus is a virtue, and a stop at rankslate reflected the same disciplined scope, knowing what to leave out is half of what makes good writing good and this post has clearly been edited with that principle in mind.
Yesterday I was complaining about the state of online writing and today this site has temporarily fixed that complaint, and a look at classychoicehub extended that mood reversal, the short term mood improvement that comes from finding good content is real and this site has produced that improvement for me at a useful moment.
Refreshing tone compared to the dry corporate posts on similar topics, and a stop at shopwithhappiness carried that personality through nicely, you can tell when a real person is behind the writing versus a content team chasing metrics and this site definitely falls into the former category clearly across what I have seen.
Worth saying that the post fit naturally into a rhythm of careful reading, and a stop at rankmetric extended the same rhythm, content that pairs well with how I actually read rather than demanding a different mode is content well calibrated to its likely audience and this site has clearly thought about that consistently.
A particular pleasure to read this with a fresh coffee, and a look at linkgain extended the pleasure across more pages, content that pairs well with quiet morning rituals is something I have come to value highly and this site has the kind of energy that fits naturally into a calm reading routine.
Quality writing that respects the reader’s intelligence without overloading them, and a quick look at moveforwardnow reflected that approach, a balanced thoughtful site that earns trust by being consistent rather than by shouting about how trustworthy it is which is the usual approach online sadly across most content categories.
Thank you for the genuine effort here, it shows in every paragraph and not just the headline, and after my visit to seoprism I was sure this site cares about getting things right rather than chasing clicks, which is the main reason I will come back later this week to read more.
Now adding a small note in my reading log that this site is one to watch, and a look at leadsprout reinforced the watch status, the few sites I track deliberately rather than encounter accidentally are sites I expect ongoing returns from and this one has cleared the bar for that elevated tracking based on what I read.
Took a quick scan first and then went back to read properly because the post deserved it, and a stop at rivercovevendorroom kept me reading carefully too, the kind of writing that earns a slower second pass rather than getting skimmed and forgotten is something I value highly when I happen to find it.
During the time spent here I noticed the absence of the usual distractions, and a stop at leadvertex extended that distraction free experience, content that does not fight my attention with pop ups and modals and aggressive prompts is content that respects me and this site has clearly chosen the respectful approach throughout.
Bookmarking this for later, the kind of resource I want to keep nearby, and a quick look at freshcarthub confirmed the rest of the site is worth the same treatment, definitely going into my reference folder for the next time the topic comes up at work or in conversation with someone who asks.
Appreciated how the writer anticipated the questions a reader might have along the way, and a stop at rapidtrendzone continued that thoughtful approach, you can tell when content has been edited with the reader in mind versus just published as a first draft and this is clearly the former approach across what I read.
Thanks for the simple approach, too many sites bury the actual point under layers of unnecessary words, but here every line earns its place, and a look at seopivot showed the same care for the reader which is something I will remember the next time I need answers on a topic.
Now planning to write about the topic myself eventually using this post as a reference, and a look at seosurge would also serve in that future piece, content that becomes raw material for my own writing rather than just informing my reading is content with multiplicative value and this site is generating that multiplicative effect.
Decided to read more before commenting and the more I read the more I wanted to say something, and a stop at linkcrest pushed that impulse further, when content provokes the urge to participate rather than just consume it is doing something quite specific and worth recognising clearly when it happens during reading.
Bookmark earned and shared the link with one specific person who would care, and a look at seocove got the same targeted share, sharing carefully rather than broadcasting is a discipline I try to maintain and this site is generating shares from me at a sustainable rate rather than the spam rate of viral content.
A piece that took its time without dragging, and a look at linkstreet kept the same patient pace, the difference between unhurried and slow is a fine editorial distinction and this site has clearly found the unhurried side without slipping into the slow side which would have lost me as a reader quickly otherwise.
Now appreciating that the post left me with enough to say in a follow up conversation, and a look at rankmotion added more material for those follow ups, content that prepares me for related conversations rather than just informing me alone is content with social utility and this site provides that social armament reliably for me.
Honest take is that I will probably forget most of what I read online today but this post is one I will remember, and a stop at makepositivechanges kept that same memorable quality going, certain writing leaves a residue in the mind in a way most content simply does not manage.
Adding to the bookmarks now before I forget, that is how good this is, and a look at seocipher confirmed the rest of the site is worth saving too, this is one of those rare finds that justifies the time spent searching the web for once which is a relief in the current environment.
Following a few of the internal links revealed more posts of similar quality, and a stop at linkcipher added more to that growing pile, sites where internal links lead to more good content rather than to more of the same recycled material are sites with depth and this one has clearly built that depth carefully.
Now adding a small note in my reading log that this site is one to watch, and a look at seoscale reinforced the watch status, the few sites I track deliberately rather than encounter accidentally are sites I expect ongoing returns from and this one has cleared the bar for that elevated tracking based on what I read.
Started taking notes about halfway through because the points were stacking up, and a look at leadstreet added enough material that my notes file grew further, content that demands note taking from a passive reader is content with substance and the writers here are clearly producing that kind of work consistently across topics.
Now thinking about whether the writer might publish a longer form work I would buy, and a look at fashionforlife suggested the same depth would translate, content that makes me want to pay for related work in other formats is content that has earned commercial trust as well as attention trust and this site has both clearly.
Honestly enjoyed every minute spent here, that is not something I say lightly, and a look at opalmeadowgoodsgallery confirmed I will be back, the bar for spending time online is high for me these days but this site clears it without effort which is high praise indeed from this reader who is usually rather demanding.
Reading this prompted a small note in my reference file, and a stop at fastbuystore prompted another, the rare site that contributes useful nuggets to my own working knowledge rather than just consuming my attention is worth the time investment many times over compared to the usual pile of forgettable scroll content.
Reading this triggered a small but real correction in something I had assumed, and a stop at leadstrike extended that corrective effect, content that updates my beliefs through evidence rather than rhetoric is content with intellectual integrity and this site has earned that label consistently across the pieces I have read so far today.
Felt the post was written for someone like me without explicitly addressing me, and a look at leadchart produced the same fit, when content lands on its target without pandering you know the writer has done careful audience thinking rather than relying on demographic targeting or interest signals to do the work of editorial decisions.
Picked this for my morning read because the topic seemed worth the time, and a look at seolane confirmed the choice was right, my morning reading slot is precious and giving it to this site felt like a good investment rather than a waste which is a higher endorsement than I usually offer for content.
Even from a single post the editorial care is clear, and a stop at admesh extended that care across more pages, the kind of attention to quality that shows up in every paragraph is what separates serious sites from the rest and this one has clearly invested in that paragraph level attention across what I have read.
A relief to read something where I did not have to fact check every claim mentally, and a look at trendshopworld continued that reliable feeling, sites where I can lower my guard and trust the content are rare and this one is earning that trust paragraph by paragraph through consistent careful work behind the scenes.
Bookmark added with a small mental note that this is a site to keep, and a look at royalcartcorner reinforced the keep status, the verb keep rather than visit captures something about how I think about this kind of site and it is a higher tier of relationship than I have with most places online today.
Skipped the related links section thinking I had read enough and then came back to it later when curiosity got the better of me, and a stop at seocraft confirmed I should have just read it first, every section of this site appears to deserve careful attention rather than skipping past lazily.
However many similar pages I have read this one taught me something new, and a stop at rankgain added more new material, content that contributes genuinely fresh information rather than recycling what is already widely available is content with real informational value and this site is providing that informational freshness at a notable rate.
Top notch writing, every paragraph carries weight and nothing feels like filler, and a stop at rankmotive reflected that same care, a rare thing on the open web these days where most pages exist for clicks rather than actual reader value or anything close to that which is honestly a real shame.
Quietly the post solved something I had been turning over without quite knowing how to phrase the question, and a look at linktactic extended that quiet solving, content that addresses unformulated needs is content with reader insight and this site has demonstrated that insight at a high rate across the pieces I have read recently.
Generally my attention drifts on long posts but this one held it through the end, and a stop at rankladder earned the same sustained focus, content that defeats my drift tendency is content with substantive pulling power and this site has demonstrated that pulling power across multiple pieces in a session that has now run quite long actually.
Excellent post, balanced and well organised without showing off, and a stop at adpivot continued in that same vein, this site has clearly figured out the formula for content that works for readers rather than for search engine ranking signals which is harder than it sounds today and worth real recognition from anyone.
Пицца в Саратов https://kosmopizza.ru свежая, ароматная и приготовленная по лучшим рецептам. Заказывайте доставку пиццы на дом или в офис, выбирайте из большого меню: классические и авторские пиццы, горячие закуски и напитки. Быстрая доставка по городу.
Decided I would read the archives over the weekend, and a stop at thebestcorner confirmed that the archives would be worth the time, very few sites have archives I would actively read through but this one has earned that level of interest based on the consistent quality across what I have sampled so far.
Worth recognising that this site does not chase the daily news cycle, and a stop at lemonlarkvendorparlor confirmed the longer publication arc, sites that resist the pressure to comment on every passing event are sites with genuine editorial discipline and this one has clearly chosen depth over volume which I respect deeply.
Generally I bookmark sparingly to avoid building up a bookmark graveyard but this one earned a permanent slot, and a stop at shopbasemarket extended that permanence designation, the few sites I keep permanent bookmarks for are sites I expect to use repeatedly and this one has clearly cleared that expectation bar today.
The tone stayed consistent across the whole post which is harder than it looks for longer pieces, and a look at linkvertex continued the same voice, this kind of editorial consistency is a sign of either a single careful writer or a tightly run team and either is impressive today across the broader media environment.
My time on this site has now extended past what I had budgeted, and a stop at linkblaze keeps extending it further, content that overstays its budget in my schedule is content that has earned the extra time and this site has been earning extra time across multiple visits to the point where my schedule needs adjustment.
Stands out for actually being useful instead of just being long, and a look at linknudge kept that going, length without value is the default mode of most blogs these days but this site has clearly chosen a different path which I respect a lot as a reader who values careful editing decisions like that.
Bookmarked the page and the homepage too because clearly there is more to explore here, and a quick stop at leadpoint only made that more obvious, this is the kind of place I want to dig through over a weekend rather than rushing through during a coffee break tomorrow morning before getting back to work.
Took something from this I did not expect to find, and a stop at rankpush added another unexpected useful piece, content that exceeds expectations rather than just meeting them is the kind that builds enthusiasm and earns repeat visits without any explicit ask from the writer or platform behind the work being read.
However many similar pages I have read this one taught me something new, and a stop at leadhatch added more new material, content that contributes genuinely fresh information rather than recycling what is already widely available is content with real informational value and this site is providing that informational freshness at a notable rate.
Reading this between meetings turned out to be the most useful thing I did all afternoon, and a stop at seofoundry kept that productivity feeling going, content can sometimes outperform actual work in terms of what gets accomplished mentally and this site managed that today which is genuinely a high bar to clear consistently.
My time on this site has now extended past what I had budgeted, and a stop at royaldealzone keeps extending it further, content that overstays its budget in my schedule is content that has earned the extra time and this site has been earning extra time across multiple visits to the point where my schedule needs adjustment.
Quietly enthusiastic about this site after the past few hours of reading, and a stop at linkthread extended that enthusiasm, the calibration of enthusiasm to evidence is something I try to maintain and this site has earned a calibrated quiet enthusiasm rather than the loud excitement that usually fades within a day or two of finding something.
Picked this up between two other things I was doing and got drawn in completely, and after linkimpact my original tasks were completely forgotten for a while, content that derails a workflow in a positive way by being more interesting than what you were already doing is rare and worth recognising clearly.
Adding this site to my regular reading list, the post earned that on its own, and a quick stop at prismoakcollective sealed the decision, the kind of place worth checking back with from time to time because it consistently produces material that holds up against a critical reading too which I really value.
Started imagining how I would explain the topic to someone else after reading, and a look at wildembervault gave me more material for that imagined explanation, content that improves my own ability to discuss a topic is content that has actually transferred knowledge rather than just decorating my screen for a few minutes.
Купить пиццу https://pizzeriacuba.ru в Воронеж с быстрой доставкой на дом или в офис. Большой выбор пиццы: классические рецепты, авторские вкусы, свежие ингредиенты и горячая выпечка. Удобный онлайн-заказ, акции и выгодные предложения для любителей вкусной пиццы.
Bookmark earned and shared the link with one specific person who would care, and a look at swiftmaplecorner got the same targeted share, sharing carefully rather than broadcasting is a discipline I try to maintain and this site is generating shares from me at a sustainable rate rather than the spam rate of viral content.
Now adding a small note in my reading log that this site is one to watch, and a look at expandyourmind reinforced the watch status, the few sites I track deliberately rather than encounter accidentally are sites I expect ongoing returns from and this one has cleared the bar for that elevated tracking based on what I read.
Found the use of subheadings really helpful for scanning back through the post later, and a stop at trendinggoodsmarket kept that reader friendly approach going, navigation is something many blog writers ignore but small structural choices make a noticeable difference for someone returning to find a specific point again days or weeks later.
Refreshing change from the usual sites covering this topic, no clickbait and no padding, and a stop at linksurge confirmed the difference, this place clearly has its own voice rather than copying the formulas everyone else uses to chase clicks online which is becoming increasingly rare these days across nearly every popular subject.
Honestly thank you to whoever wrote this because it scratched an itch I had not quite been able to articulate, and a stop at findsomethingunique kept that satisfying feeling going, the kind of writing that meets unspoken needs is special and this site clearly has writers who understand their readers more than most do today.
Better than the average post on this subject by some distance, and a look at rankchart reinforced that, you can tell within the first paragraph that the writer here actually cares about the topic rather than just covering it for the sake of having something to publish that week or that day.
Bookmark earned, share earned, return visit earned, all from one reading session, and a look at shopcoremarket did the same, the trifecta of bookmark and share and return is rare in a single visit and represents the highest level of engagement I tend to offer any piece of online content these days here.
Definitely a recommend from me, anyone curious about the topic should check this out, and a look at seoquest adds even more reason for that, the depth and quality combine to make this site one I will be pointing people toward whenever similar conversations come up over the months ahead at work or socially.
The structure of the post made it easy to follow without losing track of where I was, and a look at quartzmeadowmarketgallery kept the same logical flow going, this site clearly understands that organisation is half the battle in keeping readers engaged from the first line to the last across any kind of post.
Reading this felt productive in a way most internet reading does not, and a look at linkslate continued that productive feeling, sometimes the open web feels like a waste of time but sites like this remind me why I still bother to look around rather than retreating to old reliable sources for everything I need.
Just dropping by to say thanks for the effort, it does not go unnoticed when a writer cares this much about the reader, and after I went through leadslate I was certain this is one of the better corners of the internet for this particular kind of content which is genuinely refreshing.
My usual response to new bookmarks is to forget them but this one I have already returned to twice, and a look at leadtower pulled me back a third time, the actual return rate to bookmarked sites is the real measure of value and this one is clearing that measure at a notable rate already.
Appreciated how the post felt complete without overstaying its welcome, and a stop at seofuel confirmed that economical approach runs across the site, knowing when to stop is a skill many writers never develop but here the discipline is obvious and welcome from the perspective of a busy reader trying to learn things efficiently.
Useful enough to recommend to several people I know who would appreciate it, and a stop at linktrail added more material I will pass along too, the kind of writing that earns word of mouth is the kind that actually delivers on its promises which is what this site does without any drama or fanfare attached.
Reading this brought back the satisfaction I used to get from blogs ten years ago, and a stop at windcrestcollective kept that nostalgic quality alive, sites that capture what was good about an earlier era of internet writing are increasingly precious and this one is doing that without feeling like a deliberate throwback at all.
Good quality through and through, no rough edges and no signs of being rushed, and a quick look at prismoakcollective kept the same polish going, the kind of site that respects its own brand by maintaining consistency across pages which is something I always appreciate as a reader looking for trustworthy information online today.
Honestly impressed by the consistency of voice across what I have read so far, and a quick visit to royalgoodsarena continued that consistent feel, when a site reads like one careful person rather than a committee the experience is more rewarding for the reader who notices these subtle editorial details over time.
Decided to subscribe to the RSS feed if there is one, and a stop at adstrike confirmed that decision, content that I want delivered to me proactively rather than just remembered when I have time is content that has earned a higher level of commitment from me as a reader looking for reliable sources.
If I had to summarise the editorial sensibility of this site in a few words it would be careful and human, and a look at linkladder extended that summary feeling, capturing the essence of a sites approach in brief is hard but this site has a clear enough identity that the summary comes naturally enough.
Came away feeling slightly smarter than I was when I started, that is a real win, and a stop at rankrally added a bit more to that, the rare site that actually transfers some of its knowledge to the reader in a way that sticks rather than just creating an illusion of learning briefly.
Now adjusting my mental model of how the topic fits into the broader landscape, and a look at twilightcovecollective extended that adjustment, content that affects my structural understanding rather than just my factual knowledge is content with deeper impact and this site is providing those structural updates at a meaningful rate consistently across topics.
Liked the way the post got out of its own way, and a stop at modernoutfitstore extended that invisible craft, the best writing you barely notice while reading because it is doing its work without drawing attention to itself and this site has clearly mastered that disappearing act across the pieces I have read.
Solid recommendation from me to anyone working in the area, the perspective here is grounded, and a look at seovibe adds even more useful angles, the kind of site that becomes a reference rather than just a one time read which is a higher bar than most blogs ever reach today on the modern web.
Современный коворкинг https://expresrabota.com/kovorking-kogda-ofis-stanovitsya-soobshtestvom.html для комфортной и продуктивной работы. Рабочие места, переговорные комнаты, быстрый интернет и удобная инфраструктура. Подходит для фрилансеров, предпринимателей, стартапов и команд, которым нужен гибкий офис.
A relief to read something where I did not have to fact check every claim mentally, and a look at ranktap continued that reliable feeling, sites where I can lower my guard and trust the content are rare and this one is earning that trust paragraph by paragraph through consistent careful work behind the scenes.
Reading this brought back the satisfaction I used to get from blogs ten years ago, and a stop at floraharborvendorparlor kept that nostalgic quality alive, sites that capture what was good about an earlier era of internet writing are increasingly precious and this one is doing that without feeling like a deliberate throwback at all.
Coming to this with low expectations and being pleasantly surprised by the substance, and a stop at adgain continued exceeding expectations, the recalibration of expectations upward across multiple positive readings is one of the actual rewards of careful browsing and this site is providing that recalibration at a steady rate apparently.
Probably one of the more reliable sources I have found for this kind of careful coverage, and a look at growtogethercommunity reinforced the reliability, the small group of sources I would describe as reliable for a given topic is curated carefully and this site has earned a place in that small group through consistent performance.
Reading this on a long flight and finding it the best thing I read across hours of trying, and a stop at trendinggoodsmarket kept the streak going, when content beats long flight reading you know it has substance because flight reading is a hard test of a piece given the alternatives available everywhere.
The pacing of the post was just right, never rushed and never dragged out unnecessarily, and a look at startyourjourneytoday maintained the same rhythm, you can tell the writer has experience because the difficult skill of pacing is something only practiced writers manage to handle well in long form content over time and across formats.
A piece that handled a controversial angle without becoming heated, and a look at windspirecollective continued that calm engagement, content that can address contested topics without inflaming them is doing rare diplomatic work and this site has clearly developed the editorial maturity to handle sensitive material with the appropriate temperature of writing throughout.
Honestly the simplicity is what makes this work, the topic is not buried under filler words or overly complex examples, and a quick look at linkgrit showed the same sensible style, I left with what I came for and no headache from over reading which is a real win these days.
Left me wanting to read more rather than feeling burned out, that is a good sign, and a look at radiantmaplestore confirmed there is plenty more here to explore, the kind of writing that builds appetite rather than killing it which is a rare quality on the modern open internet today across most categories of content.
Approaching this with the usual skepticism I bring to new sites and being slowly persuaded, and a stop at seofunnel continued that gradual persuasion, the careful path from skeptical reader to genuine fan is the only one I trust and this site has walked me along that path through patient consistent quality across pieces.
Felt the post had been written without using a single buzzword, and a look at rankfunnel continued that clean vocabulary, content free of jargon and trendy phrases reads better and ages better and this site has clearly committed to a vocabulary that will not feel dated in three years which is impressive editorially.
Generally I am cautious about recommending sites on first encounter but this one warrants the exception, and a look at leadspot reinforced the exception making, the rare site that justifies breaking my normal cautious approach is the rare site worth flagging early and this one has prompted exactly that early flagging response from me.
Reading this triggered a small but real correction in something I had assumed, and a stop at adladder extended that corrective effect, content that updates my beliefs through evidence rather than rhetoric is content with intellectual integrity and this site has earned that label consistently across the pieces I have read so far today.
Thanks for the moderate length, neither so short it skips substance nor so long it bloats, and a stop at buypathmarket hit the same balance, the right length is one of the hardest things to calibrate in blog writing and I appreciate when a team has clearly thought about it rather than defaulting.
Now considering the post as evidence that careful blog writing is still possible, and a look at twilightcreststore extended that evidence, the broader question of whether the modern web can sustain quality writing has obvious empirical answers in sites like this one and seeing them is reassuring even when they remain a minority overall today.
Genuinely useful read, the points are practical and easy to apply right away, and a quick look at royalgoodsstation confirmed that this site is consistent in that approach, looking forward to digging through the rest of it when I get the chance to sit down properly later in the week or this weekend.
Considered alongside other sources I have been reading this one consistently rises to the top, and a stop at seochart maintained that top ranking, the informal ongoing comparison between sources is something I do whenever reading on a topic and this site keeps coming out near the top of those comparisons over many sessions.
Comfortable read, finished it without realising how much time had passed, and a look at daisyharborvendorparlor pulled me into more pages the same way, the absence of friction in good content lets time disappear and that is one of the highest compliments I can pay any piece of writing I find online during a regular search session.
Came back to this twice now in the same week which is unusual for me, and a look at addrift suggested I will keep coming back, the kind of post that earns repeated visits rather than one and done reading is the gold standard for content quality and this site clearly hit that standard.
казино 888 [url=www.888starz-uz-online.com/]казино 888[/url] .
Closed the laptop and walked away thinking about the post for a good twenty minutes, and a stop at digitalcartcenter produced similar lingering thoughts, content that survives the closing of the browser tab is content that has actually entered the mind rather than just decorating the screen for the duration of the reading.
Reading this prompted me to dig out an old reference book related to the topic, and a stop at radiantpinecollective extended that connection to other sources, content that connects me back to my own existing knowledge rather than asking me to forget it is content with continuity and this site has that continuous quality.
Will be sharing this with a couple of people who care about the topic, and a stop at leadburst added more material worth passing along, the kind of site that is generous with quality content and does not make you jump through hoops to access it which is appreciated more than the team probably realises.
The pacing of the post was just right, never rushed and never dragged out unnecessarily, and a look at rankmark maintained the same rhythm, you can tell the writer has experience because the difficult skill of pacing is something only practiced writers manage to handle well in long form content over time and across formats.
I appreciate the clarity here, everything is explained in simple terms without unnecessary detail, and after a quick stop at rankcrest the points came together nicely for me, the writing keeps things straightforward and respects the reader from start to finish without ever talking down to anyone.
Anyone curious about this topic would do well to start here, the foundation laid is solid, and a stop at seohatch would round out their understanding nicely, this is the kind of resource I would point a friend toward without hesitation if they asked me where to begin learning about anything in this area.
A piece that read as if the writer was thinking carefully rather than just typing fluently, and a look at staymotivatedalways continued that considered quality, the difference between fluent typing and careful thinking shows up in writing and this site reads as the product of thought rather than just the product of language fluency apparently.
Looking through the archives suggests this site has been doing this for a while at this level, and a look at adchart confirmed the long term consistency, sites that have maintained quality across years rather than just a recent stretch are sites with serious editorial discipline and this one has clearly been at it for a while.
My time on this site has now extended past what I had budgeted, and a stop at shopgatemarket keeps extending it further, content that overstays its budget in my schedule is content that has earned the extra time and this site has been earning extra time across multiple visits to the point where my schedule needs adjustment.
Reading this gave me a small jolt of recognition for an experience I thought was just mine, and a stop at rankquest produced more such jolts, content that universalises private experiences without flattening them is doing genuinely useful work and this site is providing that recognition function for me reliably across topics I read.
Worth your time, that is the simplest endorsement I can give, and a stop at trendybuyarena extends that endorsement across the rest of the site, this is one of those increasingly rare places that delivers on what it promises rather than over selling the content and under delivering on substance every time which I find frustrating elsewhere.
The pacing of the post was just right, never rushed and never dragged out unnecessarily, and a look at discovernewhorizons maintained the same rhythm, you can tell the writer has experience because the difficult skill of pacing is something only practiced writers manage to handle well in long form content over time and across formats.
A modest masterpiece in its own quiet way, and a look at twilightfernstore confirmed the same quiet quality across the rest of the site, calling something a masterpiece is usually overstating but for content this carefully crafted the word feels appropriate even if the writers themselves would probably resist the label honestly.
Picked up two new ideas that I expect will come up in conversations this week, and a look at rankhatch added another, content that arms me with talking points rather than just filling time is the kind that provides ongoing value beyond the moment of reading and this site is generating that kind of ongoing value.
Came away feeling slightly smarter than I was when I started, that is a real win, and a stop at gladeridgemarketparlor added a bit more to that, the rare site that actually transfers some of its knowledge to the reader in a way that sticks rather than just creating an illusion of learning briefly.
Took something from this I did not expect to find, and a stop at digitalpickmarket added another unexpected useful piece, content that exceeds expectations rather than just meeting them is the kind that builds enthusiasm and earns repeat visits without any explicit ask from the writer or platform behind the work being read.
Now recognising the editorial wisdom of letting some questions remain open at the end, and a look at ranksurge continued that intellectual honesty, content that does not force closure on contested questions is content that respects the limits of knowledge and this site has clearly developed the maturity to know when to leave space.
Now thinking about whether the writer might publish a longer form work I would buy, and a look at radiantshorestore suggested the same depth would translate, content that makes me want to pay for related work in other formats is content that has earned commercial trust as well as attention trust and this site has both clearly.
Reading this site over the past week has changed how I evaluate content in this space, and a look at ranknudge extended that recalibration, the standards I bring to reading on the topic have shifted upward as a direct result of regular exposure to this kind of work and that shift will outlast any single reading session.
The examples really helped me grasp the points faster than abstract descriptions would have, and a stop at globalgoodscorner added a few more practical illustrations that drove the message home, the kind of writing that knows its readers learn better through concrete situations rather than vague generalities is rare and worth recognising clearly.
Comfortable reading experience throughout, no jarring tone shifts and no awkward formatting, and a look at goldenbuycenter kept that smooth feel going, the kind of editorial polish that goes unnoticed when present but glaring when absent is something this site has clearly invested in across the broader content as well which deserves recognition.
Reading this site over the past week has changed how I evaluate content in this space, and a look at yourtrendystop extended that recalibration, the standards I bring to reading on the topic have shifted upward as a direct result of regular exposure to this kind of work and that shift will outlast any single reading session.
After reading several posts back to back the consistent voice across them is impressive, and a stop at boostradar continued that voice consistency, sites that maintain a single coherent voice across many pieces by potentially many writers represent serious editorial discipline and this one has clearly developed the institutional consistency needed for that.
Worth recognising the absence of the usual blog tropes here, and a look at shopthedayaway continued that fresh quality, sites that avoid the standard moves of the medium read as more original even when the content is on familiar topics and this one has clearly chosen its own path through the conventional terrain skilfully.
Турагентство по России https://republictravel.ru туры в Карелия, Байкал, Камчатка, Дагестан, Мурманск, Калининград, Санкт-Петербург и другие направления. Экскурсии, отдых и авторские маршруты по самым красивым регионам страны.
star888 [url=https://888starz-egyp.com]https://888starz-egyp.com/[/url]
Now realising this site has been quietly doing good work for longer than I knew, and a look at seoglide suggested an archive worth exploring, sites with deep archives of consistent quality represent a different kind of resource than sites with viral hits and this one looks like the durable kind based on what I see.
888 مباشر [url=https://888starz-egypt7.com]8888 website[/url]
This actually answered the question I had been searching for, and after I checked ranklayer I had a few more pieces I had not realised I needed, that is the sign of a site that knows what its readers want before they even know how to ask it which is impressive.
Honest reaction is that I want to send this to a friend who would benefit from it, and a look at openbuyersmarket added more material I will pass along too, the impulse to share is the strongest signal I have for content quality and this site is generating that impulse cleanly across multiple posts.
Well done, the kind of post that makes you slow down and actually read instead of skimming for keywords, and a look at seoarrow kept me reading carefully too, that is a sign of writing that has been crafted rather than churned out for an algorithm to see today and tomorrow.
A clear case of writing that does not try to do too much in one post, and a look at seotap maintained the same scoped discipline, posts that try to cover too much end up covering nothing well and this site has clearly chosen scope discipline as a core editorial principle which shows up clearly in what I read.
Now adding a small note in my reading log that this site is one to watch, and a look at rankglide reinforced the watch status, the few sites I track deliberately rather than encounter accidentally are sites I expect ongoing returns from and this one has cleared the bar for that elevated tracking based on what I read.
A piece that ended with a clean landing rather than fading out, and a look at globalgoodscenter maintained the same crisp conclusions, endings that resolve rather than dissolve are a sign of careful structural thinking and this site has clearly invested in how its pieces conclude rather than letting them simply run out of energy.
Now feeling confident that this site will continue producing work I will want to read, and a look at cartwaymarket extended that confidence into the future, projecting forward from current quality to expected future quality is something I do for sites I genuinely follow and this one has earned that forward looking trust clearly today.
Now adding this to a short list of sites I would defend in a conversation about the modern web, and a look at forestcovevendorgallery reinforced that defence list, the few sites that serve as evidence the web can still produce good things are precious and this one has clearly joined that small list of exemplary sites.
Now adding this to a list of sites I want to see flourish, and a stop at twilightgrovegoods reinforced that wish, the few sites I actively root for are sites that produce the kind of work I want more of in the world and this one has joined that small list based on what I have read so far.
A well calibrated piece that knew its scope and stayed inside it, and a look at linkglide maintained the same scope discipline, scope creep is one of the failure modes of long blog posts and this site has clearly invested in the editorial discipline to prevent it which shows up in tightly contained pieces.
Granted I am giving this site more credit than I usually give new finds, and a look at shadowglowcorner continued earning that credit, the calibration of how much trust to extend after limited exposure is something I do carefully and this site has earned more trust on shorter exposure than most due to consistent quality across.
More substantial than most of what I find searching for this topic online, and a stop at adburst kept that quality consistent, this is one of those sites where the writing actually rewards careful reading rather than punishing the patient reader with empty filler stretched out across long paragraphs that say very little.
Speaking carefully because I do not want to overstate things this site is genuinely above average across multiple measurements, and a stop at findyourinspiration continued the above average performance, the calibration of judgement against potential overstatement is something I take seriously and this site clears the higher bar even after that calibration applies.
Honestly informative, the writer covers the ground without showing off, and a look at nextgenbuyhub reflected the same humility, content that respects the reader rather than trying to dazzle them is something I always appreciate and rarely come across in this corner of the internet today across the topics I usually read.
Worth a slow read rather than the fast scan I usually default to, and a look at trendybuycenter earned the same slower pace from me, content that resets my reading speed downward is content with substance worth absorbing and this site has produced that effect on me multiple times now over the last week here.
Picked up several practical tips that I plan to try out this week, and a look at connectsharegrow added a few more I will be testing alongside, content with practical hooks that connect to my actual life is the kind that earns my repeat attention rather than the merely interesting that I forget within a day.
Took a screenshot of one section to come back to later, and a stop at adhatch prompted another saved tab, the urge to capture and revisit specific pieces of content is something I rarely feel but when I do it tells me the work is worth more than the average passing read for sure.
A piece that prompted a small mental rearrangement of how I order related ideas, and a look at rankimpact extended that rearranging effect, content that affects the structure of my thinking rather than just adding to it is content with the deepest kind of impact and this site is reaching that depth for me today.
Когда хочется отдохнуть удобно выбирать дорамы с русской озвучкой без лишних поисков, случайных сайтов и потери времени. DoramaLend собирает в одном месте корейские, китайские, японские и другие азиатские сериалы с понятным русским переводом, краткими описаниями, жанрами, годами выхода и простыми карточками сериалов. Здесь легко найти трогательную историю после работы, динамичный триллер, забавную комедию или популярную премьеру, которую уже обсуждают поклонники дорам.
Для тех, кто хочет дорамы китайские спокойно, без лишних переходов и путаницы, DoramaGo может стать хорошим вариантом для уютного просмотра в свободное время. Здесь можно найти корейские, китайские, японские, тайские и другие азиатские сериалы, где есть то самое настроение, за которое дорамы так ценят: красивые истории о любви, интриги, герои, за которых быстро начинаешь переживать и особая восточная эстетика. Понятная навигация помогает выбрать историю под настроение по стране, жанру, году или настроению, а новые добавления позволяют не пропускать продолжение.
Now noticing that the post benefited from being neither too short nor too long for its content, and a look at linkrally continued that calibration of length, sites that match length to content rather than padding to hit some target are sites that respect both their material and their readers and this site does both.
Came here from another site and ended up exploring much further than I planned, and a look at silkseasidegoodsmarket only encouraged more exploration, the kind of place where one click leads to another not through manipulative design but through genuinely interesting content is rare and worth highlighting when found like this somewhere on the open internet.
Easy to recommend without reservations, the site delivers on every promise it implicitly makes, and a look at leadladder kept that same standard going, the kind of consistency that earns trust over time rather than chasing it through aggressive marketing is what I see here and it is appreciated greatly by this particular reader today.
If I had to defend the time I spend reading independent blogs this site would feature in the defence, and a look at rapidbuymarket reinforced that defensive utility, the ongoing case for non algorithmic reading is one I make to myself periodically and sites like this one provide the actual evidence that supports the case clearly.
Bookmark folder reorganised slightly to make this site easier to find, and a look at quickcartworld earned the same accessibility upgrade, the small organisational moves I make for sites I expect to return to often are themselves a signal of how much I trust them and this site triggered those moves naturally.
Now planning to share the link with a small group of readers I trust, and a look at lemonridgevendorparlor suggested more material to share with the same group, recommending content into a curated circle requires confidence in the recommendation and this site is making me confident in those personal recommendations on multiple separate occasions now.
Bookmark moved to my permanent reference folder rather than the casual maybe later folder, and a look at silkduneemporium earned the same upgrade, the distinction between casual interest and lasting reference is something I track carefully and very few sites cross that threshold but this one did so without much effort apparently.
Most posts I read end up forgotten within a day but this one is sticking, and a look at echocrestcollective extended that lingering effect, content that survives the immediate moment of reading rather than evaporating is content with genuine retention quality and this site has been producing memorable pieces at a rate notable across my reading.
Granted I am giving this site more credit than I usually give new finds, and a look at discoverfreshperspectives continued earning that credit, the calibration of how much trust to extend after limited exposure is something I do carefully and this site has earned more trust on shorter exposure than most due to consistent quality across.
Really appreciate the confidence to make a clear point rather than hedging everything, and a quick visit to linkscale maintained the same direct stance, writing that takes positions rather than equivocating is more useful even when the positions are debatable because at least the reader has something to react to clearly.
The overall feel of the post was professional without being stuffy, and a look at twilightoakgoods kept that approachable expertise going, finding the right register for technical content is hard but this site has clearly figured out how to sound knowledgeable without slipping into that distant lecturing tone that loses readers in droves every time.
I usually skim posts like these but this one held my attention all the way through, and a stop at seoradar did the same, that is a strong endorsement coming from me because I am usually quick to bounce when content gets repetitive or fails to deliver on its initial promise made in the headline.
Even across multiple posts the writers voice has remained consistent in a way I appreciate, and a stop at linkpush continued that voice, sites that maintain editorial consistency across many pieces have something most sites lack and this one has clearly worked out how to keep its voice steady across what reads as a growing archive.
Honestly enjoyed every minute spent here, that is not something I say lightly, and a look at fashioncartworld confirmed I will be back, the bar for spending time online is high for me these days but this site clears it without effort which is high praise indeed from this reader who is usually rather demanding.
Comfortable in tone and substantive in content, that is a hard combination to land, and a look at linkstrike kept that pairing alive across more material, this is what good editorial direction looks like in practice and the team here clearly has someone keeping a steady hand on the wheel across what they decide to publish.
Came here from another site and ended up exploring much further than I planned, and a look at seodrift only encouraged more exploration, the kind of place where one click leads to another not through manipulative design but through genuinely interesting content is rare and worth highlighting when found like this somewhere on the open internet.
Honestly impressed by how much useful content sits in such a small post, and a stop at leadprism confirmed the rest of the site packs a similar punch, density without confusion is a hard balance to strike and this site has clearly cracked the code on it across many different topic areas covered.
Reading this with my morning coffee turned into reading the related posts with my morning coffee, and a stop at silkstonegoodsatelier stretched the morning further, content that pulls breakfast into a reading session rather than just accompanying it is content that has earned a higher claim on my attention than the average article does.
Stands apart from similar pages by actually being useful, that is high praise these days, and a look at goodscarthub kept that standard going, you can tell when a site is built around the reader versus around metrics and this one clearly belongs to the first category for sure based on what I read.
Closed my email tab so I could read this without interruption, and a stop at rapidcartcenter earned the same protected attention, when content is good enough to defend against the usual digital distractions you know it deserves better than the half attention most online reading gets in a typical busy day.
Worth saying that the quiet confidence of the writing is what landed first, and a look at trendycartfactory continued that quiet quality, confident writing without the loud display of confidence is a rare combination and this site has clearly developed both the knowledge and the editorial restraint to land that combination consistently.
Worth recognising the absence of the usual blog tropes here, and a look at rubyorchardtradegallery continued that fresh quality, sites that avoid the standard moves of the medium read as more original even when the content is on familiar topics and this one has clearly chosen its own path through the conventional terrain skilfully.
The whole experience of reading this was pleasant from start to finish, no pop ups and no annoying interruptions, and a look at silverbaymarket continued that clean experience, technical choices about page design matter for the reader and this site clearly cares about the small details that add up to comfort across multiple visits.
Refreshing to find writing that does not try to manipulate the reader into clicking onto the next page through cliffhangers and forced engagement, and a stop at seotower continued in the same respectful way, this is what reader first design actually looks like in practice rather than just in marketing copy that sounds nice.
Will be passing this along to a few people who would benefit from the perspective shared here, and a stop at adquest only added to what I will be sharing, this kind of generous content deserves to circulate widely rather than getting buried in some search engine algorithm tweak that pushes it down the rankings.
Reading this brought back the satisfaction I used to get from blogs ten years ago, and a stop at elitecartbazaar kept that nostalgic quality alive, sites that capture what was good about an earlier era of internet writing are increasingly precious and this one is doing that without feeling like a deliberate throwback at all.
Reading this prompted me to dig out an old reference book related to the topic, and a stop at urbanbaygoods extended that connection to other sources, content that connects me back to my own existing knowledge rather than asking me to forget it is content with continuity and this site has that continuous quality.
Really like the way the post resists reaching for cliches that would have made it feel generic, and a quick visit to linkradar kept that fresh feel going, original phrasing and unexpected metaphors are signs that the writer is actually thinking rather than just stitching together familiar phrases into the appearance of content.
If I had encountered this site five years ago I would have been telling everyone about it, and a look at fastgoodscorner extended that retrospective enthusiasm, the version of me who used to recommend favourite blogs frequently would have made sure friends knew about this one and that earlier enthusiasm is partially returning to me here.
The use of plain language without dumbing down the topic was really well done, and a look at goldenbuyzone continued in that same accessible style, this is something many technical writers fail at because they either confuse their readers or condescend to them but here neither problem appears at all which is impressive really.
Felt the post had been quietly polished rather than aggressively styled, and a look at adslate confirmed the same understated polish, sites whose quality reveals itself slowly rather than announcing itself loudly are the kind I trust more deeply because the trust is not based on first impressions of marketing but actual substance.
Now recognising that the post handled the topic with appropriate technical precision without becoming dry, and a stop at harbororchardboutiquehub continued that balance, technical precision and readability are often in tension and this site has clearly figured out how to maintain both at once which is one of the harder editorial achievements in the form.
Now recognising that this site has earned a place in the small group of resources I treat as authoritative, and a stop at goodsrisestore confirmed that placement, the difference between resources I trust and resources I just consume is real and this site has clearly moved into the trusted category through consistent quality over time.
Felt energised after reading rather than drained, which is unusual for online content these days, and a look at adblaze continued that good feeling, content that leaves you better than it found you is rare and worth bookmarking when you stumble across it for the first time today or any other day really.
Now thinking about this site as a small example of what good independent writing looks like, and a stop at rapidcarthub continued that exemplary status, the few sites that serve as good examples are sites worth holding up in conversations about quality and this one has earned that exemplary placement through patient consistent effort over time.
Reading this as part of my evening winding down routine fit perfectly, and a stop at leadnudge extended the wind down nicely, content that calms rather than agitates is what I want at the end of the day and this site provides that calming reading experience reliably which is increasingly rare across the modern web.
A piece that read as the work of someone who reads carefully themselves, and a look at nightorchardtradeparlor continued that informed feel, writers who are also serious readers produce work with a different quality and this site reads as the product of someone steeped in good writing rather than just generating content for an audience.
My reading list is short and selective and this site is now on it, and a stop at silvercrestgoods confirmed the placement, the short list of sites I read deliberately rather than encounter accidentally is something I curate carefully and adding to it is a real act of trust which this site has earned today.
Reading this brought back an idea I had set aside months ago, and a stop at rankstrike added more substance to that idea, content that revives dormant projects in my own thinking is content with serious creative value and this site is contributing to my own work in ways I had not expected when first clicking through.
Honestly this kind of writing is why I still bother to read independent sites, and a look at rankburst extended that broader reflection, the few sites that justify continued attention to non algorithmic content are sites like this one and finding them periodically is enough to keep my reading habits oriented toward independent rather than aggregated content.
Once you find a site like this the search for similar voices begins, and a look at elitecartcenter extended the search energy, finding a high quality reference point makes the gap between it and adjacent sources visible in a way it was not before and this site has provided that high reference point across multiple recent visits.
Now feeling something close to gratitude for the fact this site exists, and a look at urbancrestgoods extended that gratitude, the rare site that produces this kind of response is the rare site worth defending in conversations about whether the modern internet is still capable of producing genuinely valuable independent content for serious adults.
Liked that there was nothing performative about the writing, and a stop at fastpickhub continued that genuine quality, performative writing tries to be witnessed rather than read and the difference between performance and substance is huge for the careful reader and this site has clearly chosen substance every time clearly.
Picked up two new ideas that I expect will come up in conversations this week, and a look at shopneststore added another, content that arms me with talking points rather than just filling time is the kind that provides ongoing value beyond the moment of reading and this site is generating that kind of ongoing value.
Probably going to mention this site in a write up I am working on later this month, and a stop at trendycartspace provided more material for that potential mention, content worth referencing in my own published work rather than just personal reading is content with the highest endorsement level and this site has earned that endorsement.
Walked away in a slightly better mood than when I started reading, that says something about the writing, and a stop at rapidcartsolutions kept that going, content that leaves you feeling more capable rather than overwhelmed is the kind I keep coming back to again and again over the years and across many topics.
Now recognising the specific pleasure of reading writing that shows real care for sentence shapes, and a look at ravenseasidevendorvault extended that craft pleasure, sentence level writing quality is something most blog content ignores entirely and this site has clearly invested in the prose layer alongside the substance which is rare today.
Took the time to read every paragraph rather than skimming for the punchline, and a quick visit to leadscale earned the same careful attention from me, that is the highest signal I can give about content quality because my default mode is rapid scanning rather than deliberate reading on most pages.
A relief to read something where I did not have to fact check every claim mentally, and a look at linkarrow continued that reliable feeling, sites where I can lower my guard and trust the content are rare and this one is earning that trust paragraph by paragraph through consistent careful work behind the scenes.
Skipped breakfast still reading this and finished hungry but satisfied, and a stop at cloudcovegoodsgallery kept me past breakfast time, content that displaces basic biological needs is content with serious attentional pull and the writers here are clearly capable of producing that level of engagement which is genuinely impressive these days.
Quietly impressive in a way that does not announce itself, and a stop at silverdunecollective extended that quiet impressiveness, the kind of quality that emerges through sustained attention rather than first impressions is the kind I trust more deeply and this site has been earning that deeper trust across multiple sessions over time consistently.
Will share this on a forum I am part of where it will be appreciated by others working in the same area, and a look at adquill suggests there is more here worth passing along too, definitely a generous resource that deserves a wider audience than it probably has today across the open internet.
Closed the laptop and walked away thinking about the post for a good twenty minutes, and a stop at leadpivot produced similar lingering thoughts, content that survives the closing of the browser tab is content that has actually entered the mind rather than just decorating the screen for the duration of the reading.
Started forming counter examples to test the claims and the post handled most of them implicitly, and a look at leadradar continued that anticipatory style, writers who think two steps ahead of the critical reader save themselves from a lot of follow up work and this writer has clearly internalised that habit consistently.
Came in skeptical and left mostly convinced, that is the highest praise I can offer, and a look at goldenflashcorner pushed me further in the same direction, content that survives a critical first read is rare and worth recognising because most blog posts crumble under any real scrutiny these days when you actually pay attention closely.
Started believing the writer knew the topic deeply by about the second paragraph, and a look at buyloopshop reinforced that confidence, the speed at which a writer establishes credibility through their writing is a useful quality signal and this writer establishes it quickly and quietly without resorting to credential dropping or self promotion.
Now feeling mildly impressed in a way I do not quite remember feeling about a blog in a while, and a stop at elitecartstation extended that mild impression, content that produces specific positive emotional responses rather than just neutral information transfer is content with extra dimensions and this site has those extra dimensions clearly.
Thanks for the practical examples scattered through the post rather than abstract theory only, and a look at rapidgoodscenter continued that grounded style, abstract points are easier to remember when paired with concrete situations and the writers here clearly understand how readers actually retain information from blog content reading sessions.
Genuine pleasure to read, and that is not something I say often after a casual click through, and a quick visit to futuretrendstation kept the same feeling going across the rest of the site, finding writing that actually feels good to spend time with rather than just functional is increasingly rare on the open web.
Polished and informative without feeling overproduced, that is the sweet spot, and a look at urbanharborcollective hit it again, you can tell when a site has been built with care versus thrown together for the sake of having something to put online and this is clearly the former approach taken by the team.
A piece that was confident enough to leave some questions open rather than forcing closure, and a look at quickseasidecommercehub continued that intellectual honesty, content that admits the limits of its scope is more trustworthy than content that pretends to total understanding and this site has the right calibration on certainty consistently.
Хочешь сайтв ТОПе? https://kormclub.ru оптимизация структуры, работа с контентом, внешние ссылки и аналитика. Помогаем вывести сайт в топ поисковых систем и привлечь целевую аудиторию.
Банкротство физ лиц? битрикс24 для БФЛ специализированная система для автоматизации работы юридических компаний. Управление клиентами, контроль этапов процедуры БФЛ, учет документов, задач и платежей. Повышайте эффективность работы и контролируйте все дела в одной системе.
Left me wanting to read more rather than feeling burned out, that is a good sign, and a look at driftorchardvendorparlor confirmed there is plenty more here to explore, the kind of writing that builds appetite rather than killing it which is a rare quality on the modern open internet today across most categories of content.
Closed it feeling I had taken something away rather than just consumed something, and a stop at birchgroveexchange extended that taking away feeling, the difference between content I extract value from and content I just pass through is something I track informally and this site is consistently in the value extraction column for me.
Thanks for sharing this with the open internet rather than locking it behind a paywall like so many sites do now, and a stop at leadgain kept the same vibe going, generous helpful and clearly written by someone who actually wants people to learn from it rather than just charge them.
Found this via a link from another piece I was reading and the click was worth it, and a stop at linktap extended the value across more material, the open web still rewards clicking through citations when the underlying writers care about each other work and this site clearly belongs to that network.
A memorable post for me on a topic I had thought I was tired of, and a look at linkprism suggested the same site can refresh other tired topics, sites that can revive my interest in subjects I had written off as exhausted are doing rare work and this one is clearly doing that for me today.
Now noticing the careful balance the post struck between confidence and humility, and a stop at silverferncollective maintained the same balance, finding the line between asserting and admitting is hard and this site has clearly developed the calibration to walk that line consistently which produces a more persuasive reading experience for me.
Glad the writer kept this short rather than padding it out, the points stand on their own without needing extra context, and a look at urbantrendzone kept the same approach going, brevity is a sign of confidence in the substance and the team here clearly trusts their content to land without filler.
A piece that prompted a small mental rearrangement of how I order related ideas, and a look at goodslinkstore extended that rearranging effect, content that affects the structure of my thinking rather than just adding to it is content with the deepest kind of impact and this site is reaching that depth for me today.
Just enjoyed the experience without needing to think about why, and a look at rapidgoodscorner kept that effortless feeling going, sometimes the best content is invisible in the sense that you forget you are reading until you reach the end and realise time has passed without you noticing it pass naturally.
Different feel from the algorithmically optimised posts that dominate the topic, and a stop at futuretrendzone reinforced that human touch, you can tell when a site is being run by someone who reads what they publish versus someone just hitting submit and moving on quickly to the next assignment without checking the result.
Felt the post was written for someone like me without explicitly addressing me, and a look at ferncovecommercehub produced the same fit, when content lands on its target without pandering you know the writer has done careful audience thinking rather than relying on demographic targeting or interest signals to do the work of editorial decisions.
Skipped the social share buttons but might come back to actually use one later, and a stop at urbanlighthousestore extended that share urge, content that triggers genuine sharing impulses rather than performative ones is content that has actually moved me and not many posts in a typical week do that for me actually.
Now considering whether the post would translate well into a different form, and a look at eliteflashcorner suggested similar versatility, content that could move into other media without losing its substance is content that has been built around ideas rather than around format and this site reads as idea first throughout posts.
Excellent execution from start to finish, the post never loses its rhythm and the points stay sharp, and a quick stop at clovercrestmarketparlor kept the same level going, consistency like this across a site is the marker of a serious operation rather than a casual side project running on autopilot somewhere else.
If quality blog writing is dying as people sometimes claim then this site is one piece of evidence that it has not died yet, and a look at hazelvendorcorner extended that evidence, the broader cultural question about online writing has empirical answers in specific sites and this one is contributing to a more optimistic answer overall.
Good clean post, no errors and no awkward phrasing that breaks the reading flow, and a stop at leadtap kept the same standard, definitely the kind of editorial care that earns a return visit because it tells me the writer is paying attention to details that matter to readers rather than just rushing publication.
Now appreciating that I did not feel exhausted after reading, and a stop at rankquill extended that energising quality, content that leaves me with more attention than it consumed is rare and the gap between draining and energising content is real over the course of a typical day spent reading widely online.
Now adding this to a short list of sites I would defend in a conversation about the modern web, and a look at silvergrovegods reinforced that defence list, the few sites that serve as evidence the web can still produce good things are precious and this one has clearly joined that small list of exemplary sites.
Felt the writer respected the topic without being precious about it, and a look at rankcipher continued that respectful but unfussy treatment, finding the right register for serious topics is hard and this site has clearly figured out how to take the topic seriously while still being readable for casual visitors regularly.
Glad I gave this fifteen minutes rather than the usual three minute skim, and a look at rankscale earned the same investment, time spent on quality content is rarely wasted but the reverse is also true and learning which sites deserve which kind of attention is part of being a careful online reader.
Skipped the related links section thinking I had read enough and then came back to it later when curiosity got the better of me, and a stop at goldenpickstore confirmed I should have just read it first, every section of this site appears to deserve careful attention rather than skipping past lazily.
Now adjusting my mental model of how the topic fits into the broader landscape, and a look at onecartonline extended that adjustment, content that affects my structural understanding rather than just my factual knowledge is content with deeper impact and this site is providing those structural updates at a meaningful rate consistently across topics.
Ты финансовый директор? финансовые модели успешных компаний готовые шаблоны, аналитические статьи и практические кейсы для финансовых директоров. Материалы по управлению финансами, финансовому планированию, бюджетированию и анализу эффективности бизнеса. Полезные инструменты и решения для специалистов финансовой сферы.
Approaching this site through a casual link click and being surprised by what I found, and a look at mysticgrovegoods extended the surprise, the rare experience of stumbling into excellent independent content rather than predictable mediocrity is one of the actual remaining pleasures of casual web browsing and this site provided it cleanly.
Picked up several practical tips that I plan to try out this week, and a look at globalcartcenter added a few more I will be testing alongside, content with practical hooks that connect to my actual life is the kind that earns my repeat attention rather than the merely interesting that I forget within a day.
Honestly the simplicity is what makes this work, the topic is not buried under filler words or overly complex examples, and a quick look at quicktrailcartemporium showed the same sensible style, I left with what I came for and no headache from over reading which is a real win these days.
Really appreciate that the writer did not stretch the post to hit some target word count, the points end when they are made, and a stop at berrybazaar reflected the same discipline, brevity is generosity in disguise and this site has clearly figured that out far better than most blog operations have.
Quietly enthusiastic about this site after the past few hours of reading, and a stop at chestnutharbortradeparlor extended that enthusiasm, the calibration of enthusiasm to evidence is something I try to maintain and this site has earned a calibrated quiet enthusiasm rather than the loud excitement that usually fades within a day or two of finding something.
This filled in a gap in my understanding that I had not even noticed was there, and a stop at amberoakcollective did the same, the kind of post that gives you more than you expected when you first clicked through from somewhere else, a real find for anyone curious about the area covered here.
I appreciate the clarity here, everything is explained in simple terms without unnecessary detail, and after a quick stop at adridge the points came together nicely for me, the writing keeps things straightforward and respects the reader from start to finish without ever talking down to anyone.
Started a draft response in my head and ended without publishing it because the post said it well enough, and a look at velvetcrestmarket produced the same effect, content that satisfies my urge to add to it by being complete enough on its own is rare and represents a particular kind of editorial completeness here.
Liked how the post handled an objection I was forming as I read, and a stop at silverharborstore similarly anticipated where my thinking was going next, the rare writer who can predict reader concerns and address them in advance is doing something most online content fails to do despite that being basic editorial work.
Decided to subscribe to the RSS feed if there is one, and a stop at elitegoodsarena confirmed that decision, content that I want delivered to me proactively rather than just remembered when I have time is content that has earned a higher level of commitment from me as a reader looking for reliable sources.
The conclusions felt earned rather than tacked on at the end like an afterthought, and a look at seoburst kept that careful structure going, you can tell when a writer has thought about the shape of their post versus just letting it ramble out and hoping for the best at the end which most do.
Reading this confirmed that my time researching the topic in other places had not been wasted, and a stop at adcipher extended the confirmation, when independent sources agree that is a useful signal and this site is one of the more reliable sources I have found for cross checking what I read elsewhere on similar subjects.
Reading this prompted me to dig out an old reference book related to the topic, and a stop at rankvertex extended that connection to other sources, content that connects me back to my own existing knowledge rather than asking me to forget it is content with continuity and this site has that continuous quality.
Reading this on a slow Sunday and finding it perfectly suited to a slow Sunday read, and a quick stop at mysticmeadowgoods kept the same gentle pace, content that fits the mood of the moment is something I notice and remember and this site has the kind of pace that suits relaxed reading sessions especially well.
Worth saying this site reads better than most paid newsletters I have tried, and a stop at fernbazaar confirmed that comparison, the bar for free content is often lower than for paid but this site clears the paid bar consistently and that says something about the editorial approach behind the work being published here regularly.
A piece that suggested careful editing without showing the marks of the editing, and a look at dawnmeadowgoodsgallery continued that invisible polish, the best editing disappears into the prose and this site reads as having been edited with skill that does not announce itself which is the highest compliment I can offer any blog content.
Without overstating it this is a quietly excellent post, and a look at ketteglademarketstudio extended that quiet excellence, content that earns superlatives without demanding them through marketing language is content that has truly earned them through the substance and this site has clearly produced work in that earned excellence category today.
Great work on keeping things readable, the post never drags or repeats itself which I really appreciate, and a stop at globalcartcorner added a bit more context that fit naturally with what was already said here, no need to read everything twice to get the point being made today.
Once you start reading carefully here it is hard to go back to lower quality alternatives, and a stop at silverlaneemporium reinforced that ratchet effect, the way good content raises standards is real over time and this site has clearly contributed to raising my expectations for what is possible in writing on the topic generally.
A piece that did not lecture even when it had clear positions, and a look at velvetgrovecrafts maintained the same teaching without preaching tone, finding the line between informing and lecturing is hard and most sites land on the wrong side of it but this one has clearly figured out how to inform without becoming preachy.
Worth pointing out that the writer made the topic feel more interesting than I had been expecting, and a look at elitegoodscorner continued that elevation effect, content that improves the apparent quality of its subject through skilled treatment is doing something real and this site has clearly developed that kind of editorial alchemy throughout.
A piece that handled a controversial angle without becoming heated, and a look at goldenpickzone continued that calm engagement, content that can address contested topics without inflaming them is doing rare diplomatic work and this site has clearly developed the editorial maturity to handle sensitive material with the appropriate temperature of writing throughout.
Reading this confirmed that my time researching the topic in other places had not been wasted, and a stop at rankprism extended the confirmation, when independent sources agree that is a useful signal and this site is one of the more reliable sources I have found for cross checking what I read elsewhere on similar subjects.
A piece that prompted a small mental rearrangement of how I order related ideas, and a look at urbanpetalcollective extended that rearranging effect, content that affects the structure of my thinking rather than just adding to it is content with the deepest kind of impact and this site is reaching that depth for me today.
Came here from a search and stayed for the side links because they were that interesting, and a stop at leadimpact took me even further into the site, the kind of organic exploration that good content invites is something most sites kill through aggressive interlinking and pushy navigation choices rather than relying on quality.
Really nice to see things explained without overcomplicating the topic, the words flow naturally and stay easy to follow, and a short visit to amberpetalcollective only added to that experience because the same simple approach is used across the rest of the page too without any change in tone.
One of the more thoughtful posts I have read recently on this topic, and a stop at qualitytrendstation added even more weight to that impression, this is genuinely good content that holds its own against far better known sites in the same space without trying to imitate any of them at all which I appreciate.
If patience for careful reading is rare these days finding sites that reward it is rarer still, and a stop at techpackterra extended that rare reward, the diminishing returns on shallow content reading have made me more selective about where to spend reading time and this site is meeting the higher selectivity bar consistently.
Liked that the post landed without needing to manufacture controversy or take a contrarian stance for attention, and a stop at gildedcanyongoodsdistrict continued that grounded approach, content that earns attention through quality rather than provocation is the kind that builds long term trust rather than burning it on quick wins.
Decided to set aside time later to read more carefully, and a stop at globalgoodszone reinforced that decision, content that earns a calendar entry rather than just a passing read is in a different tier altogether and this site is clearly working at that elevated level which I really do appreciate as a reader today.
Easily one of the better explanations I have read on the topic, and a stop at silveroakcorner pushed it even higher in my mental ranking of useful resources, the kind of site that beats the average not by trying harder but by simply caring more about what it puts out daily which always shows.
Solid recommendation from me to anyone working in the area, the perspective here is grounded, and a look at velvetoakcollective adds even more useful angles, the kind of site that becomes a reference rather than just a one time read which is a higher bar than most blogs ever reach today on the modern web.
Came away with a slightly better mental model of the topic than I started with, and a stop at urbanpetalstore sharpened that further, content that improves the reader thinking apparatus rather than just dumping facts into it is the rare kind I genuinely value and seek out when I have time to read carefully.
Now considering the post as evidence that careful blog writing is still possible, and a look at elitegoodsmarket extended that evidence, the broader question of whether the modern web can sustain quality writing has obvious empirical answers in sites like this one and seeing them is reassuring even when they remain a minority overall today.
Honestly slowed down to read this carefully which is not my default, and a look at linkdrift kept me in that careful reading mode, the kind of writing that demands attention by being worth attention is rare in a media environment full of content engineered to be skimmed not read with any real focus today.
Stands apart from similar pages by actually being useful, that is high praise these days, and a look at honeyvendorworkshop kept that standard going, you can tell when a site is built around the reader versus around metrics and this one clearly belongs to the first category for sure based on what I read.
More original than the recycled takes I keep finding on the topic elsewhere, and a quick look at qualitytrendzone confirmed it, the kind of site that has its own voice rather than echoing whatever is trending which makes it stand out as a refreshing change from the usual rotation of generic content I see daily.
Reading this prompted me to dig out an old reference book related to the topic, and a stop at nightsummittradehouse extended that connection to other sources, content that connects me back to my own existing knowledge rather than asking me to forget it is content with continuity and this site has that continuous quality.
Worth recognising the absence of the usual blog tropes here, and a look at silversproutstore continued that fresh quality, sites that avoid the standard moves of the medium read as more original even when the content is on familiar topics and this one has clearly chosen its own path through the conventional terrain skilfully.
Thanks for laying this out in a way that someone newer to the topic can follow, and a stop at amberpetalmarket kept that accessibility going, writing that meets readers at different experience levels without condescending is hard to do well and the writers here have clearly thought about who they are writing for.
Generally I am cautious about recommending sites on first encounter but this one warrants the exception, and a look at goldentrendcenter reinforced the exception making, the rare site that justifies breaking my normal cautious approach is the rare site worth flagging early and this one has prompted exactly that early flagging response from me.
Reading this gave me a small jolt of recognition for an experience I thought was just mine, and a stop at epictrendcorner produced more such jolts, content that universalises private experiences without flattening them is doing genuinely useful work and this site is providing that recognition function for me reliably across topics I read.
Will recommend this to a couple of friends who have been asking about this exact topic, and after velvetorchidmarket I have even more reason to do so, the kind of site that earns word of mouth rather than chasing it through aggressive marketing or paid placements is always a treat to find online.
Skipped the related products section because there was none, and a stop at wavevendoremporium also lacked any aggressive monetisation, content that is not constantly trying to convert me into a customer or subscriber is content that has confidence in its own value and that confidence shows up as a different reading experience.
Came in tired from a long day and the writing held my attention anyway, and a stop at rapidgoodszone kept that going, content that can engage a fatigued reader is doing something right because most online reading happens in suboptimal conditions like that one and quality content adapts to it without complaint.
Even just sampling a few posts the consistency is what stands out, and a look at rankvibe confirmed the broader pattern, sites where every piece I sample lives up to the standard set by the others are sites with serious quality control and this one has clearly invested in whatever editorial process produces that consistency reliably.
Decided not to comment because the post said what needed saying, and a stop at elitegoodszone continued that complete feel, content that does not invite obvious additions or corrections from readers is content that has been carefully considered and this site appears to consistently produce pieces that satisfy rather than provoke unnecessary follow ups.
Felt the writer did the homework before publishing, the references hold up, and a look at stonelightemporium continued that documented care, content with traceable claims rather than vague assertions is the kind I trust and the lack of bald assertion in this post is one of its quietly impressive qualities for me.
Refreshing to find writing that does not try to manipulate the reader into clicking onto the next page through cliffhangers and forced engagement, and a stop at futurecartarena continued in the same respectful way, this is what reader first design actually looks like in practice rather than just in marketing copy that sounds nice.
Now noticing the post fit a particular gap in my reading without my having articulated the gap before, and a look at goldenridgevendorhub extended that gap filling effect, content that meets needs I had not consciously formulated is content with reader insight and this site has clearly developed that anticipatory editorial sense across many pieces.
A piece that ended with a clean landing rather than fading out, and a look at velvetpeakgoods maintained the same crisp conclusions, endings that resolve rather than dissolve are a sign of careful structural thinking and this site has clearly invested in how its pieces conclude rather than letting them simply run out of energy.
Looking forward to seeing what gets published next month, and a look at ranknestle extended that anticipation across the broader site, finding myself looking forward to a sites future content rather than just consuming its existing content is a stronger commitment level than I usually reach with new finds and this site triggered that.
Generally my attention drifts on long posts but this one held it through the end, and a stop at amberridgegoods earned the same sustained focus, content that defeats my drift tendency is content with substantive pulling power and this site has demonstrated that pulling power across multiple pieces in a session that has now run quite long actually.
Worth pointing out that the post avoided the temptation to summarise everything at the end, and a look at elitepickarena continued that confident closing approach, content that trusts readers to retain the substance without being reminded of it at the end is content that respects the reader and this site practices that respect.
Most of my reading time goes to a small number of trusted sources and this one is now joining that group, and a stop at adarrow reinforced the group membership, the few sites that earn a place in my regular rotation are sites I expect ongoing returns from and this one has earned that elevated position consistently.
Time spent here today felt productive in the way that good reading sessions sometimes do, and a stop at crisppost extended that productive feeling across the rest of the morning, the difference between productive reading and merely passing time is real and this site is consistently on the productive side for me lately.
Worth recognising the absence of the usual blog tropes here, and a look at mintset continued that fresh quality, sites that avoid the standard moves of the medium read as more original even when the content is on familiar topics and this one has clearly chosen its own path through the conventional terrain skilfully.
Really appreciate that the writer did not overstate the importance of the topic to make the post feel weightier, and a quick visit to grandport maintained the same modest framing, content that is honest about its own scope rather than inflating itself is the kind I trust and return to repeatedly over time.
Picked up a couple of new ideas here that I can actually try out, and after my visit to silkbin I have even more notes saved, this is the kind of resource that pays you back for the time you spend on it which is rare to come across in this corner of the web.
Honest reaction is that I want to send this to a friend who would benefit from it, and a look at petadata added more material I will pass along too, the impulse to share is the strongest signal I have for content quality and this site is generating that impulse cleanly across multiple posts.
Decided to write a short note to the author if there is contact info anywhere, and a stop at tidydeal extended that intention, the urge to thank the writer directly is a strong signal of content quality and this site has triggered that urge in me today which is a fairly rare event for my reading.
A memorable post for me on a topic I had thought I was tired of, and a look at hypercartarena suggested the same site can refresh other tired topics, sites that can revive my interest in subjects I had written off as exhausted are doing rare work and this one is clearly doing that for me today.
Reading this confirmed that my time researching the topic in other places had not been wasted, and a stop at teatimetrader extended the confirmation, when independent sources agree that is a useful signal and this site is one of the more reliable sources I have found for cross checking what I read elsewhere on similar subjects.
Worth saying that the quiet confidence of the writing is what landed first, and a look at echoaisleemporium continued that quiet quality, confident writing without the loud display of confidence is a rare combination and this site has clearly developed both the knowledge and the editorial restraint to land that combination consistently.
Now feeling the rare pleasure of trusting a source completely on first encounter, and a look at zenhold extended that initial trust into something more durable, the calibration of trust to evidence is something I do informally and this site has earned high trust through the cumulative weight of multiple consistently good posts already.
Reading carefully here has reminded me what reading carefully feels like, and a look at adnudge extended that reminder, the experience of careful reading versus skimming is different in ways I had partially forgotten and this site has clearly refreshed my memory of what attention feels like when content rewards it consistently.
Sets a higher bar than most of what shows up in search results for this topic, and a look at dawnpost did not lower that bar at all, in fact it confirmed the impression, this is the kind of consistency that earns a place in regular rotation for serious readers instead of casual scrollers passing through.
Refreshing to find writing that does not try to manipulate the reader into clicking onto the next page through cliffhangers and forced engagement, and a stop at mintsquad continued in the same respectful way, this is what reader first design actually looks like in practice rather than just in marketing copy that sounds nice.
Really appreciate the lack of pop ups, modals, cookie banners stacking on top of each other, and a quick visit to silkdash confirmed the same clean approach across the rest of the site, technical decisions about user experience are part of what makes content actually pleasant to engage with for sure.
If I had to summarise the editorial sensibility of this site in a few words it would be careful and human, and a look at petaforge extended that summary feeling, capturing the essence of a sites approach in brief is hard but this site has a clear enough identity that the summary comes naturally enough.
Really appreciate that the writer did not overstate the importance of the topic to make the post feel weightier, and a quick visit to grandport maintained the same modest framing, content that is honest about its own scope rather than inflating itself is the kind I trust and return to repeatedly over time.
Worth flagging this site to a few specific friends who would appreciate the editorial sensibility, and a look at elitetrendcenter added more pages I will mention to them, recommending sites to specific people requires understanding both the site and the person and this site is making those personalised recommendations easy and natural for me.
Thanks for putting this online without locking it behind email signups or paywalls, and a quick visit to tidydeal kept that open feel going, content that trusts the reader to come back rather than gating access is the kind of approach I will reward with regular return visits over time happily.
A memorable post for me on a topic I had thought I was tired of, and a look at linkpivot suggested the same site can refresh other tired topics, sites that can revive my interest in subjects I had written off as exhausted are doing rare work and this one is clearly doing that for me today.
Time spent here today felt productive in the way that good reading sessions sometimes do, and a stop at juniperbrookdistrict extended that productive feeling across the rest of the morning, the difference between productive reading and merely passing time is real and this site is consistently on the productive side for me lately.
Closed it feeling slightly more competent in the topic than I started, and a stop at aurorastreetgoods reinforced that competence boost, real learning is rare in casual online reading but it does happen sometimes and this site managed to make it happen for me today which is genuinely worth pausing to acknowledge.
Better signal to noise ratio than most places I check on this kind of topic, and a look at threadthrive kept that going, every paragraph here carries something worth reading rather than padding out the page to hit some arbitrary length target that search engines reward but readers ignore as soon as they notice it.
Looking at the surface design and the substance together this site has both right, and a look at silkgain reinforced that integrated quality, sites where presentation and content reinforce each other rather than fighting are sites with full editorial coherence and this one has clearly invested in both layers in a balanced way.
Saving this link for the next time someone asks me about this topic, and a look at dusksave expanded what I will be sharing with them, this is the kind of resource that makes a real difference when you are trying to point a friend to something useful and reliable rather than generic marketing pages.
Found something quietly useful here that I expect to return to, and a stop at modernwin added more of the same, content with quiet utility ages well in a way that flashy hot takes do not and I have learned to weight quiet utility much higher when deciding what to bookmark for later use.
Reading this gave me a small refresher on something I had partially forgotten, and a stop at plasmabox extended the refresher, content that strengthens existing knowledge rather than just adding new is content with a particular kind of consolidating value and this site is providing that consolidating function across multiple visits.
Reading this triggered a small reorganisation of my own thinking on the topic, and a stop at gridprobe furthered that reorganisation, content that affects the shape of my mental model rather than just decorating it with new facts is content with structural rather than informational impact and this site provides that.
Beyond the immediate post itself the editorial sensibility behind the site is what struck me, and a stop at adrally continued displaying that sensibility, content that reveals editorial choices through accumulated reading is content with structural quality and this site has clearly developed an underlying approach worth identifying through multiple sessions of reading.
Quiet confidence runs through the whole post, no need to shout to make the points stick, and a stop at nextgenpickhub carried that same restrained voice forward, content that respects the reader by trusting its own substance rather than dressing it up in theatrical language is what I look for online and rarely actually find these days.
Just sat back at the end of the post and felt grateful that someone took the time to write it, and a look at coralbrookdistrict extended that gratitude across more of the site, recognising effort behind quality work is part of what makes the open web a community rather than just a marketplace today.
Without overstating it this is a quietly excellent post, and a look at tidywing extended that quiet excellence, content that earns superlatives without demanding them through marketing language is content that has truly earned them through the substance and this site has clearly produced work in that earned excellence category today.
Recommended to anyone working in or curious about this area, the depth and clarity combine well, and a look at zensensor keeps that going across more pages, the kind of site that earns regular visits rather than chasing trends has my respect because it suggests genuine commitment to the topic itself rather than to chasing trends.
Most blog writing on this subject reaches for the same handful of arguments and this post avoided them, and a look at epiccartcenter continued the original treatment, content that finds its own path through territory other writers have flattened is content with real authorial energy and this site has plenty of that distinctive energy.
Generally I am cautious about recommending sites on first encounter but this one warrants the exception, and a look at advertex reinforced the exception making, the rare site that justifies breaking my normal cautious approach is the rare site worth flagging early and this one has prompted exactly that early flagging response from me.
Decided not to comment because the post said what needed saying, and a stop at silkgroup continued that complete feel, content that does not invite obvious additions or corrections from readers is content that has been carefully considered and this site appears to consistently produce pieces that satisfy rather than provoke unnecessary follow ups.
After several visits I am now confident this site is one to follow seriously, and a stop at duskstand reinforced that confidence, the gradual building of trust through repeated quality exposures is the only sustainable way to develop reader loyalty and this site is building that loyalty in me through patient consistent work consistently.
Found this through a search that was generic enough I did not expect quality results, and a look at plushperk continued the surprisingly good experience, search engines occasionally still surface excellent independent content if you scroll past the obvious paid and high authority results which is reassuring to remember sometimes.
Refreshing to read something where the words actually mean something instead of filling space, and a stop at neogrid kept that going, the writing here trusts the reader to follow along without endless repetition or constant reminders of what was already said earlier in the post which I appreciate.
Speaking from the perspective of having read widely on the topic this site offers something distinct, and a look at azuregrovecrafts reinforced that distinctness, the rare site that contributes something genuinely original to a saturated topic is the rare site worth following carefully and this one has demonstrated that original contribution capability today.
Taking the time to read carefully here has been worthwhile for the past hour, and a look at hashaxis extended the worthwhile reading, the calculation of return on reading time spent is something I do informally and this site has been producing positive returns across multiple sessions during the last week of regular visits and reads.
Looking through the archives suggests this site has been doing this for a while at this level, and a look at embergrovecurated confirmed the long term consistency, sites that have maintained quality across years rather than just a recent stretch are sites with serious editorial discipline and this one has clearly been at it for a while.
I really like how the writer keeps the tone friendly without sounding fake or overly polished, and after a stop at leadmesh the same calm pace was there, no rushing to make a point and no padding either, just clean honest writing that I can respect and come back to later again.
Now adding this to a short list of sites I would defend in a conversation about the modern web, and a look at agilebox reinforced that defence list, the few sites that serve as evidence the web can still produce good things are precious and this one has clearly joined that small list of exemplary sites.
Left me wanting to read more rather than feeling burned out, that is a good sign, and a look at tokennode confirmed there is plenty more here to explore, the kind of writing that builds appetite rather than killing it which is a rare quality on the modern open internet today across most categories of content.
Without overstating it this is a quietly excellent post, and a look at leadquill extended that quiet excellence, content that earns superlatives without demanding them through marketing language is content that has truly earned them through the substance and this site has clearly produced work in that earned excellence category today.
If I were to recommend a starting point for the topic this site would be near the top of my list, and a stop at freshcartcorner reinforced that recommendation status, the small list of starting point recommendations I keep for friends asking about topics is short and this site is now firmly on it.
Looking at the surface design and the substance together this site has both right, and a look at freshcartarena reinforced that integrated quality, sites where presentation and content reinforce each other rather than fighting are sites with full editorial coherence and this one has clearly invested in both layers in a balanced way.
Thanks for the simple approach, too many sites bury the actual point under layers of unnecessary words, but here every line earns its place, and a look at dusktribe showed the same care for the reader which is something I will remember the next time I need answers on a topic.
Even across multiple posts the writers voice has remained consistent in a way I appreciate, and a stop at portwire continued that voice, sites that maintain editorial consistency across many pieces have something most sites lack and this one has clearly worked out how to keep its voice steady across what reads as a growing archive.
Glad the writer kept this short rather than padding it out, the points stand on their own without needing extra context, and a look at netscout kept the same approach going, brevity is a sign of confidence in the substance and the team here clearly trusts their content to land without filler.
A clear cut above the usual noise on the subject, and a look at nextgenstorefront only made that gap wider in my view, the kind of place that earns its visitors through quality rather than through aggressive marketing or sponsored placements which is increasingly the only way most sites stay afloat across the modern web.
Really grateful for content like this, it does not waste my time and it does not insult my intelligence either, and a quick look at emberstonecourtyard was the same, balanced respectful writing that makes a person feel welcome rather than rushed through pages of forced engagement just to keep clicking around.
Decided not to skim despite my usual habit and was rewarded for the discipline, and a stop at zerodepot earned the same patient approach, training myself to recognise sites that warrant slower reading is part of being a careful online reader and this site is the kind that helps me practice that skill regularly.
Reading this slowly to absorb the structure, and the structure is doing real work alongside the words, and a look at hashboard maintained the same architectural quality, when sentence shapes and paragraph rhythms reinforce the meaning rather than just transporting words you know you are reading skilled work today.
Bookmark added with a small note about why, and a look at tokenware prompted another bookmark with another note, the bookmarks I annotate are the ones I expect to return to deliberately rather than stumble into and this site is generating annotated bookmarks at a higher rate than my usual content sources by some margin.
Now adding this to a list of sites I want to see flourish, and a stop at blossombaycollective reinforced that wish, the few sites I actively root for are sites that produce the kind of work I want more of in the world and this one has joined that small list based on what I have read so far.
Quietly enjoying that I have found a new site to follow for the topic, and a look at digitaldealcorner reinforced the small pleasure of the find, the discovery of new high quality sources is one of the more durable pleasures of careful internet reading and this site has been generating that discovery pleasure at multiple points already today.
https://stabiline.ru/
Bookmark added with a small mental note that this is a site to keep, and a look at leadarrow reinforced the keep status, the verb keep rather than visit captures something about how I think about this kind of site and it is a higher tier of relationship than I have with most places online today.
Nice to see a post that does not try to overcomplicate the basics for the sake of looking smart, and once I looked at arcscout the same direct tone was there too, which honestly makes a difference when you are short on time and want answers without long pointless intros.
Now sitting with the thoughts the post triggered rather than rushing on to the next thing, and a stop at freshcartstation extended that reflective pause, content that earns time for thought after closing the tab is content of higher value than the merely interesting and this site has clearly produced that lasting effect today.
A clean read with no irritations, and a look at echoferncollective continued that frictionless quality, the absence of small irritations is something I notice only when present elsewhere and this site is one of the rare places where everything just works and lets me focus on the substance rather than fighting the format.
Now considering whether the post would translate well into a different form, and a look at echocode suggested similar versatility, content that could move into other media without losing its substance is content that has been built around ideas rather than around format and this site reads as idea first throughout posts.
Now noticing the careful balance the post struck between confidence and humility, and a stop at primechip maintained the same balance, finding the line between asserting and admitting is hard and this site has clearly developed the calibration to walk that line consistently which produces a more persuasive reading experience for me.
Liked that the post acknowledged complications rather than pretending they did not exist, and a stop at glademeadowoutlet continued that honest framing, sites that handle complexity with care rather than papering it over with simplifying claims are doing real intellectual work and this one is clearly in that category based on what I have read.
UFCWAR is a website http://www.ufcwar.com for fans of the Ultimate Fighting Championship and MMA. Latest news, fight results, tournament schedules, analysis, and fight reviews. Up-to-date information on fighters, events, and major fights.
Worth your time, that is the simplest endorsement I can give, and a stop at nodedrive extends that endorsement across the rest of the site, this is one of those increasingly rare places that delivers on what it promises rather than over selling the content and under delivering on substance every time which I find frustrating elsewhere.
Now planning a longer reading session for the archives, and a stop at hashtools confirmed the archives are worth that longer commitment, sites with archives I want to read deliberately rather than just sample are rare and this one has clearly earned that level of interest based on the consistency of what I have already read.
Thank you for being clear and direct, that simple approach saves so much frustration on the reader’s end, and a stop at truedock only made me more sure of it, the rest of the content seems to follow the same pattern which is a great sign of consistent editorial care behind the scenes.
Found the rhythm of the prose particularly enjoyable on this read through, and a look at stylishdealhub kept that musical quality going across the related pages, sentence rhythm is something most blog writers ignore but it makes a real difference in how content lands with the careful reader who cares.
Now setting this aside as a model of how to write thoughtfully on the topic, and a stop at prismlink extended that model status, content that becomes a reference for how a kind of writing should be done is content with influence beyond its own readership and this site is reaching that level for me clearly today.
Honestly informative, the writer covers the ground without showing off, and a look at echoperk reflected the same humility, content that respects the reader rather than trying to dazzle them is something I always appreciate and rarely come across in this corner of the internet today across the topics I usually read.
Pass this along to anyone you know dealing with similar questions, the answers here are clear, and a stop at zeroflow adds even more useful material, this is the kind of resource that deserves to circulate widely rather than getting lost in the constant churn of new content online that buries good work daily.
Took something from this I did not expect to find, and a stop at nextgentrendzone added another unexpected useful piece, content that exceeds expectations rather than just meeting them is the kind that builds enthusiasm and earns repeat visits without any explicit ask from the writer or platform behind the work being read.
Now feeling mildly impressed in a way I do not quite remember feeling about a blog in a while, and a stop at seolayer extended that mild impression, content that produces specific positive emotional responses rather than just neutral information transfer is content with extra dimensions and this site has those extra dimensions clearly.
Recommended without reservation for anyone interested in the topic at any level of expertise, and a look at jewelwillowmarketplace only strengthens that recommendation, this site clearly knows how to serve readers across a range of backgrounds without watering down the content or talking past anyone in the audience which is genuinely impressive to see.
Now considering the post as evidence that careful blog writing is still possible, and a look at freshcartzone extended that evidence, the broader question of whether the modern web can sustain quality writing has obvious empirical answers in sites like this one and seeing them is reassuring even when they remain a minority overall today.
Started reading without much expectation and ended on a high note, and a look at hyperinit continued that arc, content that builds rather than peaks early is a sign of a writer who knows how to structure a piece for sustained reader engagement rather than relying on a strong hook to do all the work.
Probably worth setting aside a longer block to read more carefully than I can right now, and a stop at novabin confirmed the longer block plan, the impulse to schedule dedicated time for a sites archive is itself a measure of trust and this site has earned that scheduling impulse from me clearly today actually.
A memorable post for me on a topic I had thought I was tired of, and a look at arctools suggested the same site can refresh other tired topics, sites that can revive my interest in subjects I had written off as exhausted are doing rare work and this one is clearly doing that for me today.
UFCShare is a portal http://www.ufcshare.com for fans of the Ultimate Fighting Championship and the world of MMA. News, fight results, tournament schedules, analysis, and fight reviews. Follow the best fighters and the main events of mixed martial arts.
Once you start reading carefully here it is hard to go back to lower quality alternatives, and a stop at echogrovecollective reinforced that ratchet effect, the way good content raises standards is real over time and this site has clearly contributed to raising my expectations for what is possible in writing on the topic generally.
A nicely understated post that does not shout for attention, and a look at ultraboot maintained the same quiet quality, understatement is a stylistic choice that distinguishes serious writing from attention seeking writing and this site has clearly committed to the understated approach as a core editorial value rather than just a phase.
A piece that respected the reader by not over explaining the obvious, and a look at prismwing continued that calibrated approach, finding the right level of explanation is one of the harder editorial calls and this site has clearly thought carefully about what readers will already know versus what they need help with consistently.
Decided not to comment because the post said what needed saying, and a stop at echoprism continued that complete feel, content that does not invite obvious additions or corrections from readers is content that has been carefully considered and this site appears to consistently produce pieces that satisfy rather than provoke unnecessary follow ups.
Found this really helpful, the explanations are simple but they actually answer the questions a normal reader would have, and after I followed copperwindessentials I had a clearer sense of the topic, no extra fluff just useful points laid out in a sensible order that made the time worth it.
Now placing this in the same category as a few other sites I have come to trust, and a look at socksyndicate continued the placement decision, the small category of fully trusted sites is one I extend rarely and only after multiple positive reading sessions and this site has earned the category placement methodically over time.
Now feeling something close to gratitude for the fact this site exists, and a look at ivorysave extended that gratitude, the rare site that produces this kind of response is the rare site worth defending in conversations about whether the modern internet is still capable of producing genuinely valuable independent content for serious adults.
On reflection this is the kind of writing that improves my taste for what is possible in the format, and a look at freshdealstation continued raising that bar, content that elevates my expectations rather than lowering them is doing important work in calibrating my standards and this site is participating in that elevation reliably.
F1 Direct is a website https://www.f1-direct.net about the world of Formula 1. Latest news, race results, race calendar, team and driver statistics. Up-to-date information for fans of the royal motor racing world.
Will be sharing this with a couple of people who care about the topic, and a stop at novaroad added more material worth passing along, the kind of site that is generous with quality content and does not make you jump through hoops to access it which is appreciated more than the team probably realises.
A piece that built up gradually rather than front loading its main points, and a look at zeroprobe maintained the same gradual structure, content that trusts the reader to reach conclusions through accumulating reasoning is more persuasive than content that announces conclusions and then defends them and this site uses the persuasive approach.
Appreciate how nothing here feels copied or pieced together from other places, the voice is consistent and the tone stays human, and after I checked probebyte I noticed the same style holds, which is a small detail but it makes the whole experience feel personal rather than like another generic site.
A clean piece that knew exactly what it wanted to say and said it, and a look at epicbooth maintained the same clarity of intention, knowing the goal of a piece before writing is something most blog content lacks and the clarity of purpose here shows up in every paragraph for any careful reader to notice.
Worth a quiet moment of recognition for the consistency I have noticed across multiple posts, and a stop at crystalbaystore continued that consistent quality, sites that maintain quality across many pieces rather than peaking on one viral post are sites with real editorial discipline and this one has clearly developed that discipline carefully.
My usual pattern is to skim and bounce but this site has reset that pattern temporarily, and a stop at vexflag maintained the slower reading mode, content that changes how I read is content with structural influence and this site has clearly nudged my reading behaviour toward something better at least for the duration of these visits.
Comfortable reading experience throughout, no jarring tone shifts and no awkward formatting, and a look at nextlevelcart kept that smooth feel going, the kind of editorial polish that goes unnoticed when present but glaring when absent is something this site has clearly invested in across the broader content as well which deserves recognition.
Pass this along to colleagues if the topic comes up, the framing here is sensible, and a stop at axisbit adds more useful angles to share, the kind of content that improves conversations rather than just feeding them is what makes a resource genuinely valuable in professional contexts going forward over time and across project boundaries too.
Reading this in segments because the day was busy, and the post survived the fragmented attention well, and a stop at stretchstudio held up similarly under interrupted reading, content that can withstand modern distracted reading patterns rather than requiring a perfect block of focused time is increasingly the kind I prefer.
However measured this site clears the bar I set for sites I take seriously, and a stop at jadeperk continued clearing that bar, the metrics I use for site quality are admittedly informal but they are consistent and this site has cleared them on multiple measurements across multiple visits which is meaningful for my evaluation.
Found something new in here that I had not seen explained this way before, and a quick stop at echoharborstore expanded the idea even further, the kind of writing that nudges your thinking forward a bit without forcing the issue is exactly what I look for online today and rarely actually find anywhere.
Розповідаємо про складні https://notatky.net.ua речі простими словами. Зрозумілі пояснення науки, технологій, економіки та повсякденних явищ. Статті, розбори та факти, які допомагають краще розуміти світ та знаходити відповіді на складні питання.
A piece that built up gradually rather than front loading its main points, and a look at freshtrendarena maintained the same gradual structure, content that trusts the reader to reach conclusions through accumulating reasoning is more persuasive than content that announces conclusions and then defends them and this site uses the persuasive approach.
Found this through a friend who recommended it and now I see why, and a look at ohmcore only strengthened that recommendation in my own mind, word of mouth still works for content that actually delivers and this site is clearly earning recommendations the old fashioned way through quality rather than marketing.
Well crafted post, the structure flows naturally from one point to the next without forcing transitions, and a stop at protoflux kept the same flow going, you can tell when a writer has thought about how their content reads rather than just what it contains and this is one of those examples.
Top notch writing, every paragraph carries weight and nothing feels like filler, and a stop at epicplus reflected that same care, a rare thing on the open web these days where most pages exist for clicks rather than actual reader value or anything close to that which is honestly a real shame.
Picked a single sentence from this post to remember, and a look at bundlebungalow gave me another to keep, content that produces memorable lines is doing more than just transferring information and the small selection of sentences I keep from each reading session is one of the actual returns I get from reading carefully.
Liked that the post resisted a sales pitch ending, and a stop at crystalbloommarket maintained the no pitch approach, content that ends without trying to convert me into a customer or subscriber is content that has confidence in its own value and this site is clearly playing the long game on reader trust.
Took the time to read the comments on this post too and they were also worth reading, and a stop at vexring suggested the community quality matches the content quality, when the conversation around a piece is as good as the piece itself you know you have found a real corner of the internet.
Bookmark added in three places to make sure I do not lose the link, and a look at jetmesh got the same redundant treatment, sites I am afraid to lose are the rare keepers and this is clearly one of them based on what I have read so far across this and a couple of related posts.
Glad the writer did not feel compelled to cover every possible angle of the topic, focus is a virtue, and a stop at zesttrack reflected the same disciplined scope, knowing what to leave out is half of what makes good writing good and this post has clearly been edited with that principle in mind.
Big thanks to whoever wrote this, you saved me a lot of time hunting for the same info on other sites, and a stop at axisdepot only added more useful detail without going off topic, that kind of focus is honestly hard to come across these days when most posts wander everywhere.
Recommended without hesitation if you care about careful coverage of this topic, and a stop at protonkit reinforced the recommendation, the bar I set for unhesitating recommendations is fairly high and this site has cleared it through the cumulative weight of multiple consistently good pieces rather than through any single standout post which is meaningful.
Solid information that lines up with what I have been hearing from other reliable sources, and after my visit to flaircase I was even more certain of that, this site checks out which is something I value highly when so many places online play loose with the facts to chase a quick click.
Even just sampling a few posts the consistency is what stands out, and a look at ohmframe confirmed the broader pattern, sites where every piece I sample lives up to the standard set by the others are sites with serious quality control and this one has clearly invested in whatever editorial process produces that consistency reliably.
Now noticing the post fit a particular gap in my reading without my having articulated the gap before, and a look at freshtrendstation extended that gap filling effect, content that meets needs I had not consciously formulated is content with reader insight and this site has clearly developed that anticipatory editorial sense across many pieces.
Left me wanting to read more rather than feeling burned out, that is a good sign, and a look at pearlpocket confirmed there is plenty more here to explore, the kind of writing that builds appetite rather than killing it which is a rare quality on the modern open internet today across most categories of content.
Started reading and ended an hour later without realising the time had passed, and a look at perfectbuycorner produced the same time dilation effect, when content makes time feel different the writer has achieved something well beyond the average and this site is producing that experience for me reliably across multiple readings.
Слот с тематикой собачек https://thedoghouse-slots.top слот предлагает бонусные фриспины, липкие вайлд-символы и высокий потенциал выигрыша благодаря множителям и расширяющимся символам.
Felt the writer was being honest with the reader which is rare enough that I want to acknowledge it, and a look at sunmeadowstore continued that honest feel, content built on actual knowledge rather than aggregated summaries is something I value highly and rarely come across in regular searches on the open internet these days.
If I had to defend the time I spend reading independent blogs this site would feature in the defence, and a look at ironpetalworks reinforced that defensive utility, the ongoing case for non algorithmic reading is one I make to myself periodically and sites like this one provide the actual evidence that supports the case clearly.
Excellent post, balanced and well organised without showing off, and a stop at crystalfernstore continued in that same vein, this site has clearly figured out the formula for content that works for readers rather than for search engine ranking signals which is harder than it sounds today and worth real recognition from anyone.
Generally my attention drifts on long posts but this one held it through the end, and a stop at growthcart earned the same sustained focus, content that defeats my drift tendency is content with substantive pulling power and this site has demonstrated that pulling power across multiple pieces in a session that has now run quite long actually.
Came in tired from a long day and the writing held my attention anyway, and a stop at vexsync kept that going, content that can engage a fatigued reader is doing something right because most online reading happens in suboptimal conditions like that one and quality content adapts to it without complaint.
Reading this in three sittings because the day was fragmented, and the piece survived the fragmentation, and a stop at futuregoodszone held up under similar reading conditions, content engineered for continuous attention is fragile in modern conditions and this site reads as durable across the realistic ways people consume content today.
Started imagining how I would explain the topic to someone else after reading, and a look at kilobase gave me more material for that imagined explanation, content that improves my own ability to discuss a topic is content that has actually transferred knowledge rather than just decorating my screen for a few minutes.
Approaching this site through a casual link click and being surprised by what I found, and a look at amberflux extended the surprise, the rare experience of stumbling into excellent independent content rather than predictable mediocrity is one of the actual remaining pleasures of casual web browsing and this site provided it cleanly.
This filled in a gap in my understanding that I had not even noticed was there, and a stop at decdart did the same, the kind of post that gives you more than you expected when you first clicked through from somewhere else, a real find for anyone curious about the area covered here.
A small editorial detail caught my attention, the way headings related to body text, and a look at purepost maintained that careful relationship, structural details like that show up to readers who notice them and the writers here have clearly thought about every level of the piece rather than just the words.
Reading this site over the past week has changed how I evaluate content in this space, and a look at flairpack extended that recalibration, the standards I bring to reading on the topic have shifted upward as a direct result of regular exposure to this kind of work and that shift will outlast any single reading session.
Glad to have another reliable bookmark for this topic, and a look at macromountain suggested several more pages I will be marking too, building a personal library of trustworthy resources is one of the actual rewards of careful browsing and this site is earning a place on my permanent shortlist for the topic.
Reading carefully here has reminded me what reading carefully feels like, and a look at ohmgrid extended that reminder, the experience of careful reading versus skimming is different in ways I had partially forgotten and this site has clearly refreshed my memory of what attention feels like when content rewards it consistently.
Felt the post was written for someone like me without explicitly addressing me, and a look at sunpetalmarket produced the same fit, when content lands on its target without pandering you know the writer has done careful audience thinking rather than relying on demographic targeting or interest signals to do the work of editorial decisions.
Любишь азарт? https://nodepositcasinopromo.top подборка онлайн-казино с бесплатными фриспинами, акциями и приветственными предложениями для новых игроков. Узнайте условия получения и начните играть без пополнения счета.
A piece that did not require external context to follow, and a look at magicshelf maintained the same self contained quality, content that stands alone without forcing readers to chase prerequisites is more accessible and this site has clearly thought about how each piece can serve a fresh visitor rather than only existing members.
Felt the writer respected the topic without being precious about it, and a look at futurebuyarena continued that respectful but unfussy treatment, finding the right register for serious topics is hard and this site has clearly figured out how to take the topic seriously while still being readable for casual visitors regularly.
Worth bookmarking and sharing with anyone interested in the topic, that is my honest take, and a stop at crystalfieldstore reinforces that, the kind of generous resource that makes the open web feel worth defending against the constant pressure to retreat into walled gardens and curated feeds today everywhere I look across all my devices.
Felt the writer was being honest with the reader which is rare enough that I want to acknowledge it, and a look at axisflag continued that honest feel, content built on actual knowledge rather than aggregated summaries is something I value highly and rarely come across in regular searches on the open internet these days.
Started reading skeptically because the headline seemed overconfident, and the post earned the headline by the end, and a look at globalgoodsarena continued that pattern of earning its claims, sites that can back up their headlines without overpromising are rare and this one has clearly developed editorial calibration on that front consistently.
Came in skeptical and left mostly convinced, that is the highest praise I can offer, and a look at vividloft pushed me further in the same direction, content that survives a critical first read is rare and worth recognising because most blog posts crumble under any real scrutiny these days when you actually pay attention closely.
Now considering carefully how to share this site with the right audience rather than broadcasting widely, and a look at kilocore extended that careful sharing impulse, content worth sharing carefully rather than spamming is content that has earned a higher kind of recommendation and this site has earned that careful shareability throughout pieces.
Thanks for taking the time to write this, it is clear that some thought went into how each point would land, and after I went through declume I had a better grip on the topic, real value without the usual marketing noise people have to put up with online when searching for answers.
A piece that suggested careful editing without showing the marks of the editing, and a look at amberlume continued that invisible polish, the best editing disappears into the prose and this site reads as having been edited with skill that does not announce itself which is the highest compliment I can offer any blog content.
Closed it feeling I had taken something away rather than just consumed something, and a stop at riverset extended that taking away feeling, the difference between content I extract value from and content I just pass through is something I track informally and this site is consistently in the value extraction column for me.
Considered alongside other sources I have been reading this one consistently rises to the top, and a stop at velvetpetalstore maintained that top ranking, the informal ongoing comparison between sources is something I do whenever reading on a topic and this site keeps coming out near the top of those comparisons over many sessions.
Stands out for actually being useful instead of just being long, and a look at flashport kept that going, length without value is the default mode of most blogs these days but this site has clearly chosen a different path which I respect a lot as a reader who values careful editing decisions like that.
Liked that the post resisted a sales pitch ending, and a stop at mystichorizonstore maintained the no pitch approach, content that ends without trying to convert me into a customer or subscriber is content that has confidence in its own value and this site is clearly playing the long game on reader trust.
Closed the tab feeling I had spent the time well, and a stop at pixelharvest extended that feeling across more pages, the test of whether time on a site was well spent is one I apply silently after closing tabs and very few sites pass it but this one passed it cleanly today afternoon clearly.
Decided to subscribe to the RSS feed if there is one, and a stop at sunpetalstore confirmed that decision, content that I want delivered to me proactively rather than just remembered when I have time is content that has earned a higher level of commitment from me as a reader looking for reliable sources.
The examples really helped me grasp the points faster than abstract descriptions would have, and a stop at premiumbuyarena added a few more practical illustrations that drove the message home, the kind of writing that knows its readers learn better through concrete situations rather than vague generalities is rare and worth recognising clearly.
Excellent execution from start to finish, the post never loses its rhythm and the points stay sharp, and a quick stop at silkjump kept the same level going, consistency like this across a site is the marker of a serious operation rather than a casual side project running on autopilot somewhere else.
Reading more of the archives is now on my plan for the weekend, and a stop at royaltrendcorner confirmed the archive worth the time, the rare archive worth a dedicated reading session rather than just casual sampling is the rare archive of serious work and this site has clearly produced enough of that work to warrant the deeper exploration.
Now feeling the quiet pleasure of finding writing that takes itself seriously without being self serious, and a stop at crystalharborgoods extended that subtle pleasure, the gap between earnest and pretentious is fine and this site has clearly chosen to land on the earnest side without slipping over into pretentious which is impressive.
Now feeling that this site is the kind I want to make sure does not disappear, and a look at blossomhavenstore reinforced that quiet protective feeling, the rare sites whose disappearance would actually matter to me are the sites I want to support through return visits and recommendations and this one has joined that small protected list.
Liked that the post landed without needing to manufacture controversy or take a contrarian stance for attention, and a stop at voltcard continued that grounded approach, content that earns attention through quality rather than provocation is the kind that builds long term trust rather than burning it on quick wins.
Glad I gave this fifteen minutes rather than the usual three minute skim, and a look at kilobolt earned the same investment, time spent on quality content is rarely wasted but the reverse is also true and learning which sites deserve which kind of attention is part of being a careful online reader.
Recommended without reservation for anyone interested in the topic at any level of expertise, and a look at kiloorbit only strengthens that recommendation, this site clearly knows how to serve readers across a range of backgrounds without watering down the content or talking past anyone in the audience which is genuinely impressive to see.
Just want to record that this site is entering my regular reading list, and a look at pixierod confirmed it deserves the spot, my regular reading list is short and well curated and adding to it requires meeting a fairly high quality bar that this site has clearly cleared without much effort apparently.
Easy to recommend, the content speaks for itself without needing additional praise from me, and a stop at rustflow only adds more reasons to send people this way, the kind of generous resource that benefits its readers without demanding anything in return is increasingly rare and worth recognising clearly today across the broader open internet.
I came here looking for a quick answer and ended up reading the whole post because it was actually interesting, and after globaltrendstation I had a much fuller picture, no stress and no confusion just a clear walk through the topic that made everything fall into place without much effort.
Worth saying that the prose reads naturally without straining for style, and a stop at fluxbin maintained the same unforced quality, writing that achieves elegance without effort is the highest tier and this site has clearly worked out how to land that effortless quality consistently rather than only on the writers best days.
Saving this link for the next time someone asks me about this topic, and a look at dockspark expanded what I will be sharing with them, this is the kind of resource that makes a real difference when you are trying to point a friend to something useful and reliable rather than generic marketing pages.
Solid endorsement from me, the writing earns it, and a look at promorank continues to earn it across the broader site too, the kind of operation that maintains quality across many pages rather than just one viral post is a sign of serious commitment and that is what I see here clearly across what I read.
Useful read, especially because the writer did not assume too much background from the reader, and a quick look at opalshorecollective continued in the same way, a thoughtful site that meets people where they are which is something the modern web could use a lot more of for both casual and serious readers.
Felt the post handled a sensitive angle of the topic with appropriate care, and a look at ampblip extended that careful handling across related material, sites that can navigate delicate territory without causing damage are rare and require a level of judgement that comes from experience rather than from following any clear playbook.
Appreciate the work that went into laying this out so clearly, every section earns its place without filler, and a look at zapscan confirmed the same care, definitely the kind of place that deserves a return visit when the topic comes up again later in the future or for any related question.
A particular kind of restraint shows up in the writing, and a look at velvetpinecollective maintained the same restraint across pages, knowing what not to say is just as important as knowing what to say and this site has clearly developed strong instincts on both sides of that editorial line throughout pieces I have read.
Glad I gave this fifteen minutes rather than the usual three minute skim, and a look at sunspirecollective earned the same investment, time spent on quality content is rarely wasted but the reverse is also true and learning which sites deserve which kind of attention is part of being a careful online reader.
Genuinely changed how I think about a small piece of the topic, which does not happen often online, and a look at axonspark added another nudge in the same direction, the kind of writing that earns a small mental shift rather than just confirming what you already thought before reading is a sign of careful thought.
Now wondering how the writers calibrated the level of detail so well, and a stop at silkmint continued the same calibration, the right level of detail is one of the harder editorial calls in any piece and this site has clearly developed an instinct for it through what I assume is years of careful practice publicly.
Pleasant surprise, the post delivered more than the headline promised, and a stop at kiloboost continued that pattern of under promising and over delivering, the rarest combination on the modern web where most content does the opposite by promising the world and delivering thin recycled summaries instead each time you click on something interesting.
Thanks for the moderate length, neither so short it skips substance nor so long it bloats, and a stop at crystalmapletraders hit the same balance, the right length is one of the hardest things to calibrate in blog writing and I appreciate when a team has clearly thought about it rather than defaulting.
Skipped the related links section thinking I had read enough and then came back to it later when curiosity got the better of me, and a stop at kilorealm confirmed I should have just read it first, every section of this site appears to deserve careful attention rather than skipping past lazily.
If you scroll past this site without looking carefully you will miss something, and a stop at voltorbit extended that mild warning, the surface of the site does not advertise its quality loudly which means careful attention is required to recognise what is being offered here which is itself a kind of editorial signal.
Now considering the post as evidence that careful blog writing is still possible, and a look at royaltrendhub extended that evidence, the broader question of whether the modern web can sustain quality writing has obvious empirical answers in sites like this one and seeing them is reassuring even when they remain a minority overall today.
Found something new in here that I had not seen explained this way before, and a quick stop at rustkit expanded the idea even further, the kind of writing that nudges your thinking forward a bit without forcing the issue is exactly what I look for online today and rarely actually find anywhere.
Now recognising that the post handled the topic with appropriate technical precision without becoming dry, and a stop at rankcraft continued that balance, technical precision and readability are often in tension and this site has clearly figured out how to maintain both at once which is one of the harder editorial achievements in the form.
Generally my comment to other readers about new sites is to wait and see but for this one I would jump to recommend now, and a look at fluxbuild reinforced that early recommendation, the speed at which a site earns my recommendation is itself a quality signal and this one has earned mine quickly clearly.
Walked away with a clearer head than I had before reading this, and a quick visit to fastcartarena only sharpened that, the writing has a way of cutting through the noise that surrounds most topics online which is something I will definitely remember the next time I am searching for an answer to anything.
Worth a slow read rather than the fast scan I usually default to, and a look at xenojet earned the same slower pace from me, content that resets my reading speed downward is content with substance worth absorbing and this site has produced that effect on me multiple times now over the last week here.
Pass this along to colleagues if the topic comes up, the framing here is sensible, and a stop at twilightpetalmarket adds more useful angles to share, the kind of content that improves conversations rather than just feeding them is what makes a resource genuinely valuable in professional contexts going forward over time and across project boundaries too.
Worth every minute of the time spent reading, and a stop at zingdart extends that value across more pages, in a media environment where most content is engineered to waste attention this site stands out by treating reader time as something valuable rather than something to be exploited and stretched as far as possible.
Thanks for keeping the writing direct without losing the warmth that makes content feel human, and a stop at docktone carried both qualities forward, balancing professionalism and personality is a rare skill and the writers here have clearly figured out how to consistently land it across many posts which I notice.
Time spent here today felt productive in the way that good reading sessions sometimes do, and a stop at brightforgecraft extended that productive feeling across the rest of the morning, the difference between productive reading and merely passing time is real and this site is consistently on the productive side for me lately.
Thanks for the moderate length, neither so short it skips substance nor so long it bloats, and a stop at silkplus hit the same balance, the right length is one of the hardest things to calibrate in blog writing and I appreciate when a team has clearly thought about it rather than defaulting.
Just sat with this for a bit longer than I usually would because the points are worth thinking about, and after premiumcartarena I had even more to chew on, the kind of post that nudges your thinking forward without forcing the issue is something I have always appreciated in good writing online.
Играешь в казино? https://nodepositcasino.top обзоры онлайн-казино, актуальные бездепозитные бонусы, фриспины и акции для новых игроков. Узнайте условия получения бонусов и начните играть без вложений.
Reading this gave me a small refresher on something I had partially forgotten, and a stop at ampcard extended the refresher, content that strengthens existing knowledge rather than just adding new is content with a particular kind of consolidating value and this site is providing that consolidating function across multiple visits.
Felt no urge to argue with the conclusions even though I started the post slightly skeptical, and a look at velvetridgecollective maintained that pattern, writing that earns agreement through clarity of argument rather than rhetorical pressure is the kind I find most persuasive and the kind I want to read more of these days.
The whole experience of reading this was pleasant from start to finish, no pop ups and no annoying interruptions, and a look at kilostud continued that clean experience, technical choices about page design matter for the reader and this site clearly cares about the small details that add up to comfort across multiple visits.
Decided to subscribe to the RSS feed if there is one, and a stop at crystalmeadowgoods confirmed that decision, content that I want delivered to me proactively rather than just remembered when I have time is content that has earned a higher level of commitment from me as a reader looking for reliable sources.
Reading this in a moment of low energy still kept my attention, and a stop at linensave continued that engagement under suboptimal conditions, content that survives the reader being tired is content with extra reserves of pull and this site has the kind of writing that holds up even when I am not at my reading best.
Honestly the simplicity is what makes this work, the topic is not buried under filler words or overly complex examples, and a quick look at rustpick showed the same sensible style, I left with what I came for and no headache from over reading which is a real win these days.
Thanks for keeping the writing direct without losing the warmth that makes content feel human, and a stop at beamqueue carried both qualities forward, balancing professionalism and personality is a rare skill and the writers here have clearly figured out how to consistently land it across many posts which I notice.
Now feeling that this site is the kind I want to make sure does not disappear, and a look at voltprobe reinforced that quiet protective feeling, the rare sites whose disappearance would actually matter to me are the sites I want to support through return visits and recommendations and this one has joined that small protected list.
Generally I bookmark sparingly to avoid building up a bookmark graveyard but this one earned a permanent slot, and a stop at rankseller extended that permanence designation, the few sites I keep permanent bookmarks for are sites I expect to use repeatedly and this one has clearly cleared that expectation bar today.
Probably worth setting aside a longer block to read more carefully than I can right now, and a stop at fluxfuel confirmed the longer block plan, the impulse to schedule dedicated time for a sites archive is itself a measure of trust and this site has earned that scheduling impulse from me clearly today actually.
Found the post genuinely useful for something I was working on this week, and a look at urbancrestemporium added more material I will reference, content that connects to my actual life and work rather than just being interesting in the abstract is the kind I will pay attention to and return to repeatedly.
Thanks for a post that does not try to be funny when it is not the moment for it, and a stop at royaltrendstation maintained the same appropriate seriousness, knowing when humour helps and when it just signals desperation for engagement is a sign of editorial maturity that many blogs have not developed yet.
Took something from this I did not expect to find, and a stop at zingtorch added another unexpected useful piece, content that exceeds expectations rather than just meeting them is the kind that builds enthusiasm and earns repeat visits without any explicit ask from the writer or platform behind the work being read.
Now realising this site has been quietly doing good work for longer than I knew, and a look at fastcartcenter suggested an archive worth exploring, sites with deep archives of consistent quality represent a different kind of resource than sites with viral hits and this one looks like the durable kind based on what I see.
Refreshing change from the usual sites covering this topic, no clickbait and no padding, and a stop at sleekgain confirmed the difference, this place clearly has its own voice rather than copying the formulas everyone else uses to chase clicks online which is becoming increasingly rare these days across nearly every popular subject.
A piece that brought a sense of order to a topic I had been finding chaotic, and a look at zapflux continued that organising effect, content that imposes useful structure on messy subjects is doing genuine intellectual work and this site is providing that organisational function across multiple posts I have read recently here.
Now wishing I had found this site sooner, and a look at duostem extended that mild regret, the calculation of how many years of good content I missed by not finding the right sources earlier is one I try not to make too often but it does come up sometimes when I find sites this good.
Came in confused about the topic and left with a much firmer grasp on it, and after kilozen I felt I could explain this to someone else without hesitation, that is the gold standard for any educational content and most sites simply fail to reach it ever which is unfortunate but true.
Just enjoyed the experience without needing to think about why, and a look at amploom kept that effortless feeling going, sometimes the best content is invisible in the sense that you forget you are reading until you reach the end and realise time has passed without you noticing it pass naturally.
A welcome reminder that thoughtful writing still happens online, and a look at rapidshelf extended that reassurance, the modern web makes it easy to forget that careful writing exists and finding sites that practice it is a small antidote to the cynicism that builds up from too much exposure to algorithmic content.
Great work on keeping things readable, the post never drags or repeats itself which I really appreciate, and a stop at rustroad added a bit more context that fit naturally with what was already said here, no need to read everything twice to get the point being made today.
I appreciate the clarity here, everything is explained in simple terms without unnecessary detail, and after a quick stop at velvetshorecollective the points came together nicely for me, the writing keeps things straightforward and respects the reader from start to finish without ever talking down to anyone.
Now wondering how the writers calibrated the level of detail so well, and a stop at crystalpetalcollective continued the same calibration, the right level of detail is one of the harder editorial calls in any piece and this site has clearly developed an instinct for it through what I assume is years of careful practice publicly.
Honest reaction is that this is the kind of writing I would defend in a conversation about good blog content, and a look at logicarc reinforced that, the rare site whose work I would actively recommend rather than just tolerate is the kind I want to support through return visits regularly.
Over the course of reading several posts here a pattern of quality has emerged, and a stop at cloudforgegoods confirmed the pattern, the difference between sites that hit quality occasionally and sites that hit it consistently is huge and this site has clearly demonstrated the consistent kind through what I have read this morning.
Reading this gave me a small jolt of recognition for an experience I thought was just mine, and a stop at volttray produced more such jolts, content that universalises private experiences without flattening them is doing genuinely useful work and this site is providing that recognition function for me reliably across topics I read.
Felt the post had been written without looking over its shoulder, and a look at fluxvibe continued that confident posture, content written for its own sake rather than against imagined critics has a different quality and this site reads as written from a place of confidence rather than defensive justification of every claim.
Took some notes for a project I am working on, and a stop at urbanfernmarket added more raw material to those notes, content that contributes to my own creative work rather than just being interesting in the moment is the kind I value most and the kind I will keep coming back to repeatedly.
Reading this brought back the satisfaction I used to get from blogs ten years ago, and a stop at zingtrace kept that nostalgic quality alive, sites that capture what was good about an earlier era of internet writing are increasingly precious and this one is doing that without feeling like a deliberate throwback at all.
Міський портал Дніпро https://faine-misto.dp.ua свіжі новини, події, афіша заходів та корисна інформація. Довідник компаній, міські сервіси, оголошення та все про життя міста.
Сайт міста Хмельницький https://faine-misto.km.ua новини, події, корисна інформація для мешканців та гостей. Афіша заходів, міські служби, довідник організацій, цікаві місця та актуальні події міста.
Really grateful for content like this, it does not waste my time and it does not insult my intelligence either, and a quick look at sleekhold was the same, balanced respectful writing that makes a person feel welcome rather than rushed through pages of forced engagement just to keep clicking around.
Now thinking I want more sites built on this kind of editorial foundation, and a stop at fastgoodsarena extended that wish into a broader hope, sites built on substance and care rather than on metrics and growth are the kind of sites I want to see more of and this one is a small example worth supporting.
Чоловічий блог https://u-kuma.com з корисною інформацією про фінанси, кар’єру, здоров’я, спорт і стиль. Практичні поради, аналітика та матеріали для саморозвитку та впевненого руху до цілей.
If a friend asked me where to read carefully on the topic I would send them here without hesitation, and a look at premiumcartcorner confirmed the recommendation strength, the directness of my recommendation reflects how confident I am in the quality and this site has earned undiluted recommendations from me across multiple recent conversations actually.
The examples really helped me grasp the points faster than abstract descriptions would have, and a stop at savvyshopstation added a few more practical illustrations that drove the message home, the kind of writing that knows its readers learn better through concrete situations rather than vague generalities is rare and worth recognising clearly.
Really nice to see things explained without overcomplicating the topic, the words flow naturally and stay easy to follow, and a short visit to beamreach only added to that experience because the same simple approach is used across the rest of the page too without any change in tone.
Once you find a site like this the search for similar voices begins, and a look at linkcast extended the search energy, finding a high quality reference point makes the gap between it and adjacent sources visible in a way it was not before and this site has provided that high reference point across multiple recent visits.
Found the use of subheadings really helpful for scanning back through the post later, and a stop at duotile kept that reader friendly approach going, navigation is something many blog writers ignore but small structural choices make a noticeable difference for someone returning to find a specific point again days or weeks later.
Now saved this in a way that I will actually find again rather than the casual bookmark approach, and a stop at royalshelf earned the same careful saving, organising my reading bookmarks so that high quality sources rise to the top is something I should do more of and this site triggered that organisation today.
Now adding this site to a small mental group of recommendations I keep ready for specific kinds of inquiries, and a stop at rustwin extended the recommendation readiness, content that I can confidently point friends and colleagues toward in specific contexts is content with real social utility and this site has that utility clearly.
A particular pleasure to read this with a fresh coffee, and a look at lushfind extended the pleasure across more pages, content that pairs well with quiet morning rituals is something I have come to value highly and this site has the kind of energy that fits naturally into a calm reading routine.
Just wanted to say this was useful and leave a small note of thanks, and a quick visit to crystalpinegoods earned a similar nod from me, the small acknowledgements add up over time and represent the real economy of trust that good content runs on across the open and increasingly fragmented modern internet.
Now adding this to a short list of sites I would defend in a conversation about the modern web, and a look at glamtower reinforced that defence list, the few sites that serve as evidence the web can still produce good things are precious and this one has clearly joined that small list of exemplary sites.
Reading this slowly in the morning before opening email, and a stop at astrorod extended that protected attention, content that earns the prime morning reading slot before the daily distractions begin is content with elevated status and this site has earned that prime slot consistently in my recent reading habits clearly.
The conclusions felt earned rather than tacked on at the end like an afterthought, and a look at velvettrailbazaar kept that careful structure going, you can tell when a writer has thought about the shape of their post versus just letting it ramble out and hoping for the best at the end which most do.
Started thinking about my own writing differently after reading, and a look at vortexarc continued that reflective effect, content that influences how I work rather than just informing what I know is content with the highest kind of impact and this site has triggered some of that reflective influence today on me.
A piece that reads like it was written for me without claiming to be written for me, and a look at simplebuycorner produced the same fit, when the writer audience match clicks naturally without being engineered through demographic targeting you know the writing is solid and this site has that natural fit consistently for me.
Glad I gave this a chance instead of bouncing on the headline, and after urbanlatticehub I was certain I had made the right call, snap judgements based on titles miss a lot of good content and this is a reminder to slow down and check things out before scrolling past in a hurry.
A piece that did not require external context to follow, and a look at snapfork maintained the same self contained quality, content that stands alone without forcing readers to chase prerequisites is more accessible and this site has clearly thought about how each piece can serve a fresh visitor rather than only existing members.
Just want to record that this site is entering my regular reading list, and a look at fastgoodsbazaar confirmed it deserves the spot, my regular reading list is short and well curated and adding to it requires meeting a fairly high quality bar that this site has clearly cleared without much effort apparently.
Looking back on this reading session it stands as one of the better ones recently, and a look at lunarcode extended that ranking, the informal ranking of reading sessions against each other is something I do mentally and this session ranks high largely because of this site and a couple of related pages here.
Now adding the homepage to my regular check rotation rather than waiting for individual links to find me, and a stop at seobridge confirmed the rotation upgrade, the move from passive discovery to active checking is a vote of confidence in a sites ongoing quality and this site has earned that active engagement clearly.
Picked a friend mentally as the audience for this and decided to send the link, and a look at cloudmeadowcollective confirmed the send was the right choice, choosing whom to share content with is a small act of curation that I take more seriously than the public sharing most platforms encourage these days online.
Appreciate the thoughtful approach, the writer clearly took time to make this readable for someone who is not already an expert, and a look at smartcartarena kept that going nicely, easy on the eyes and easy on the brain which is always a winning combination when reading on a busy day.
Thanks for laying this out in a way that someone newer to the topic can follow, and a stop at sagebay kept that accessibility going, writing that meets readers at different experience levels without condescending is hard to do well and the writers here have clearly thought about who they are writing for.
However casually I came to this site I have ended up reading carefully, and a look at emberkit continued earning that careful reading, the conversion from casual visitor to careful reader is something content earns rather than demands and this site has accomplished that conversion for me over the course of just a few pieces.
Picked something concrete from the post that I will use immediately, and a look at lushstack added another concrete piece, content that produces immediately useful output rather than just abstract appreciation is content that earns its place in my regular rotation without needing any further evaluation from me at this point honestly.
Really nice to see things explained without overcomplicating the topic, the words flow naturally and stay easy to follow, and a short visit to bloomhold only added to that experience because the same simple approach is used across the rest of the page too without any change in tone.
Skipped a meeting reminder to finish the post, and a stop at glowjump held me past another reminder, when content beats meetings the writer is doing something extraordinary because meetings have institutional support behind them and yet good writing can still occasionally win that competition for attention which I find heartening today.
Reading this prompted a small redirection in something I was working on, and a stop at crystalwindcollective extended that redirecting influence, content that affects my actual work rather than just my thinking has the highest practical impact and this site is providing that level of influence for me at a sustainable rate apparently.
Жіночий портал https://soloha.in.ua з актуальними матеріалами про моду, красу, здоров’я, психологію та сім’ю. Корисні поради, ідеї та натхнення для сучасних жінок щодня.
Жіночий онлайн-сайт https://u-kumy.com з корисними статтями про красу, здоров’я, психологію, моду та будинок. Практичні поради, лайфхаки та надихаючі матеріали для жінок будь-якого віку.
Now considering whether the post would translate well into a different form, and a look at findyouranswers suggested similar versatility, content that could move into other media without losing its substance is content that has been built around ideas rather than around format and this site reads as idea first throughout posts.
Портал для людей похилого https://pensioneram.in.ua віку з Україна з корисною інформацією про пенсії, пільги, здоров’я та соціальні послуги. Прості поради, новини та інструкції для повсякденного життя пенсіонерів.
Reading this prompted me to subscribe to my first newsletter in months, and a stop at urbanmeadowgoods confirmed the subscribe was the right call, content that earns a newsletter signup is content that has cleared a higher trust bar than a casual visit and this site has clearly earned that level of commitment from me.
Now wondering how the writers calibrated the level of detail so well, and a stop at solidcrew continued the same calibration, the right level of detail is one of the harder editorial calls in any piece and this site has clearly developed an instinct for it through what I assume is years of careful practice publicly.
Generally my comment to other readers about new sites is to wait and see but for this one I would jump to recommend now, and a look at webboot reinforced that early recommendation, the speed at which a site earns my recommendation is itself a quality signal and this one has earned mine quickly clearly.
Reading this with a fresh mind in the morning brought out details I might have missed in the afternoon, and a stop at premiumcartzone earned the same fresh attention, content that rewards being read at full attention rather than at energy lows is content with real density and this site has that density consistently.
Really appreciate the absence of stock photos that have nothing to do with the content, and a quick visit to axislume maintained the same restraint, visual filler is a tell that the writing cannot stand on its own and the lack of it here suggests the team has confidence in their content quality alone.
Worth saying that the prose reads naturally without straining for style, and a stop at megreef maintained the same unforced quality, writing that achieves elegance without effort is the highest tier and this site has clearly worked out how to land that effortless quality consistently rather than only on the writers best days.
However measured this site clears the bar I set for sites I take seriously, and a stop at seocart continued clearing that bar, the metrics I use for site quality are admittedly informal but they are consistent and this site has cleared them on multiple measurements across multiple visits which is meaningful for my evaluation.
A handful of memorable phrases from this one I will probably use later, and a look at fastpickzone added a couple more, content that contributes language to my own communication rather than just facts is content with a different kind of utility and this site is providing that linguistic utility consistently across what I read.
https://lavita-clinik.ru/
Ставка на любовь – 2 сезон. Любовь, страсть и неожиданные повороты возвращаются! Новые герои, жаркие свидания и судьбоносные решения – кто рискнёт всем ради чувств? Драматичные признания, сложный выбор и финал, от которого захватывает дух. Не пропусти ни одной серии – включай прямо сейчас: Ставка на любовь новый сезон
Found a couple of useful angles in here I had not considered before reading carefully, and a quick stop at sagejump added more, this is one of those sites where the value compounds the more you read rather than peaking at one viral post and then offering nothing else of substance afterwards which is common.
More original than the recycled takes I keep finding on the topic elsewhere, and a quick look at smartchoicebazaar confirmed it, the kind of site that has its own voice rather than echoing whatever is trending which makes it stand out as a refreshing change from the usual rotation of generic content I see daily.
A piece that read smoothly because the writer understood how readers actually move through prose, and a look at emberpin maintained the same reader awareness, writers who think about the reading experience as much as the writing experience produce better work and this site has clearly made that shift in editorial approach.
Really liked the calm tone running through the post, no shouting and no urgency forced into the writing, and a look at macrobase kept that quiet confidence going, the kind of voice that makes the reader feel respected rather than yelled at which is depressingly common across most modern blog content these days.
Now adjusting my expectations upward for the topic based on this post, and a stop at glowware continued that bar raising effect, content that resets what I think is possible on a subject is doing real work in shaping my standards and this site is providing those bar raising experiences at a notable rate during sessions.
Quietly impressive in a way that does not announce itself, and a stop at globaltrendhub extended that quiet impressiveness, the kind of quality that emerges through sustained attention rather than first impressions is the kind I trust more deeply and this site has been earning that deeper trust across multiple sessions over time consistently.
A genuine pleasure to find a site that publishes at a sustainable cadence rather than chasing the daily content treadmill, and a look at urbanpetalmarket confirmed the careful publication rhythm, sites that prioritise quality over frequency are rare and this one has clearly chosen the slower pace which I appreciate as a reader.
Comfortable read, finished it without realising how much time had passed, and a look at dreamwovenbazaar pulled me into more pages the same way, the absence of friction in good content lets time disappear and that is one of the highest compliments I can pay any piece of writing I find online during a regular search session.
Going to come back when I have more time to read carefully, the post deserves more than a quick scan, and a stop at sparkbit reinforced that, this is the kind of site that rewards a slower read which is hard to find in this fast paced corner of the internet but really worthwhile.
Felt slightly impressed without being able to point to one specific reason, and a look at simplebasket continued that diffuse positive feeling, when content works at a level you cannot easily articulate the writer is doing something with craft rather than just delivering information and that is something I have learned to recognise.
Последние новости Киева https://xxl.kyiv.ua сегодня: события города, политика, экономика, происшествия, транспорт и городская жизнь. Актуальная информация, репортажи, аналитика и важные обновления, которые помогают быть в курсе всех событий столицы Украины.
Picked up several practical tips that I plan to try out this week, and a look at widedock added a few more I will be testing alongside, content with practical hooks that connect to my actual life is the kind that earns my repeat attention rather than the merely interesting that I forget within a day.
A clear cut above the usual noise on the subject, and a look at nodecard only made that gap wider in my view, the kind of place that earns its visitors through quality rather than through aggressive marketing or sponsored placements which is increasingly the only way most sites stay afloat across the modern web.
Педагоги и психологи http://smartxpert.ru экспертный портал о воспитании, обучении и развитии личности. Полезные статьи, практические советы специалистов, современные методики педагогики и психологии, рекомендации для родителей, учителей и всех, кто интересуется развитием человека.
Услуги грузчиков https://www.gruzchiki-kiev.net в Киеве для переездов, разгрузки транспорта, подъема мебели и строительных материалов. Профессиональные рабочие выполняют погрузочно-разгрузочные работы любой сложности, гарантируя аккуратное обращение с имуществом и оперативное выполнение заказа.
Felt energised after reading rather than drained, which is unusual for online content these days, and a look at cloudpetalcollective continued that good feeling, content that leaves you better than it found you is rare and worth bookmarking when you stumble across it for the first time today or any other day really.
Took the time to read every paragraph rather than skimming for the punchline, and a quick visit to fasttrendcorner earned the same careful attention from me, that is the highest signal I can give about content quality because my default mode is rapid scanning rather than deliberate reading on most pages.
Worth observing that the post landed without needing a flashy headline to hook attention, and a stop at boldswap did the same, content that earns engagement through substance rather than packaging is the kind I trust more deeply and this site has clearly chosen substance as the primary lever for reader engagement throughout.
A piece that respected the reader by not over explaining the obvious, and a look at bitvent continued that calibrated approach, finding the right level of explanation is one of the harder editorial calls and this site has clearly thought carefully about what readers will already know versus what they need help with consistently.
Reading this with a notebook open turned out to be the right move, and a stop at wildpathmarket added more material to the notes, content that justifies active note taking from a passive reader is content with real informational density and this site is producing notes worthy material at a high rate consistently.
Most of the time I feel the open web is in decline and then I find a site like this, and a stop at sparkcard reinforced that mood lift, the cumulative effect of finding occasional excellent independent content versus the cumulative effect of finding mostly mediocre content is real for the long term reader maintaining web habits today.
Started forming counter examples to test the claims and the post handled most of them implicitly, and a look at fizzlane continued that anticipatory style, writers who think two steps ahead of the critical reader save themselves from a lot of follow up work and this writer has clearly internalised that habit consistently.
Glad the writer did not feel the need to argue with imaginary critics in the post itself, and a stop at urbanpinebazaar kept the same focused approach going, defensive writing wastes the reader time and confidence on positions that did not need defending and this post has clearly avoided that common failure.
Adding this site to my regular reading list, the post earned that on its own, and a quick stop at smartparcel sealed the decision, the kind of place worth checking back with from time to time because it consistently produces material that holds up against a critical reading too which I really value.
Reading this confirmed something I had been suspecting about the topic, and a look at macrocard pushed that confirmation toward greater confidence, content that lines up with independently held intuitions earns a special kind of trust and I will return to writers who consistently land that way for me without overselling positions.
Reading this prompted a small note in my reference file, and a stop at driftspiregoods prompted another, the rare site that contributes useful nuggets to my own working knowledge rather than just consuming my attention is worth the time investment many times over compared to the usual pile of forgettable scroll content.
Материал о душевых стойках Ravak с разбором конструкций, режимов лейки, качества покрытий, монтажа и совместимости со смесителями. Статья полезна тем, кто выбирает готовое решение для душевой зоны и хочет заранее оценить практичность оборудования: https://santexnik-market.ru/dush/dushevye-stojki-ravak/
Useful read, especially because the writer did not assume too much background from the reader, and a quick look at noderod continued in the same way, a thoughtful site that meets people where they are which is something the modern web could use a lot more of for both casual and serious readers.
My usual pattern is to skim and bounce but this site has reset that pattern temporarily, and a stop at premiumdealcorner maintained the slower reading mode, content that changes how I read is content with structural influence and this site has clearly nudged my reading behaviour toward something better at least for the duration of these visits.
Honestly enjoyed not being sold anything for the entire duration of the post, and a look at ohmpanel kept that pleasant absence going across more pages, content that exists for its own sake rather than as a funnel to a paid product is increasingly rare and worth supporting where I can find it.
Thanks for the moderate length, neither so short it skips substance nor so long it bloats, and a stop at wideswap hit the same balance, the right length is one of the hardest things to calibrate in blog writing and I appreciate when a team has clearly thought about it rather than defaulting.
Обучение педагогов https://edplatform.ru и учеников современным методикам интеллектуального развития. Программы дополнительного образования с 2016 года: ментальная арифметика, скорочтение, развитие памяти и внимания. Подготовка педагогов, учебные материалы и эффективные методики обучения.
Started thinking about my own writing differently after reading, and a look at smartdealhouse continued that reflective effect, content that influences how I work rather than just informing what I know is content with the highest kind of impact and this site has triggered some of that reflective influence today on me.
Now thinking about this site as a small example of what good independent writing looks like, and a stop at fasttrendhub continued that exemplary status, the few sites that serve as good examples are sites worth holding up in conversations about quality and this one has earned that exemplary placement through patient consistent effort over time.
Продажа и установка камеры видеонаблюдения купить. Современные системы безопасности для квартир, домов, магазинов и складов. Настройка удалённого доступа, запись видео и круглосуточный контроль объекта.
Быстрая профессиональная монтаж видеонаблюдения в калининграде для квартир, домов, офисов и коммерческих объектов. Проектирование, монтаж и настройка систем безопасности, удалённый доступ, запись видео и контроль в реальном времени. Надёжные решения для защиты имущества и контроля территории.
Halfway through I knew I would finish the post, and a stop at discoverbettervalue also held me through to the end, content that signals its quality early and then sustains it is content with real internal consistency and this site has clearly figured out how to maintain quality from opening sentence through to closing thought.
Reading this confirmed that my time researching the topic in other places had not been wasted, and a stop at startfreshnow extended the confirmation, when independent sources agree that is a useful signal and this site is one of the more reliable sources I have found for cross checking what I read elsewhere on similar subjects.
Appreciated how the post felt complete without overstaying its welcome, and a stop at northernskycollections confirmed that economical approach runs across the site, knowing when to stop is a skill many writers never develop but here the discipline is obvious and welcome from the perspective of a busy reader trying to learn things efficiently.
If I am being honest this is the kind of site I quietly hope my own work will someday resemble, and a stop at globalfashionworld extended that aspirational feeling, finding work that models what I want to produce is part of why I read carefully and this site has been performing that modelling function for me lately consistently.
Speaking as someone who used to recommend blogs frequently and got out of the habit this site is rekindling that impulse, and a look at blipfork extended the rekindling, the recovery of an old habit triggered by encountering work that justifies it is itself a small kind of pleasure and this site is providing that recovery experience.
Reading this confirmed that my time researching the topic in other places had not been wasted, and a stop at findgreatoffers extended the confirmation, when independent sources agree that is a useful signal and this site is one of the more reliable sources I have found for cross checking what I read elsewhere on similar subjects.
cek gangguan mobile banking
Stayed longer than planned because each section earned the next, and a look at pureharbortrends kept that pulling effect going across more pages, the kind of subtle pull that good writing exerts on attention is something I find harder and harder to resist when I encounter it on the open web today.
A clear cut above the usual noise on the subject, and a look at supershelf only made that gap wider in my view, the kind of place that earns its visitors through quality rather than through aggressive marketing or sponsored placements which is increasingly the only way most sites stay afloat across the modern web.
Going to come back when I have more time to read carefully, the post deserves more than a quick scan, and a stop at sparkswap reinforced that, this is the kind of site that rewards a slower read which is hard to find in this fast paced corner of the internet but really worthwhile.
Compared to the usual results for this kind of search this site stands well above the average, and a quick visit to boltdepot kept the standard high, you can tell within seconds whether a site is going to waste your time or actually deliver and this one clearly delivers without any false starts.
Took the time to read the comments on this post too and they were also worth reading, and a stop at octajet suggested the community quality matches the content quality, when the conversation around a piece is as good as the piece itself you know you have found a real corner of the internet.
Now adding this to a short list of sites I would defend in a conversation about the modern web, and a look at macropipe reinforced that defence list, the few sites that serve as evidence the web can still produce good things are precious and this one has clearly joined that small list of exemplary sites.
Reading this in the time it took to drink half a cup of coffee, and a stop at fizzstep fit naturally into the second half, content that respects the rhythms of a typical morning is content with practical fit and this site has the kind of length and pacing that works for the way I actually read.
Now placing this in the same category as a few other sites I have come to trust, and a look at driftwoodvalleygoods continued the placement decision, the small category of fully trusted sites is one I extend rarely and only after multiple positive reading sessions and this site has earned the category placement methodically over time.
Now understanding why someone recommended this site to me a while back, and a stop at ohmsensor explained the recommendation, sometimes recommendations make sense only after experience and this site has finally clicked into place as the kind of resource I now understand was being recommended for sound editorial reasons by my friend.
A piece that read as the work of someone who reads carefully themselves, and a look at woolperk continued that informed feel, writers who are also serious readers produce work with a different quality and this site reads as the product of someone steeped in good writing rather than just generating content for an audience.
Granted my mood today might be elevating my reading experience but I still think this is genuinely good, and a stop at urbanridgecollective reinforced that even discounted assessment, controlling for the mood adjustment that affects content perception this site still reads as substantively above average across multiple pieces I have read carefully today.
Worth saying that this is one of the better things I have read on the topic in months, and a stop at fasttrendstation reinforced that ranking, the topic is well covered by many sources but few do it with this level of care and the few that do deserve to be flagged so other readers can find them.
Now leaving a small mental note to recommend this when the topic comes up in conversation, and a look at dailyvaluecorner extended that recommend ready feeling, content that arms me with shareable references for likely future conversations is content with social value and this site is providing that conversational ammunition consistently for me lately.
Just wanted to say this was useful and leave a small note of thanks, and a quick visit to smartpickcorner earned a similar nod from me, the small acknowledgements add up over time and represent the real economy of trust that good content runs on across the open and increasingly fragmented modern internet.
Reading this prompted me to send the link to two different people for two different reasons, and a stop at simplefashionmarket provided ammunition for a third share, content that suits multiple audiences without being generic enough to be useless to any of them is genuinely valuable and this site has that multi audience quality clearly.
Really appreciate this kind of writing, no shouting and no clickbait headlines just steady useful content, and a quick look at trustcorner kept that going, definitely a site I will be returning to whenever I need a sensible take on similar topics in the days ahead and also during slower work weeks.
If I were to recommend a starting point for the topic this site would be near the top of my list, and a stop at findyourtruepath reinforced that recommendation status, the small list of starting point recommendations I keep for friends asking about topics is short and this site is now firmly on it.
Big thanks to whoever wrote this, you saved me a lot of time hunting for the same info on other sites, and a stop at yourstylestore only added more useful detail without going off topic, that kind of focus is honestly hard to come across these days when most posts wander everywhere.
Reading this between meetings turned out to be the most useful thing I did all afternoon, and a stop at discoverandbuyhub kept that productivity feeling going, content can sometimes outperform actual work in terms of what gets accomplished mentally and this site managed that today which is genuinely a high bar to clear consistently.
A piece that left me thinking I had been undercaring about the topic, and a look at zestwin reinforced that mild concern, content that raises the appropriate weight of a subject without being preachy about it is doing important work and this site is providing that gentle elevation of attention for me consistently.
Interested in processors lga 2011 cpu list with detailed specifications: clock speed, core count, generation, process technology, and supported sockets. A convenient CPU catalog for comparing and matching processors to your motherboard.
Coming back tomorrow when I can give this a proper read, the post deserves better attention than I can give right now, and a look at octamesh suggests there is plenty more here that deserves the same treatment, definitely a site I will be exploring properly over the next few days when I can.
Closed the tab feeling I had spent the time well, and a stop at premiumdealzone extended that feeling across more pages, the test of whether time on a site was well spent is one I apply silently after closing tabs and very few sites pass it but this one passed it cleanly today afternoon clearly.
Closed my email tab so I could read this without interruption, and a stop at duskharborstore earned the same protected attention, when content is good enough to defend against the usual digital distractions you know it deserves better than the half attention most online reading gets in a typical busy day.
Felt the writer was speaking my language without trying to imitate it, and a look at fizzwave continued that natural fit, when a writers default voice happens to match what you find easy to read the experience feels frictionless and that is something I notice and remember about specific sites going forward.
The tone stayed consistent across the whole post which is harder than it looks for longer pieces, and a look at cloudpetalmarket continued the same voice, this kind of editorial consistency is a sign of either a single careful writer or a tightly run team and either is impressive today across the broader media environment.
Now adding this to a short list of sites I would defend in a conversation about the modern web, and a look at zendock reinforced that defence list, the few sites that serve as evidence the web can still produce good things are precious and this one has clearly joined that small list of exemplary sites.
Closed the laptop after this and let the ideas settle for a few hours, and a stop at ohmvault similarly rewarded reflective time, content that benefits from sitting with rather than racing past is the kind I want more of and the kind that this site appears to consistently produce week after week here.
I learned more from this short post than from longer articles I read earlier today, and a stop at trustparcel added even more useful detail without going off topic, this site clearly knows how to keep things focused without sacrificing depth which is a hard balance to strike for any writer.
Easy to recommend, the content speaks for itself without needing additional praise from me, and a stop at boltport only adds more reasons to send people this way, the kind of generous resource that benefits its readers without demanding anything in return is increasingly rare and worth recognising clearly today across the broader open internet.
Reading this in the time it took to drink half a cup of coffee, and a stop at creativegiftmarket fit naturally into the second half, content that respects the rhythms of a typical morning is content with practical fit and this site has the kind of length and pacing that works for the way I actually read.
Really clear writing, the kind that makes you want to share the link with someone who has been asking about the topic, and a quick browse through shopwithjoy only made me more sure of that, the information here stays useful long after the first read is done which says a lot.
Thanks for a post that does not try to be funny when it is not the moment for it, and a stop at oakwhisperstore maintained the same appropriate seriousness, knowing when humour helps and when it just signals desperation for engagement is a sign of editorial maturity that many blogs have not developed yet.
Liked the way the post got out of its own way, and a stop at findyourstylehub extended that invisible craft, the best writing you barely notice while reading because it is doing its work without drawing attention to itself and this site has clearly mastered that disappearing act across the pieces I have read.
Reading this gave me a small sense of progress on a topic I have been slowly working through, and a stop at earthstoneboutique added another step forward, learning happens in small increments across many sources and finding sources that consistently contribute is the actual practical value of careful curation in an information rich world.
A piece that did not waste any of its substance on sales or promotion, and a look at discoveramazingdeals continued that pure content focus, sites that resist the urge to monetise every paragraph are increasingly rare and this one has clearly made the editorial choice to keep the writing clean from commercial intrusion which I value highly.
If I had to defend the time I spend reading independent blogs this site would feature in the defence, and a look at smarttrendarena reinforced that defensive utility, the ongoing case for non algorithmic reading is one I make to myself periodically and sites like this one provide the actual evidence that supports the case clearly.
Found this really helpful, the explanations are simple but they actually answer the questions a normal reader would have, and after I followed octasign I had a clearer sense of the topic, no extra fluff just useful points laid out in a sensible order that made the time worth it.
Looking through other posts here the consistency is what makes the site valuable rather than any single piece, and a stop at velvetcovegoods extended that consistency observation, sites whose value lies in the ongoing pattern rather than in standout posts are sites I trust more deeply and this one has clearly built that kind of trust.
Genuine reaction is that this site clicked with how I like to read, and a look at duskpetalcorner kept that comfortable fit going, sometimes you find a place online whose editorial decisions just align with your preferences and when that happens it is worth recognising and supporting through repeat engagement consistently going forward.
Going to come back when I have more time to read carefully, the post deserves more than a quick scan, and a stop at sprydash reinforced that, this is the kind of site that rewards a slower read which is hard to find in this fast paced corner of the internet but really worthwhile.
Felt like I was reading something written by someone who actually thinks about the topic rather than reciting it, and a look at flagsync reinforced that impression, the difference between recited content and considered content is huge and this site clearly belongs to the latter category which I appreciate as a careful reader looking for substance.
Reading this on a difficult day was a small bright spot, and a stop at webboosters extended that brightness, content that improves a hard day is content that has earned a particular kind of place in my reading habits and this site is occupying that uplifting role for me today which I appreciate clearly.
A piece that earned its conclusions through the body rather than asserting them at the end, and a look at creativefashioncorner maintained the same earned quality, conclusions that follow from what came before are more persuasive than declarations and this site has clearly internalised that principle in how it constructs arguments throughout pieces.
Found this really helpful, the explanations are simple but they actually answer the questions a normal reader would have, and after I followed bestdailyhub I had a clearer sense of the topic, no extra fluff just useful points laid out in a sensible order that made the time worth it.
Honestly impressed, did not expect to find this level of care on the topic, and a stop at oceancrestboutique cemented the impression, you can tell within the first few paragraphs whether a site is going to be worth the time and this one delivered on that early promise nicely throughout the rest of what I read.
Solid endorsement from me, the writing earns it, and a look at shopthebestdeals continues to earn it across the broader site too, the kind of operation that maintains quality across many pages rather than just one viral post is a sign of serious commitment and that is what I see here clearly across what I read.
Reading this in a moment of low energy still kept my attention, and a stop at blurchip continued that engagement under suboptimal conditions, content that survives the reader being tired is content with extra reserves of pull and this site has the kind of writing that holds up even when I am not at my reading best.
A piece that suggested careful editing without showing the marks of the editing, and a look at olivepick continued that invisible polish, the best editing disappears into the prose and this site reads as having been edited with skill that does not announce itself which is the highest compliment I can offer any blog content.
Reading this site over the past week has changed how I evaluate content in this space, and a look at trustedshoppinghub extended that recalibration, the standards I bring to reading on the topic have shifted upward as a direct result of regular exposure to this kind of work and that shift will outlast any single reading session.
Now adding the homepage to my regular check rotation rather than waiting for individual links to find me, and a stop at simplegiftfinder confirmed the rotation upgrade, the move from passive discovery to active checking is a vote of confidence in a sites ongoing quality and this site has earned that active engagement clearly.
Now planning to share the link with a small group of readers I trust, and a look at finduniqueproducts suggested more material to share with the same group, recommending content into a curated circle requires confidence in the recommendation and this site is making me confident in those personal recommendations on multiple separate occasions now.
Will be back, that is the simplest way to say it, and a quick visit to octflag reinforced the decision, this site has earned a spot in my regular rotation alongside a few other reliable places I check when I want something genuinely informative without all the usual modern web noise getting in the way.
Reading this triggered a small but real correction in something I had assumed, and a stop at yourdailyvalue extended that corrective effect, content that updates my beliefs through evidence rather than rhetoric is content with intellectual integrity and this site has earned that label consistently across the pieces I have read so far today.
Probably this is one of the better quiet successes on the open web at the moment, and a look at cloudpetalstore reinforced that quiet success quality, sites that are doing well without making a noise about doing well are the sites I most respect and this one has clearly chosen the quiet success path consistently throughout.
However many similar pages I have read this one taught me something new, and a stop at premiumflashhub added more new material, content that contributes genuinely fresh information rather than recycling what is already widely available is content with real informational value and this site is providing that informational freshness at a notable rate.
Felt like the post had been edited rather than just drafted and published, and a stop at bravoflow suggested the same care across the site, the difference between edited and unedited content is enormous for the reader and this site has clearly invested in the editing pass that most blogs skip entirely which really does show up.
Reading this in the gap between work projects was a small but meaningful break, and a stop at sprygain extended that gentle reset, content that provides genuine refreshment rather than just distraction during work breaks is content with a particular kind of utility and this site fits that role for me reliably during work days.
Now feeling the small relief of finding writing that does not condescend, and a stop at createimpactnow extended that respect for readers, content that treats its audience as capable adults rather than as people to be managed produces a different reading experience and this site has clearly chosen the respectful approach across all pieces.
Now I want to find more sites like this but I suspect they are rare, and a look at flagtag extended that thought, the few sites that meet this quality bar are precious specifically because they are rare and finding others like them is one of the ongoing projects of careful internet curation across the years.
Pass this along to anyone you know dealing with similar questions, the answers here are clear, and a stop at pureleafemporium adds even more useful material, this is the kind of resource that deserves to circulate widely rather than getting lost in the constant churn of new content online that buries good work daily.
Bookmark earned and folder updated to track this site separately, and a look at bestdailyhub confirmed the folder upgrade was the right call, organising my reading list so that good sites do not get lost in a sea of casual bookmarks is something I do more carefully now and this site warranted its own spot.
If I were to recommend a starting point for the topic this site would be near the top of my list, and a stop at leadcrest reinforced that recommendation status, the small list of starting point recommendations I keep for friends asking about topics is short and this site is now firmly on it.
Started imagining how I would explain the topic to someone else after reading, and a look at modernvaluecollection gave me more material for that imagined explanation, content that improves my own ability to discuss a topic is content that has actually transferred knowledge rather than just decorating my screen for a few minutes.
However casually I came to this site I have ended up reading carefully, and a look at findamazingoffers continued earning that careful reading, the conversion from casual visitor to careful reader is something content earns rather than demands and this site has accomplished that conversion for me over the course of just a few pieces.
Now adding this to a list of sites I want to see flourish, and a stop at smarttrendstore reinforced that wish, the few sites I actively root for are sites that produce the kind of work I want more of in the world and this one has joined that small list based on what I have read so far.
Now adding this to a list of sites I want to see flourish, and a stop at onyxhold reinforced that wish, the few sites I actively root for are sites that produce the kind of work I want more of in the world and this one has joined that small list based on what I have read so far.
Did not expect much when I clicked through but ended up reading the whole thing carefully, and a stop at nightfallmarketplace kept that engagement going, sometimes the unassuming sites turn out to deliver more than the flashy ones which is something I have learned to look out for over time online lately and across topics.
Now appreciating the small but real way this post improved my afternoon, and a stop at boldlume extended that small improvement effect, content that produces measurable positive impact on the texture of a reading day is content with real value and this site is producing those small positive impacts at a sustainable rate apparently.
Beyond the topic at hand this site reads as a small ongoing project of taking writing seriously, and a look at velvetfieldmarket reinforced that project quality, sites that treat publishing as an ongoing serious practice rather than as content production for traffic are sites worth supporting and this one has clearly chosen the serious approach.
A piece that brought a sense of order to a topic I had been finding chaotic, and a look at uniquegiftcollection continued that organising effect, content that imposes useful structure on messy subjects is doing genuine intellectual work and this site is providing that organisational function across multiple posts I have read recently here.
Honest take is that this was better than I expected when I clicked through, and a look at spryshelf reinforced that, the bar for online content has dropped so much that finding something thoughtful and well constructed feels almost noteworthy now which says more about the average than about this site itself.
Quietly the writers approach to the topic differs from the dominant takes I have been encountering, and a stop at octpier extended that distinctive approach, content that maintains a different perspective without explicitly arguing against the dominant ones is content with confident editorial identity and this site has that confidence throughout pieces.
If I had to summarise the editorial sensibility of this site in a few words it would be careful and human, and a look at buildyourfuturetoday extended that summary feeling, capturing the essence of a sites approach in brief is hard but this site has a clear enough identity that the summary comes naturally enough.
Refreshing tone compared to the dry corporate posts on similar topics, and a stop at easyonlinepurchases carried that personality through nicely, you can tell when a real person is behind the writing versus a content team chasing metrics and this site definitely falls into the former category clearly across what I have seen.
Now planning to come back when I have the right kind of attention to read carefully, and a stop at adtower reinforced that plan, choosing the right moment to read certain content is a quiet form of respect for the work and this site is generating those careful planning behaviours from me consistently as a reader.
Reading this confirmed a hunch I had been carrying about the topic without having articulated it, and a stop at purefashionoutlet extended the confirmation, content that gives shape to fuzzy intuitions is doing the rare work of making private thoughts public and this site is providing that articulating service consistently for me lately.
Speaking from the perspective of a fairly demanding reader the writing here clears the bar consistently, and a look at bestdailycorner continued clearing that bar, the calibration of demanding reader is something I apply to all sources and this site has been one of the few that handles the demanding reading well across pieces sampled.
Liked the way the post balanced confidence and humility, and a stop at happytrendstore maintained the same balance, knowing when to assert and when to acknowledge uncertainty is a sign of mature thinking and the writers here have clearly developed that calibration through what I assume is years of careful work on their craft.
Felt like I was reading something written by someone who actually thinks about the topic rather than reciting it, and a look at explorewithoutlimits reinforced that impression, the difference between recited content and considered content is huge and this site clearly belongs to the latter category which I appreciate as a careful reader looking for substance.
Bookmark earned, share earned, return visit earned, all from one reading session, and a look at flagwave did the same, the trifecta of bookmark and share and return is rare in a single visit and represents the highest level of engagement I tend to offer any piece of online content these days here.
Now placing this in the same category as a few other sites I have come to trust, and a look at agilebox continued the placement decision, the small category of fully trusted sites is one I extend rarely and only after multiple positive reading sessions and this site has earned the category placement methodically over time.
Better signal to noise ratio than most places I check on this kind of topic, and a look at onyxrack kept that going, every paragraph here carries something worth reading rather than padding out the page to hit some arbitrary length target that search engines reward but readers ignore as soon as they notice it.
Comfortable reading experience throughout, no jarring tone shifts and no awkward formatting, and a look at smartchoicecorner kept that smooth feel going, the kind of editorial polish that goes unnoticed when present but glaring when absent is something this site has clearly invested in across the broader content as well which deserves recognition.
Adding to the bookmarks now before I forget, that is how good this is, and a look at stylishbuycorner confirmed the rest of the site is worth saving too, this is one of those rare finds that justifies the time spent searching the web for once which is a relief in the current environment.
Reading this with my morning coffee turned into reading the related posts with my morning coffee, and a stop at premiumgoodsarena stretched the morning further, content that pulls breakfast into a reading session rather than just accompanying it is content that has earned a higher claim on my attention than the average article does.
A slim post with substantial content per word, and a look at swiftgain maintained the same density, the content per word ratio is something I track informally and this site scores high on that ratio compared to most sources I read regularly which is a quiet indicator of careful editorial work behind the scenes.
Reading this confirmed a small detail I had been uncertain about, and a stop at learnandexplore provided the source for further checking, content that supports verification through citations or links rather than just asserting facts is more trustworthy and this site has clearly built its credibility through that kind of verifiable approach consistently.
A piece that suggested careful editing without showing the marks of the editing, and a look at ohmburst continued that invisible polish, the best editing disappears into the prose and this site reads as having been edited with skill that does not announce itself which is the highest compliment I can offer any blog content.
Found the rhythm of the prose particularly enjoyable on this read through, and a look at bosonlab kept that musical quality going across the related pages, sentence rhythm is something most blog writers ignore but it makes a real difference in how content lands with the careful reader who cares.
Reading this in a moment of low energy still kept my attention, and a stop at buildconfidencehere continued that engagement under suboptimal conditions, content that survives the reader being tired is content with extra reserves of pull and this site has the kind of writing that holds up even when I am not at my reading best.
Reading this confirmed that my time researching the topic in other places had not been wasted, and a stop at modernlifestylecorner extended the confirmation, when independent sources agree that is a useful signal and this site is one of the more reliable sources I have found for cross checking what I read elsewhere on similar subjects.
Without overstating it this is a quietly excellent post, and a look at findyourwayforward extended that quiet excellence, content that earns superlatives without demanding them through marketing language is content that has truly earned them through the substance and this site has clearly produced work in that earned excellence category today.
Started believing the writer knew the topic deeply by about the second paragraph, and a look at wonderviewgoods reinforced that confidence, the speed at which a writer establishes credibility through their writing is a useful quality signal and this writer establishes it quickly and quietly without resorting to credential dropping or self promotion.
Продажа и установка камеры видеонаблюдения. Современные системы безопасности для квартир, домов, магазинов и складов. Настройка удалённого доступа, запись видео и круглосуточный контроль объекта.
A piece that demonstrated competence without performing it, and a look at dynamictrendcorner maintained the same self assured but unshowy register, the gap between competence and performance of competence is one I track and this site has clearly chosen to demonstrate rather than perform which I find much more persuasive as a reader.
Quality writing that respects the reader’s intelligence without overloading them, and a quick look at exploreopportunityzone reflected that approach, a balanced thoughtful site that earns trust by being consistent rather than by shouting about how trustworthy it is which is the usual approach online sadly across most content categories.
Быстрая профессиональная установка камер видеонаблюдения для квартир, домов, офисов и коммерческих объектов. Проектирование, монтаж и настройка систем безопасности, удалённый доступ, запись видео и контроль в реальном времени. Надёжные решения для защиты имущества и контроля территории.
Halfway through I knew I would finish the post, and a stop at flickreef also held me through to the end, content that signals its quality early and then sustains it is content with real internal consistency and this site has clearly figured out how to maintain quality from opening sentence through to closing thought.
В интернете представлен сайт https://cvt25pro.ru где подробно рассматривается устройство и обслуживание трансмиссий. На его страницах можно найти информацию, касающуюся ремонта вариатора CVT 25 Chery, особенностей диагностики и возможных неисправностей этого агрегата. Материалы ресурса помогают понять специфику работы таких коробок передач и основные подходы к их восстановлению
Most posts I read end up forgotten within a day but this one is sticking, and a look at orbitbase extended that lingering effect, content that survives the immediate moment of reading rather than evaporating is content with genuine retention quality and this site has been producing memorable pieces at a rate notable across my reading.
A piece that built up gradually rather than front loading its main points, and a look at synaplab maintained the same gradual structure, content that trusts the reader to reach conclusions through accumulating reasoning is more persuasive than content that announces conclusions and then defends them and this site uses the persuasive approach.
The clarity here is something I really appreciate, especially compared to sites that pile on jargon for no reason, and a look at ohmlab was the same, simple direct sentences that actually deliver information instead of dancing around the point for paragraphs at a time which wastes reader patience.
Really appreciate that the writer did not stretch the post to hit some target word count, the points end when they are made, and a stop at simplebuyzone reflected the same discipline, brevity is generosity in disguise and this site has clearly figured that out far better than most blog operations have.
Liked how the post handled an objection I was forming as I read, and a stop at arcscout similarly anticipated where my thinking was going next, the rare writer who can predict reader concerns and address them in advance is doing something most online content fails to do despite that being basic editorial work.
Recommend this to anyone who values clear thinking over flashy presentation, and a stop at swiftgoodszone continued in the same understated way, this site has its priorities in the right place which makes it worth supporting through repeat visits and recommendations rather than just one passing read today before moving on quickly elsewhere.
Really appreciate that the writer did not overstate the importance of the topic to make the post feel weightier, and a quick visit to bettershoppinghub maintained the same modest framing, content that is honest about its own scope rather than inflating itself is the kind I trust and return to repeatedly over time.
Got something practical out of this that I can apply later this week, and a stop at brightvaluecorner added more details to think about, this is exactly the kind of content I bookmark for future reference rather than the throwaway listicles that dominate most search results these days for almost any common topic.
Decided this was the best thing I had read all morning, and a stop at happylivingoutlet kept that ranking intact, ranking my reading is something I do mentally throughout the day and the top rank is competitive and not easily won but this site won it without needing to overstate its claims for that.
Nice and clean, that is the best way to describe the writing here, no clutter and no wasted words, and a quick visit to finduniqueoffers kept that going, I appreciate when a site treats its readers like people who can think for themselves without needing constant hand holding through every paragraph.
A particular pleasure to read this with a fresh coffee, and a look at honestgrovegoods extended the pleasure across more pages, content that pairs well with quiet morning rituals is something I have come to value highly and this site has the kind of energy that fits naturally into a calm reading routine.
Glad the writer did not feel the need to argue with imaginary critics in the post itself, and a stop at buzzlane kept the same focused approach going, defensive writing wastes the reader time and confidence on positions that did not need defending and this post has clearly avoided that common failure.
Found this through a friend who recommended it and now I see why, and a look at everydayvaluezone only strengthened that recommendation in my own mind, word of mouth still works for content that actually delivers and this site is clearly earning recommendations the old fashioned way through quality rather than marketing.
Coming back tomorrow when I can give this a proper read, the post deserves better attention than I can give right now, and a look at wildshoreworkshop suggests there is plenty more here that deserves the same treatment, definitely a site I will be exploring properly over the next few days when I can.
Ищете тротуарную плитку https://dvordekor.by борты или заборные блоки в Минске? Компания ДворДекорпредлагает широкий выбор материалов для ландшафтного дизайна и благоустройства. Посетите dvordekor.by/about и ознакомьтесь с ассортиментом!
Железобетонные изделия https://postroi-ka.by (ЖБ) в Минске — покупайте напрямую от производителя! Гарантия качества, оптовые цены, быстрая доставка. Широкий выбор ЖБ?конструкций для любых строительных задач. Заходите на postroi-ka.by
Компрессорное оборудование https://macunak.by в Минске: продажа и обслуживание. Широкий выбор промышленного компрессорного оборудования на macunak.by — надёжность и сервис под ключ.
Bookmark earned and shared the link with one specific person who would care, and a look at onyxlink got the same targeted share, sharing carefully rather than broadcasting is a discipline I try to maintain and this site is generating shares from me at a sustainable rate rather than the spam rate of viral content.
Thank you for being clear and direct, that simple approach saves so much frustration on the reader’s end, and a stop at teraware only made me more sure of it, the rest of the content seems to follow the same pattern which is a great sign of consistent editorial care behind the scenes.
A piece that handled the topic with appropriate weight without becoming portentous, and a look at gigaaxis continued that calibrated seriousness, content that takes itself seriously without becoming pompous is something this site has clearly figured out and the balance shows up in every piece I have read across multiple sessions now.
Good post, the kind that respects the reader by getting to the point quickly without skipping the details that matter, and a short look at orbitfind confirmed that approach is consistent across the site which is rare to find online these days, definitely a place I will return to soon.
During a quiet evening reading session this provided just the right depth without being heavy, and a stop at modernstyleoutlet maintained the same evening appropriate weight, content with depth that does not exhaust the reader is content with editorial calibration and this site has clearly figured out how to be substantial without being demanding all the time.
Nice to see a post that does not try to overcomplicate the basics for the sake of looking smart, and once I looked at dynamictrendhub the same direct tone was there too, which honestly makes a difference when you are short on time and want answers without long pointless intros.
Picked this for my morning read because the topic seemed worth the time, and a look at bestchoicehub confirmed the choice was right, my morning reading slot is precious and giving it to this site felt like a good investment rather than a waste which is a higher endorsement than I usually offer for content.
Decided to write a short note to the author if there is contact info anywhere, and a stop at happylivingmarket extended that intention, the urge to thank the writer directly is a strong signal of content quality and this site has triggered that urge in me today which is a fairly rare event for my reading.
Now noticing the post fit a particular gap in my reading without my having articulated the gap before, and a look at modernlifestylecorner extended that gap filling effect, content that meets needs I had not consciously formulated is content with reader insight and this site has clearly developed that anticipatory editorial sense across many pieces.
If patience for careful reading is rare these days finding sites that reward it is rarer still, and a stop at swiftpickmarket extended that rare reward, the diminishing returns on shallow content reading have made me more selective about where to spend reading time and this site is meeting the higher selectivity bar consistently.
During a quiet evening reading session this provided just the right depth without being heavy, and a stop at everydaytrendstore maintained the same evening appropriate weight, content with depth that does not exhaust the reader is content with editorial calibration and this site has clearly figured out how to be substantial without being demanding all the time.
Took some notes for a project I am working on, and a stop at wildcrestcorner added more raw material to those notes, content that contributes to my own creative work rather than just being interesting in the moment is the kind I value most and the kind I will keep coming back to repeatedly.
Skipped the comments to avoid spoilers and came back later to find them genuinely worth reading, and a stop at arctools extended that surprised respect, when the discussion below a post matches the quality of the post itself you have found something special and this site appears to attract that kind of audience.
Нужен забор? купить 3д забор от производителя надежные металлические ограждения для частных домов, предприятий и общественных территорий. Производство, продажа и установка секционных заборов с антикоррозийным покрытием, высокой прочностью и долгим сроком службы.
If I had to defend the time I spend reading independent blogs this site would feature in the defence, and a look at buzzrod reinforced that defensive utility, the ongoing case for non algorithmic reading is one I make to myself periodically and sites like this one provide the actual evidence that supports the case clearly.
Пиломатериалы в Минске https://farbwood.by сибирская лиственница от производителя Farbwood. Качественные строительные материалы из лиственницы — доски, брус, вагонка. Гарантия долговечности и природной красоты.
Решил сделать ограждение? панели ограждения 3д прочные металлические секции для заборов и ограждений территорий. Подходят для частных домов, предприятий, школ и складов. Панели имеют антикоррозийное покрытие, современный внешний вид и обеспечивают надежную защиту участка.
Worth recognising the absence of the usual blog tropes here, and a look at orbdust continued that fresh quality, sites that avoid the standard moves of the medium read as more original even when the content is on familiar topics and this one has clearly chosen its own path through the conventional terrain skilfully.
Generally I do not leave comments but this post merits a small note, and a stop at opendealsmarket extended that comment worthy quality, the urge to actively contribute to a sites community rather than passively consume from it is something specific content provokes and this site has provoked that engagement urge from me today.
Going to come back when I have more time to read carefully, the post deserves more than a quick scan, and a stop at gigadash reinforced that, this is the kind of site that rewards a slower read which is hard to find in this fast paced corner of the internet but really worthwhile.
Now noticing the careful balance the post struck between confidence and humility, and a stop at orbitway maintained the same balance, finding the line between asserting and admitting is hard and this site has clearly developed the calibration to walk that line consistently which produces a more persuasive reading experience for me.
Bookmarking this for later, the kind of resource I want to keep nearby, and a quick look at freshtrendcollection confirmed the rest of the site is worth the same treatment, definitely going into my reference folder for the next time the topic comes up at work or in conversation with someone who asks.
Took the time to read the comments on this post too and they were also worth reading, and a stop at yourtimeisnow suggested the community quality matches the content quality, when the conversation around a piece is as good as the piece itself you know you have found a real corner of the internet.
Probably the kind of site that should be more widely read than it appears to be, and a look at findpurposeandpeace reinforced that quiet wish, the gap between a sites quality and its apparent reach is sometimes large and that gap exists for this site in a way that makes me want to mention it more.
Liked everything about the experience, from the opening through to the closing notes, and a stop at freshpurchasehub extended that into more pages, finding a site where the editorial vision shows through every choice rather than feeling random is an increasingly rare experience and one I am glad to have today during this particular reading session.
Quiet confidence runs through the whole post, no need to shout to make the points stick, and a stop at creativegiftoutlet carried that same restrained voice forward, content that respects the reader by trusting its own substance rather than dressing it up in theatrical language is what I look for online and rarely actually find these days.
Closed the laptop and walked away thinking about the post for a good twenty minutes, and a stop at blueharborcorner produced similar lingering thoughts, content that survives the closing of the browser tab is content that has actually entered the mind rather than just decorating the screen for the duration of the reading.
Таможенное оформление для юридических лиц в Москве и Московской области. СБ Карго – официальный таможенный представитель: подготовка документов, расчёт платежей, сопровождение импорта и экспорта, помощь в прохождении таможенных процедур без лишних рисков и задержек. Консультации для участников ВЭД: https://protamozhennoe-oformlenie.ru/
Now considering the post as evidence that careful blog writing is still possible, and a look at happyhomecorner extended that evidence, the broader question of whether the modern web can sustain quality writing has obvious empirical answers in sites like this one and seeing them is reassuring even when they remain a minority overall today.
Better signal to noise ratio than most places I check on this kind of topic, and a look at freshvalueplace kept that going, every paragraph here carries something worth reading rather than padding out the page to hit some arbitrary length target that search engines reward but readers ignore as soon as they notice it.
https://dzen.ru/a/afB52blaGm-DZM-7
Most attempts at writing on this topic feel like they are missing something and this post finally identified what was missing, and a look at discovernewproducts extended that diagnostic clarity, content that names what is wrong with adjacent treatments while doing better itself is content with both critical and constructive value and this site has both.
This filled in a gap in my understanding that I had not even noticed was there, and a stop at fashionchoicehub did the same, the kind of post that gives you more than you expected when you first clicked through from somewhere else, a real find for anyone curious about the area covered here.
If I had to summarise the editorial sensibility of this site in a few words it would be careful and human, and a look at orbitport extended that summary feeling, capturing the essence of a sites approach in brief is hard but this site has a clear enough identity that the summary comes naturally enough.
Worth pointing out the careful word choice in this post, no buzzwords and no jargon, and a look at uniquevaluecollection continued that disciplined vocabulary, sites that resist the pull of trendy language are sites that will read well in five years and this one is clearly built for that kind of long durability.
Most attempts at writing on this topic feel like they are missing something and this post finally identified what was missing, and a look at elitebuyarena extended that diagnostic clarity, content that names what is wrong with adjacent treatments while doing better itself is content with both critical and constructive value and this site has both.
Thanks for a post that does not try to be funny when it is not the moment for it, and a stop at suncolorcollection maintained the same appropriate seriousness, knowing when humour helps and when it just signals desperation for engagement is a sign of editorial maturity that many blogs have not developed yet.
Рекомендую ресурс, посвящённый теме вариаторов, их обслуживанию и ремонту. На портале можно найти общие сведения об устройстве этой трансмиссии, возможных неисправностях и методах их диагностики. В материалах сайта рассматриваются различные аспекты эксплуатации вариаторов, что может быть полезно для общего понимания их работы https://provariatory.ru/
A piece that did not lean on the writer credentials or institutional backing, and a look at globalfashionmarket maintained the same focus on substance, content that earns trust through quality rather than through name dropping is the kind I find most persuasive and this site is clearly playing on the substance side of that distinction.
Once you start reading carefully here it is hard to go back to lower quality alternatives, and a stop at coralray reinforced that ratchet effect, the way good content raises standards is real over time and this site has clearly contributed to raising my expectations for what is possible in writing on the topic generally.
Took some notes for a project I am working on, and a stop at urbanmeadowstore added more raw material to those notes, content that contributes to my own creative work rather than just being interesting in the moment is the kind I value most and the kind I will keep coming back to repeatedly.
Thanks for the practical examples scattered through the post rather than abstract theory only, and a look at yourdealhub continued that grounded style, abstract points are easier to remember when paired with concrete situations and the writers here clearly understand how readers actually retain information from blog content reading sessions.
Thanks for the honest framing without exaggerated claims that the topic will change my life, and a stop at axisbit kept the same modest tone, restraint in marketing language signals trustworthiness and the writers here are clearly playing the long game by building credibility rather than chasing immediate clicks through hyperbole.
Got something practical out of this that I can apply later this week, and a stop at freshstyleboutique added more details to think about, this is exactly the kind of content I bookmark for future reference rather than the throwaway listicles that dominate most search results these days for almost any common topic.
The conclusions felt earned rather than tacked on at the end like an afterthought, and a look at findyourstyle kept that careful structure going, you can tell when a writer has thought about the shape of their post versus just letting it ramble out and hoping for the best at the end which most do.
Reading this in the gap between work projects was a small but meaningful break, and a stop at bestgiftmarket extended that gentle reset, content that provides genuine refreshment rather than just distraction during work breaks is content with a particular kind of utility and this site fits that role for me reliably during work days.
Picked up two new ideas that I expect will come up in conversations this week, and a look at freshvaluecollection added another, content that arms me with talking points rather than just filling time is the kind that provides ongoing value beyond the moment of reading and this site is generating that kind of ongoing value.
Going to share this with a friend who has been asking the same questions for a while now, and a stop at classytrendhub added a few more pages I will pass along too, this is the kind of generous information that earns a small thank you from me right now and again later this week.
Good clean post, no errors and no awkward phrasing that breaks the reading flow, and a stop at happyhomefinds kept the same standard, definitely the kind of editorial care that earns a return visit because it tells me the writer is paying attention to details that matter to readers rather than just rushing publication.
Picked this up while looking for something else and ended up reading every paragraph because it was actually informative, and after makeithappenhere I was sure I would come back, that does not happen often when most sites bury the useful parts under endless ads and pop ups today and across most categories online.
Liked the way the post handled the final paragraph, no neat bow but no abrupt cutoff either, and a stop at petaskin continued that thoughtful ending pattern, endings are hard and most blog writers either over engineer them or skip them entirely and this site has clearly figured out a sustainable middle approach.
During a quiet evening reading session this provided just the right depth without being heavy, and a stop at fashionchoicehub maintained the same evening appropriate weight, content with depth that does not exhaust the reader is content with editorial calibration and this site has clearly figured out how to be substantial without being demanding all the time.
A satisfying piece in the way that good meals are satisfying rather than just filling, and a look at discovermoreideas extended that satisfaction, the metaphor between content and meals is one I find useful and this site reads as a satisfying meal rather than the empty calories that most content provides for casual readers.
Reading this brought back an idea I had set aside months ago, and a stop at uniquehomefinds added more substance to that idea, content that revives dormant projects in my own thinking is content with serious creative value and this site is contributing to my own work in ways I had not expected when first clicking through.
This one is staying open in a tab for the rest of the day so I can come back and re read certain parts, and a look at truewoodsupply suggests I will be doing the same with a few more pages here too, this is going to be a deep dive over the coming hours.
Now feeling something close to gratitude for the fact this site exists, and a look at oldtownstylehub extended that gratitude, the rare site that produces this kind of response is the rare site worth defending in conversations about whether the modern internet is still capable of producing genuinely valuable independent content for serious adults.
Reading this gave me confidence to make a decision I had been putting off, and a stop at finduniqueoffers reinforced that confidence, content that translates into action in my own life rather than just informing it is content with the highest practical value and this site is generating that action level utility for me lately.
Skipped a meeting reminder to finish the post, and a stop at creativevaluehub held me past another reminder, when content beats meetings the writer is doing something extraordinary because meetings have institutional support behind them and yet good writing can still occasionally win that competition for attention which I find heartening today.
Now feeling confident that this site will continue producing work I will want to read, and a look at coralzen extended that confidence into the future, projecting forward from current quality to expected future quality is something I do for sites I genuinely follow and this one has earned that forward looking trust clearly today.
A nicely understated post that does not shout for attention, and a look at freshstylecorner maintained the same quiet quality, understatement is a stylistic choice that distinguishes serious writing from attention seeking writing and this site has clearly committed to the understated approach as a core editorial value rather than just a phase.
Just want to flag that this was useful and not bury the appreciation in caveats, and a look at startsomethingnewtoday earned the same direct praise, recognising good work without hedging it with criticism is something I try to practice because over qualified compliments tend to read as backhanded and miss the point sometimes.
Approaching this with the usual skepticism I bring to new sites and being slowly persuaded, and a stop at ironwooddesigns continued that gradual persuasion, the careful path from skeptical reader to genuine fan is the only one I trust and this site has walked me along that path through patient consistent quality across pieces.
Felt mildly happier after reading, which sounds silly but is true, and a look at axisdepot extended that small mood lift, content that improves rather than degrades my mental state is content I want more of and the cumulative effect of reading sites that lift versus sites that drag is real over time.
Reading this on a difficult day was a small bright spot, and a stop at yourjourneycontinues extended that brightness, content that improves a hard day is content that has earned a particular kind of place in my reading habits and this site is occupying that uplifting role for me today which I appreciate clearly.
Picked up a couple of new ideas here that I can actually try out, and after my visit to everydaytrendstore I have even more notes saved, this is the kind of resource that pays you back for the time you spend on it which is rare to come across in this corner of the web.
Glad to find a site whose links lead somewhere worth going rather than back to itself for SEO juice, and a stop at threeforestboutique kept that generous outbound feel, citing other peoples work with real respect rather than just for ranking signals is a sign of an honest operation worth supporting going forward.
Reading this on a slow Sunday and finding it perfectly suited to a slow Sunday read, and a quick stop at dailytrendcollection kept the same gentle pace, content that fits the mood of the moment is something I notice and remember and this site has the kind of pace that suits relaxed reading sessions especially well.
Reading this in pieces during a long afternoon and finding it consistently rewarding, and a stop at dreamfashionfinds fit naturally into the same fragmented reading pattern, sites whose posts can be read in segments without losing the thread are well suited to how I actually read these days and this one is built well.
This filled in a gap in my understanding that I had not even noticed was there, and a stop at trendspotstore did the same, the kind of post that gives you more than you expected when you first clicked through from somewhere else, a real find for anyone curious about the area covered here.
Solid post, the structure is easy to follow and the language stays simple even when the topic gets a bit more involved, and a look at brightstylemarket kept that same standard going, so I left feeling like the time spent here was actually worth something for once which is rare lately.
Pass this along to colleagues if the topic comes up, the framing here is sensible, and a stop at findnewoffers adds more useful angles to share, the kind of content that improves conversations rather than just feeding them is what makes a resource genuinely valuable in professional contexts going forward over time and across project boundaries too.
Now adding this to a list of sites I want to see flourish, and a stop at makeeverymomentcount reinforced that wish, the few sites I actively root for are sites that produce the kind of work I want more of in the world and this one has joined that small list based on what I have read so far.
The clarity here is something I really appreciate, especially compared to sites that pile on jargon for no reason, and a look at humzip was the same, simple direct sentences that actually deliver information instead of dancing around the point for paragraphs at a time which wastes reader patience.
Glad I gave this a chance instead of bouncing on the headline, and after freshstyleboutique I was certain I had made the right call, snap judgements based on titles miss a lot of good content and this is a reminder to slow down and check things out before scrolling past in a hurry.
A memorable post for me on a topic I had thought I was tired of, and a look at brightstylecollection suggested the same site can refresh other tired topics, sites that can revive my interest in subjects I had written off as exhausted are doing rare work and this one is clearly doing that for me today.
Reading this prompted me to dig out an old reference book related to the topic, and a stop at trendbuycollection extended that connection to other sources, content that connects me back to my own existing knowledge rather than asking me to forget it is content with continuity and this site has that continuous quality.
Without overstating it this is a quietly excellent post, and a look at cosmojet extended that quiet excellence, content that earns superlatives without demanding them through marketing language is content that has truly earned them through the substance and this site has clearly produced work in that earned excellence category today.
Продажа и установка камеры видеонаблюдения. Современные системы безопасности для квартир, домов, магазинов и складов. Настройка удалённого доступа, запись видео и круглосуточный контроль объекта.
Быстрая профессиональная монтаж видеонаблюдения для квартир, домов, офисов и коммерческих объектов. Проектирование, монтаж и настройка систем безопасности, удалённый доступ, запись видео и контроль в реальном времени. Надёжные решения для защиты имущества и контроля территории.
Now thinking about how to apply some of this to a project I have been planning, and a look at inspiregrowthdaily added more material for the planning, content that connects to my actual creative work rather than just being interesting in the abstract is the kind that earns priority placement in my reading rotation consistently going forward.
Came across this and immediately thought of a friend who would enjoy it, and a stop at yourtrendzone also reminded me of someone, content that triggers the urge to share is content that has earned my recommendation and this site has earned multiple from me already across different conversations during the week.
Now realising the post solved a small problem I had been carrying for weeks, and a look at urbanfashionshop extended that problem solving function, content that connects to specific unresolved questions in my own life rather than just providing general interest is content with real practical impact and this site is providing that practical value.
During a reading session that included several other sources this one stood out, and a look at mystylezone continued the standout quality, the side by side comparison of sources during research is a useful exercise and this site has been winning those comparisons for me consistently across multiple research sessions during the last week.
Looking at the surface design and the substance together this site has both right, and a look at dreamfashionfinds reinforced that integrated quality, sites where presentation and content reinforce each other rather than fighting are sites with full editorial coherence and this one has clearly invested in both layers in a balanced way.
Reading this triggered a small reorganisation of my own thinking on the topic, and a stop at thinkcreateinnovate furthered that reorganisation, content that affects the shape of my mental model rather than just decorating it with new facts is content with structural rather than informational impact and this site provides that.
A piece that took its time without dragging, and a look at startdreamingbig kept the same patient pace, the difference between unhurried and slow is a fine editorial distinction and this site has clearly found the unhurried side without slipping into the slow side which would have lost me as a reader quickly otherwise.
Came here from a search and stayed for the side links because they were that interesting, and a stop at createimpactnow took me even further into the site, the kind of organic exploration that good content invites is something most sites kill through aggressive interlinking and pushy navigation choices rather than relying on quality.
Appreciate the work that went into laying this out so clearly, every section earns its place without filler, and a look at zapscan confirmed the same care, definitely the kind of place that deserves a return visit when the topic comes up again later in the future or for any related question.
Felt the post had been written without using a single buzzword, and a look at fashiondailyhub continued that clean vocabulary, content free of jargon and trendy phrases reads better and ages better and this site has clearly committed to a vocabulary that will not feel dated in three years which is impressive editorially.
Started smiling at one paragraph because the writing was just nice, and a look at axisflag produced a couple more such moments, prose that produces small spontaneous reactions in the reader is doing more than just transferring information and the writers here are clearly hitting that level fairly consistently throughout pieces.
Reading this in the gap between work projects was a small but meaningful break, and a stop at goldenrootmart extended that gentle reset, content that provides genuine refreshment rather than just distraction during work breaks is content with a particular kind of utility and this site fits that role for me reliably during work days.
A relief to read something where I did not have to fact check every claim mentally, and a look at simplechoiceoutlet continued that reliable feeling, sites where I can lower my guard and trust the content are rare and this one is earning that trust paragraph by paragraph through consistent careful work behind the scenes.
Speaking honestly this is among the better discoveries of my recent browsing, and a stop at growthcart reinforced that discovery quality, the ranking of recent discoveries is informal but meaningful and this site has placed near the top of that ranking based on the consistency of quality across what I have already read carefully.
A piece that handled multiple complications without becoming confused, and a look at freshseasonfinds continued that organisational clarity, holding multiple threads in a single piece without losing any of them is a sign of skilled writing and this site has clearly developed the editorial discipline to manage complexity without sacrificing readability throughout.
Well structured and easy to read, that combination is rarer than people think, and a stop at discoverfashionfinds confirmed the same standard runs across the rest of the site, definitely the kind of place I will be coming back to when this topic comes up in conversation later again over the weeks ahead.
Will share this on a forum I am part of where it will be appreciated by others working in the same area, and a look at jetspark suggests there is more here worth passing along too, definitely a generous resource that deserves a wider audience than it probably has today across the open internet.
Coming to this with low expectations and being pleasantly surprised by the substance, and a stop at trendandgiftstore continued exceeding expectations, the recalibration of expectations upward across multiple positive readings is one of the actual rewards of careful browsing and this site is providing that recalibration at a steady rate apparently.
Big thanks to whoever wrote this, you saved me a lot of time hunting for the same info on other sites, and a stop at brightgiftcorner only added more useful detail without going off topic, that kind of focus is honestly hard to come across these days when most posts wander everywhere.
Reading this felt productive in a way most internet reading does not, and a look at fashiondailycorner continued that productive feeling, sometimes the open web feels like a waste of time but sites like this remind me why I still bother to look around rather than retreating to old reliable sources for everything I need.
Reading this gave me a small mental break from the heavier reading I had been doing, and a stop at dartpath extended that lighter feel, content that provides relief without becoming trivial is harder to produce than people realise and this site has clearly figured out how to be light without being shallow at all.
Thanks for the clean writing, no broken sentences and no awkward translations like some other sites have, and a quick stop at growwithdetermination kept that polish going nicely, it really does make a difference when a reader can move through a page without tripping on every line or going back to reread.
Generally I am cautious about recommending sites on first encounter but this one warrants the exception, and a look at yourstylemarket reinforced the exception making, the rare site that justifies breaking my normal cautious approach is the rare site worth flagging early and this one has prompted exactly that early flagging response from me.
уличная вайфай камера http://ulichnye-kamery.ru
Now sitting with the thoughts the post triggered rather than rushing on to the next thing, and a stop at urbanedgecollective extended that reflective pause, content that earns time for thought after closing the tab is content of higher value than the merely interesting and this site has clearly produced that lasting effect today.
Thank you for not assuming the reader already knows everything, the explanations meet me where I am, and a look at happyvaluehub did the same, that consideration is what makes a site feel welcoming rather than gatekeepy which is sadly the default mood across the modern web today for most subjects covered.
Reading this gave me confidence to make a decision I had been putting off, and a stop at brightfashionoutlet reinforced that confidence, content that translates into action in my own life rather than just informing it is content with the highest practical value and this site is generating that action level utility for me lately.
Reading this on a long flight and finding it the best thing I read across hours of trying, and a stop at springlightgoods kept the streak going, when content beats long flight reading you know it has substance because flight reading is a hard test of a piece given the alternatives available everywhere.
Bookmarking this for later, the kind of resource I want to keep nearby, and a quick look at zingdart confirmed the rest of the site is worth the same treatment, definitely going into my reference folder for the next time the topic comes up at work or in conversation with someone who asks.
Well crafted post, the structure flows naturally from one point to the next without forcing transitions, and a stop at wiseparcel kept the same flow going, you can tell when a writer has thought about how their content reads rather than just what it contains and this is one of those examples.
Without comparing too aggressively to other sources this one stands out for the right reasons, and a look at thetrendstore continued that distinctive quality, content that distinguishes itself through substance rather than style tricks is content with lasting differentiation and this site has clearly chosen substance based differentiation as its core editorial strategy.
A clean piece that knew exactly what it wanted to say and said it, and a look at connectandcreate maintained the same clarity of intention, knowing the goal of a piece before writing is something most blog content lacks and the clarity of purpose here shows up in every paragraph for any careful reader to notice.
Picked up on several small touches that suggest a careful editor, and a look at fashionanddesign suggested the same hand at work across the broader site, editorial consistency at a granular level is one of the strongest signs that an operation is serious rather than just hobbyist and this site reads as serious throughout.
Reading this in the morning set a good tone for the day, and a quick visit to freshfindshub kept that good tone going, content can do that sometimes when it hits the right notes and finding sites that consistently strike that tone is something I have learned to recognise and reward with regular visits.
Now appreciating that the post left me with enough to say in a follow up conversation, and a look at joltfork added more material for those follow ups, content that prepares me for related conversations rather than just informing me alone is content with social utility and this site provides that social armament reliably for me.
Probably worth setting aside a longer block to read more carefully than I can right now, and a stop at redmoonemporium confirmed the longer block plan, the impulse to schedule dedicated time for a sites archive is itself a measure of trust and this site has earned that scheduling impulse from me clearly today actually.
A genuine compliment to the writer for keeping the post focused on what mattered, and a look at sunsetstemgoods continued that disciplined focus, focus is a editorial choice that compounds across many small decisions and this site has clearly made those small decisions consistently across what I have read so far this week here.
Adding this site to my regular reading list, the post earned that on its own, and a quick stop at bestvaluecorner sealed the decision, the kind of place worth checking back with from time to time because it consistently produces material that holds up against a critical reading too which I really value.
The lack of unnecessary jargon made the post accessible without sacrificing accuracy, and a look at goldenrootcollection continued in the same accessible style, technical topics often hide behind specialised vocabulary but here the writer trusts the reader to keep up with plain language and that trust pays off nicely throughout the entire post.
Found something quietly useful here that I expect to return to, and a stop at yourpotentialgrows added more of the same, content with quiet utility ages well in a way that flashy hot takes do not and I have learned to weight quiet utility much higher when deciding what to bookmark for later use.
Came in confused about the topic and left with a much firmer grasp on it, and after axonspark I felt I could explain this to someone else without hesitation, that is the gold standard for any educational content and most sites simply fail to reach it ever which is unfortunate but true.
Definitely returning here, that is decided, and a look at betterbasket only made the case stronger, this is one of those rare websites that rewards regular visits rather than feeling stale after the first read which is something I cannot say about most of the places I bookmark today across all my topics.
лазерная косметология краснодар
Found this useful, the points line up well with what I have been thinking about lately, and a stop at growwithdetermination added some angles I had not considered yet, definitely walking away with more than I came for which is the best outcome from time spent reading online for any kind of topic.
A clean piece that knew exactly what it wanted to say and said it, and a look at uniquefashioncorner maintained the same clarity of intention, knowing the goal of a piece before writing is something most blog content lacks and the clarity of purpose here shows up in every paragraph for any careful reader to notice.
Now considering carefully how to share this site with the right audience rather than broadcasting widely, and a look at shopandsmilehub extended that careful sharing impulse, content worth sharing carefully rather than spamming is content that has earned a higher kind of recommendation and this site has earned that careful shareability throughout pieces.
Легендарная охота за богатствами продолжается! Новые загадки древних династий, опасные экспедиции и тайны, скрытые веками. Кто разгадает шифры прошлого и доберётся до бесценных артефактов? Захватывающие повороты, рискованные ставки и неожиданные союзники ждут тебя: Сокровища императора 3 сезон новые серии
Glad the writer did not feel compelled to cover every possible angle of the topic, focus is a virtue, and a stop at fashiondailycorner reflected the same disciplined scope, knowing what to leave out is half of what makes good writing good and this post has clearly been edited with that principle in mind.
Closed the laptop and walked away thinking about the post for a good twenty minutes, and a stop at happyhomecorner produced similar lingering thoughts, content that survives the closing of the browser tab is content that has actually entered the mind rather than just decorating the screen for the duration of the reading.
Honestly enjoyed every minute spent here, that is not something I say lightly, and a look at shopwithdelight confirmed I will be back, the bar for spending time online is high for me these days but this site clears it without effort which is high praise indeed from this reader who is usually rather demanding.
Reading this prompted a small note in my reference file, and a stop at zingtorch prompted another, the rare site that contributes useful nuggets to my own working knowledge rather than just consuming my attention is worth the time investment many times over compared to the usual pile of forgettable scroll content.
If I am being honest this is the kind of site I quietly hope my own work will someday resemble, and a stop at findyourstyle extended that aspirational feeling, finding work that models what I want to produce is part of why I read carefully and this site has been performing that modelling function for me lately consistently.
A piece that did not require external context to follow, and a look at fashionandbeauty maintained the same self contained quality, content that stands alone without forcing readers to chase prerequisites is more accessible and this site has clearly thought about how each piece can serve a fresh visitor rather than only existing members.
Appreciate the work that went into laying this out so clearly, every section earns its place without filler, and a look at thepathforward confirmed the same care, definitely the kind of place that deserves a return visit when the topic comes up again later in the future or for any related question.
If you asked me to point to a recent positive sign for the open web this site would be near the top, and a stop at classytrendcorner reinforced that designation, the few sites that serve as evidence the web can still produce quality independent content are precious and this one has clearly become one for me.
Learned something from this without having to dig through layers of fluff, and a stop at shadylaneshoppe added a bit more context that helped tie things together for me, definitely a useful corner of the internet for anyone who wants real information without the usual marketing nonsense around it that often ruins similar pages.
Now noticing that the post never raised its voice even when making a strong point, and a look at goldenrootcollection continued that calm volume, content that can make important points without resorting to typographic emphasis or emotional appeal is content that trusts its substance to do the work and this site has that confidence consistently.
This filled in a gap in my understanding that I had not even noticed was there, and a stop at startanewpath did the same, the kind of post that gives you more than you expected when you first clicked through from somewhere else, a real find for anyone curious about the area covered here.
Felt a small spark of recognition when the post named something I had been struggling to articulate, and a look at urbanwearhub produced more such moments, the rare service of giving readers language for fuzzy intuitions is one of the higher values that good writing can provide and this site offered several today instances.
Skipped the comments to avoid spoilers and came back later to find them genuinely worth reading, and a stop at yourfavoritetrend extended that surprised respect, when the discussion below a post matches the quality of the post itself you have found something special and this site appears to attract that kind of audience.
Decided this was the best thing I had read all morning, and a stop at trendandbuyhub kept that ranking intact, ranking my reading is something I do mentally throughout the day and the top rank is competitive and not easily won but this site won it without needing to overstate its claims for that.
Decided I would read the archives over the weekend, and a stop at oceanviewemporium confirmed that the archives would be worth the time, very few sites have archives I would actively read through but this one has earned that level of interest based on the consistent quality across what I have sampled so far.
A relief to read something where I did not have to fact check every claim mentally, and a look at brightfashionhub continued that reliable feeling, sites where I can lower my guard and trust the content are rare and this one is earning that trust paragraph by paragraph through consistent careful work behind the scenes.
Just dropping by to say thanks for the effort, it does not go unnoticed when a writer cares this much about the reader, and after I went through zingtrace I was certain this is one of the better corners of the internet for this particular kind of content which is genuinely refreshing.
Will be back, that is the simplest way to say it, and a quick visit to growbeyondlimits reinforced the decision, this site has earned a spot in my regular rotation alongside a few other reliable places I check when I want something genuinely informative without all the usual modern web noise getting in the way.
Now appreciating that the post did not require external context to follow, and a look at globalvaluehub maintained the same self contained quality, content that respects new visitors by being readable without prerequisites is content with broader accessibility and this site has clearly invested in keeping each piece reader friendly for fresh arrivals.
Reading this prompted me to send the link to two different people for two different reasons, and a stop at findyourstrength provided ammunition for a third share, content that suits multiple audiences without being generic enough to be useless to any of them is genuinely valuable and this site has that multi audience quality clearly.
Once you start reading carefully here it is hard to go back to lower quality alternatives, and a stop at everydayvaluecenter reinforced that ratchet effect, the way good content raises standards is real over time and this site has clearly contributed to raising my expectations for what is possible in writing on the topic generally.
Great work on keeping things readable, the post never drags or repeats itself which I really appreciate, and a stop at redmoonemporium added a bit more context that fit naturally with what was already said here, no need to read everything twice to get the point being made today.
Speaking as someone who reads a lot on this topic this site has earned a high position in my source rankings, and a stop at beamqueue reinforced that ranking, the informal ranking of sources for a topic is something I maintain mentally and this site has moved into the upper portion of those rankings clearly.
Skipped breakfast still reading this and finished hungry but satisfied, and a stop at stonebridgeoutlet kept me past breakfast time, content that displaces basic biological needs is content with serious attentional pull and the writers here are clearly capable of producing that level of engagement which is genuinely impressive these days.
Pass this along to anyone you know dealing with similar questions, the answers here are clear, and a stop at everydayvaluezone adds even more useful material, this is the kind of resource that deserves to circulate widely rather than getting lost in the constant churn of new content online that buries good work daily.
Found the rhythm of the prose particularly enjoyable on this read through, and a look at changeyourmindset kept that musical quality going across the related pages, sentence rhythm is something most blog writers ignore but it makes a real difference in how content lands with the careful reader who cares.
Found this through a friend who recommended it and now I see why, and a look at goldenharborgoods only strengthened that recommendation in my own mind, word of mouth still works for content that actually delivers and this site is clearly earning recommendations the old fashioned way through quality rather than marketing.
A piece that respected the reader by not over explaining the obvious, and a look at purestylecorner continued that calibrated approach, finding the right level of explanation is one of the harder editorial calls and this site has clearly thought carefully about what readers will already know versus what they need help with consistently.
Just nice to read something that does not feel like it was assembled from a content brief, and a stop at boostrank kept that handcrafted feel going, you can tell when a real human with real understanding is behind the words versus a templated piece churned out for an algorithm to find.
Quietly enjoying that I have found a new site to follow for the topic, and a look at smartshoppingmarket reinforced the small pleasure of the find, the discovery of new high quality sources is one of the more durable pleasures of careful internet reading and this site has been generating that discovery pleasure at multiple points already today.
Reading this on a difficult day was a small bright spot, and a stop at urbantrendmarket extended that brightness, content that improves a hard day is content that has earned a particular kind of place in my reading habits and this site is occupying that uplifting role for me today which I appreciate clearly.
Quality writing that respects the reader’s intelligence without overloading them, and a quick look at yourbuyinghub reflected that approach, a balanced thoughtful site that earns trust by being consistent rather than by shouting about how trustworthy it is which is the usual approach online sadly across most content categories.
Started thinking about my own writing differently after reading, and a look at freshseasoncollection continued that reflective effect, content that influences how I work rather than just informing what I know is content with the highest kind of impact and this site has triggered some of that reflective influence today on me.
However selective I am about new bookmarks this one made it past my filter, and a look at suncrestfashions confirmed the bookmark was worth the slot, the precious slots in my permanent bookmark folder are difficult to earn and this site earned one without making me think twice about whether the slot was justified by the quality.
Useful reading material, the kind I can hand off to someone newer to the topic without worrying about confusing them, and a quick look at learncreategrow confirmed the same beginner friendly tone runs throughout the site which is great for sharing with people just starting their learning journey on this particular topic.
Reading this fit naturally into my afternoon walk because I was reading on my phone, and a stop at simplebuycorner continued well in that walking format, content that survives mobile reading without becoming awkward is content with format flexibility and this site has clearly thought about how it reads across different devices today.
Adding this to my list of go to references for the topic, and a stop at findpurposeandpeace confirmed the rest of the site deserves the same, definitely the kind of resource that earns its place rather than getting forgotten the moment the next interesting article shows up in my feed somewhere else on the web.
Just want to record that this site is entering my regular reading list, and a look at globalvaluecollection confirmed it deserves the spot, my regular reading list is short and well curated and adding to it requires meeting a fairly high quality bar that this site has clearly cleared without much effort apparently.
Picked a single sentence from this post to remember, and a look at purevaluecenter gave me another to keep, content that produces memorable lines is doing more than just transferring information and the small selection of sentences I keep from each reading session is one of the actual returns I get from reading carefully.
Felt energised after reading rather than drained, which is unusual for online content these days, and a look at dreamfashionoutlet continued that good feeling, content that leaves you better than it found you is rare and worth bookmarking when you stumble across it for the first time today or any other day really.
Reading this post made me realise I had been settling for lower quality elsewhere, and a look at globalvaluecorner extended that recalibration, content that exposes how much I had been accepting in adjacent sources is content with calibrating effect on my standards and this site is performing that calibration function across topics for me reliably.
Solid value for anyone willing to read carefully, and a look at starwayboutique extends that value across the rest of the site, this is the kind of place that rewards return visits rather than offering everything in a single splashy post and then leaving readers nothing to come back for later which is unfortunately common.
Worth saying that the writing carries a particular kind of authority without making any explicit claims to it, and a stop at goldenfieldstore extended that earned authority feeling, sites that demonstrate expertise through the quality of their explanations rather than by stating credentials are sites I trust most and this site has it.
Reading this triggered a small change in how I think about the topic going forward, and a stop at urbantrendstore reinforced that subtle shift, the rare content that actually moves my thinking rather than just confirming or filling it is the kind I most value and this site is providing that kind of impact today.
Beyond the immediate post itself the editorial sensibility behind the site is what struck me, and a stop at trendystylezone continued displaying that sensibility, content that reveals editorial choices through accumulated reading is content with structural quality and this site has clearly developed an underlying approach worth identifying through multiple sessions of reading.
A piece that demonstrated competence without performing it, and a look at smartlivingmarket maintained the same self assured but unshowy register, the gap between competence and performance of competence is one I track and this site has clearly chosen to demonstrate rather than perform which I find much more persuasive as a reader.
Genuinely useful read, the points are practical and easy to apply right away, and a quick look at buildyourvision confirmed that this site is consistent in that approach, looking forward to digging through the rest of it when I get the chance to sit down properly later in the week or this weekend.
Speaking from the perspective of having read widely on the topic this site offers something distinct, and a look at beamreach reinforced that distinctness, the rare site that contributes something genuinely original to a saturated topic is the rare site worth following carefully and this one has demonstrated that original contribution capability today.
Liked how the writer used real examples instead of theoretical ones to make the points stick, and a stop at highriverdesigns added even more concrete examples, this is the kind of practical approach that respects readers who actually want to apply what they learn rather than just nodding along passively without doing anything useful.
Found the writing surprisingly fresh for what is by now a well covered topic, and a stop at everydayessentials kept that freshness going across the related pages, original perspective on familiar ground is hard to come by and this site has clearly earned its place in the conversation rather than just rehashing old ideas.
A piece that read as the work of someone who reads carefully themselves, and a look at softcrestcorner continued that informed feel, writers who are also serious readers produce work with a different quality and this site reads as the product of someone steeped in good writing rather than just generating content for an audience.
Got something practical out of this that I can apply later this week, and a stop at findyouranswers added more details to think about, this is exactly the kind of content I bookmark for future reference rather than the throwaway listicles that dominate most search results these days for almost any common topic.
Glad I gave this fifteen minutes rather than the usual three minute skim, and a look at brightchoicecollection earned the same investment, time spent on quality content is rarely wasted but the reverse is also true and learning which sites deserve which kind of attention is part of being a careful online reader.
Reading this in the gap between work projects was a small but meaningful break, and a stop at findnewdealsnow extended that gentle reset, content that provides genuine refreshment rather than just distraction during work breaks is content with a particular kind of utility and this site fits that role for me reliably during work days.
Going to come back when I have more time to read carefully, the post deserves more than a quick scan, and a stop at purefieldoutlet reinforced that, this is the kind of site that rewards a slower read which is hard to find in this fast paced corner of the internet but really worthwhile.
The conclusions felt earned rather than tacked on at the end like an afterthought, and a look at globalseasonhub kept that careful structure going, you can tell when a writer has thought about the shape of their post versus just letting it ramble out and hoping for the best at the end which most do.
Generally I do not leave comments but this post merits a small note, and a stop at purefashioncollection extended that comment worthy quality, the urge to actively contribute to a sites community rather than passively consume from it is something specific content provokes and this site has provoked that engagement urge from me today.
A piece that did not waste any of its substance on sales or promotion, and a look at dreamdiscoverachieve continued that pure content focus, sites that resist the urge to monetise every paragraph are increasingly rare and this one has clearly made the editorial choice to keep the writing clean from commercial intrusion which I value highly.
Now feeling slightly more optimistic about the state of independent writing online, and a stop at globalmarketoutlet extended that quiet optimism, sites like this one are the reason I have not given up on the open web entirely and finding them occasionally renews the case for paying attention to non algorithmic content sources today.
If I were grading sites on this topic this one would receive high marks, and a stop at brightparcel continued earning those high marks, the informal grading I do mentally for content sources is something I take seriously even though it is informal and this site has been receiving consistent high marks across multiple sessions today.
Really nice to see things explained without overcomplicating the topic, the words flow naturally and stay easy to follow, and a short visit to goldcreststudio only added to that experience because the same simple approach is used across the rest of the page too without any change in tone.
Picked up several practical tips that I plan to try out this week, and a look at startsomethingnewtoday added a few more I will be testing alongside, content with practical hooks that connect to my actual life is the kind that earns my repeat attention rather than the merely interesting that I forget within a day.
Really like the way the post resists reaching for cliches that would have made it feel generic, and a quick visit to urbanfashioncollective kept that fresh feel going, original phrasing and unexpected metaphors are signs that the writer is actually thinking rather than just stitching together familiar phrases into the appearance of content.
However measured this site clears the bar I set for sites I take seriously, and a stop at globalstylecorner continued clearing that bar, the metrics I use for site quality are admittedly informal but they are consistent and this site has cleared them on multiple measurements across multiple visits which is meaningful for my evaluation.
Found the rhythm of the prose particularly enjoyable on this read through, and a look at trendfashionhub kept that musical quality going across the related pages, sentence rhythm is something most blog writers ignore but it makes a real difference in how content lands with the careful reader who cares.
Now feeling mildly impressed in a way I do not quite remember feeling about a blog in a while, and a stop at simplefashionoutlet extended that mild impression, content that produces specific positive emotional responses rather than just neutral information transfer is content with extra dimensions and this site has those extra dimensions clearly.
Reading this slowly because the writing rewards a slower pace, and a stop at globaltrendhub did the same, the pace at which I read content is something I now use as a quality signal and writing that earns a slower pace earns my attention as a reader looking for substance these days.
Now recognising that this site has earned a place in the small group of resources I treat as authoritative, and a stop at simplefashionstore confirmed that placement, the difference between resources I trust and resources I just consume is real and this site has clearly moved into the trusted category through consistent quality over time.
Solid little post, the kind that does not need to be flashy because the substance is doing the work, and a look at buildyourfuturetoday kept that quiet confidence going across the site, this is what writing looks like when the writer trusts the content to land on its own without theatrics or unnecessary attention seeking behaviour.
Started reading without much expectation and ended on a high note, and a look at findamazingproducts continued that arc, content that builds rather than peaks early is a sign of a writer who knows how to structure a piece for sustained reader engagement rather than relying on a strong hook to do all the work.
Honestly enjoyed every minute spent here, that is not something I say lightly, and a look at northernpeakchoice confirmed I will be back, the bar for spending time online is high for me these days but this site clears it without effort which is high praise indeed from this reader who is usually rather demanding.
A clear cut above the usual noise on the subject, and a look at discovernewpaths only made that gap wider in my view, the kind of place that earns its visitors through quality rather than through aggressive marketing or sponsored placements which is increasingly the only way most sites stay afloat across the modern web.
Once I had read three posts the editorial pattern was clear, and a look at globalfindshub confirmed the pattern from a fourth angle, sites where the underlying approach reveals itself through accumulated reading rather than being announced are sites with real depth and this one has that quality clearly visible across multiple pieces consistently.
Closed it feeling slightly more competent in the topic than I started, and a stop at dreamdiscoverachieve reinforced that competence boost, real learning is rare in casual online reading but it does happen sometimes and this site managed to make it happen for me today which is genuinely worth pausing to acknowledge.
Closed the tab with a small sense of finality rather than the usual rushed exit, and a stop at bloomhold produced the same considered closing, when reading ends with deliberate satisfaction rather than impatient skip you know the time was well spent and this site is producing those satisfying endings consistently across what I read.
A clean piece that knew exactly what it wanted to say and said it, and a look at glowlaneoutlet maintained the same clarity of intention, knowing the goal of a piece before writing is something most blog content lacks and the clarity of purpose here shows up in every paragraph for any careful reader to notice.
Now adjusting my mental model of how the topic fits into the broader landscape, and a look at findnewoffers extended that adjustment, content that affects my structural understanding rather than just my factual knowledge is content with deeper impact and this site is providing those structural updates at a meaningful rate consistently across topics.
Honest reaction is that this is the kind of writing I would defend in a conversation about good blog content, and a look at uniquevalueoutlet reinforced that, the rare site whose work I would actively recommend rather than just tolerate is the kind I want to support through return visits regularly.
Probably the kind of site that should be more widely read than it appears to be, and a look at startanewpath reinforced that quiet wish, the gap between a sites quality and its apparent reach is sometimes large and that gap exists for this site in a way that makes me want to mention it more.
Now feeling slightly more committed to my own careful reading practices having read this, and a stop at wildpathmarket reinforced that commitment, content that models the kind of attention it deserves is content that calibrates the reader and this site has clearly raised my own bar for what to bring to good writing today.
Reading this in three sittings because the day was fragmented, and the piece survived the fragmentation, and a stop at takeactionnow held up under similar reading conditions, content engineered for continuous attention is fragile in modern conditions and this site reads as durable across the realistic ways people consume content today.
Now wishing more sites covered topics with this level of care, and a look at learnwithoutlimits extended that wish across more subjects, the rarity of careful coverage on most topics is a problem and this site is one of the small antidotes to that broader pattern of casual or surface treatment of complex subjects.
Found this through a friend who recommended it and now I see why, and a look at simplefashionhub only strengthened that recommendation in my own mind, word of mouth still works for content that actually delivers and this site is clearly earning recommendations the old fashioned way through quality rather than marketing.
Glad the writer kept this short rather than padding it out, the points stand on their own without needing extra context, and a look at fashionloversstore kept the same approach going, brevity is a sign of confidence in the substance and the team here clearly trusts their content to land without filler.
I learned more from this short post than from longer articles I read earlier today, and a stop at beststylecollection added even more useful detail without going off topic, this site clearly knows how to keep things focused without sacrificing depth which is a hard balance to strike for any writer.
Now thinking about whether the writer might publish a longer form work I would buy, and a look at brightvaluecenter suggested the same depth would translate, content that makes me want to pay for related work in other formats is content that has earned commercial trust as well as attention trust and this site has both clearly.
Refreshing to find writing that does not try to manipulate the reader into clicking onto the next page through cliffhangers and forced engagement, and a stop at nightbloomoutlet continued in the same respectful way, this is what reader first design actually looks like in practice rather than just in marketing copy that sounds nice.
Started reading and ended an hour later without realising the time had passed, and a look at startfreshnow produced the same time dilation effect, when content makes time feel different the writer has achieved something well beyond the average and this site is producing that experience for me reliably across multiple readings.
Now planning to come back when I have the right kind of attention to read carefully, and a stop at clickrank reinforced that plan, choosing the right moment to read certain content is a quiet form of respect for the work and this site is generating those careful planning behaviours from me consistently as a reader.
Reading the writers other posts after this one suggests the quality is consistent rather than peak, and a stop at freshvaluestore confirmed the consistent quality reading, sites that hold the same level across many pieces rather than peaking on a few are sites with sustainable editorial discipline and this one has clearly developed that.
Reading this gave me a small mental break from the heavier reading I had been doing, and a stop at uniquechoicehub extended that lighter feel, content that provides relief without becoming trivial is harder to produce than people realise and this site has clearly figured out how to be light without being shallow at all.
Considered against the flood of similar content this one stands apart in important ways, and a stop at globalbuycenter extended that distinctive feel, sites that find their own corner of a crowded topic and stay there are sites worth following and this one has clearly carved out its own space and committed to defending it carefully.
Quietly the post solved something I had been turning over without quite knowing how to phrase the question, and a look at findgreatoffers extended that quiet solving, content that addresses unformulated needs is content with reader insight and this site has demonstrated that insight at a high rate across the pieces I have read recently.
Really appreciate the absence of stock photos that have nothing to do with the content, and a quick visit to discoverandshop maintained the same restraint, visual filler is a tell that the writing cannot stand on its own and the lack of it here suggests the team has confidence in their content quality alone.
Now adding this to a list of sites I want to see flourish, and a stop at softwindstudio reinforced that wish, the few sites I actively root for are sites that produce the kind of work I want more of in the world and this one has joined that small list based on what I have read so far.
Found this really helpful, the explanations are simple but they actually answer the questions a normal reader would have, and after I followed staymotivateddaily I had a clearer sense of the topic, no extra fluff just useful points laid out in a sensible order that made the time worth it.
Easy to recommend, the content speaks for itself without needing additional praise from me, and a stop at fashionloversoutlet only adds more reasons to send people this way, the kind of generous resource that benefits its readers without demanding anything in return is increasingly rare and worth recognising clearly today across the broader open internet.
Just want to say thank you for putting this together, posts like these make searching online actually worth it sometimes, and a quick look at boldswap kept that going, useful and easy to read without any of the tricks that ruin most blog comment sections lately on the wider open web.
Found this via a link from another piece I was reading and the click was worth it, and a stop at discoverfashioncorner extended the value across more material, the open web still rewards clicking through citations when the underlying writers care about each other work and this site clearly belongs to that network.
Came away with a small but real shift in perspective on the topic, and a stop at naturerootstudio pushed that shift a bit further, the kind of subtle reframing that good writing does to a reader without making a big deal of it is something I always appreciate when it happens which is sadly not that often.
Really appreciate the confidence to make a clear point rather than hedging everything, and a quick visit to shopandsmilemore maintained the same direct stance, writing that takes positions rather than equivocating is more useful even when the positions are debatable because at least the reader has something to react to clearly.
However selective I am about new bookmarks this one made it past my filter, and a look at freshgiftmarket confirmed the bookmark was worth the slot, the precious slots in my permanent bookmark folder are difficult to earn and this site earned one without making me think twice about whether the slot was justified by the quality.
A thoughtful piece that did not strain to be thoughtful, and a look at brightstyleoutlet continued that effortless quality, when thinking shows up in writing without the writer drawing attention to it you know you are reading something genuinely considered rather than something performing the appearance of consideration which is also common online.
The conclusions felt earned rather than tacked on at the end like an afterthought, and a look at trendylivinghub kept that careful structure going, you can tell when a writer has thought about the shape of their post versus just letting it ramble out and hoping for the best at the end which most do.
Appreciate that you did not pad this with fluff to hit a word count, the post says what it needs to say and stops, and a look at learnsomethingincredible did the same, brevity here feels intentional not lazy which is a distinction many writers miss completely sometimes when they are working under deadlines.
Worth saying that the writing carries a particular kind of authority without making any explicit claims to it, and a stop at fullbloomdesigns extended that earned authority feeling, sites that demonstrate expertise through the quality of their explanations rather than by stating credentials are sites I trust most and this site has it.
Now noticing that the post benefited from being neither too short nor too long for its content, and a look at yourstylestore continued that calibration of length, sites that match length to content rather than padding to hit some target are sites that respect both their material and their readers and this site does both.
Reading this triggered a small but real correction in something I had assumed, and a stop at dartray extended that corrective effect, content that updates my beliefs through evidence rather than rhetoric is content with intellectual integrity and this site has earned that label consistently across the pieces I have read so far today.
Reading this prompted me to dig into a related topic later, and a stop at shopandsmiletoday provided some of the starting points for that follow up reading, content that triggers further exploration rather than satisfying curiosity completely is content with real generative energy and this site has plenty of that energy throughout it.
Bookmarking this for later, the kind of resource I want to keep nearby, and a quick look at middaymarketplace confirmed the rest of the site is worth the same treatment, definitely going into my reference folder for the next time the topic comes up at work or in conversation with someone who asks.
Now placing this in the small category of sites whose updates I would actually want to know about, and a stop at brightvaluehub confirmed that placement, the difference between sites I want to follow and sites I just consume from is real and this one has crossed into the active follow category from the casual consumption side.
Reading this with a notebook open turned out to be the right move, and a stop at freshfashionfinds added more material to the notes, content that justifies active note taking from a passive reader is content with real informational density and this site is producing notes worthy material at a high rate consistently.
Will be back, that is the simplest way to say it, and a quick visit to fashiondailyhub reinforced the decision, this site has earned a spot in my regular rotation alongside a few other reliable places I check when I want something genuinely informative without all the usual modern web noise getting in the way.
Reading this in the time it took to drink half a cup of coffee, and a stop at trendypurchasehub fit naturally into the second half, content that respects the rhythms of a typical morning is content with practical fit and this site has the kind of length and pacing that works for the way I actually read.
Thank you for keeping the writing honest and the points easy to verify against your own experience, and a stop at softstoneemporium reflected the same approach, no exaggeration just steady useful content that I can take with me into my own work without second guessing every sentence I happen to read here.
Picked up something useful for a side project, and a look at naturerailstore added another piece I will incorporate, content that connects to specific projects I am working on is content with practical utility and the practical utility of this site is showing up across multiple posts I have read in the last hour or so.
Started reading without much expectation and ended on a high note, and a look at bestbuycorner continued that arc, content that builds rather than peaks early is a sign of a writer who knows how to structure a piece for sustained reader engagement rather than relying on a strong hook to do all the work.
Thank you for being clear and direct, that simple approach saves so much frustration on the reader’s end, and a stop at dailydealsplace only made me more sure of it, the rest of the content seems to follow the same pattern which is a great sign of consistent editorial care behind the scenes.
Thanks for the breakdown, it gave me a clearer picture of something I had been confused about for a while now, and a stop at bestchoiceoutlet closed the remaining gaps in my understanding nicely, no need to hunt around twenty other articles to put the pieces together which is a real time saver.
Better signal to noise ratio than most places I check on this kind of topic, and a look at startfreshnow kept that going, every paragraph here carries something worth reading rather than padding out the page to hit some arbitrary length target that search engines reward but readers ignore as soon as they notice it.
Took the time to read every paragraph rather than skimming for the punchline, and a quick visit to shopandshine earned the same careful attention from me, that is the highest signal I can give about content quality because my default mode is rapid scanning rather than deliberate reading on most pages.
Found this useful, the points line up well with what I have been thinking about lately, and a stop at fairshelf added some angles I had not considered yet, definitely walking away with more than I came for which is the best outcome from time spent reading online for any kind of topic.
Even on a quick first read the substance of the post comes through, and a look at findyourbestself reinforced that immediate quality, content that does not require a slow careful read to demonstrate value but rewards one anyway is content with real depth and this site has produced work of that demanding depth class.
Decided this was the kind of site I would defend in a discussion about good blog content, and a stop at freshchoicehub reinforced that, very few sites earn active defence rather than passive consumption and this one has clearly crossed that threshold for me without needing any explicit pitch from the writers themselves either.
A piece that respected the reader by not over explaining the obvious, and a look at boltdepot continued that calibrated approach, finding the right level of explanation is one of the harder editorial calls and this site has clearly thought carefully about what readers will already know versus what they need help with consistently.
Genuine reaction is that I will probably think about this on and off for a few days, and a look at trendshoppingworld added fuel to that, the best content lingers in your head after you close the tab rather than evaporating immediately and this site clearly knows how to write that kind of memorable content.
I really like how the writer keeps the tone friendly without sounding fake or overly polished, and after a stop at brightstyleoutlet the same calm pace was there, no rushing to make a point and no padding either, just clean honest writing that I can respect and come back to later again.
Took a quick scan first and then went back to read properly because the post deserved it, and a stop at freshtrendcorner kept me reading carefully too, the kind of writing that earns a slower second pass rather than getting skimmed and forgotten is something I value highly when I happen to find it.
Reading this gave me a small sense of progress on a topic I have been slowly working through, and a stop at earthstoneboutique added another step forward, learning happens in small increments across many sources and finding sources that consistently contribute is the actual practical value of careful curation in an information rich world.
Adding this site to my regular reading list, the post earned that on its own, and a quick stop at brighttrendstore sealed the decision, the kind of place worth checking back with from time to time because it consistently produces material that holds up against a critical reading too which I really value.
Going to come back when I have more time to read carefully, the post deserves more than a quick scan, and a stop at shopandsmiletoday reinforced that, this is the kind of site that rewards a slower read which is hard to find in this fast paced corner of the internet but really worthwhile.
Felt the post had been written without looking over its shoulder, and a look at midcitycollections continued that confident posture, content written for its own sake rather than against imagined critics has a different quality and this site reads as written from a place of confidence rather than defensive justification of every claim.
Felt a small spark of recognition when the post named something I had been struggling to articulate, and a look at freshcollectionhub produced more such moments, the rare service of giving readers language for fuzzy intuitions is one of the higher values that good writing can provide and this site offered several today instances.
If I had to summarise the editorial sensibility of this site in a few words it would be careful and human, and a look at fashionchoiceworld extended that summary feeling, capturing the essence of a sites approach in brief is hard but this site has a clear enough identity that the summary comes naturally enough.
Took longer than expected to finish because I kept stopping to think, and a stop at uniquegiftplace did the same to me, content that provokes thought rather than just delivering information is in a different category and the team here is clearly working at that higher level rather than just cranking out posts.
Now saved this in a way that I will actually find again rather than the casual bookmark approach, and a stop at discoveramazingstories earned the same careful saving, organising my reading bookmarks so that high quality sources rise to the top is something I should do more of and this site triggered that organisation today.
After reading several posts back to back the consistent voice across them is impressive, and a stop at trendloversplace continued that voice consistency, sites that maintain a single coherent voice across many pieces by potentially many writers represent serious editorial discipline and this one has clearly developed the institutional consistency needed for that.
Honest take is that I will probably forget most of what I read online today but this post is one I will remember, and a stop at namedriftboutique kept that same memorable quality going, certain writing leaves a residue in the mind in a way most content simply does not manage.
Really appreciate this kind of writing, no shouting and no clickbait headlines just steady useful content, and a quick look at deccard kept that going, definitely a site I will be returning to whenever I need a sensible take on similar topics in the days ahead and also during slower work weeks.
Taking the time to read carefully here has been worthwhile for the past hour, and a look at softpeakselection extended the worthwhile reading, the calculation of return on reading time spent is something I do informally and this site has been producing positive returns across multiple sessions during the last week of regular visits and reads.
Once I trust a site this much I tend to read everything they publish and that is the trajectory I am on with this one, and a stop at learnsomethingincredible confirmed the trajectory, the rare progression from interested reader to comprehensive reader is something only certain sites earn and this one is earning that progression rapidly.
Found something new in here that I had not seen explained this way before, and a quick stop at rareseasonshoppe expanded the idea even further, the kind of writing that nudges your thinking forward a bit without forcing the issue is exactly what I look for online today and rarely actually find anywhere.
Clean writing, easy to read, and never tries too hard to impress, that combination is harder to find than people think, and after my time on dailydealsplace I am sure this site treats its readers well, no flashy tricks just useful content done right which is honestly all I want online.
номер установки домофона установка домофона расценки
дипломная на заказ
Looking at the surface design and the substance together this site has both right, and a look at trendmarketzone reinforced that integrated quality, sites where presentation and content reinforce each other rather than fighting are sites with full editorial coherence and this one has clearly invested in both layers in a balanced way.
Glad I stumbled across this post, the explanations actually make sense without needing background knowledge to follow along, and after a stop at dreamfieldessentials the same was true there, no assumptions about the reader just clear writing that anyone can understand from the first line right through to the end.
Refreshing to read something where the words actually mean something instead of filling space, and a stop at boldhorizonmarket kept that going, the writing here trusts the reader to follow along without endless repetition or constant reminders of what was already said earlier in the post which I appreciate.
After reading several posts back to back the consistent voice across them is impressive, and a stop at simplegiftfinder continued that voice consistency, sites that maintain a single coherent voice across many pieces by potentially many writers represent serious editorial discipline and this one has clearly developed the institutional consistency needed for that.
Thanks for the simple approach, too many sites bury the actual point under layers of unnecessary words, but here every line earns its place, and a look at modernfashionhub showed the same care for the reader which is something I will remember the next time I need answers on a topic.
Useful reading material, the kind I can hand off to someone newer to the topic without worrying about confusing them, and a quick look at learnsomethingvaluable confirmed the same beginner friendly tone runs throughout the site which is great for sharing with people just starting their learning journey on this particular topic.
Honestly slowed down to read this carefully which is not my default, and a look at brightchoicecollection kept me in that careful reading mode, the kind of writing that demands attention by being worth attention is rare in a media environment full of content engineered to be skimmed not read with any real focus today.
Really like the way the post resists reaching for cliches that would have made it feel generic, and a quick visit to forestlanecreations kept that fresh feel going, original phrasing and unexpected metaphors are signs that the writer is actually thinking rather than just stitching together familiar phrases into the appearance of content.
Reading this between meetings turned out to be the most useful thing I did all afternoon, and a stop at besttrendshub kept that productivity feeling going, content can sometimes outperform actual work in terms of what gets accomplished mentally and this site managed that today which is genuinely a high bar to clear consistently.
Got pulled in by the headline and stayed because the content actually delivered on the promise, and a stop at learnshareachieve kept that trust intact, when a site lives up to its own framing it earns the right to keep showing up in my browser tabs going forward indefinitely from here on out really.
Came in skeptical and left mostly convinced, that is the highest praise I can offer, and a look at bestbuycollection pushed me further in the same direction, content that survives a critical first read is rare and worth recognising because most blog posts crumble under any real scrutiny these days when you actually pay attention closely.
Considered as a whole this site has developed a coherent point of view that comes through in individual pieces, and a look at puregiftcorner continued displaying that coherence, sites with a unified perspective rather than a grab bag of takes are sites with editorial maturity and this one has clearly developed that maturity through years of work.
Solid value packed into a relatively short post, that takes skill, and a look at exploreopportunities continues the dense useful content across more pages, this site clearly understands that respecting reader time is itself a form of generosity which is something most blog operations seem to have forgotten lately across the wider open web.
Took me back a step or two on an assumption I had been making, and a stop at freshbuycollection pushed that reconsideration further, writing that gently corrects the reader without being aggressive about it is a rare diplomatic skill and the team here clearly knows how to land critical points without turning readers off.
Советую – владимир воронин
A clear case of writing that does not try to do too much in one post, and a look at mountainviewoutlet maintained the same scoped discipline, posts that try to cover too much end up covering nothing well and this site has clearly chosen scope discipline as a core editorial principle which shows up clearly in what I read.
A piece that read as the work of someone who reads carefully themselves, and a look at trendfashioncorner continued that informed feel, writers who are also serious readers produce work with a different quality and this site reads as the product of someone steeped in good writing rather than just generating content for an audience.
Reading this in a moment of low energy still kept my attention, and a stop at startbuildingtoday continued that engagement under suboptimal conditions, content that survives the reader being tired is content with extra reserves of pull and this site has the kind of writing that holds up even when I am not at my reading best.
Now placing this in the same category as a few other sites I have come to trust, and a look at uniquegiftplace continued the placement decision, the small category of fully trusted sites is one I extend rarely and only after multiple positive reading sessions and this site has earned the category placement methodically over time.
The headings made navigating the post simple even when I needed to find a specific section quickly, and a look at boltport continued the same thoughtful structure, small details like clear headings show that someone is actually thinking about how the reader uses the page rather than just filling it for length alone.
Bookmark earned, calendar reminder set, share queued, all from one good post, and a look at smartbuyplace did the same, when a single reading session triggers multiple downstream actions you know the content has actually moved me beyond the page and this site is moving me at that higher level reliably.
Now noticing that the post benefited from being neither too short nor too long for its content, and a look at trendandstyleworld continued that calibration of length, sites that match length to content rather than padding to hit some target are sites that respect both their material and their readers and this site does both.
Reading this confirmed that my time researching the topic in other places had not been wasted, and a stop at timelessharbornow extended the confirmation, when independent sources agree that is a useful signal and this site is one of the more reliable sources I have found for cross checking what I read elsewhere on similar subjects.
Now noticing the careful balance the post struck between confidence and humility, and a stop at happytrendworld maintained the same balance, finding the line between asserting and admitting is hard and this site has clearly developed the calibration to walk that line consistently which produces a more persuasive reading experience for me.
Found a couple of useful angles in here I had not considered before reading carefully, and a quick stop at discovernewvalue added more, this is one of those sites where the value compounds the more you read rather than peaking at one viral post and then offering nothing else of substance afterwards which is common.
Now feeling the post has earned a proper recommendation rather than a casual mention, and a stop at trendmarketplace reinforced the recommendation strength, the difference between mentioning and recommending is a small editorial distinction I observe in my own conversations and this site has earned the upgraded recommendation level from me confidently today.
Honest assessment is that this is one of the better short reads I have had this week, and a look at purestylehub reinforced that, the bar for short content is low because most of it sacrifices substance for brevity but this site manages both at once which is harder than it sounds for most writers attempting it.
This one is staying open in a tab for the rest of the day so I can come back and re read certain parts, and a look at modernvaluecollection suggests I will be doing the same with a few more pages here too, this is going to be a deep dive over the coming hours.
Now planning to write about the topic myself eventually using this post as a reference, and a look at brightchoicecollection would also serve in that future piece, content that becomes raw material for my own writing rather than just informing my reading is content with multiplicative value and this site is generating that multiplicative effect.
Without overstating it this is a quietly excellent post, and a look at discovergiftitems extended that quiet excellence, content that earns superlatives without demanding them through marketing language is content that has truly earned them through the substance and this site has clearly produced work in that earned excellence category today.
Took a quick scan first and then went back to read properly because the post deserved it, and a stop at yourgiftcorner kept me reading carefully too, the kind of writing that earns a slower second pass rather than getting skimmed and forgotten is something I value highly when I happen to find it.
My usual response to new bookmarks is to forget them but this one I have already returned to twice, and a look at learnandexplore pulled me back a third time, the actual return rate to bookmarked sites is the real measure of value and this one is clearing that measure at a notable rate already.
Started this morning and finished at lunch with a small sense of having spent the time well, and a look at dreamshopworld extended that satisfaction into the afternoon, content that fits naturally into the rhythm of a working day rather than demanding a dedicated reading block is increasingly the kind I prefer.
Genuinely well crafted writing, the kind that makes the topic look easier than it actually is, and a look at urbanwearhub added even more depth, you can feel the experience behind every line which is something only writers who have been at this for a while can pull off with this level of grace.
A piece that did not waste any of its substance on sales or promotion, and a look at purefashionpick continued that pure content focus, sites that resist the urge to monetise every paragraph are increasingly rare and this one has clearly made the editorial choice to keep the writing clean from commercial intrusion which I value highly.
Now setting this aside as a model of how to write thoughtfully on the topic, and a stop at findyourtruepath extended that model status, content that becomes a reference for how a kind of writing should be done is content with influence beyond its own readership and this site is reaching that level for me clearly today.
Now appreciating that the post did not try to imitate any other style I might recognise, and a stop at learnsomethingvaluable continued that distinct voice, content with its own register rather than borrowed from elsewhere is content with real authorial presence and this site has clearly developed that presence through what feels like patient editorial work.
Honestly enjoyed every minute spent here, that is not something I say lightly, and a look at besttrendoutlet confirmed I will be back, the bar for spending time online is high for me these days but this site clears it without effort which is high praise indeed from this reader who is usually rather demanding.
Just sat with this for a bit longer than I usually would because the points are worth thinking about, and after creativegiftoutlet I had even more to chew on, the kind of post that nudges your thinking forward without forcing the issue is something I have always appreciated in good writing online.
Reading this gave me a quiet moment of intellectual pleasure that I had not been expecting, and a stop at findbettervalue extended that pleasure across more pages, the unexpected reward of stumbling into careful writing is one of the small ongoing pleasures of reading the open web and this site is delivering it reliably.
Reading this gave me confidence to make a decision I had been putting off, and a stop at modernfashionhub reinforced that confidence, content that translates into action in my own life rather than just informing it is content with the highest practical value and this site is generating that action level utility for me lately.
Felt the post had been written without looking over its shoulder, and a look at modernlivinghub continued that confident posture, content written for its own sake rather than against imagined critics has a different quality and this site reads as written from a place of confidence rather than defensive justification of every claim.
Thanks for not padding this with the usual filler intros and outros that every other blog seems to require, and a quick visit to trendcollectionstore continued that lean approach across more posts, content stripped of waste is content that respects you and I will always come back to that kind of approach.
Halfway through I knew I would finish the post, and a stop at staymotivateddaily also held me through to the end, content that signals its quality early and then sustains it is content with real internal consistency and this site has clearly figured out how to maintain quality from opening sentence through to closing thought.
Now adjusting my mental model of how the topic fits into the broader landscape, and a look at uniquegiftmarket extended that adjustment, content that affects my structural understanding rather than just my factual knowledge is content with deeper impact and this site is providing those structural updates at a meaningful rate consistently across topics.
Probably going to mention this site in a write up I am working on later this month, and a stop at skylinefashionstore provided more material for that potential mention, content worth referencing in my own published work rather than just personal reading is content with the highest endorsement level and this site has earned that endorsement.
The clarity here is something I really appreciate, especially compared to sites that pile on jargon for no reason, and a look at timberlinewebstore was the same, simple direct sentences that actually deliver information instead of dancing around the point for paragraphs at a time which wastes reader patience.
A thoughtful piece that did not strain to be thoughtful, and a look at trendandstylemarket continued that effortless quality, when thinking shows up in writing without the writer drawing attention to it you know you are reading something genuinely considered rather than something performing the appearance of consideration which is also common online.
Just want to acknowledge that the writing here is doing something right, and a quick visit to happytrendstore confirmed the same standards run across the broader site, recognising good work is something I try to do when I find it because the alternative is silence and silence rewards mediocrity.
Reading this in the morning set a good tone for the day, and a quick visit to besttrendcollection kept that good tone going, content can do that sometimes when it hits the right notes and finding sites that consistently strike that tone is something I have learned to recognise and reward with regular visits.
Worth recognising that the post did not pretend to be the final word on the topic, and a stop at discovernewvalue continued that humility, content that admits its own scope and limits is more trustworthy than content that overreaches and this site has clearly developed the editorial maturity to know what it can and cannot claim well.
More original than the recycled takes I keep finding on the topic elsewhere, and a quick look at happydailycorner confirmed it, the kind of site that has its own voice rather than echoing whatever is trending which makes it stand out as a refreshing change from the usual rotation of generic content I see daily.
Felt the post was written for someone like me without explicitly addressing me, and a look at modernstyleworld produced the same fit, when content lands on its target without pandering you know the writer has done careful audience thinking rather than relying on demographic targeting or interest signals to do the work of editorial decisions.
Considered alongside other sources I have been reading this one consistently rises to the top, and a stop at dailybuyoutlet maintained that top ranking, the informal ongoing comparison between sources is something I do whenever reading on a topic and this site keeps coming out near the top of those comparisons over many sessions.
Stands out for actually being useful instead of just being long, and a look at dreambuildachieve kept that going, length without value is the default mode of most blogs these days but this site has clearly chosen a different path which I respect a lot as a reader who values careful editing decisions like that.
Worth pointing out the careful word choice in this post, no buzzwords and no jargon, and a look at bravoflow continued that disciplined vocabulary, sites that resist the pull of trendy language are sites that will read well in five years and this one is clearly built for that kind of long durability.
Following the post through to the end without my attention drifting once, and a look at ironrootcorner earned the same uninterrupted attention, content that holds attention without manipulating it is content with substantive pull and this site has demonstrated that substantive pull across multiple pieces in a single reading session reliably here today.
The tone stayed consistent across the whole post which is harder than it looks for longer pieces, and a look at bestbuycollection continued the same voice, this kind of editorial consistency is a sign of either a single careful writer or a tightly run team and either is impressive today across the broader media environment.
Generally my comment to other readers about new sites is to wait and see but for this one I would jump to recommend now, and a look at purefashionoutlet reinforced that early recommendation, the speed at which a site earns my recommendation is itself a quality signal and this one has earned mine quickly clearly.
Generally I am cautious about recommending sites on first encounter but this one warrants the exception, and a look at findyourdirection reinforced the exception making, the rare site that justifies breaking my normal cautious approach is the rare site worth flagging early and this one has prompted exactly that early flagging response from me.
Considered alongside other sources I have been reading this one consistently rises to the top, and a stop at yourdailyshopping maintained that top ranking, the informal ongoing comparison between sources is something I do whenever reading on a topic and this site keeps coming out near the top of those comparisons over many sessions.
If I had encountered this site five years ago I would have been telling everyone about it, and a look at modernfashionzone extended that retrospective enthusiasm, the version of me who used to recommend favourite blogs frequently would have made sure friends knew about this one and that earlier enthusiasm is partially returning to me here.
The depth of coverage felt about right for the format, neither shallow nor overwhelming, and a look at happyshoppingcorner kept that calibration going, getting the depth right for blog format is genuinely difficult because too shallow loses experts and too deep loses beginners but this site nailed it nicely which I really do appreciate.
Reading this triggered a small but real correction in something I had assumed, and a stop at smartlivingmarket extended that corrective effect, content that updates my beliefs through evidence rather than rhetoric is content with intellectual integrity and this site has earned that label consistently across the pieces I have read so far today.
Reading this in the morning set a good tone for the day, and a quick visit to bestseasonfinds kept that good tone going, content can do that sometimes when it hits the right notes and finding sites that consistently strike that tone is something I have learned to recognise and reward with regular visits.
I usually skim posts like these but this one held my attention all the way through, and a stop at trendandbuyworld did the same, that is a strong endorsement coming from me because I am usually quick to bounce when content gets repetitive or fails to deliver on its initial promise made in the headline.
Looking back on this reading session it stands as one of the better ones recently, and a look at startdreamingbig extended that ranking, the informal ranking of reading sessions against each other is something I do mentally and this session ranks high largely because of this site and a couple of related pages here.
A modest masterpiece in its own quiet way, and a look at modernfashioncorner confirmed the same quiet quality across the rest of the site, calling something a masterpiece is usually overstating but for content this carefully crafted the word feels appropriate even if the writers themselves would probably resist the label honestly.
Now adjusting my mental model of how the topic fits into the broader landscape, and a look at findbetterdeals extended that adjustment, content that affects my structural understanding rather than just my factual knowledge is content with deeper impact and this site is providing those structural updates at a meaningful rate consistently across topics.
Worth flagging that this approach to the topic is fresh without being contrarian, and a stop at shopwithdelight extended the same fresh angle, finding original perspective on familiar subjects is rare and this site has clearly developed its own way of seeing rather than echoing the dominant takes from elsewhere consistently.
Excellent post, balanced and well organised without showing off, and a stop at smartbuyzone continued in that same vein, this site has clearly figured out the formula for content that works for readers rather than for search engine ranking signals which is harder than it sounds today and worth real recognition from anyone.
Solid endorsement from me, the writing earns it, and a look at uniquegiftcenter continues to earn it across the broader site too, the kind of operation that maintains quality across many pages rather than just one viral post is a sign of serious commitment and that is what I see here clearly across what I read.
Without overstating it this is a quietly excellent post, and a look at findyourwayforward extended that quiet excellence, content that earns superlatives without demanding them through marketing language is content that has truly earned them through the substance and this site has clearly produced work in that earned excellence category today.
Decided I would read the archives over the weekend, and a stop at timbergroveoutlet confirmed that the archives would be worth the time, very few sites have archives I would actively read through but this one has earned that level of interest based on the consistent quality across what I have sampled so far.
Worth flagging that the writing rewarded a second read more than I expected, and a look at wildhorizontrends produced the same second read benefit, content with hidden depths that emerge only on careful rereading is rare in the modern blog space and this site has clearly invested in that level of compositional density throughout.
Honestly impressed by the consistency of voice across what I have read so far, and a quick visit to learnandshine continued that consistent feel, when a site reads like one careful person rather than a committee the experience is more rewarding for the reader who notices these subtle editorial details over time.
Reading this prompted me to send the link to two different people for two different reasons, and a stop at urbanwearcollection provided ammunition for a third share, content that suits multiple audiences without being generic enough to be useless to any of them is genuinely valuable and this site has that multi audience quality clearly.
Now feeling something close to gratitude for the fact this site exists, and a look at dreambelievegrow extended that gratitude, the rare site that produces this kind of response is the rare site worth defending in conversations about whether the modern internet is still capable of producing genuinely valuable independent content for serious adults.
Now realising this site has been quietly doing good work for longer than I knew, and a look at ironlinemarket suggested an archive worth exploring, sites with deep archives of consistent quality represent a different kind of resource than sites with viral hits and this one looks like the durable kind based on what I see.
Skipped to a specific section because I knew that was the question I had, and the answer was clean, and a stop at creativechoicecorner similarly delivered targeted answers without burying them, content engineered for readers who arrive with specific needs rather than open ended browsing is increasingly valuable in a search heavy reading environment.
Really like that the writer trusts the reader to follow simple logic without restating every previous point, and a stop at createpositivechange kept that respect going, treating an audience as capable adults rather than as people who need constant hand holding makes a noticeable difference in the reading experience for me.
Felt mildly happier after reading, which sounds silly but is true, and a look at findyouranswers extended that small mood lift, content that improves rather than degrades my mental state is content I want more of and the cumulative effect of reading sites that lift versus sites that drag is real over time.
Really appreciate that the writer did not stretch the post to hit some target word count, the points end when they are made, and a stop at purefashionchoice reflected the same discipline, brevity is generosity in disguise and this site has clearly figured that out far better than most blog operations have.
Without overstating it this is a quietly excellent post, and a look at cozycabincreations extended that quiet excellence, content that earns superlatives without demanding them through marketing language is content that has truly earned them through the substance and this site has clearly produced work in that earned excellence category today.
Came in expecting another generic take and got something with actual character instead, and a look at happychoicecorner carried that personality forward, finding a distinct voice on a saturated topic is impressive and worth pointing out when it happens because most sites end up sounding identical to their nearest competitors quickly.
Just enjoyed the experience without needing to think about why, and a look at majesticgrovers kept that effortless feeling going, sometimes the best content is invisible in the sense that you forget you are reading until you reach the end and realise time has passed without you noticing it pass naturally.
Generally I do not leave comments but this post merits a small note, and a stop at softstoneoffering extended that comment worthy quality, the urge to actively contribute to a sites community rather than passively consume from it is something specific content provokes and this site has provoked that engagement urge from me today.
Excellent execution from start to finish, the post never loses its rhythm and the points stay sharp, and a quick stop at timelessstyleplace kept the same level going, consistency like this across a site is the marker of a serious operation rather than a casual side project running on autopilot somewhere else.
The clarity here is something I really appreciate, especially compared to sites that pile on jargon for no reason, and a look at yourdailyfinds was the same, simple direct sentences that actually deliver information instead of dancing around the point for paragraphs at a time which wastes reader patience.
Now adjusting my mental model of how the topic fits into the broader landscape, and a look at growwithdetermination extended that adjustment, content that affects my structural understanding rather than just my factual knowledge is content with deeper impact and this site is providing those structural updates at a meaningful rate consistently across topics.
Really clear writing, the kind that makes you want to share the link with someone who has been asking about the topic, and a quick browse through bestpickshub only made me more sure of that, the information here stays useful long after the first read is done which says a lot.
A piece that brought a sense of order to a topic I had been finding chaotic, and a look at briskpost continued that organising effect, content that imposes useful structure on messy subjects is doing genuine intellectual work and this site is providing that organisational function across multiple posts I have read recently here.
Felt the writer respected the topic without being precious about it, and a look at learnsomethingdaily continued that respectful but unfussy treatment, finding the right register for serious topics is hard and this site has clearly figured out how to take the topic seriously while still being readable for casual visitors regularly.
Reading this on the train into work was a better use of the commute than my usual choices, and a stop at simplegiftmarket extended that commute reading well, content that improves transit time rather than just filling it is content with practical benefit and this site has earned its place in my morning commute reading rotation.
Excellent post, balanced and well organised without showing off, and a stop at fashionvaluecorner continued in that same vein, this site has clearly figured out the formula for content that works for readers rather than for search engine ranking signals which is harder than it sounds today and worth real recognition from anyone.
Reading this on a difficult day was a small bright spot, and a stop at finduniqueoffers extended that brightness, content that improves a hard day is content that has earned a particular kind of place in my reading habits and this site is occupying that uplifting role for me today which I appreciate clearly.
Will be sharing this with a couple of people who care about the topic, and a stop at findpeaceandpurpose added more material worth passing along, the kind of site that is generous with quality content and does not make you jump through hoops to access it which is appreciated more than the team probably realises.
Reading this felt easy in the best way, no friction and no confusion at any point, and a stop at shoptheday carried that same comfort across more pages, the kind of editorial flow that lets you absorb information without fighting the format which is increasingly hard to find on the open web today across topics.
Going to come back when I have more time to read carefully, the post deserves more than a quick scan, and a stop at urbanseedcenter reinforced that, this is the kind of site that rewards a slower read which is hard to find in this fast paced corner of the internet but really worthwhile.
Decided to read this site for a while before forming a verdict, and the verdict after several pages is positive, and a stop at trendysaleoutlet continued that pattern, judging a site requires more than one post and giving sites a fair sample is something I try to do for promising candidates rather than rushing to dismiss.
Came back to this an hour later to reread a specific section, and a quick visit to sunwaveessentials also drew a second look, content that pulls you back rather than letting you move on permanently is the kind I want to fill my browser bookmarks with in 2026 and beyond as the open internet evolves.
Will be sharing this with a couple of people who care about the topic, and a stop at discovernewworlds added more material worth passing along, the kind of site that is generous with quality content and does not make you jump through hoops to access it which is appreciated more than the team probably realises.
Worth a quiet moment of recognition for the consistency I have noticed across multiple posts, and a stop at inspireyourjourney continued that consistent quality, sites that maintain quality across many pieces rather than peaking on one viral post are sites with real editorial discipline and this one has clearly developed that discipline carefully.
Quietly the writers approach to the topic differs from the dominant takes I have been encountering, and a stop at lostmeadowmarket extended that distinctive approach, content that maintains a different perspective without explicitly arguing against the dominant ones is content with confident editorial identity and this site has that confidence throughout pieces.
Reading this gave me a small sense of progress on a topic I have been slowly working through, and a stop at brightleafemporium added another step forward, learning happens in small increments across many sources and finding sources that consistently contribute is the actual practical value of careful curation in an information rich world.
A genuine pleasure to find a site that publishes at a sustainable cadence rather than chasing the daily content treadmill, and a look at pureearthoutlet confirmed the careful publication rhythm, sites that prioritise quality over frequency are rare and this one has clearly chosen the slower pace which I appreciate as a reader.
Coming back to this one, definitely, and a quick visit to findsomethingbetter only made me more sure of that, the kind of writing that makes you want to set aside time later rather than rushing through it now while distracted by everything else competing for attention on the screen today across so many tabs.
Bookmark folder reorganised slightly to make this site easier to find, and a look at yourjourneycontinues earned the same accessibility upgrade, the small organisational moves I make for sites I expect to return to often are themselves a signal of how much I trust them and this site triggered those moves naturally.
Now planning to share the link with a small group of readers I trust, and a look at simplevaluehub suggested more material to share with the same group, recommending content into a curated circle requires confidence in the recommendation and this site is making me confident in those personal recommendations on multiple separate occasions now.
Different in a good way from the cookie cutter content that fills most blogs covering this area, and a stop at simpletrendmarket kept showing me why, original thoughtful writing exists if you know where to look and this site has earned a place on my short list of those rare exceptions worth defending.
Liked the way the post balanced confidence and humility, and a stop at coastalbrookstore maintained the same balance, knowing when to assert and when to acknowledge uncertainty is a sign of mature thinking and the writers here have clearly developed that calibration through what I assume is years of careful work on their craft.
Really liked the calm tone running through the post, no shouting and no urgency forced into the writing, and a look at grandstyleemporium kept that quiet confidence going, the kind of voice that makes the reader feel respected rather than yelled at which is depressingly common across most modern blog content these days.
Found this through a search that was generic enough I did not expect quality results, and a look at simplevaluecorner continued the surprisingly good experience, search engines occasionally still surface excellent independent content if you scroll past the obvious paid and high authority results which is reassuring to remember sometimes.
A piece that did not lean on the writer credentials or institutional backing, and a look at happyhomehub maintained the same focus on substance, content that earns trust through quality rather than through name dropping is the kind I find most persuasive and this site is clearly playing on the substance side of that distinction.
Decided to set aside time later to read more carefully, and a stop at growbeyondboundaries reinforced that decision, content that earns a calendar entry rather than just a passing read is in a different tier altogether and this site is clearly working at that elevated level which I really do appreciate as a reader today.
Better signal to noise ratio than most places I check on this kind of topic, and a look at yourdailycollection kept that going, every paragraph here carries something worth reading rather than padding out the page to hit some arbitrary length target that search engines reward but readers ignore as soon as they notice it.
The conclusions felt earned rather than tacked on at the end like an afterthought, and a look at bestchoicevalue kept that careful structure going, you can tell when a writer has thought about the shape of their post versus just letting it ramble out and hoping for the best at the end which most do.
A piece that was confident enough to leave some questions open rather than forcing closure, and a look at simplebuyzone continued that intellectual honesty, content that admits the limits of its scope is more trustworthy than content that pretends to total understanding and this site has the right calibration on certainty consistently.
Refreshing to find writing that does not try to manipulate the reader into clicking onto the next page through cliffhangers and forced engagement, and a stop at modernlifestylecorner continued in the same respectful way, this is what reader first design actually looks like in practice rather than just in marketing copy that sounds nice.
Really appreciate the absence of stock photos that have nothing to do with the content, and a quick visit to trendandfashionzone maintained the same restraint, visual filler is a tell that the writing cannot stand on its own and the lack of it here suggests the team has confidence in their content quality alone.
Thank you for being clear and direct, that simple approach saves so much frustration on the reader’s end, and a stop at trendylivingmarket only made me more sure of it, the rest of the content seems to follow the same pattern which is a great sign of consistent editorial care behind the scenes.
Honestly impressed by the consistency of voice across what I have read so far, and a quick visit to happyvaluecollection continued that consistent feel, when a site reads like one careful person rather than a committee the experience is more rewarding for the reader who notices these subtle editorial details over time.
Worth flagging this post as worth a careful read rather than a casual skim, and a stop at fashiontrendstore earned the same careful approach, the few sites that warrant slower reading are sites I now treat differently from the daily content stream and this one has clearly moved into that elevated treatment category.
Working through this site has been a small antidote to the shallow content that fills most of my reading time, and a stop at createpositivechange extended that antidote function, sites that quietly improve the average quality of my reading by being themselves are sites worth supporting through return visits and recommendations consistently.
Got something practical out of this that I can apply later this week, and a stop at inspiregrowthdaily added more details to think about, this is exactly the kind of content I bookmark for future reference rather than the throwaway listicles that dominate most search results these days for almost any common topic.
During my morning reading slot this fit perfectly into the routine, and a look at shopforvalue extended that perfect fit into the rest of the routine, content that matches the rhythm of how I actually read rather than demanding accommodation from my schedule is content well calibrated to its likely audience and this site has it.
Now feeling something close to gratitude for the fact this site exists, and a look at cedarloft extended that gratitude, the rare site that produces this kind of response is the rare site worth defending in conversations about whether the modern internet is still capable of producing genuinely valuable independent content for serious adults.
Reading this prompted me to dig out an old reference book related to the topic, and a stop at learnsomethingvaluable extended that connection to other sources, content that connects me back to my own existing knowledge rather than asking me to forget it is content with continuity and this site has that continuous quality.
A thoughtful read in a week that has been mostly noisy, and a look at starlitstylehouse carried that thoughtful quality across more pages, finding pockets of considered writing in a week of distractions is one of the small wins of careful curation and this site is providing those pockets at a sustainable rate.
Looking for similar voices elsewhere has come up empty in my recent searches, and a stop at trendylivingcorner extended the search frustration, the rare site that does what no other does in quite the same way is precious and this one has clearly developed a particular approach that I have not been able to find duplicates of.
Reading this confirmed that the topic deserves more careful attention than it usually gets, and a stop at shopforvalue extended that elevated framing, content that raises the appropriate weight of a subject without being preachy about it is serving a quiet but important editorial function for the broader cultural conversation about it.
Beyond the immediate post itself the editorial sensibility behind the site is what struck me, and a stop at findgreatoffers continued displaying that sensibility, content that reveals editorial choices through accumulated reading is content with structural quality and this site has clearly developed an underlying approach worth identifying through multiple sessions of reading.
Came in confused about the topic and left with a much firmer grasp on it, and after purechoicecenter I felt I could explain this to someone else without hesitation, that is the gold standard for any educational content and most sites simply fail to reach it ever which is unfortunate but true.
Will be passing this along to a few people who would benefit from the perspective shared here, and a stop at brightcollectionstore only added to what I will be sharing, this kind of generous content deserves to circulate widely rather than getting buried in some search engine algorithm tweak that pushes it down the rankings.
Honestly this hits the sweet spot between detail and brevity, no rambling and no shortcuts, and a quick visit to dreamfashionoutlet kept that going across the related pages, the kind of place that respects your attention without trying to grab it through cheap tactics or attention seeking design choices that get tired fast.
Reading this in the gap between work projects was a small but meaningful break, and a stop at simplelivingmarket extended that gentle reset, content that provides genuine refreshment rather than just distraction during work breaks is content with a particular kind of utility and this site fits that role for me reliably during work days.
Reading this triggered a small reorganisation of my own thinking on the topic, and a stop at autumnspringtrends furthered that reorganisation, content that affects the shape of my mental model rather than just decorating it with new facts is content with structural rather than informational impact and this site provides that.
Strong recommendation, anyone interested in this topic owes themselves a visit, and a stop at globalhomecorner extends that recommendation across more of the site, this is the kind of resource that makes me more optimistic about the state of the open web than I usually am these days actually for once which is genuinely refreshing.
Гранитная мастерская https://святаятроица73.рф в Рязани — изготовление памятников из гранита и мрамора на заказ. Производство, гравировка портретов, установка памятников и благоустройство мест захоронения. Индивидуальные проекты, качественный камень и профессиональный подход.
Will share this on a forum I am part of where it will be appreciated by others working in the same area, and a look at moderntrendmarket suggests there is more here worth passing along too, definitely a generous resource that deserves a wider audience than it probably has today across the open internet.
Обновления по теме: https://spainslov.ru/site/word/word/%D0%92%D0%9E%D0%9B%D0%9E%D0%9D%D0%A2%D0%95%D0%A0
Generally I find the content on similar topics frustrating in specific ways and this post avoided all of them, and a look at findpurposeandpeace continued that frustration free experience, content that sidesteps the standard failure modes of its genre is content with editorial awareness and this site has clearly studied what fails elsewhere consistently.
Started forming counter examples to test the claims and the post handled most of them implicitly, and a look at trendylifestylecorner continued that anticipatory style, writers who think two steps ahead of the critical reader save themselves from a lot of follow up work and this writer has clearly internalised that habit consistently.
Closed my email tab so I could read this without interruption, and a stop at globaltrendoutlet earned the same protected attention, when content is good enough to defend against the usual digital distractions you know it deserves better than the half attention most online reading gets in a typical busy day.
Took me back a step or two on an assumption I had been making, and a stop at wildwoodfashion pushed that reconsideration further, writing that gently corrects the reader without being aggressive about it is a rare diplomatic skill and the team here clearly knows how to land critical points without turning readers off.
Different in a good way from the cookie cutter content that fills most blogs covering this area, and a stop at trendyvaluezone kept showing me why, original thoughtful writing exists if you know where to look and this site has earned a place on my short list of those rare exceptions worth defending.
Glad I stumbled across this post, the explanations actually make sense without needing background knowledge to follow along, and after a stop at honestharvesthub the same was true there, no assumptions about the reader just clear writing that anyone can understand from the first line right through to the end.
Skipped the comments to avoid spoilers and came back later to find them genuinely worth reading, and a stop at happylivingoutlet extended that surprised respect, when the discussion below a post matches the quality of the post itself you have found something special and this site appears to attract that kind of audience.
Halfway through I knew I would finish the post, and a stop at shopandsmiletoday also held me through to the end, content that signals its quality early and then sustains it is content with real internal consistency and this site has clearly figured out how to maintain quality from opening sentence through to closing thought.
During my morning reading slot this fit perfectly into the routine, and a look at kindlecrestmarket extended that perfect fit into the rest of the routine, content that matches the rhythm of how I actually read rather than demanding accommodation from my schedule is content well calibrated to its likely audience and this site has it.
Speaking honestly this is among the better discoveries of my recent browsing, and a stop at rustictrademarket reinforced that discovery quality, the ranking of recent discoveries is informal but meaningful and this site has placed near the top of that ranking based on the consistency of quality across what I have already read carefully.
Great work on keeping things readable, the post never drags or repeats itself which I really appreciate, and a stop at fashionpicksmarket added a bit more context that fit naturally with what was already said here, no need to read everything twice to get the point being made today.
Going to share this with a friend who has been asking the same questions for a while now, and a stop at simpletrendbuy added a few more pages I will pass along too, this is the kind of generous information that earns a small thank you from me right now and again later this week.
Now placing this in the small category of sites whose updates I would actually want to know about, and a stop at dreamdiscovercreate confirmed that placement, the difference between sites I want to follow and sites I just consume from is real and this one has crossed into the active follow category from the casual consumption side.
High quality writing, no marketing speak and no buzzwords that mean nothing, and a stop at fashionfindsmarket kept that going, simple direct content that actually communicates something is harder to find than it should be and this is one of the rare places that gets it right consistently across many different posts.
Most of my reading time goes to a small number of trusted sources and this one is now joining that group, and a stop at urbanbuycorner reinforced the group membership, the few sites that earn a place in my regular rotation are sites I expect ongoing returns from and this one has earned that elevated position consistently.
Reading this confirmed that my time researching the topic in other places had not been wasted, and a stop at softcloudboutique extended the confirmation, when independent sources agree that is a useful signal and this site is one of the more reliable sources I have found for cross checking what I read elsewhere on similar subjects.
Comfortable in tone and substantive in content, that is a hard combination to land, and a look at newvoyagecorner kept that pairing alive across more material, this is what good editorial direction looks like in practice and the team here clearly has someone keeping a steady hand on the wheel across what they decide to publish.
Bookmark earned, calendar reminder set, share queued, all from one good post, and a look at happybuycorner did the same, when a single reading session triggers multiple downstream actions you know the content has actually moved me beyond the page and this site is moving me at that higher level reliably.
Quality you can feel from the first paragraph, the writer clearly knows the topic and how to share it, and a quick look at trendycollectionstore confirmed the same depth runs throughout the rest of the site as well which is rare and worth pointing out when it happens online for any reader passing through.
Stands out for actually being useful instead of just being long, and a look at dreamfashionoutlet kept that going, length without value is the default mode of most blogs these days but this site has clearly chosen a different path which I respect a lot as a reader who values careful editing decisions like that.
Now understanding why someone recommended this site to me a while back, and a stop at simplehomefinds explained the recommendation, sometimes recommendations make sense only after experience and this site has finally clicked into place as the kind of resource I now understand was being recommended for sound editorial reasons by my friend.
Genuine reaction is that this site clicked with how I like to read, and a look at boldstreetboutique kept that comfortable fit going, sometimes you find a place online whose editorial decisions just align with your preferences and when that happens it is worth recognising and supporting through repeat engagement consistently going forward.
A piece that did exactly what it promised in the headline without overshooting or underdelivering, and a look at clearport continued that calibration, alignment between promise and delivery is a basic editorial virtue that many sites fail at and this site has clearly mastered the matching of expectation and substance throughout pieces.
If the topic interests you at all this is a place to spend time, and a look at yourdealhub reinforced that recommendation, the broader question of where to invest topical reading time is one this site answers convincingly through the consistent quality across multiple pieces I have sampled during the current reading session today.
The post made the topic feel approachable without making it feel trivial, that is a fine balance, and a stop at timberwoodcorner maintained the same balance, finding the middle ground between welcoming and serious is genuinely difficult and the writers here have clearly figured out how to consistently hit it well across many different posts.
Really appreciate the lack of pop ups, modals, cookie banners stacking on top of each other, and a quick visit to yourfavstore confirmed the same clean approach across the rest of the site, technical decisions about user experience are part of what makes content actually pleasant to engage with for sure.
Glad to have another data point on a question I am still thinking through, and a look at warmwindsmarket added two more, content that acknowledges its place in a wider conversation rather than pretending to settle the question alone is intellectually honest in a way that I wish was more common across the open web.
Came in skeptical and left mostly convinced, that is the highest praise I can offer, and a look at globalfashioncenter pushed me further in the same direction, content that survives a critical first read is rare and worth recognising because most blog posts crumble under any real scrutiny these days when you actually pay attention closely.
Reading this gave me a small mental break from the heavier reading I had been doing, and a stop at believeinyourdreams extended that lighter feel, content that provides relief without becoming trivial is harder to produce than people realise and this site has clearly figured out how to be light without being shallow at all.
Decided not to comment because the post said what needed saying, and a stop at globalstylecorner continued that complete feel, content that does not invite obvious additions or corrections from readers is content that has been carefully considered and this site appears to consistently produce pieces that satisfy rather than provoke unnecessary follow ups.
Found this through a friend who recommended it and now I see why, and a look at purestylecollection only strengthened that recommendation in my own mind, word of mouth still works for content that actually delivers and this site is clearly earning recommendations the old fashioned way through quality rather than marketing.
A piece that read as if the writer was thinking carefully rather than just typing fluently, and a look at highpineoutlet continued that considered quality, the difference between fluent typing and careful thinking shows up in writing and this site reads as the product of thought rather than just the product of language fluency apparently.
A piece that did not try to be timeless and ended up reading as durable anyway, and a look at inspireeverymoment extended that durable feel, content that stays useful past its publication date without straining for permanence is content that ages well and this site has the kind of evergreen quality that I value highly today.
Liked the way the post balanced confidence and humility, and a stop at trendworldmarket maintained the same balance, knowing when to assert and when to acknowledge uncertainty is a sign of mature thinking and the writers here have clearly developed that calibration through what I assume is years of careful work on their craft.
Только лучшие материалы: https://eco-naturel.com/
Without overstating it this is a quietly excellent post, and a look at purevaluecorner extended that quiet excellence, content that earns superlatives without demanding them through marketing language is content that has truly earned them through the substance and this site has clearly produced work in that earned excellence category today.
Now feeling slightly more optimistic about the state of independent writing online, and a stop at happylivinghub extended that quiet optimism, sites like this one are the reason I have not given up on the open web entirely and finding them occasionally renews the case for paying attention to non algorithmic content sources today.
Glad to find a site whose links lead somewhere worth going rather than back to itself for SEO juice, and a stop at fashiondealstore kept that generous outbound feel, citing other peoples work with real respect rather than just for ranking signals is a sign of an honest operation worth supporting going forward.
Thanks for putting in the work to make this approachable, plenty of sites cover the same ground but most do it badly, and a quick visit to dreamdiscovercreate confirmed this one stands apart, simple language and useful examples without anyone trying to sell me anything along the way which I really appreciated.
Now feeling that this site is the kind I want to make sure does not disappear, and a look at mountainmistgoods reinforced that quiet protective feeling, the rare sites whose disappearance would actually matter to me are the sites I want to support through return visits and recommendations and this one has joined that small protected list.
Generally I bookmark sparingly to avoid building up a bookmark graveyard but this one earned a permanent slot, and a stop at fashionloversoutlet extended that permanence designation, the few sites I keep permanent bookmarks for are sites I expect to use repeatedly and this one has clearly cleared that expectation bar today.
Genuinely changed how I think about a small piece of the topic, which does not happen often online, and a look at softblossomcorner added another nudge in the same direction, the kind of writing that earns a small mental shift rather than just confirming what you already thought before reading is a sign of careful thought.
Closed the tab with a small sense of finality rather than the usual rushed exit, and a stop at buildconfidencehere produced the same considered closing, when reading ends with deliberate satisfaction rather than impatient skip you know the time was well spent and this site is producing those satisfying endings consistently across what I read.
Speaking as someone who reads a lot on this topic this site has earned a high position in my source rankings, and a stop at trendycollectionstore reinforced that ranking, the informal ranking of sources for a topic is something I maintain mentally and this site has moved into the upper portion of those rankings clearly.
Once I trust a site this much I tend to read everything they publish and that is the trajectory I am on with this one, and a stop at simpledealmarket confirmed the trajectory, the rare progression from interested reader to comprehensive reader is something only certain sites earn and this one is earning that progression rapidly.
Just enjoyed the experience without needing to think about why, and a look at shopthebestdeals kept that effortless feeling going, sometimes the best content is invisible in the sense that you forget you are reading until you reach the end and realise time has passed without you noticing it pass naturally.
Liked that the post resisted a sales pitch ending, and a stop at oldtownstylehub maintained the no pitch approach, content that ends without trying to convert me into a customer or subscriber is content that has confidence in its own value and this site is clearly playing the long game on reader trust.
Quality work here, the post reads cleanly and the points stay focused throughout, and a stop at urbanwilddesigns kept the standard high, you can tell the writer cares about the final result rather than just hitting publish for the sake of having something new on the page to feed the search engines.
Well done, the writing is professional without being stiff, and the topic is treated with care, and a look at puregiftmarket reflected that approach, the kind of site I would point a colleague to if they asked for a reliable starting point on this topic in the future without any hesitation at all.
Found a small mental shift after reading this, the framing here is just a bit different from the standard takes online, and a look at highlandcraftstore extended that fresh perspective across more material, the rare site whose voice actually changes how you think about something rather than just confirming existing beliefs.
Reading this in three sittings because the day was fragmented, and the piece survived the fragmentation, and a stop at grandforeststudio held up under similar reading conditions, content engineered for continuous attention is fragile in modern conditions and this site reads as durable across the realistic ways people consume content today.
Decided to subscribe to the RSS feed if there is one, and a stop at globaltrendoutlet confirmed that decision, content that I want delivered to me proactively rather than just remembered when I have time is content that has earned a higher level of commitment from me as a reader looking for reliable sources.
Recommended without hesitation if you care about careful coverage of this topic, and a stop at yourbuyingcorner reinforced the recommendation, the bar I set for unhesitating recommendations is fairly high and this site has cleared it through the cumulative weight of multiple consistently good pieces rather than through any single standout post which is meaningful.
Worth recognising that this site does not chase the daily news cycle, and a stop at simplelivingcorner confirmed the longer publication arc, sites that resist the pressure to comment on every passing event are sites with genuine editorial discipline and this one has clearly chosen depth over volume which I respect deeply.
Generally my comment to other readers about new sites is to wait and see but for this one I would jump to recommend now, and a look at futurepathmarket reinforced that early recommendation, the speed at which a site earns my recommendation is itself a quality signal and this one has earned mine quickly clearly.
Thanks for the readable length, I finished it without checking how much was left, and a stop at findbetterdeals kept me reading the same way, when I stop noticing the length of a piece because the content is engaging enough to sustain attention without willpower the writer has done their job well today.
Thanks for the readable length, I finished it without checking how much was left, and a stop at globalchoicehub kept me reading the same way, when I stop noticing the length of a piece because the content is engaging enough to sustain attention without willpower the writer has done their job well today.
Just dropping by to say thanks for the effort, it does not go unnoticed when a writer cares this much about the reader, and after I went through fashiondealplace I was certain this is one of the better corners of the internet for this particular kind of content which is genuinely refreshing.
Different in a good way from the cookie cutter content that fills most blogs covering this area, and a stop at uniquevaluehub kept showing me why, original thoughtful writing exists if you know where to look and this site has earned a place on my short list of those rare exceptions worth defending.
Honest reaction is that this is the kind of writing I would defend in a conversation about good blog content, and a look at crispplus reinforced that, the rare site whose work I would actively recommend rather than just tolerate is the kind I want to support through return visits regularly.
Thanks for the simple approach, too many sites bury the actual point under layers of unnecessary words, but here every line earns its place, and a look at purefashionworld showed the same care for the reader which is something I will remember the next time I need answers on a topic.
Came back to this an hour later to reread a specific section, and a quick visit to moonglowcollection also drew a second look, content that pulls you back rather than letting you move on permanently is the kind I want to fill my browser bookmarks with in 2026 and beyond as the open internet evolves.
Bookmark folder reorganised slightly to make this site easier to find, and a look at dreambelievegrow earned the same accessibility upgrade, the small organisational moves I make for sites I expect to return to often are themselves a signal of how much I trust them and this site triggered those moves naturally.
Thanks for taking the time to write this, it is clear that some thought went into how each point would land, and after I went through happylifestylemarket I had a better grip on the topic, real value without the usual marketing noise people have to put up with online when searching for answers.
Looking at the surface design and the substance together this site has both right, and a look at thinkcreateinnovate reinforced that integrated quality, sites where presentation and content reinforce each other rather than fighting are sites with full editorial coherence and this one has clearly invested in both layers in a balanced way.
My professional context would benefit from having this kind of resource available, and a look at buildconfidencehere extended the professional applicability, the rare site that contributes meaningfully to professional work rather than just personal interest is content with multiplied value and this one is providing that professional utility consistently across multiple pieces.
Now adding a small note in my reading log that this site is one to watch, and a look at silvermoonmarket reinforced the watch status, the few sites I track deliberately rather than encounter accidentally are sites I expect ongoing returns from and this one has cleared the bar for that elevated tracking based on what I read.
Came here from another site and ended up exploring much further than I planned, and a look at fashionlifestylehub only encouraged more exploration, the kind of place where one click leads to another not through manipulative design but through genuinely interesting content is rare and worth highlighting when found like this somewhere on the open internet.
Now planning to write about the topic myself eventually using this post as a reference, and a look at shopanddiscoverhub would also serve in that future piece, content that becomes raw material for my own writing rather than just informing my reading is content with multiplicative value and this site is generating that multiplicative effect.
Got pulled in by the headline and stayed because the content actually delivered on the promise, and a stop at urbantrendlifestyle kept that trust intact, when a site lives up to its own framing it earns the right to keep showing up in my browser tabs going forward indefinitely from here on out really.
Started smiling at one paragraph because the writing was just nice, and a look at quietplainstrading produced a couple more such moments, prose that produces small spontaneous reactions in the reader is doing more than just transferring information and the writers here are clearly hitting that level fairly consistently throughout pieces.
Took a quick scan first and then went back to read properly because the post deserved it, and a stop at trendmarketoutlet kept me reading carefully too, the kind of writing that earns a slower second pass rather than getting skimmed and forgotten is something I value highly when I happen to find it.
Новое в категории: https://igrushenka.ru/
Нужна CRM по банкротству? CRM для БФЛ автоматизация работы юридической компании, контроль этапов БФЛ, учет клиентов, документов и платежей. Управляйте делами, задачами и сроками процедур в единой системе с удобной аналитикой и отчетами.
Quietly enjoying that I have found a new site to follow for the topic, and a look at nobleridgefashion reinforced the small pleasure of the find, the discovery of new high quality sources is one of the more durable pleasures of careful internet reading and this site has been generating that discovery pleasure at multiple points already today.
Picked this up between two other things I was doing and got drawn in completely, and after yourtrendstore my original tasks were completely forgotten for a while, content that derails a workflow in a positive way by being more interesting than what you were already doing is rare and worth recognising clearly.
Good post, the kind that respects the reader by getting to the point quickly without skipping the details that matter, and a short look at hiddenvalleyfinds confirmed that approach is consistent across the site which is rare to find online these days, definitely a place I will return to soon.
A piece that reads like it was written for me without claiming to be written for me, and a look at goldplumeoutlet produced the same fit, when the writer audience match clicks naturally without being engineered through demographic targeting you know the writing is solid and this site has that natural fit consistently for me.
Reading this gave me a small sense of progress on a topic I have been slowly working through, and a stop at fashionanddesign added another step forward, learning happens in small increments across many sources and finding sources that consistently contribute is the actual practical value of careful curation in an information rich world.
Now feeling the rare pleasure of trusting a source completely on first encounter, and a look at futuregardenmart extended that initial trust into something more durable, the calibration of trust to evidence is something I do informally and this site has earned high trust through the cumulative weight of multiple consistently good posts already.
High quality writing, no marketing speak and no buzzwords that mean nothing, and a stop at futuregrooveoutlet kept that going, simple direct content that actually communicates something is harder to find than it should be and this is one of the rare places that gets it right consistently across many different posts.
Adding this to my list of go to references for the topic, and a stop at mooncrestdesign confirmed the rest of the site deserves the same, definitely the kind of resource that earns its place rather than getting forgotten the moment the next interesting article shows up in my feed somewhere else on the web.
Now feeling the quiet pleasure of finding writing that takes itself seriously without being self serious, and a stop at modernstylecorner extended that subtle pleasure, the gap between earnest and pretentious is fine and this site has clearly chosen to land on the earnest side without slipping over into pretentious which is impressive.
Really nice to see things explained without overcomplicating the topic, the words flow naturally and stay easy to follow, and a short visit to wonderpeakboutique only added to that experience because the same simple approach is used across the rest of the page too without any change in tone.
If quality blog writing is dying as people sometimes claim then this site is one piece of evidence that it has not died yet, and a look at yourtrendstore extended that evidence, the broader cultural question about online writing has empirical answers in specific sites and this one is contributing to a more optimistic answer overall.
Took a chance on the headline and was rewarded, and a stop at discovertrendystore kept the rewards coming as I clicked through, the kind of place where every link leads somewhere worth the click is a small luxury on the modern web where so many sites are mostly empty calories disguised as content.
Most of the time I bounce off similar pages within seconds, and a stop at urbanlifestylehub held me longer than I would have predicted, the ability to convert a likely bouncing visitor into an engaged reader is a quality signal and this site has demonstrated that conversion ability across multiple visits where I expected to bounce.
Bookmark earned, share earned, return visit earned, all from one reading session, and a look at moderntrendhub did the same, the trifecta of bookmark and share and return is rare in a single visit and represents the highest level of engagement I tend to offer any piece of online content these days here.
Worth a quiet moment of recognition for the consistency I have noticed across multiple posts, and a stop at shopthedaytoday continued that consistent quality, sites that maintain quality across many pieces rather than peaking on one viral post are sites with real editorial discipline and this one has clearly developed that discipline carefully.
Probably the kind of site that should be more widely read than it appears to be, and a look at morningrustgoods reinforced that quiet wish, the gap between a sites quality and its apparent reach is sometimes large and that gap exists for this site in a way that makes me want to mention it more.
Now appreciating that the post did not require external context to follow, and a look at rarelinefinds maintained the same self contained quality, content that respects new visitors by being readable without prerequisites is content with broader accessibility and this site has clearly invested in keeping each piece reader friendly for fresh arrivals.
Once you find a site like this the search for similar voices begins, and a look at globalshoppingzone extended the search energy, finding a high quality reference point makes the gap between it and adjacent sources visible in a way it was not before and this site has provided that high reference point across multiple recent visits.
A piece that read smoothly because the writer understood how readers actually move through prose, and a look at fashiondailyplace maintained the same reader awareness, writers who think about the reading experience as much as the writing experience produce better work and this site has clearly made that shift in editorial approach.
Genuine reaction is that I will probably think about this on and off for a few days, and a look at trendforlifehub added fuel to that, the best content lingers in your head after you close the tab rather than evaporating immediately and this site clearly knows how to write that kind of memorable content.
This filled in a gap in my understanding that I had not even noticed was there, and a stop at growbeyondboundaries did the same, the kind of post that gives you more than you expected when you first clicked through from somewhere else, a real find for anyone curious about the area covered here.
Reading this confirmed a hunch I had been carrying about the topic without having articulated it, and a stop at growandflourish extended the confirmation, content that gives shape to fuzzy intuitions is doing the rare work of making private thoughts public and this site is providing that articulating service consistently for me lately.
In the middle of an otherwise scattered day this post landed as a moment of focus, and a stop at sacredridgecorner extended that focused feeling across more pages, content that anchors a fragmented day rather than contributing to the fragmentation is content with real centring effect and this site is providing that anchoring function for me.
Such writing is increasingly rare and worth supporting through attention, and a stop at boldhorizonmarket extended that supportive attention across more pages, the conscious choice to spend time on sites that produce careful work rather than convenient consumption is itself a small form of patronage and this site is receiving that conscious patronage from me.
Glad I clicked through from where I did because this turned out to be worth the time spent, and after uniquevaluehub I had a fuller picture, the kind of content that earns its visitors through delivering value rather than chasing them through aggressive advertising or constant pop ups appearing everywhere on the screen lately.
Found something quietly useful here that I expect to return to, and a stop at everydaytrendhub added more of the same, content with quiet utility ages well in a way that flashy hot takes do not and I have learned to weight quiet utility much higher when deciding what to bookmark for later use.
Approaching this site through a casual link click and being surprised by what I found, and a look at fashiontrendcorner extended the surprise, the rare experience of stumbling into excellent independent content rather than predictable mediocrity is one of the actual remaining pleasures of casual web browsing and this site provided it cleanly.
Thanks for treating the topic with the seriousness it deserves without becoming pompous about it, and a stop at yourtrendstore continued that balanced treatment, the gap between earnest and self serious is huge and writers who can stay on the right side of it earn my respect when I find them online today.
Now appreciating that the post left me with enough to say in a follow up conversation, and a look at moderntrendstore added more material for those follow ups, content that prepares me for related conversations rather than just informing me alone is content with social utility and this site provides that social armament reliably for me.
Reading this slowly to absorb the structure, and the structure is doing real work alongside the words, and a look at freshmeadowstore maintained the same architectural quality, when sentence shapes and paragraph rhythms reinforce the meaning rather than just transporting words you know you are reading skilled work today.
Really appreciate the absence of stock photos that have nothing to do with the content, and a quick visit to uniquegiftcollection maintained the same restraint, visual filler is a tell that the writing cannot stand on its own and the lack of it here suggests the team has confidence in their content quality alone.
Worth saying that the post fit naturally into a rhythm of careful reading, and a stop at happylivingcorner extended the same rhythm, content that pairs well with how I actually read rather than demanding a different mode is content well calibrated to its likely audience and this site has clearly thought about that consistently.
Glad to find something on this topic that does not start with three paragraphs of throat clearing before getting to the point, and a stop at noblegroveoutlet also dives right in, respect for the readers time shows up in small editorial choices like this and they add up to a real difference quickly.
Solid stuff, the kind of post that I will probably refer back to later this month when the topic comes up again, and a look at urbanvinecollective only confirmed I should bookmark the site as a whole rather than just this single page for future reference and use across coming weeks.
Saving the link for sure, this one is a keeper, and a look at softpineoutlet confirmed I should bookmark the entire site rather than just this page, the consistency across what I have seen so far suggests there is a lot more here worth coming back for soon when I have more time.
Skipped the TLDR thinking I would read everything anyway, and ended up enjoying the path through the full post, and a stop at discovernewcollection similarly rewarded the patient read, summaries are useful but the journey through good writing is part of what makes the destination feel earned rather than just delivered cleanly.
Just want to say thank you for putting this together, posts like these make searching online actually worth it sometimes, and a quick look at goldleafemporium kept that going, useful and easy to read without any of the tricks that ruin most blog comment sections lately on the wider open web.
Worth pointing out that the writing reads as confident without being defensive about it, and a look at goldenmeadowhouse extended that secure tone, content that does not pre emptively argue against imagined critics has a different quality from defensive writing and this site reads as written from a place of real ease.
Now considering writing a longer note about the post somewhere, and a look at moderntrendstore added more material for that note, content that prompts me to write rather than just consume is content with generative energy and this site is producing that generative effect for me at a higher rate than most sources.
Now appreciating that the post did not try to imitate any other style I might recognise, and a stop at rainforestchoice continued that distinct voice, content with its own register rather than borrowed from elsewhere is content with real authorial presence and this site has clearly developed that presence through what feels like patient editorial work.
A piece that read smoothly because the writer understood how readers actually move through prose, and a look at silverhollowstudio maintained the same reader awareness, writers who think about the reading experience as much as the writing experience produce better work and this site has clearly made that shift in editorial approach.
Now considering carefully how to share this site with the right audience rather than broadcasting widely, and a look at yourtrendcollection extended that careful sharing impulse, content worth sharing carefully rather than spamming is content that has earned a higher kind of recommendation and this site has earned that careful shareability throughout pieces.
I learned more from this short post than from longer articles I read earlier today, and a stop at shopandsavebig added even more useful detail without going off topic, this site clearly knows how to keep things focused without sacrificing depth which is a hard balance to strike for any writer.
A small editorial detail caught my attention, the way headings related to body text, and a look at globaltrendlifestyle maintained that careful relationship, structural details like that show up to readers who notice them and the writers here have clearly thought about every level of the piece rather than just the words.
Complete Deadlock https://www.deadlock1.com hub for English speakers. Latest patches, hero counters, item tier lists, community builds, step?by?step guides, pro match analysis, tournament brackets, and esports news. All in one site – perfect for beginners and competitive players alike.
Glad to find something on this topic that does not start with three paragraphs of throat clearing before getting to the point, and a stop at fashionchoicehub also dives right in, respect for the readers time shows up in small editorial choices like this and they add up to a real difference quickly.
UFC Rankings 2026 ufcfans updated weekly. Detailed tables for each division: heavyweight, light heavyweight, middleweight, welterweight, lightweight, featherweight, bantamweight, flyweight, and women’s classes.
Genuinely good work, the kind that holds up over multiple readings without losing its appeal, and a stop at coastlinecrafts kept that going, definitely a site I will be returning to and probably mentioning to others who work in or care about this particular area of interest today and in coming weeks.
The tone stayed consistent across the whole post which is harder than it looks for longer pieces, and a look at trenddealplace continued the same voice, this kind of editorial consistency is a sign of either a single careful writer or a tightly run team and either is impressive today across the broader media environment.
A modest masterpiece in its own quiet way, and a look at everydayshoppingoutlet confirmed the same quiet quality across the rest of the site, calling something a masterpiece is usually overstating but for content this carefully crafted the word feels appropriate even if the writers themselves would probably resist the label honestly.
Useful reading material, the kind I can hand off to someone newer to the topic without worrying about confusing them, and a quick look at yourtrendstore confirmed the same beginner friendly tone runs throughout the site which is great for sharing with people just starting their learning journey on this particular topic.
Felt like I was reading something written by someone who actually thinks about the topic rather than reciting it, and a look at wildsandcollection reinforced that impression, the difference between recited content and considered content is huge and this site clearly belongs to the latter category which I appreciate as a careful reader looking for substance.
Skipped the related products section because there was none, and a stop at uniquegiftcorner also lacked any aggressive monetisation, content that is not constantly trying to convert me into a customer or subscriber is content that has confidence in its own value and that confidence shows up as a different reading experience.
Felt the writer respected the topic without being precious about it, and a look at happyhomehub continued that respectful but unfussy treatment, finding the right register for serious topics is hard and this site has clearly figured out how to take the topic seriously while still being readable for casual visitors regularly.
Reading more of the archives is now on my plan for the weekend, and a stop at modernstylecorner confirmed the archive worth the time, the rare archive worth a dedicated reading session rather than just casual sampling is the rare archive of serious work and this site has clearly produced enough of that work to warrant the deeper exploration.
Decided this was the kind of site I would defend in a discussion about good blog content, and a stop at noblegroveoutlet reinforced that, very few sites earn active defence rather than passive consumption and this one has clearly crossed that threshold for me without needing any explicit pitch from the writers themselves either.
Beyond the topic at hand this site reads as a small ongoing project of taking writing seriously, and a look at freshchoicecorner reinforced that project quality, sites that treat publishing as an ongoing serious practice rather than as content production for traffic are sites worth supporting and this one has clearly chosen the serious approach.
Felt energised after reading rather than drained, which is unusual for online content these days, and a look at pinecrestboutique continued that good feeling, content that leaves you better than it found you is rare and worth bookmarking when you stumble across it for the first time today or any other day really.
Picked this site to mention to a colleague who would benefit, and a look at freshfindstore added more material I will pass along, recommending sites to colleagues is a higher bar than recommending to friends because the professional context demands more careful curation and this site cleared the professional bar without me having to think.
Decided to set a calendar reminder to revisit, and a stop at brightforestmall extended that revisit list, calendar entries for content are a level of commitment I rarely make but when I do they signal a higher regard than a simple bookmark and this site has earned that calendar tier of relationship from me today.
Stayed longer than planned because each section earned the next, and a look at goldenhillgallery kept that pulling effect going across more pages, the kind of subtle pull that good writing exerts on attention is something I find harder and harder to resist when I encounter it on the open web today.
More substantial than most of what I find searching for this topic online, and a stop at modernhomecollection kept that quality consistent, this is one of those sites where the writing actually rewards careful reading rather than punishing the patient reader with empty filler stretched out across long paragraphs that say very little.
Refreshing tone compared to the dry corporate posts on similar topics, and a stop at discovermoreideas carried that personality through nicely, you can tell when a real person is behind the writing versus a content team chasing metrics and this site definitely falls into the former category clearly across what I have seen.
After several visits I am now confident this site is one to follow seriously, and a stop at purewavechoice reinforced that confidence, the gradual building of trust through repeated quality exposures is the only sustainable way to develop reader loyalty and this site is building that loyalty in me through patient consistent work consistently.
Now realising this site has been quietly doing good work for longer than I knew, and a look at takeactionnow suggested an archive worth exploring, sites with deep archives of consistent quality represent a different kind of resource than sites with viral hits and this one looks like the durable kind based on what I see.
Worth pointing out the careful word choice in this post, no buzzwords and no jargon, and a look at globalgiftmarket continued that disciplined vocabulary, sites that resist the pull of trendy language are sites that will read well in five years and this one is clearly built for that kind of long durability.
Found this through a friend who recommended it and now I see why, and a look at goldenlanecreations only strengthened that recommendation in my own mind, word of mouth still works for content that actually delivers and this site is clearly earning recommendations the old fashioned way through quality rather than marketing.
Liked that the post resisted a sales pitch ending, and a stop at globalridgeemporium maintained the no pitch approach, content that ends without trying to convert me into a customer or subscriber is content that has confidence in its own value and this site is clearly playing the long game on reader trust.
Different in a good way from the cookie cutter content that fills most blogs covering this area, and a stop at originpeakboutique kept showing me why, original thoughtful writing exists if you know where to look and this site has earned a place on my short list of those rare exceptions worth defending.
Reading this between meetings turned out to be the most useful thing I did all afternoon, and a stop at rusticfieldmarket kept that productivity feeling going, content can sometimes outperform actual work in terms of what gets accomplished mentally and this site managed that today which is genuinely a high bar to clear consistently.
Probably going to mention this site in a write up I am working on later this month, and a stop at discovernewcollection provided more material for that potential mention, content worth referencing in my own published work rather than just personal reading is content with the highest endorsement level and this site has earned that endorsement.
Liked the way the post handled the final paragraph, no neat bow but no abrupt cutoff either, and a stop at brightgiftmarket continued that thoughtful ending pattern, endings are hard and most blog writers either over engineer them or skip them entirely and this site has clearly figured out a sustainable middle approach.
Generally my comment to other readers about new sites is to wait and see but for this one I would jump to recommend now, and a look at bestseasonstore reinforced that early recommendation, the speed at which a site earns my recommendation is itself a quality signal and this one has earned mine quickly clearly.
One of the more thoughtful posts I have read recently on this topic, and a stop at explorelimitlessgrowth added even more weight to that impression, this is genuinely good content that holds its own against far better known sites in the same space without trying to imitate any of them at all which I appreciate.
Skipped the related links section thinking I had read enough and then came back to it later when curiosity got the better of me, and a stop at trendchoicecenter confirmed I should have just read it first, every section of this site appears to deserve careful attention rather than skipping past lazily.
Generally my comment to other readers about new sites is to wait and see but for this one I would jump to recommend now, and a look at everwoodsupply reinforced that early recommendation, the speed at which a site earns my recommendation is itself a quality signal and this one has earned mine quickly clearly.
Liked that the post acknowledged complications rather than pretending they did not exist, and a stop at growandflourish continued that honest framing, sites that handle complexity with care rather than papering it over with simplifying claims are doing real intellectual work and this one is clearly in that category based on what I have read.
Easily one of the better explanations I have read on the topic, and a stop at dailyvalueworld pushed it even higher in my mental ranking of useful resources, the kind of site that beats the average not by trying harder but by simply caring more about what it puts out daily which always shows.
Glad the writer did not feel the need to argue with imaginary critics in the post itself, and a stop at everhollowbazaar kept the same focused approach going, defensive writing wastes the reader time and confidence on positions that did not need defending and this post has clearly avoided that common failure.
Useful reading material, the kind I can hand off to someone newer to the topic without worrying about confusing them, and a quick look at globalshoppingzone confirmed the same beginner friendly tone runs throughout the site which is great for sharing with people just starting their learning journey on this particular topic.
Really liked the calm tone running through the post, no shouting and no urgency forced into the writing, and a look at everfieldhome kept that quiet confidence going, the kind of voice that makes the reader feel respected rather than yelled at which is depressingly common across most modern blog content these days.
Definitely returning here, that is decided, and a look at modernshoppingcorner only made the case stronger, this is one of those rare websites that rewards regular visits rather than feeling stale after the first read which is something I cannot say about most of the places I bookmark today across all my topics.
Felt the writer was speaking my language without trying to imitate it, and a look at futureharborhome continued that natural fit, when a writers default voice happens to match what you find easy to read the experience feels frictionless and that is something I notice and remember about specific sites going forward.
Felt the post handled a sensitive angle of the topic with appropriate care, and a look at pureharborstudio extended that careful handling across related material, sites that can navigate delicate territory without causing damage are rare and require a level of judgement that comes from experience rather than from following any clear playbook.
A satisfying piece in the way that good meals are satisfying rather than just filling, and a look at findamazingproducts extended that satisfaction, the metaphor between content and meals is one I find useful and this site reads as a satisfying meal rather than the empty calories that most content provides for casual readers.
Now feeling confident enough in this site to use it as a reference point for evaluating others on the same topic, and a look at yourstylecorner continued the comparison friendly quality, sites that serve as quality benchmarks for their topic are precious and this one has clearly become a benchmark for me on this particular subject area.
Started believing the writer knew the topic deeply by about the second paragraph, and a look at modernfashionworld reinforced that confidence, the speed at which a writer establishes credibility through their writing is a useful quality signal and this writer establishes it quickly and quietly without resorting to credential dropping or self promotion.
Appreciate the practical examples, they made the abstract points easier to grasp, and a stop at purefashioncollection added more of the same, this site clearly understands that real examples beat empty theory every single time which is the mark of a writer who knows their audience well and respects their time.
Picked this post to share in a Slack channel where I knew it would be appreciated, and a look at freshfashiondeal suggested I will share more from here later, content worth sharing into a professional context is content that has earned a higher kind of trust than mere personal interest and this site has it.
A piece that demonstrated competence without performing it, and a look at silveroakstudio maintained the same self assured but unshowy register, the gap between competence and performance of competence is one I track and this site has clearly chosen to demonstrate rather than perform which I find much more persuasive as a reader.
Liked how the writer used real examples instead of theoretical ones to make the points stick, and a stop at discoverfindsmarket added even more concrete examples, this is the kind of practical approach that respects readers who actually want to apply what they learn rather than just nodding along passively without doing anything useful.
Bookmark earned, share earned, return visit earned, all from one reading session, and a look at globalcrestfinds did the same, the trifecta of bookmark and share and return is rare in a single visit and represents the highest level of engagement I tend to offer any piece of online content these days here.
Walked away with a clearer head than I had before reading this, and a quick visit to ironvalleydesigns only sharpened that, the writing has a way of cutting through the noise that surrounds most topics online which is something I will definitely remember the next time I am searching for an answer to anything.
Glad I stumbled across this post, the explanations actually make sense without needing background knowledge to follow along, and after a stop at apexhelm the same was true there, no assumptions about the reader just clear writing that anyone can understand from the first line right through to the end.
Now organising my browser bookmarks to give this site easier access, and a look at boldcrestfinds earned the same organisational priority, the small acts of digital housekeeping I do for sites I expect to use often are themselves a measure of trust and this site has triggered the trust based housekeeping behaviour from me clearly.
Really like that there are no exclamation marks or all caps shouting throughout the post, and a quick visit to sunsetgrovestore maintained the same calm voice, restraint in punctuation signals confidence in the content and this site clearly trusts its substance to do the persuading rather than relying on typographic emphasis.
Took a screenshot of one section to come back to later, and a stop at openplainstrading prompted another saved tab, the urge to capture and revisit specific pieces of content is something I rarely feel but when I do it tells me the work is worth more than the average passing read for sure.
Honestly thank you to whoever wrote this because it scratched an itch I had not quite been able to articulate, and a stop at globaltrendcollection kept that satisfying feeling going, the kind of writing that meets unspoken needs is special and this site clearly has writers who understand their readers more than most do today.
Good clean post, no errors and no awkward phrasing that breaks the reading flow, and a stop at urbanstylecollection kept the same standard, definitely the kind of editorial care that earns a return visit because it tells me the writer is paying attention to details that matter to readers rather than just rushing publication.
Bookmark added with a small note about why, and a look at whisperingtrendstore prompted another bookmark with another note, the bookmarks I annotate are the ones I expect to return to deliberately rather than stumble into and this site is generating annotated bookmarks at a higher rate than my usual content sources by some margin.
Looking back on this reading session it stands as one of the better ones recently, and a look at everydayforestgoods extended that ranking, the informal ranking of reading sessions against each other is something I do mentally and this session ranks high largely because of this site and a couple of related pages here.
Refreshing tone compared to the dry corporate posts on similar topics, and a stop at everwildmarket carried that personality through nicely, you can tell when a real person is behind the writing versus a content team chasing metrics and this site definitely falls into the former category clearly across what I have seen.
Without comparing too aggressively to other sources this one stands out for the right reasons, and a look at softmorningshoppe continued that distinctive quality, content that distinguishes itself through substance rather than style tricks is content with lasting differentiation and this site has clearly chosen substance based differentiation as its core editorial strategy.
Reading this triggered a small but real correction in something I had assumed, and a stop at trendandstylezone extended that corrective effect, content that updates my beliefs through evidence rather than rhetoric is content with intellectual integrity and this site has earned that label consistently across the pieces I have read so far today.
If you asked me to point to a recent positive sign for the open web this site would be near the top, and a stop at brightfashionstore reinforced that designation, the few sites that serve as evidence the web can still produce quality independent content are precious and this one has clearly become one for me.
Now adding this to a short list of sites I would defend in a conversation about the modern web, and a look at rusticstoneemporium reinforced that defence list, the few sites that serve as evidence the web can still produce good things are precious and this one has clearly joined that small list of exemplary sites.
Generally my attention drifts on long posts but this one held it through the end, and a stop at modernshoppingcorner earned the same sustained focus, content that defeats my drift tendency is content with substantive pulling power and this site has demonstrated that pulling power across multiple pieces in a session that has now run quite long actually.
Glad I gave this a chance instead of bouncing on the headline, and after risingrivercollective I was certain I had made the right call, snap judgements based on titles miss a lot of good content and this is a reminder to slow down and check things out before scrolling past in a hurry.
Now setting up a small reminder to revisit the site on a slow day, and a stop at modernfablefinds confirmed the reminder was a good idea, planning return visits is a small organisational act that signals trust in ongoing quality and this site has earned that planned return through consistent performance across the pieces I have read so far.
Bookmark earned, calendar reminder set, share queued, all from one good post, and a look at fashiontrendcorner did the same, when a single reading session triggers multiple downstream actions you know the content has actually moved me beyond the page and this site is moving me at that higher level reliably.
Now noticing how rare it is to find a site that does not feel rushed, and a look at purechoicehub extended that calm pace, content produced without time pressure has a different quality than content shipped to meet a deadline and this site reads as written without urgency which produces a different and better experience for readers.
Considered as a whole this site has developed a coherent point of view that comes through in individual pieces, and a look at futurewildcollection continued displaying that coherence, sites with a unified perspective rather than a grab bag of takes are sites with editorial maturity and this one has clearly developed that maturity through years of work.
However many similar pages I have read this one taught me something new, and a stop at moongrovegallery added more new material, content that contributes genuinely fresh information rather than recycling what is already widely available is content with real informational value and this site is providing that informational freshness at a notable rate.
Came across this looking for something else entirely and ended up reading it through twice, and a look at softmoonmarket pulled me deeper into the site than I planned, the writing has a way of holding attention without resorting to manipulative cliffhangers or vague promises that never get delivered later down the page.
Felt the post handled a sensitive angle of the topic with appropriate care, and a look at puregiftoutlet extended that careful handling across related material, sites that can navigate delicate territory without causing damage are rare and require a level of judgement that comes from experience rather than from following any clear playbook.
If a friend asked me where to read carefully on the topic I would send them here without hesitation, and a look at everhilltrading confirmed the recommendation strength, the directness of my recommendation reflects how confident I am in the quality and this site has earned undiluted recommendations from me across multiple recent conversations actually.
Worth saying that the quiet confidence of the writing is what landed first, and a look at freshdailycorner continued that quiet quality, confident writing without the loud display of confidence is a rare combination and this site has clearly developed both the knowledge and the editorial restraint to land that combination consistently.
Now noticing how rare it is to find a site that does not feel rushed, and a look at discoverfashionfinds extended that calm pace, content produced without time pressure has a different quality than content shipped to meet a deadline and this site reads as written without urgency which produces a different and better experience for readers.
On reflection this is the kind of writing that improves my taste for what is possible in the format, and a look at bestbuyinghub continued raising that bar, content that elevates my expectations rather than lowering them is doing important work in calibrating my standards and this site is participating in that elevation reliably.
Will be coming back to this for sure, too much good content to absorb in one sitting, and a stop at globalfindsoutlet only added more pages I want to dig through, this site is going onto my regular rotation list because it consistently delivers something worth the visit lately rather than empty filler.
A slim post with substantial content per word, and a look at cozyorchardgoods maintained the same density, the content per word ratio is something I track informally and this site scores high on that ratio compared to most sources I read regularly which is a quiet indicator of careful editorial work behind the scenes.
Honestly this kind of writing is why I still bother to read independent sites, and a look at globalfindsmarket extended that broader reflection, the few sites that justify continued attention to non algorithmic content are sites like this one and finding them periodically is enough to keep my reading habits oriented toward independent rather than aggregated content.
Reading this between two meetings turned out to be the highlight of the morning, and a stop at modernvaluehub continued that highlight quality, content that outshines the structured parts of a working day is doing something well beyond ordinary and this site has produced multiple such highlights for me already this week alone.
Now setting up a small reminder to revisit the site on a slow day, and a stop at evernovaemporium confirmed the reminder was a good idea, planning return visits is a small organisational act that signals trust in ongoing quality and this site has earned that planned return through consistent performance across the pieces I have read so far.
Better than most of the writing I have come across on this topic recently, simpler and more direct, and a look at evermountainstyle continued in that same way, a real outlier in a crowded space full of repetitive content that says little while taking up a lot of reader time today which is unfortunate.
Liked the way the post handled the final paragraph, no neat bow but no abrupt cutoff either, and a stop at softmeadowstudio continued that thoughtful ending pattern, endings are hard and most blog writers either over engineer them or skip them entirely and this site has clearly figured out a sustainable middle approach.
Now feeling that this site is the kind I want to make sure does not disappear, and a look at brightlinecrafted reinforced that quiet protective feeling, the rare sites whose disappearance would actually matter to me are the sites I want to support through return visits and recommendations and this one has joined that small protected list.
Strong recommendation from me, anyone curious about the topic should make time for this, and a look at modernrootsmarket only sharpens that recommendation further, the kind of resource that holds up against careful scrutiny rather than crumbling at the first critical question is rare and worth pointing other people toward when the topic comes up.
Now noticing that the post avoided the temptation to be funny in places where humour would have undermined the substance, and a stop at startbuildingtoday maintained the same restraint, knowing when to be serious is a rare editorial virtue and this site has clearly developed it through what I assume is careful editorial practice over years.
Speaking honestly this is among the better discoveries of my recent browsing, and a stop at yourshoppingzone reinforced that discovery quality, the ranking of recent discoveries is informal but meaningful and this site has placed near the top of that ranking based on the consistency of quality across what I have already read carefully.
Took a chance on the headline and was rewarded, and a stop at timberwolfemporium kept the rewards coming as I clicked through, the kind of place where every link leads somewhere worth the click is a small luxury on the modern web where so many sites are mostly empty calories disguised as content.
Time spent here today felt productive in the way that good reading sessions sometimes do, and a stop at coastlinecrafted extended that productive feeling across the rest of the morning, the difference between productive reading and merely passing time is real and this site is consistently on the productive side for me lately.
Worth recognising that the post did not pretend to be the final word on the topic, and a stop at lunarwaveoutlet continued that humility, content that admits its own scope and limits is more trustworthy than content that overreaches and this site has clearly developed the editorial maturity to know what it can and cannot claim well.
Honestly this was a good read, no jargon and no padding, and a short look at freshseasonmarket kept that same feel going which I really appreciated, the writer clearly knows the topic well enough to explain it without hiding behind big words or filler that often gets used to seem clever.
The world of ultimate fighting http://www.t.me/s/UFClive_en/ expert predictions, MMA analysis, and exclusive content from inside the Octagon. Ultimate Fighting Championship news, fight breakdowns, fighter stats, and the main events of mixed martial arts.
Reading this in segments because the day was busy, and the post survived the fragmented attention well, and a stop at newleafcreations held up similarly under interrupted reading, content that can withstand modern distracted reading patterns rather than requiring a perfect block of focused time is increasingly the kind I prefer.
Reading this on the train into work was a better use of the commute than my usual choices, and a stop at silverbranchdesigns extended that commute reading well, content that improves transit time rather than just filling it is content with practical benefit and this site has earned its place in my morning commute reading rotation.
Real-time Formula 1 http://www.t.me/s/f1vpe/ news. Race results, driver transfers, round analysis, interviews, and the main events of the FIA ??World Championship.
A piece that took its time without dragging, and a look at brightfashionhub kept the same patient pace, the difference between unhurried and slow is a fine editorial distinction and this site has clearly found the unhurried side without slipping into the slow side which would have lost me as a reader quickly otherwise.
Liked that there was nothing performative about the writing, and a stop at discovernewworlds continued that genuine quality, performative writing tries to be witnessed rather than read and the difference between performance and substance is huge for the careful reader and this site has clearly chosen substance every time clearly.
Found the post genuinely useful for something I was working on this week, and a look at findyourstrength added more material I will reference, content that connects to my actual life and work rather than just being interesting in the abstract is the kind I will pay attention to and return to repeatedly.
Reading this gave me a small sense of progress on a topic I have been slowly working through, and a stop at globalfindscorner added another step forward, learning happens in small increments across many sources and finding sources that consistently contribute is the actual practical value of careful curation in an information rich world.
Reading this fit naturally into my afternoon walk because I was reading on my phone, and a stop at discoverbetteroffers continued well in that walking format, content that survives mobile reading without becoming awkward is content with format flexibility and this site has clearly thought about how it reads across different devices today.
Reading this site over the past week has changed how I evaluate content in this space, and a look at timberlakecollections extended that recalibration, the standards I bring to reading on the topic have shifted upward as a direct result of regular exposure to this kind of work and that shift will outlast any single reading session.
Reading this on a slow Sunday and finding it perfectly suited to a slow Sunday read, and a quick stop at urbanvaluecenter kept the same gentle pace, content that fits the mood of the moment is something I notice and remember and this site has the kind of pace that suits relaxed reading sessions especially well.
Worth flagging this post as worth a careful read rather than a casual skim, and a stop at urbanwildroot earned the same careful approach, the few sites that warrant slower reading are sites I now treat differently from the daily content stream and this one has clearly moved into that elevated treatment category.
Came away with some new perspectives I had not considered before, and after modernridgecorner those ideas felt more complete, the kind of content that stays with you a little while after reading rather than slipping out the moment you switch tabs and move on with your day to whatever comes next.
Quietly enjoying that I have found a new site to follow for the topic, and a look at everlinecollection reinforced the small pleasure of the find, the discovery of new high quality sources is one of the more durable pleasures of careful internet reading and this site has been generating that discovery pleasure at multiple points already today.
Genuine reaction is that I will probably think about this on and off for a few days, and a look at futurecreststudio added fuel to that, the best content lingers in your head after you close the tab rather than evaporating immediately and this site clearly knows how to write that kind of memorable content.
Speaking carefully because I do not want to overstate things this site is genuinely above average across multiple measurements, and a stop at newdawnessentials continued the above average performance, the calibration of judgement against potential overstatement is something I take seriously and this site clears the higher bar even after that calibration applies.
Reading this confirmed a small detail I had been uncertain about, and a stop at moonhavenemporium provided the source for further checking, content that supports verification through citations or links rather than just asserting facts is more trustworthy and this site has clearly built its credibility through that kind of verifiable approach consistently.
Now thinking about whether the writer might publish a longer form work I would buy, and a look at everwillowcrafts suggested the same depth would translate, content that makes me want to pay for related work in other formats is content that has earned commercial trust as well as attention trust and this site has both clearly.
Now setting this aside as a model of how to write thoughtfully on the topic, and a stop at discoverandshopnow extended that model status, content that becomes a reference for how a kind of writing should be done is content with influence beyond its own readership and this site is reaching that level for me clearly today.
Felt the writer respected me as a reader without making a show of doing so, and a look at evergardenhub continued that quiet respect, this is the kind of small but meaningful detail that separates the sites I bookmark from the ones I close after a single skim and never return to again no matter how interesting the headline.
Bookmark earned and folder updated to track this site separately, and a look at moderncollectionhub confirmed the folder upgrade was the right call, organising my reading list so that good sites do not get lost in a sea of casual bookmarks is something I do more carefully now and this site warranted its own spot.
Came across this and immediately thought of a friend who would enjoy it, and a stop at freshseasonhub also reminded me of someone, content that triggers the urge to share is content that has earned my recommendation and this site has earned multiple from me already across different conversations during the week.
Reading this confirmed something I had been suspecting about the topic, and a look at simplechoicecorner pushed that confirmation toward greater confidence, content that lines up with independently held intuitions earns a special kind of trust and I will return to writers who consistently land that way for me without overselling positions.
Now recognising the post as a rare example of careful writing on a topic that mostly receives careless treatment, and a stop at freshhomemarket extended that contrast with the average elsewhere, content that highlights how much the average is settling for low quality is content that has both internal merit and external value as a benchmark.
Decided to subscribe to the RSS feed if there is one, and a stop at kindlewoodmarket confirmed that decision, content that I want delivered to me proactively rather than just remembered when I have time is content that has earned a higher level of commitment from me as a reader looking for reliable sources.
If you scroll past this site without looking carefully you will miss something, and a stop at learnandshine extended that mild warning, the surface of the site does not advertise its quality loudly which means careful attention is required to recognise what is being offered here which is itself a kind of editorial signal.
Skipped past the first paragraph thinking it was setup and had to come back when the rest referenced it, and a stop at brightstonefinds similarly rewarded careful reading from the start, content where every paragraph carries weight is content I now know to read from the beginning rather than skipping ahead.
Speaking honestly this is among the better discoveries of my recent browsing, and a stop at mountainstartrends reinforced that discovery quality, the ranking of recent discoveries is informal but meaningful and this site has placed near the top of that ranking based on the consistency of quality across what I have already read carefully.
Solid recommendation from me to anyone working in the area, the perspective here is grounded, and a look at believeandachieve adds even more useful angles, the kind of site that becomes a reference rather than just a one time read which is a higher bar than most blogs ever reach today on the modern web.
Skipped the social share buttons but might come back to actually use one later, and a stop at globalfashioncorner extended that share urge, content that triggers genuine sharing impulses rather than performative ones is content that has actually moved me and not many posts in a typical week do that for me actually.
Honestly impressed by the consistency of voice across what I have read so far, and a quick visit to fashionloversmarket continued that consistent feel, when a site reads like one careful person rather than a committee the experience is more rewarding for the reader who notices these subtle editorial details over time.
Бытовая химия для дома https://bytovoy-ugolok.ru средства для уборки кухни, ванной, пола, стирки и дезинфекции. Заказывайте качественные товары для поддержания чистоты и комфорта с доставкой и выгодными предложениями.
Услуги грузчиков https://www.gruzchiki-kiev.net в Киеве для переездов, разгрузки транспорта, подъема мебели и строительных материалов. Профессиональные рабочие выполняют погрузочно-разгрузочные работы любой сложности, гарантируя аккуратное обращение с имуществом и оперативное выполнение заказа.
Reading this brought back an idea I had set aside months ago, and a stop at discovernewpaths added more substance to that idea, content that revives dormant projects in my own thinking is content with serious creative value and this site is contributing to my own work in ways I had not expected when first clicking through.
Good post, the kind that respects the reader by getting to the point quickly without skipping the details that matter, and a short look at discoverandshop confirmed that approach is consistent across the site which is rare to find online these days, definitely a place I will return to soon.
Glad I clicked through from where I did because this turned out to be worth the time spent, and after autumnstonecorner I had a fuller picture, the kind of content that earns its visitors through delivering value rather than chasing them through aggressive advertising or constant pop ups appearing everywhere on the screen lately.
Worth recognising the absence of the usual blog tropes here, and a look at silvermoonfabrics continued that fresh quality, sites that avoid the standard moves of the medium read as more original even when the content is on familiar topics and this one has clearly chosen its own path through the conventional terrain skilfully.
On reflection this is the kind of writing that improves my taste for what is possible in the format, and a look at pureeverwind continued raising that bar, content that elevates my expectations rather than lowering them is doing important work in calibrating my standards and this site is participating in that elevation reliably.
Skipped a meeting reminder to finish the post, and a stop at evergreenchoicehub held me past another reminder, when content beats meetings the writer is doing something extraordinary because meetings have institutional support behind them and yet good writing can still occasionally win that competition for attention which I find heartening today.
Worth your time, that is the simplest endorsement I can give, and a stop at bestvalueoutlet extends that endorsement across the rest of the site, this is one of those increasingly rare places that delivers on what it promises rather than over selling the content and under delivering on substance every time which I find frustrating elsewhere.
Granted my mood today might be elevating my reading experience but I still think this is genuinely good, and a stop at wildcreststudios reinforced that even discounted assessment, controlling for the mood adjustment that affects content perception this site still reads as substantively above average across multiple pieces I have read carefully today.
Glad I gave this a chance instead of bouncing on the headline, and after modernharborhub I was certain I had made the right call, snap judgements based on titles miss a lot of good content and this is a reminder to slow down and check things out before scrolling past in a hurry.
Now adding the homepage to my regular check rotation rather than waiting for individual links to find me, and a stop at brightpetalhub confirmed the rotation upgrade, the move from passive discovery to active checking is a vote of confidence in a sites ongoing quality and this site has earned that active engagement clearly.
Now feeling that this site is the kind I want to make sure does not disappear, and a look at yourshoppingcorner reinforced that quiet protective feeling, the rare sites whose disappearance would actually matter to me are the sites I want to support through return visits and recommendations and this one has joined that small protected list.
Found something quietly useful here that I expect to return to, and a stop at everwildharbor added more of the same, content with quiet utility ages well in a way that flashy hot takes do not and I have learned to weight quiet utility much higher when deciding what to bookmark for later use.
Speaking from the perspective of a fairly demanding reader the writing here clears the bar consistently, and a look at grandridgeessentials continued clearing that bar, the calibration of demanding reader is something I apply to all sources and this site has been one of the few that handles the demanding reading well across pieces sampled.
Now feeling the small relief of finding writing that does not condescend, and a stop at midriveremporium extended that respect for readers, content that treats its audience as capable adults rather than as people to be managed produces a different reading experience and this site has clearly chosen the respectful approach across all pieces.
Took longer than expected to finish because I kept stopping to think, and a stop at freshgiftoutlet did the same to me, content that provokes thought rather than just delivering information is in a different category and the team here is clearly working at that higher level rather than just cranking out posts.
Found this useful, the points line up well with what I have been thinking about lately, and a stop at grandriverfinds added some angles I had not considered yet, definitely walking away with more than I came for which is the best outcome from time spent reading online for any kind of topic.
Сервис оценки недвижимости https://shalmach.pro помогает быстро узнать примерную стоимость объекта, возможные риски и рекомендации перед сделкой. Анализируйте состояние жилья, бюджет покупки и сценарии дальнейших действий до подписания договора.
Now I want to find more sites like this but I suspect they are rare, and a look at freshfashionstore extended that thought, the few sites that meet this quality bar are precious specifically because they are rare and finding others like them is one of the ongoing projects of careful internet curation across the years.
Worth marking this site as one to come back to deliberately rather than by accident, and a stop at truewaveemporium reinforced that intention, the difference between sites I find again by chance and sites I return to on purpose is meaningful and this one has clearly moved into the deliberate return category for me.
Now noticing that the post did not mention the writer at all, focus stayed on the topic, and a look at fashionchoicecenter continued that author absent quality, content that disappears the writer to focus on the substance is a particular kind of generosity and this site has clearly chosen the substance over the personality consistently.
Reading this slowly to absorb the structure, and the structure is doing real work alongside the words, and a look at moderntrendoutlet maintained the same architectural quality, when sentence shapes and paragraph rhythms reinforce the meaning rather than just transporting words you know you are reading skilled work today.
Worth a quiet moment of recognition for the consistency I have noticed across multiple posts, and a stop at everforestdesign continued that consistent quality, sites that maintain quality across many pieces rather than peaking on one viral post are sites with real editorial discipline and this one has clearly developed that discipline carefully.
Useful reading material, the kind I can hand off to someone newer to the topic without worrying about confusing them, and a quick look at simplebuyinghub confirmed the same beginner friendly tone runs throughout the site which is great for sharing with people just starting their learning journey on this particular topic.
Recommended without reservation for anyone interested in the topic at any level of expertise, and a look at sunwindemporium only strengthens that recommendation, this site clearly knows how to serve readers across a range of backgrounds without watering down the content or talking past anyone in the audience which is genuinely impressive to see.
If I am being honest this is the kind of site I quietly hope my own work will someday resemble, and a stop at urbantrendfinds extended that aspirational feeling, finding work that models what I want to produce is part of why I read carefully and this site has been performing that modelling function for me lately consistently.
This one is staying open in a tab for the rest of the day so I can come back and re read certain parts, and a look at dailyvaluecorner suggests I will be doing the same with a few more pages here too, this is going to be a deep dive over the coming hours.
Felt like I was reading something written by someone who actually thinks about the topic rather than reciting it, and a look at silverharvesthub reinforced that impression, the difference between recited content and considered content is huge and this site clearly belongs to the latter category which I appreciate as a careful reader looking for substance.
Quietly the writers approach to the topic differs from the dominant takes I have been encountering, and a stop at puremeadowmarket extended that distinctive approach, content that maintains a different perspective without explicitly arguing against the dominant ones is content with confident editorial identity and this site has that confidence throughout pieces.
Reading this triggered a small but real correction in something I had assumed, and a stop at creativelivingcorner extended that corrective effect, content that updates my beliefs through evidence rather than rhetoric is content with intellectual integrity and this site has earned that label consistently across the pieces I have read so far today.
Reading this fit naturally into my afternoon walk because I was reading on my phone, and a stop at everglowdesignmarket continued well in that walking format, content that survives mobile reading without becoming awkward is content with format flexibility and this site has clearly thought about how it reads across different devices today.
Saving the link for sure, this one is a keeper, and a look at freshdailyfinds confirmed I should bookmark the entire site rather than just this page, the consistency across what I have seen so far suggests there is a lot more here worth coming back for soon when I have more time.
Thanks for the moderate length, neither so short it skips substance nor so long it bloats, and a stop at modernfashionchoice hit the same balance, the right length is one of the hardest things to calibrate in blog writing and I appreciate when a team has clearly thought about it rather than defaulting.
Now sitting back and recognising that this was a small but real win in my reading day, and a stop at goldenvinemarket extended that quiet win, the cumulative effect of small reading wins versus the cumulative effect of small reading losses is real over time and this site is contributing to the wins side of that ledger.
Good post, the kind that respects the reader by getting to the point quickly without skipping the details that matter, and a short look at wildmooncorners confirmed that approach is consistent across the site which is rare to find online these days, definitely a place I will return to soon.
Reading this in the gap between work projects was a small but meaningful break, and a stop at wildcrestemporium extended that gentle reset, content that provides genuine refreshment rather than just distraction during work breaks is content with a particular kind of utility and this site fits that role for me reliably during work days.
Really appreciate that the writer did not stretch the post to hit some target word count, the points end when they are made, and a stop at freshdailydeals reflected the same discipline, brevity is generosity in disguise and this site has clearly figured that out far better than most blog operations have.
Reading this felt easy in the best way, no friction and no confusion at any point, and a stop at midnighttrendhouse carried that same comfort across more pages, the kind of editorial flow that lets you absorb information without fighting the format which is increasingly hard to find on the open web today across topics.
Decided this was the best thing I had read all morning, and a stop at growwithpurpose kept that ranking intact, ranking my reading is something I do mentally throughout the day and the top rank is competitive and not easily won but this site won it without needing to overstate its claims for that.
Honestly this hits the sweet spot between detail and brevity, no rambling and no shortcuts, and a quick visit to besttrendmarket kept that going across the related pages, the kind of place that respects your attention without trying to grab it through cheap tactics or attention seeking design choices that get tired fast.
Following a few of the internal links revealed more posts of similar quality, and a stop at goldensagecollections added more to that growing pile, sites where internal links lead to more good content rather than to more of the same recycled material are sites with depth and this one has clearly built that depth carefully.
Most attempts at writing on this topic feel like they are missing something and this post finally identified what was missing, and a look at freshgiftcollection extended that diagnostic clarity, content that names what is wrong with adjacent treatments while doing better itself is content with both critical and constructive value and this site has both.
Bookmark earned and folder updated to track this site separately, and a look at wildnorthtrading confirmed the folder upgrade was the right call, organising my reading list so that good sites do not get lost in a sea of casual bookmarks is something I do more carefully now and this site warranted its own spot.
A small thing but the line spacing and font choices made reading this physically pleasant, and a look at exploreopportunities maintained the same careful design, technical choices about typography are part of what makes online reading actually comfortable and this site has clearly invested in the design layer alongside the content layer carefully.
Reading this prompted a small redirection in something I was working on, and a stop at modernfashionzone extended that redirecting influence, content that affects my actual work rather than just my thinking has the highest practical impact and this site is providing that level of influence for me at a sustainable rate apparently.
Now feeling confident that this site will continue producing work I will want to read, and a look at sunmeadowgallery extended that confidence into the future, projecting forward from current quality to expected future quality is something I do for sites I genuinely follow and this one has earned that forward looking trust clearly today.
Coming back tomorrow when I can give this a proper read, the post deserves better attention than I can give right now, and a look at simplebuycorner suggests there is plenty more here that deserves the same treatment, definitely a site I will be exploring properly over the next few days when I can.
Strong recommendation from me, anyone curious about the topic should make time for this, and a look at timberpathstore only sharpens that recommendation further, the kind of resource that holds up against careful scrutiny rather than crumbling at the first critical question is rare and worth pointing other people toward when the topic comes up.
Decent post that improved my afternoon a small amount, and a look at softpineemporium added a bit more to that, sometimes the small wins online add up over time and a useful site like this one is the kind of place that contributes consistently to those small wins for me lately across many different topics I follow.
Genuinely glad I clicked through to read this rather than skipping past, and a stop at buildyourownfuture confirmed I should keep clicking through to more pages here, the kind of resource that justifies its place in my browser history rather than feeling like wasted time which is the highest compliment I offer any site online today.
При правильном подходе хрумер прогон https://www.olx.ua/d/uk/obyavlenie/progon-hrumerom-dr-50-po-ahrefs-uvelichu-reyting-domena-IDXnHrG.html помогает улучшить позиции сайта в поисковой выдаче.
Thanks again for the post, I learned a couple of things I can actually use later this week, and after I went over creativegiftstore the rest of the site looked equally promising, definitely going to spend more time here when I get a free moment over the weekend to read more carefully.
Really appreciate the confidence to make a clear point rather than hedging everything, and a quick visit to wildcoastworkshop maintained the same direct stance, writing that takes positions rather than equivocating is more useful even when the positions are debatable because at least the reader has something to react to clearly.
Really appreciate the lack of pop ups, modals, cookie banners stacking on top of each other, and a quick visit to urbantrendstore confirmed the same clean approach across the rest of the site, technical decisions about user experience are part of what makes content actually pleasant to engage with for sure.
Bookmark earned and shared the link with one specific person who would care, and a look at rusticriverstudio got the same targeted share, sharing carefully rather than broadcasting is a discipline I try to maintain and this site is generating shares from me at a sustainable rate rather than the spam rate of viral content.
If a friend asked me where to read carefully on the topic I would send them here without hesitation, and a look at coastalmeadowmarket confirmed the recommendation strength, the directness of my recommendation reflects how confident I am in the quality and this site has earned undiluted recommendations from me across multiple recent conversations actually.
Genuine reaction is that this site clicked with how I like to read, and a look at modernfashioncenter kept that comfortable fit going, sometimes you find a place online whose editorial decisions just align with your preferences and when that happens it is worth recognising and supporting through repeat engagement consistently going forward.
Bookmark added without hesitation after finishing, and a look at moonhavenstudio confirmed I should bookmark the homepage too rather than just this page, the rare site that earns category level trust rather than just single article approval is the kind I want to rely on across many different topics over time.
Decided not to comment because the post said what needed saying, and a stop at timelessgrovehub continued that complete feel, content that does not invite obvious additions or corrections from readers is content that has been carefully considered and this site appears to consistently produce pieces that satisfy rather than provoke unnecessary follow ups.
Now thinking I want more sites built on this kind of editorial foundation, and a stop at everpathcollective extended that wish into a broader hope, sites built on substance and care rather than on metrics and growth are the kind of sites I want to see more of and this one is a small example worth supporting.
Now noticing that the post did not mention the writer at all, focus stayed on the topic, and a look at explorelimitlessgrowth continued that author absent quality, content that disappears the writer to focus on the substance is a particular kind of generosity and this site has clearly chosen the substance over the personality consistently.
Reading this on a long flight and finding it the best thing I read across hours of trying, and a stop at softleafemporium kept the streak going, when content beats long flight reading you know it has substance because flight reading is a hard test of a piece given the alternatives available everywhere.
Honest opinion is that this is the kind of post that builds long term trust with readers, and a look at everrootcollections reinforced that perception, the slow accumulation of trust through consistent quality is the only sustainable way to build a real audience and this site is clearly playing that long game.
Honestly this was the highlight of my reading queue today, and a look at dailytrendmarket extended that across more pages I will return to, ranking what I read against what else I read each day is something I do informally and this site keeps moving up in those rankings the more I explore it.
Appreciated how the post felt complete without overstaying its welcome, and a stop at urbanstyleoutlet confirmed that economical approach runs across the site, knowing when to stop is a skill many writers never develop but here the discipline is obvious and welcome from the perspective of a busy reader trying to learn things efficiently.
A clear cut above the usual noise on the subject, and a look at findnewhorizons only made that gap wider in my view, the kind of place that earns its visitors through quality rather than through aggressive marketing or sponsored placements which is increasingly the only way most sites stay afloat across the modern web.
Reading the writers other posts after this one suggests the quality is consistent rather than peak, and a stop at wildfieldmercantile confirmed the consistent quality reading, sites that hold the same level across many pieces rather than peaking on a few are sites with sustainable editorial discipline and this one has clearly developed that.
Liked the balance between depth and brevity, never too shallow and never too long, and a stop at everwildgrove kept the same balance going across the rest of the site, this is one of the harder skills in writing and the team here clearly has it figured out very well indeed across every page.
The pacing of the post was just right, never rushed and never dragged out unnecessarily, and a look at besthomefinds maintained the same rhythm, you can tell the writer has experience because the difficult skill of pacing is something only practiced writers manage to handle well in long form content over time and across formats.
Speaking from the perspective of a fairly demanding reader the writing here clears the bar consistently, and a look at shopwithstyletoday continued clearing that bar, the calibration of demanding reader is something I apply to all sources and this site has been one of the few that handles the demanding reading well across pieces sampled.
Honestly impressed by how much useful content sits in such a small post, and a stop at budgetfriendlyhub confirmed the rest of the site packs a similar punch, density without confusion is a hard balance to strike and this site has clearly cracked the code on it across many different topic areas covered.
Worth recognising that the post handled a familiar topic without reaching for any of the obvious hot takes, and a stop at creativegiftmarket continued that fresh treatment, sites that find new angles on subjects others have exhausted are sites worth following carefully and this one has clearly developed that exploratory instinct through patient practice.
A piece that handled the topic with appropriate weight without becoming portentous, and a look at tallcedarmarket continued that calibrated seriousness, content that takes itself seriously without becoming pompous is something this site has clearly figured out and the balance shows up in every piece I have read across multiple sessions now.
Good clean post, no errors and no awkward phrasing that breaks the reading flow, and a stop at groweverydaynow kept the same standard, definitely the kind of editorial care that earns a return visit because it tells me the writer is paying attention to details that matter to readers rather than just rushing publication.
Took something from this I did not expect to find, and a stop at lunarharvestgoods added another unexpected useful piece, content that exceeds expectations rather than just meeting them is the kind that builds enthusiasm and earns repeat visits without any explicit ask from the writer or platform behind the work being read.
Took a quick scan first and then went back to read properly because the post deserved it, and a stop at whitestonechoice kept me reading carefully too, the kind of writing that earns a slower second pass rather than getting skimmed and forgotten is something I value highly when I happen to find it.
A memorable post for me on a topic I had thought I was tired of, and a look at lushvalleychoice suggested the same site can refresh other tired topics, sites that can revive my interest in subjects I had written off as exhausted are doing rare work and this one is clearly doing that for me today.
Honestly impressed by how much useful content sits in such a small post, and a stop at urbanstonegallery confirmed the rest of the site packs a similar punch, density without confusion is a hard balance to strike and this site has clearly cracked the code on it across many different topic areas covered.
A modest masterpiece in its own quiet way, and a look at apexhelm confirmed the same quiet quality across the rest of the site, calling something a masterpiece is usually overstating but for content this carefully crafted the word feels appropriate even if the writers themselves would probably resist the label honestly.
Thanks for the moderate length, neither so short it skips substance nor so long it bloats, and a stop at evergreenstyleplace hit the same balance, the right length is one of the hardest things to calibrate in blog writing and I appreciate when a team has clearly thought about it rather than defaulting.
Decided not to comment because the post said what needed saying, and a stop at discoverbettervalue continued that complete feel, content that does not invite obvious additions or corrections from readers is content that has been carefully considered and this site appears to consistently produce pieces that satisfy rather than provoke unnecessary follow ups.
Probably this is one of the better quiet successes on the open web at the moment, and a look at moonviewdesigns reinforced that quiet success quality, sites that are doing well without making a noise about doing well are the sites I most respect and this one has clearly chosen the quiet success path consistently throughout.
I learned more from this short post than from longer articles I read earlier today, and a stop at silvergardenmart added even more useful detail without going off topic, this site clearly knows how to keep things focused without sacrificing depth which is a hard balance to strike for any writer.
In the middle of an otherwise scattered day this post landed as a moment of focus, and a stop at moongladeboutique extended that focused feeling across more pages, content that anchors a fragmented day rather than contributing to the fragmentation is content with real centring effect and this site is providing that anchoring function for me.
Skipped the comments to avoid spoilers and came back later to find them genuinely worth reading, and a stop at brightfloralhub extended that surprised respect, when the discussion below a post matches the quality of the post itself you have found something special and this site appears to attract that kind of audience.
A piece that reads like it was written for me without claiming to be written for me, and a look at discoverandshopnow produced the same fit, when the writer audience match clicks naturally without being engineered through demographic targeting you know the writing is solid and this site has that natural fit consistently for me.
Really appreciate that the writer did not stretch the post to hit some target word count, the points end when they are made, and a stop at wildshoregalleria reflected the same discipline, brevity is generosity in disguise and this site has clearly figured that out far better than most blog operations have.
Really clear writing, the kind that makes you want to share the link with someone who has been asking about the topic, and a quick browse through edendome only made me more sure of that, the information here stays useful long after the first read is done which says a lot.
Reading this gave me a small refresher on something I had partially forgotten, and a stop at trendyvaluezone extended the refresher, content that strengthens existing knowledge rather than just adding new is content with a particular kind of consolidating value and this site is providing that consolidating function across multiple visits.
Well done, the kind of post that makes you slow down and actually read instead of skimming for keywords, and a look at frameparish kept me reading carefully too, that is a sign of writing that has been crafted rather than churned out for an algorithm to see today and tomorrow.
Now planning a longer reading session for the archives, and a stop at cosmohorizon confirmed the archives are worth that longer commitment, sites with archives I want to read deliberately rather than just sample are rare and this one has clearly earned that level of interest based on the consistency of what I have already read.
Now considering carefully how to share this site with the right audience rather than broadcasting widely, and a look at firminlet extended that careful sharing impulse, content worth sharing carefully rather than spamming is content that has earned a higher kind of recommendation and this site has earned that careful shareability throughout pieces.
Closed the tab and immediately reopened it ten minutes later because I wanted to reread a part, and a stop at irisarbor drew the same return, content that pulls you back after closing it is doing something well beyond the average and worth marking as exceptional in my mental catalogue of reliable sites.
Refreshing tone compared to the dry corporate posts on similar topics, and a stop at fullcirclemart carried that personality through nicely, you can tell when a real person is behind the writing versus a content team chasing metrics and this site definitely falls into the former category clearly across what I have seen.
Liked that the post left some questions open rather than pretending to settle everything, and a stop at shopwithjoy continued that intellectual honesty, content that respects the limits of its own claims is more trustworthy than content that overreaches and this site has clearly figured out which positions it can defend confidently.
Generally I am cautious about recommending sites on first encounter but this one warrants the exception, and a look at lagooncrown reinforced the exception making, the rare site that justifies breaking my normal cautious approach is the rare site worth flagging early and this one has prompted exactly that early flagging response from me.
Adding this site to my regular reading list, the post earned that on its own, and a quick stop at marveldome sealed the decision, the kind of place worth checking back with from time to time because it consistently produces material that holds up against a critical reading too which I really value.
Looking back on this reading session it stands as one of the better ones recently, and a look at classystylemarket extended that ranking, the informal ranking of reading sessions against each other is something I do mentally and this session ranks high largely because of this site and a couple of related pages here.
Quality writing that respects the reader’s intelligence without overloading them, and a quick look at brightwindemporium reflected that approach, a balanced thoughtful site that earns trust by being consistent rather than by shouting about how trustworthy it is which is the usual approach online sadly across most content categories.
Reading this slowly in the morning before opening email, and a stop at softfeathermarket extended that protected attention, content that earns the prime morning reading slot before the daily distractions begin is content with elevated status and this site has earned that prime slot consistently in my recent reading habits clearly.
Considered against the flood of similar content this one stands apart in important ways, and a stop at bravofarm extended that distinctive feel, sites that find their own corner of a crowded topic and stay there are sites worth following and this one has clearly carved out its own space and committed to defending it carefully.
Felt like I was reading something written by someone who actually thinks about the topic rather than reciting it, and a look at findnewdeals reinforced that impression, the difference between recited content and considered content is huge and this site clearly belongs to the latter category which I appreciate as a careful reader looking for substance.
Over the course of reading several posts here a pattern of quality has emerged, and a stop at softpineoutlet confirmed the pattern, the difference between sites that hit quality occasionally and sites that hit it consistently is huge and this site has clearly demonstrated the consistent kind through what I have read this morning.
Even just sampling a few posts the consistency is what stands out, and a look at dailyfindsmarket confirmed the broader pattern, sites where every piece I sample lives up to the standard set by the others are sites with serious quality control and this one has clearly invested in whatever editorial process produces that consistency reliably.
Came back to this twice now in the same week which is unusual for me, and a look at urbanpeakselection suggested I will keep coming back, the kind of post that earns repeated visits rather than one and done reading is the gold standard for content quality and this site clearly hit that standard.
Really appreciate the absence of stock photos that have nothing to do with the content, and a quick visit to blueharborbloom maintained the same restraint, visual filler is a tell that the writing cannot stand on its own and the lack of it here suggests the team has confidence in their content quality alone.
One of the more honest takes on the topic I have seen lately, no spin and no oversell, and a stop at wildridgeattic kept that going, the kind of voice the open web could use a lot more of rather than the endless echo chamber of recycled opinions floating around every social platform these days.
Honest reaction is that I want to send this to a friend who would benefit from it, and a look at softfeathergoods added more material I will pass along too, the impulse to share is the strongest signal I have for content quality and this site is generating that impulse cleanly across multiple posts.
If the topic interests you at all this is a place to spend time, and a look at freshcluster reinforced that recommendation, the broader question of where to invest topical reading time is one this site answers convincingly through the consistent quality across multiple pieces I have sampled during the current reading session today.
A piece that read as if the writer was thinking carefully rather than just typing fluently, and a look at flareaisle continued that considered quality, the difference between fluent typing and careful thinking shows up in writing and this site reads as the product of thought rather than just the product of language fluency apparently.
Found the post genuinely useful for something I was working on this week, and a look at cosmoorchid added more material I will reference, content that connects to my actual life and work rather than just being interesting in the abstract is the kind I will pay attention to and return to repeatedly.
Coming back to this one, definitely, and a quick visit to irisbureau only made me more sure of that, the kind of writing that makes you want to set aside time later rather than rushing through it now while distracted by everything else competing for attention on the screen today across so many tabs.
Reading this prompted me to send the link to two different people for two different reasons, and a stop at autumnmistemporium provided ammunition for a third share, content that suits multiple audiences without being generic enough to be useless to any of them is genuinely valuable and this site has that multi audience quality clearly.
Honestly enjoyed every minute spent here, that is not something I say lightly, and a look at urbantrendmarket confirmed I will be back, the bar for spending time online is high for me these days but this site clears it without effort which is high praise indeed from this reader who is usually rather demanding.
Felt the post was written for someone like me without explicitly addressing me, and a look at globalvaluecorner produced the same fit, when content lands on its target without pandering you know the writer has done careful audience thinking rather than relying on demographic targeting or interest signals to do the work of editorial decisions.
Reading the writers other posts after this one suggests the quality is consistent rather than peak, and a stop at oceanleafcollections confirmed the consistent quality reading, sites that hold the same level across many pieces rather than peaking on a few are sites with sustainable editorial discipline and this one has clearly developed that.
Worth saying this site reads better than most paid newsletters I have tried, and a stop at buildyourownfuture confirmed that comparison, the bar for free content is often lower than for paid but this site clears the paid bar consistently and that says something about the editorial approach behind the work being published here regularly.
Speaking from the perspective of a fairly demanding reader the writing here clears the bar consistently, and a look at shopthelatestdeals continued clearing that bar, the calibration of demanding reader is something I apply to all sources and this site has been one of the few that handles the demanding reading well across pieces sampled.
Appreciate the thoughtful approach, the writer clearly took time to make this readable for someone who is not already an expert, and a look at bravoparish kept that going nicely, easy on the eyes and easy on the brain which is always a winning combination when reading on a busy day.
Now recognising the post as a rare example of careful writing on a topic that mostly receives careless treatment, and a stop at lagoonforge extended that contrast with the average elsewhere, content that highlights how much the average is settling for low quality is content that has both internal merit and external value as a benchmark.
Reading carefully here has reminded me what reading carefully feels like, and a look at meritgrange extended that reminder, the experience of careful reading versus skimming is different in ways I had partially forgotten and this site has clearly refreshed my memory of what attention feels like when content rewards it consistently.
Now planning to share the link with a small group of readers I trust, and a look at brightcollectionhub suggested more material to share with the same group, recommending content into a curated circle requires confidence in the recommendation and this site is making me confident in those personal recommendations on multiple separate occasions now.
Really nice to see things explained without overcomplicating the topic, the words flow naturally and stay easy to follow, and a short visit to brightpeakharbor only added to that experience because the same simple approach is used across the rest of the page too without any change in tone.
Comfortable reading experience throughout, no jarring tone shifts and no awkward formatting, and a look at coastalridgecorner kept that smooth feel going, the kind of editorial polish that goes unnoticed when present but glaring when absent is something this site has clearly invested in across the broader content as well which deserves recognition.
Just enjoyed the experience without needing to think about why, and a look at createyourpath kept that effortless feeling going, sometimes the best content is invisible in the sense that you forget you are reading until you reach the end and realise time has passed without you noticing it pass naturally.
Came away feeling slightly smarter than I was when I started, that is a real win, and a stop at dailyshoppingplace added a bit more to that, the rare site that actually transfers some of its knowledge to the reader in a way that sticks rather than just creating an illusion of learning briefly.
Now adding this site to a small mental group of recommendations I keep ready for specific kinds of inquiries, and a stop at freshguild extended the recommendation readiness, content that I can confidently point friends and colleagues toward in specific contexts is content with real social utility and this site has that utility clearly.
Reading this on the train into work was a better use of the commute than my usual choices, and a stop at deepbrookcorner extended that commute reading well, content that improves transit time rather than just filling it is content with practical benefit and this site has earned its place in my morning commute reading rotation.
Took a quick scan first and then went back to read properly because the post deserved it, and a stop at newharborbloom kept me reading carefully too, the kind of writing that earns a slower second pass rather than getting skimmed and forgotten is something I value highly when I happen to find it.
Liked how the writer used real examples instead of theoretical ones to make the points stick, and a stop at shopthelatestdeals added even more concrete examples, this is the kind of practical approach that respects readers who actually want to apply what they learn rather than just nodding along passively without doing anything useful.
Now adding this to a short list of sites I would defend in a conversation about the modern web, and a look at flarefest reinforced that defence list, the few sites that serve as evidence the web can still produce good things are precious and this one has clearly joined that small list of exemplary sites.
Solid little post, the kind that does not need to be flashy because the substance is doing the work, and a look at cosmoprairie kept that quiet confidence going across the site, this is what writing looks like when the writer trusts the content to land on its own without theatrics or unnecessary attention seeking behaviour.
Closed and reopened the tab three times before finally finishing, and a stop at findbettervalue held my attention straight through, sometimes content fights for time against my own distraction and the times it wins say something positive about its quality and this post clearly won that fight today afternoon for me.
Reading this in a relaxed evening setting was a small pleasure, and a stop at islemeadow extended the pleasant evening reading, content that fits the tone of relaxed time without becoming forgettable is what I look for in evening reading and this site has the right tone for that particular slot in my daily reading routine.
I came here looking for a quick answer and ended up reading the whole post because it was actually interesting, and after wildgroveemporium I had a much fuller picture, no stress and no confusion just a clear walk through the topic that made everything fall into place without much effort.
One of the more honest takes on the topic I have seen lately, no spin and no oversell, and a stop at bravopier kept that going, the kind of voice the open web could use a lot more of rather than the endless echo chamber of recycled opinions floating around every social platform these days.
Reading this as part of my evening winding down routine fit perfectly, and a stop at brightstylemarket extended the wind down nicely, content that calms rather than agitates is what I want at the end of the day and this site provides that calming reading experience reliably which is increasingly rare across the modern web.
Reading this in the morning set a good tone for the day, and a quick visit to uniquetrendcollection kept that good tone going, content can do that sometimes when it hits the right notes and finding sites that consistently strike that tone is something I have learned to recognise and reward with regular visits.
Most attempts at writing on this topic feel like they are missing something and this post finally identified what was missing, and a look at shopthebestfinds extended that diagnostic clarity, content that names what is wrong with adjacent treatments while doing better itself is content with both critical and constructive value and this site has both.
Glad to find a site whose links lead somewhere worth going rather than back to itself for SEO juice, and a stop at meritlibrary kept that generous outbound feel, citing other peoples work with real respect rather than just for ranking signals is a sign of an honest operation worth supporting going forward.
Thanks for the practical examples scattered through the post rather than abstract theory only, and a look at beststylecollection continued that grounded style, abstract points are easier to remember when paired with concrete situations and the writers here clearly understand how readers actually retain information from blog content reading sessions.
Reading this on a long flight and finding it the best thing I read across hours of trying, and a stop at brightmoorcorner kept the streak going, when content beats long flight reading you know it has substance because flight reading is a hard test of a piece given the alternatives available everywhere.
If I were to recommend a starting point for the topic this site would be near the top of my list, and a stop at lagoonmill reinforced that recommendation status, the small list of starting point recommendations I keep for friends asking about topics is short and this site is now firmly on it.
A memorable post for me on a topic I had thought I was tired of, and a look at frostcoast suggested the same site can refresh other tired topics, sites that can revive my interest in subjects I had written off as exhausted are doing rare work and this one is clearly doing that for me today.
Honestly impressed by how much useful content sits in such a small post, and a stop at starlightforest confirmed the rest of the site packs a similar punch, density without confusion is a hard balance to strike and this site has clearly cracked the code on it across many different topic areas covered.
Took some notes for a project I am working on, and a stop at softblossomstudio added more raw material to those notes, content that contributes to my own creative work rather than just being interesting in the moment is the kind I value most and the kind I will keep coming back to repeatedly.
Probably one of the more reliable sources I have found for this kind of careful coverage, and a look at flarefoil reinforced the reliability, the small group of sources I would describe as reliable for a given topic is curated carefully and this site has earned a place in that small group through consistent performance.
Glad the writer did not feel compelled to cover every possible angle of the topic, focus is a virtue, and a stop at goldenmeadowsupply reflected the same disciplined scope, knowing what to leave out is half of what makes good writing good and this post has clearly been edited with that principle in mind.
Generally I bookmark sparingly to avoid building up a bookmark graveyard but this one earned a permanent slot, and a stop at urbanstylechoice extended that permanence designation, the few sites I keep permanent bookmarks for are sites I expect to use repeatedly and this one has clearly cleared that expectation bar today.
Generally my attention drifts on long posts but this one held it through the end, and a stop at curiopact earned the same sustained focus, content that defeats my drift tendency is content with substantive pulling power and this site has demonstrated that pulling power across multiple pieces in a session that has now run quite long actually.
Reading this confirmed a hunch I had been carrying about the topic without having articulated it, and a stop at isleparish extended the confirmation, content that gives shape to fuzzy intuitions is doing the rare work of making private thoughts public and this site is providing that articulating service consistently for me lately.
Adding this to my list of go to references for the topic, and a stop at globalseasonstore confirmed the rest of the site deserves the same, definitely the kind of resource that earns its place rather than getting forgotten the moment the next interesting article shows up in my feed somewhere else on the web.
Honest opinion is that this is the kind of post that builds long term trust with readers, and a look at sunsetcrestboutique reinforced that perception, the slow accumulation of trust through consistent quality is the only sustainable way to build a real audience and this site is clearly playing that long game.
Reading this in the time it took to drink half a cup of coffee, and a stop at briskcanopy fit naturally into the second half, content that respects the rhythms of a typical morning is content with practical fit and this site has the kind of length and pacing that works for the way I actually read.
Reading this on a difficult day was a small bright spot, and a stop at meritmarina extended that brightness, content that improves a hard day is content that has earned a particular kind of place in my reading habits and this site is occupying that uplifting role for me today which I appreciate clearly.
Felt the writer respected me as a reader without making a show of doing so, and a look at cozytimberoutlet continued that quiet respect, this is the kind of small but meaningful detail that separates the sites I bookmark from the ones I close after a single skim and never return to again no matter how interesting the headline.
Glad I gave this fifteen minutes rather than the usual three minute skim, and a look at creativehomeoutlet earned the same investment, time spent on quality content is rarely wasted but the reverse is also true and learning which sites deserve which kind of attention is part of being a careful online reader.
Reading this in a relaxed evening setting was a small pleasure, and a stop at frostorchard extended the pleasant evening reading, content that fits the tone of relaxed time without becoming forgettable is what I look for in evening reading and this site has the right tone for that particular slot in my daily reading routine.
Took the time to read every paragraph rather than skimming for the punchline, and a quick visit to brighttimbermarket earned the same careful attention from me, that is the highest signal I can give about content quality because my default mode is rapid scanning rather than deliberate reading on most pages.
A thoughtful read in a week that has been mostly noisy, and a look at bestdailycorner carried that thoughtful quality across more pages, finding pockets of considered writing in a week of distractions is one of the small wins of careful curation and this site is providing those pockets at a sustainable rate.
The conclusions felt earned rather than tacked on at the end like an afterthought, and a look at dreamcrestridge kept that careful structure going, you can tell when a writer has thought about the shape of their post versus just letting it ramble out and hoping for the best at the end which most do.
Quality writing that respects the reader’s intelligence without overloading them, and a quick look at purefashionchoice reflected that approach, a balanced thoughtful site that earns trust by being consistent rather than by shouting about how trustworthy it is which is the usual approach online sadly across most content categories.
Great work on keeping things readable, the post never drags or repeats itself which I really appreciate, and a stop at lakeblossom added a bit more context that fit naturally with what was already said here, no need to read everything twice to get the point being made today.
A piece that ended with a clean landing rather than fading out, and a look at flareinlet maintained the same crisp conclusions, endings that resolve rather than dissolve are a sign of careful structural thinking and this site has clearly invested in how its pieces conclude rather than letting them simply run out of energy.
Took a few notes from this post, the points are easy to remember without needing to come back and check, and a look at sunsetpinecorner added a couple more, the kind of place that sticks in the memory long after the browser tab has been closed for the day which says a lot really.
The use of plain language without dumbing down the topic was really well done, and a look at dazzquay continued in that same accessible style, this is something many technical writers fail at because they either confuse their readers or condescend to them but here neither problem appears at all which is impressive really.
Picked this for a morning recommendation in our company chat, and a look at isleprairie suggested I will mention this site again later, recommending content into a workplace context is a small editorial act that requires confidence in the recommendation and this site is making me confident in those recommendations consistently here too.
Really appreciate the confidence to make a clear point rather than hedging everything, and a quick visit to urbanmeadowboutique maintained the same direct stance, writing that takes positions rather than equivocating is more useful even when the positions are debatable because at least the reader has something to react to clearly.
However measured this site clears the bar I set for sites I take seriously, and a stop at uniquegiftoutlet continued clearing that bar, the metrics I use for site quality are admittedly informal but they are consistent and this site has cleared them on multiple measurements across multiple visits which is meaningful for my evaluation.
Glad to find a site whose links lead somewhere worth going rather than back to itself for SEO juice, and a stop at briskolive kept that generous outbound feel, citing other peoples work with real respect rather than just for ranking signals is a sign of an honest operation worth supporting going forward.
Reading this between two meetings turned out to be the highlight of the morning, and a stop at lunarbranchstore continued that highlight quality, content that outshines the structured parts of a working day is doing something well beyond ordinary and this site has produced multiple such highlights for me already this week alone.
Excellent post, balanced and well organised without showing off, and a stop at lunarcrestlifestyle continued in that same vein, this site has clearly figured out the formula for content that works for readers rather than for search engine ranking signals which is harder than it sounds today and worth real recognition from anyone.
Found the post genuinely useful for something I was working on this week, and a look at galafactor added more material I will reference, content that connects to my actual life and work rather than just being interesting in the abstract is the kind I will pay attention to and return to repeatedly.
A clean read with no irritations, and a look at meritpoise continued that frictionless quality, the absence of small irritations is something I notice only when present elsewhere and this site is one of the rare places where everything just works and lets me focus on the substance rather than fighting the format.
Worth recognising that the post did not pretend to be the final word on the topic, and a stop at carefreecornerstore continued that humility, content that admits its own scope and limits is more trustworthy than content that overreaches and this site has clearly developed the editorial maturity to know what it can and cannot claim well.
Walked away in a slightly better mood than when I started reading, that says something about the writing, and a stop at autumnpeakstudio kept that going, content that leaves you feeling more capable rather than overwhelmed is the kind I keep coming back to again and again over the years and across many topics.
Decided this was the best thing I had read all morning, and a stop at urbanfashiondeal kept that ranking intact, ranking my reading is something I do mentally throughout the day and the top rank is competitive and not easily won but this site won it without needing to overstate its claims for that.
Now appreciating that I did not feel exhausted after reading, and a stop at timbercrestcorner extended that energising quality, content that leaves me with more attention than it consumed is rare and the gap between draining and energising content is real over the course of a typical day spent reading widely online.
Thanks for a post that does not try to be funny when it is not the moment for it, and a stop at flarelantern maintained the same appropriate seriousness, knowing when humour helps and when it just signals desperation for engagement is a sign of editorial maturity that many blogs have not developed yet.
Skimmed first and then went back to read carefully, and the careful read paid off in places I had missed, and a stop at globalmarketcorner got the same treatment, the rare site whose content rewards a second pass is content I want more of in my regular rotation rather than disposable single read articles.
Now I want to find more sites like this but I suspect they are rare, and a look at lushgrovecorner extended that thought, the few sites that meet this quality bar are precious specifically because they are rare and finding others like them is one of the ongoing projects of careful internet curation across the years.
Bookmarking this for later, the kind of resource I want to keep nearby, and a quick look at ivypier confirmed the rest of the site is worth the same treatment, definitely going into my reference folder for the next time the topic comes up at work or in conversation with someone who asks.
Generally I find the content on similar topics frustrating in specific ways and this post avoided all of them, and a look at dewdawn continued that frustration free experience, content that sidesteps the standard failure modes of its genre is content with editorial awareness and this site has clearly studied what fails elsewhere consistently.
Will be sharing this with a couple of people who care about the topic, and a stop at cadetarena added more material worth passing along, the kind of site that is generous with quality content and does not make you jump through hoops to access it which is appreciated more than the team probably realises.
Reading this in the time it took to drink half a cup of coffee, and a stop at lakelake fit naturally into the second half, content that respects the rhythms of a typical morning is content with practical fit and this site has the kind of length and pacing that works for the way I actually read.
Liked that the post left some questions open rather than pretending to settle everything, and a stop at gemcoast continued that intellectual honesty, content that respects the limits of its own claims is more trustworthy than content that overreaches and this site has clearly figured out which positions it can defend confidently.
More substantial than most of what I find searching for this topic online, and a stop at silvermaplecollective kept that quality consistent, this is one of those sites where the writing actually rewards careful reading rather than punishing the patient reader with empty filler stretched out across long paragraphs that say very little.
The depth of coverage felt about right for the format, neither shallow nor overwhelming, and a look at sunrisepeakstudio kept that calibration going, getting the depth right for blog format is genuinely difficult because too shallow loses experts and too deep loses beginners but this site nailed it nicely which I really do appreciate.
Reading carefully this time rather than scanning, and the depth shows up in places I missed first time around, and a look at lunarwoodstudio rewarded the same careful approach, content that holds up to multiple reads is content I want more of in my regular rotation rather than disposable scroll fodder daily.
Found this via a link from another piece I was reading and the click was worth it, and a stop at meritquay extended the value across more material, the open web still rewards clicking through citations when the underlying writers care about each other work and this site clearly belongs to that network.
Picked this site to mention to a colleague who would benefit, and a look at everforestcollective added more material I will pass along, recommending sites to colleagues is a higher bar than recommending to friends because the professional context demands more careful curation and this site cleared the professional bar without me having to think.
If I had encountered this site five years ago I would have been telling everyone about it, and a look at modernhomemarket extended that retrospective enthusiasm, the version of me who used to recommend favourite blogs frequently would have made sure friends knew about this one and that earlier enthusiasm is partially returning to me here.
Reading this between meetings turned out to be the most useful thing I did all afternoon, and a stop at portcanopy kept that productivity feeling going, content can sometimes outperform actual work in terms of what gets accomplished mentally and this site managed that today which is genuinely a high bar to clear consistently.
My usual response to new bookmarks is to forget them but this one I have already returned to twice, and a look at budgetfriendlyhub pulled me back a third time, the actual return rate to bookmarked sites is the real measure of value and this one is clearing that measure at a notable rate already.
Working through this site has been a small antidote to the shallow content that fills most of my reading time, and a stop at wildpeakcorner extended that antidote function, sites that quietly improve the average quality of my reading by being themselves are sites worth supporting through return visits and recommendations consistently.
Now appreciating the small but real way this post improved my afternoon, and a stop at goldenrootboutique extended that small improvement effect, content that produces measurable positive impact on the texture of a reading day is content with real value and this site is producing those small positive impacts at a sustainable rate apparently.
Now planning to recommend this site in a context where my recommendations are taken seriously, and a stop at tallbirchoutlet confirmed I should make that recommendation soon, the small but real act of recommending content into spaces where my taste matters is something I take seriously and this site is worth the recommendation.
More substantial than most of what I find searching for this topic online, and a stop at evermaplecrafts kept that quality consistent, this is one of those sites where the writing actually rewards careful reading rather than punishing the patient reader with empty filler stretched out across long paragraphs that say very little.
Felt like I was reading something written by someone who actually thinks about the topic rather than reciting it, and a look at nimbuscabin reinforced that impression, the difference between recited content and considered content is huge and this site clearly belongs to the latter category which I appreciate as a careful reader looking for substance.
The overall feel of the post was professional without being stuffy, and a look at puremountaincorner kept that approachable expertise going, finding the right register for technical content is hard but this site has clearly figured out how to sound knowledgeable without slipping into that distant lecturing tone that loses readers in droves every time.
Generally I bookmark sparingly to avoid building up a bookmark graveyard but this one earned a permanent slot, and a stop at urbanwearzone extended that permanence designation, the few sites I keep permanent bookmarks for are sites I expect to use repeatedly and this one has clearly cleared that expectation bar today.
Reading this slowly to absorb the structure, and the structure is doing real work alongside the words, and a look at flarequill maintained the same architectural quality, when sentence shapes and paragraph rhythms reinforce the meaning rather than just transporting words you know you are reading skilled work today.
If the topic interests you at all this is a place to spend time, and a look at uniquefashionhub reinforced that recommendation, the broader question of where to invest topical reading time is one this site answers convincingly through the consistent quality across multiple pieces I have sampled during the current reading session today.
Time spent here today felt productive in the way that good reading sessions sometimes do, and a stop at moonlitgardenmart extended that productive feeling across the rest of the morning, the difference between productive reading and merely passing time is real and this site is consistently on the productive side for me lately.
Reading this prompted a brief but useful conversation with a colleague who happened to walk by, and a stop at jetdome extended that conversational seed, content that becomes a starting point for in person discussion rather than ending in solitary reading is content with social generative energy and this site has plenty of it apparently.
Picked this for a morning recommendation in our company chat, and a look at dockjournal suggested I will mention this site again later, recommending content into a workplace context is a small editorial act that requires confidence in the recommendation and this site is making me confident in those recommendations consistently here too.
A particular pleasure to read this with a fresh coffee, and a look at cadetgrail extended the pleasure across more pages, content that pairs well with quiet morning rituals is something I have come to value highly and this site has the kind of energy that fits naturally into a calm reading routine.
Now planning to recommend this site in a context where my recommendations are taken seriously, and a stop at globebeat confirmed I should make that recommendation soon, the small but real act of recommending content into spaces where my taste matters is something I take seriously and this site is worth the recommendation.
Reading this on a slow Sunday and finding it perfectly suited to a slow Sunday read, and a quick stop at goldshoreattic kept the same gentle pace, content that fits the mood of the moment is something I notice and remember and this site has the kind of pace that suits relaxed reading sessions especially well.
During a reading session that included several other sources this one stood out, and a look at lakequill continued the standout quality, the side by side comparison of sources during research is a useful exercise and this site has been winning those comparisons for me consistently across multiple research sessions during the last week.
Skipped breakfast still reading this and finished hungry but satisfied, and a stop at brightmountainmall kept me past breakfast time, content that displaces basic biological needs is content with serious attentional pull and the writers here are clearly capable of producing that level of engagement which is genuinely impressive these days.
Quality work here, the post reads cleanly and the points stay focused throughout, and a stop at wildbrookmodern kept the standard high, you can tell the writer cares about the final result rather than just hitting publish for the sake of having something new on the page to feed the search engines.
Reading this post made me realise I had been settling for lower quality elsewhere, and a look at truehorizontrends extended that recalibration, content that exposes how much I had been accepting in adjacent sources is content with calibrating effect on my standards and this site is performing that calibration function across topics for me reliably.
If I am being honest this is the kind of site I quietly hope my own work will someday resemble, and a stop at meritquill extended that aspirational feeling, finding work that models what I want to produce is part of why I read carefully and this site has been performing that modelling function for me lately consistently.
Now placing this in the same category as a few other sites I have come to trust, and a look at brightvalueworld continued the placement decision, the small category of fully trusted sites is one I extend rarely and only after multiple positive reading sessions and this site has earned the category placement methodically over time.
Really appreciate the absence of stock photos that have nothing to do with the content, and a quick visit to portguild maintained the same restraint, visual filler is a tell that the writing cannot stand on its own and the lack of it here suggests the team has confidence in their content quality alone.
Quality work here, the post reads cleanly and the points stay focused throughout, and a stop at urbanhillfashion kept the standard high, you can tell the writer cares about the final result rather than just hitting publish for the sake of having something new on the page to feed the search engines.
Speaking as someone who reads a lot on this topic this site has earned a high position in my source rankings, and a stop at bluewillowmarket reinforced that ranking, the informal ranking of sources for a topic is something I maintain mentally and this site has moved into the upper portion of those rankings clearly.
Skipped the comments section but might come back to read it, and a stop at brightdeltafabrics hinted at a quality reader community, sites where the comments are worth reading separately from the post are increasingly rare and signal a particular kind of audience that has grown around the editorial vision over time gradually.
Started reading skeptically because the headline seemed overconfident, and the post earned the headline by the end, and a look at fleetatelier continued that pattern of earning its claims, sites that can back up their headlines without overpromising are rare and this one has clearly developed editorial calibration on that front consistently.
Halfway through I knew I would finish the post, and a stop at softforestfabrics also held me through to the end, content that signals its quality early and then sustains it is content with real internal consistency and this site has clearly figured out how to maintain quality from opening sentence through to closing thought.
Bookmark added with a small mental note that this is a site to keep, and a look at wildmeadowstudio reinforced the keep status, the verb keep rather than visit captures something about how I think about this kind of site and it is a higher tier of relationship than I have with most places online today.
Worth saying that this is one of the better things I have read on the topic in months, and a stop at globehaven reinforced that ranking, the topic is well covered by many sources but few do it with this level of care and the few that do deserve to be flagged so other readers can find them.
Highly recommend to anyone looking for a sensible take on this topic without the usual marketing nonsense, and a look at jetmanor kept that grounded approach going, sites that stay focused on serving readers rather than monetising every click are rare and this is clearly one of those rare ones I really appreciate finding.
Will be coming back to this for sure, too much good content to absorb in one sitting, and a stop at candidmeadow only added more pages I want to dig through, this site is going onto my regular rotation list because it consistently delivers something worth the visit lately rather than empty filler.
I really like the calm tone here, it does not push anything on the reader, and after I went through uniquebuyoutlet I felt the same way, just steady useful content laid out without drama, which is exactly what someone trying to learn something quickly needs to find rather than aggressive marketing.
Halfway through reading I knew this would be one to bookmark, and a look at domelegend confirmed that early intuition, when bookmark intent forms before finishing a post you know the writing has cleared a quality bar that most content fails to clear and this site has cleared it on multiple visits already.
Now appreciating that the post did not require me to agree with the writer to find it valuable, and a look at wildspireemporium maintained the same useful regardless of agreement quality, content that informs even when it does not convince is content with broader utility and this site reads as useful even when I disagree.
Found this useful, the points line up well with what I have been thinking about lately, and a stop at urbanlegendstore added some angles I had not considered yet, definitely walking away with more than I came for which is the best outcome from time spent reading online for any kind of topic.
Quietly the writers approach to the topic differs from the dominant takes I have been encountering, and a stop at timelessharveststore extended that distinctive approach, content that maintains a different perspective without explicitly arguing against the dominant ones is content with confident editorial identity and this site has that confidence throughout pieces.
Will recommend this to a couple of friends who have been asking about this exact topic, and after dreamridgeemporium I have even more reason to do so, the kind of site that earns word of mouth rather than chasing it through aggressive marketing or paid placements is always a treat to find online.
Genuinely glad I clicked through to read this rather than skipping past, and a stop at noblearena confirmed I should keep clicking through to more pages here, the kind of resource that justifies its place in my browser history rather than feeling like wasted time which is the highest compliment I offer any site online today.
Reading this on the train into work was a better use of the commute than my usual choices, and a stop at trendysalehub extended that commute reading well, content that improves transit time rather than just filling it is content with practical benefit and this site has earned its place in my morning commute reading rotation.
Bookmarked the page and the homepage too because clearly there is more to explore here, and a quick stop at larkcliff only made that more obvious, this is the kind of place I want to dig through over a weekend rather than rushing through during a coffee break tomorrow morning before getting back to work.
After reading several posts back to back the consistent voice across them is impressive, and a stop at urbanharvesthub continued that voice consistency, sites that maintain a single coherent voice across many pieces by potentially many writers represent serious editorial discipline and this one has clearly developed the institutional consistency needed for that.
Generally I find the content on similar topics frustrating in specific ways and this post avoided all of them, and a look at brightwillowboutique continued that frustration free experience, content that sidesteps the standard failure modes of its genre is content with editorial awareness and this site has clearly studied what fails elsewhere consistently.
Decided I would read the archives over the weekend, and a stop at portmill confirmed that the archives would be worth the time, very few sites have archives I would actively read through but this one has earned that level of interest based on the consistent quality across what I have sampled so far.
Started reading and ended an hour later without realising the time had passed, and a look at trendandstylecorner produced the same time dilation effect, when content makes time feel different the writer has achieved something well beyond the average and this site is producing that experience for me reliably across multiple readings.
Liked that the post left some questions open rather than pretending to settle everything, and a stop at bluehavenstyles continued that intellectual honesty, content that respects the limits of its own claims is more trustworthy than content that overreaches and this site has clearly figured out which positions it can defend confidently.
Stayed longer than planned because each section earned the next, and a look at brightwoodmarket kept that pulling effect going across more pages, the kind of subtle pull that good writing exerts on attention is something I find harder and harder to resist when I encounter it on the open web today.
I came here looking for a quick answer and ended up reading the whole post because it was actually interesting, and after fleetessence I had a much fuller picture, no stress and no confusion just a clear walk through the topic that made everything fall into place without much effort.
Honestly thank you to whoever wrote this because it scratched an itch I had not quite been able to articulate, and a stop at urbanridgeemporium kept that satisfying feeling going, the kind of writing that meets unspoken needs is special and this site clearly has writers who understand their readers more than most do today.
Reading this gave me a small framework I expect to use going forward, and a stop at softwinterfields extended that framework, content that produces transferable mental models rather than just specific facts is content with multiplicative value and this site is providing those models at a rate that justifies extra attention from me regularly.
Honestly this was the highlight of my reading queue today, and a look at softpetalstore extended that across more pages I will return to, ranking what I read against what else I read each day is something I do informally and this site keeps moving up in those rankings the more I explore it.
Now realising this site has been quietly doing good work for longer than I knew, and a look at goldmanor suggested an archive worth exploring, sites with deep archives of consistent quality represent a different kind of resource than sites with viral hits and this one looks like the durable kind based on what I see.
Halfway through reading I knew this would be one to bookmark, and a look at candidoasis confirmed that early intuition, when bookmark intent forms before finishing a post you know the writing has cleared a quality bar that most content fails to clear and this site has cleared it on multiple visits already.
I came here looking for a quick answer and ended up reading the whole post because it was actually interesting, and after lushmeadowgallery I had a much fuller picture, no stress and no confusion just a clear walk through the topic that made everything fall into place without much effort.
The overall feel of the post was professional without being stuffy, and a look at keencluster kept that approachable expertise going, finding the right register for technical content is hard but this site has clearly figured out how to sound knowledgeable without slipping into that distant lecturing tone that loses readers in droves every time.
Felt like the writer was speaking directly to someone with my level of curiosity, neither talking down nor showing off, and a stop at domelounge kept that comfortable matching going, finding writing that meets you where you are rather than asking you to climb up or stoop down feels great every time it happens.
Reading this on a phone at a coffee shop and finding it perfectly suited to that context, and a stop at mistyharbortrends continued the comfortable mobile experience, content that works across reading conditions without compromising on substance is increasingly important and this site has clearly thought about the whole reader experience here.
Reading carefully here has reminded me what reading carefully feels like, and a look at trendmarketzone extended that reminder, the experience of careful reading versus skimming is different in ways I had partially forgotten and this site has clearly refreshed my memory of what attention feels like when content rewards it consistently.
Skipped the related products section because there was none, and a stop at brightwindcollections also lacked any aggressive monetisation, content that is not constantly trying to convert me into a customer or subscriber is content that has confidence in its own value and that confidence shows up as a different reading experience.
санкт петербург уборка после ремонта
генеральная уборка
Now placing this in the small category of sites whose updates I would actually want to know about, and a stop at laurellake confirmed that placement, the difference between sites I want to follow and sites I just consume from is real and this one has crossed into the active follow category from the casual consumption side.
генеральная уборка квартиры
Considered as a whole this site has developed a coherent point of view that comes through in individual pieces, and a look at sunlitvalleymarket continued displaying that coherence, sites with a unified perspective rather than a grab bag of takes are sites with editorial maturity and this one has clearly developed that maturity through years of work.
Reading this confirmed a small detail I had been uncertain about, and a stop at portolive provided the source for further checking, content that supports verification through citations or links rather than just asserting facts is more trustworthy and this site has clearly built its credibility through that kind of verifiable approach consistently.
During my morning reading slot this fit perfectly into the routine, and a look at brightstonevillage extended that perfect fit into the rest of the routine, content that matches the rhythm of how I actually read rather than demanding accommodation from my schedule is content well calibrated to its likely audience and this site has it.
Bookmark added in three places to make sure I do not lose the link, and a look at fleetmarina got the same redundant treatment, sites I am afraid to lose are the rare keepers and this is clearly one of them based on what I have read so far across this and a couple of related posts.
Thanks for a post that does not try to be funny when it is not the moment for it, and a stop at brightbrookmodern maintained the same appropriate seriousness, knowing when humour helps and when it just signals desperation for engagement is a sign of editorial maturity that many blogs have not developed yet.
Skipped past the first paragraph thinking it was setup and had to come back when the rest referenced it, and a stop at trendandbuyhub similarly rewarded careful reading from the start, content where every paragraph carries weight is content I now know to read from the beginning rather than skipping ahead.
Now organising my browser bookmarks to give this site easier access, and a look at coastlinegather earned the same organisational priority, the small acts of digital housekeeping I do for sites I expect to use often are themselves a measure of trust and this site has triggered the trust based housekeeping behaviour from me clearly.
Going to come back when I have more time to read carefully, the post deserves more than a quick scan, and a stop at candidpalace reinforced that, this is the kind of site that rewards a slower read which is hard to find in this fast paced corner of the internet but really worthwhile.
Decided after reading this that I would check this site weekly going forward, and a stop at kitecommune reinforced that commitment, deciding to add a site to a regular rotation requires meeting a quality bar that very few places clear and this one cleared it cleanly without any noticeable effort or marketing push behind it.
Cuts through the usual marketing fluff that dominates this topic online, and a stop at graingarden kept the same clean approach going, this is the kind of writing that respects the reader’s time rather than wasting it on repetitive setups before finally getting to the point at hand which is what most sites do.
Liked how the writer used real examples instead of theoretical ones to make the points stick, and a stop at urbanwildfabrics added even more concrete examples, this is the kind of practical approach that respects readers who actually want to apply what they learn rather than just nodding along passively without doing anything useful.
Looking for similar voices elsewhere has come up empty in my recent searches, and a stop at wildbirdstudio extended the search frustration, the rare site that does what no other does in quite the same way is precious and this one has clearly developed a particular approach that I have not been able to find duplicates of.
Reading this on a difficult day was a small bright spot, and a stop at noblecradle extended that brightness, content that improves a hard day is content that has earned a particular kind of place in my reading habits and this site is occupying that uplifting role for me today which I appreciate clearly.
Now adding this to a list of sites I want to see flourish, and a stop at futurewoodtrends reinforced that wish, the few sites I actively root for are sites that produce the kind of work I want more of in the world and this one has joined that small list based on what I have read so far.
Started smiling at one paragraph because the writing was just nice, and a look at everlineartisan produced a couple more such moments, prose that produces small spontaneous reactions in the reader is doing more than just transferring information and the writers here are clearly hitting that level fairly consistently throughout pieces.
Now adding this to a short list of sites I would defend in a conversation about the modern web, and a look at domemarina reinforced that defence list, the few sites that serve as evidence the web can still produce good things are precious and this one has clearly joined that small list of exemplary sites.
Good post, the kind that respects the reader by getting to the point quickly without skipping the details that matter, and a short look at makeeverymomentcount confirmed that approach is consistent across the site which is rare to find online these days, definitely a place I will return to soon.
A piece that read smoothly because the writer understood how readers actually move through prose, and a look at edendune maintained the same reader awareness, writers who think about the reading experience as much as the writing experience produce better work and this site has clearly made that shift in editorial approach.
Reading this prompted a brief but useful conversation with a colleague who happened to walk by, and a stop at leafdawn extended that conversational seed, content that becomes a starting point for in person discussion rather than ending in solitary reading is content with social generative energy and this site has plenty of it apparently.
I usually skim posts like these but this one held my attention all the way through, and a stop at creativefashioncorner did the same, that is a strong endorsement coming from me because I am usually quick to bounce when content gets repetitive or fails to deliver on its initial promise made in the headline.
Picked up two new ideas that I expect will come up in conversations this week, and a look at sunrisetrailmarket added another, content that arms me with talking points rather than just filling time is the kind that provides ongoing value beyond the moment of reading and this site is generating that kind of ongoing value.
A piece that did not lean on the writer credentials or institutional backing, and a look at softwillowdesigns maintained the same focus on substance, content that earns trust through quality rather than through name dropping is the kind I find most persuasive and this site is clearly playing on the substance side of that distinction.
Now I want to find more sites like this but I suspect they are rare, and a look at freshwindemporium extended that thought, the few sites that meet this quality bar are precious specifically because they are rare and finding others like them is one of the ongoing projects of careful internet curation across the years.
Came in confused about the topic and left with a much firmer grasp on it, and after flickaltar I felt I could explain this to someone else without hesitation, that is the gold standard for any educational content and most sites simply fail to reach it ever which is unfortunate but true.
If quality blog writing is dying as people sometimes claim then this site is one piece of evidence that it has not died yet, and a look at brightpineemporium extended that evidence, the broader cultural question about online writing has empirical answers in specific sites and this one is contributing to a more optimistic answer overall.
Reading this gave me a quiet moment of intellectual pleasure that I had not been expecting, and a stop at micamarket extended that pleasure across more pages, the unexpected reward of stumbling into careful writing is one of the small ongoing pleasures of reading the open web and this site is delivering it reliably.
Liked that the post left some questions open rather than pretending to settle everything, and a stop at portpoise continued that intellectual honesty, content that respects the limits of its own claims is more trustworthy than content that overreaches and this site has clearly figured out which positions it can defend confidently.
Picked up something useful for a side project, and a look at clippoise added another piece I will incorporate, content that connects to specific projects I am working on is content with practical utility and the practical utility of this site is showing up across multiple posts I have read in the last hour or so.
Really appreciate that the writer did not assume I would read every other related post first, and a look at graingrove kept that self contained feel going where each piece can stand alone, accessibility for new readers is a sign of generous editorial thinking and this site has clearly invested in that approach.
Clean writing, easy to read, and never tries too hard to impress, that combination is harder to find than people think, and after my time on northernmiststore I am sure this site treats its readers well, no flashy tricks just useful content done right which is honestly all I want online.
A piece that was confident enough to leave some questions open rather than forcing closure, and a look at kitefoundry continued that intellectual honesty, content that admits the limits of its scope is more trustworthy than content that pretends to total understanding and this site has the right calibration on certainty consistently.
Closed it feeling slightly more competent in the topic than I started, and a stop at learnshareachieve reinforced that competence boost, real learning is rare in casual online reading but it does happen sometimes and this site managed to make it happen for me today which is genuinely worth pausing to acknowledge.
Better than the average post on this subject by some distance, and a look at sunwavecollection reinforced that, you can tell within the first paragraph that the writer here actually cares about the topic rather than just covering it for the sake of having something to publish that week or that day.
Now setting aside time on my next free afternoon to read more from the archives, and a stop at wildwoodartisan confirmed that time will be well spent, the rare site whose archive deserves a dedicated reading session rather than just casual sampling is the kind of resource worth scheduling around and this one qualifies clearly.
Really appreciate the confidence to make a clear point rather than hedging everything, and a quick visit to nextgenerationlifestyle maintained the same direct stance, writing that takes positions rather than equivocating is more useful even when the positions are debatable because at least the reader has something to react to clearly.
A piece that did not try to be timeless and ended up reading as durable anyway, and a look at bluepeakdesignhouse extended that durable feel, content that stays useful past its publication date without straining for permanence is content that ages well and this site has the kind of evergreen quality that I value highly today.
A particular kind of restraint shows up in the writing, and a look at pinecrestmodern maintained the same restraint across pages, knowing what not to say is just as important as knowing what to say and this site has clearly developed strong instincts on both sides of that editorial line throughout pieces I have read.
Once I trust a site this much I tend to read everything they publish and that is the trajectory I am on with this one, and a stop at draftcradle confirmed the trajectory, the rare progression from interested reader to comprehensive reader is something only certain sites earn and this one is earning that progression rapidly.
Glad the writer did not feel the need to argue with imaginary critics in the post itself, and a stop at mountainwindstudio kept the same focused approach going, defensive writing wastes the reader time and confidence on positions that did not need defending and this post has clearly avoided that common failure.
Will be coming back to this for sure, too much good content to absorb in one sitting, and a stop at edenfair only added more pages I want to dig through, this site is going onto my regular rotation list because it consistently delivers something worth the visit lately rather than empty filler.
Found a small mental shift after reading this, the framing here is just a bit different from the standard takes online, and a look at blueharborbloom extended that fresh perspective across more material, the rare site whose voice actually changes how you think about something rather than just confirming existing beliefs.
Different feel from the algorithmically optimised posts that dominate the topic, and a stop at globalshoppingzone reinforced that human touch, you can tell when a site is being run by someone who reads what they publish versus someone just hitting submit and moving on quickly to the next assignment without checking the result.
Took a quick scan first and then went back to read properly because the post deserved it, and a stop at moderncollectorsmarket kept me reading carefully too, the kind of writing that earns a slower second pass rather than getting skimmed and forgotten is something I value highly when I happen to find it.
A thoughtful piece that did not strain to be thoughtful, and a look at sunnyslopefinds continued that effortless quality, when thinking shows up in writing without the writer drawing attention to it you know you are reading something genuinely considered rather than something performing the appearance of consideration which is also common online.
Approaching this with the usual skepticism I bring to new sites and being slowly persuaded, and a stop at linenguild continued that gradual persuasion, the careful path from skeptical reader to genuine fan is the only one I trust and this site has walked me along that path through patient consistent quality across pieces.
A handful of memorable phrases from this one I will probably use later, and a look at northdawn added a couple more, content that contributes language to my own communication rather than just facts is content with a different kind of utility and this site is providing that linguistic utility consistently across what I read.
Now considering writing a longer note about the post somewhere, and a look at creativechoicehub added more material for that note, content that prompts me to write rather than just consume is content with generative energy and this site is producing that generative effect for me at a higher rate than most sources.
Started reading expecting to disagree and ended mostly nodding along, and a look at flicklegend continued the pattern, content that wins agreement through evidence and reasoning rather than rhetorical force is the kind that actually shifts minds and this site clearly knows how to do that across what I have read so far.
Worth recognising that the post handled a familiar topic without reaching for any of the obvious hot takes, and a stop at grippalace continued that fresh treatment, sites that find new angles on subjects others have exhausted are sites worth following carefully and this one has clearly developed that exploratory instinct through patient practice.
Appreciate that you did not pad this with fluff to hit a word count, the post says what it needs to say and stops, and a look at cobaltcellar did the same, brevity here feels intentional not lazy which is a distinction many writers miss completely sometimes when they are working under deadlines.
Came here from another site and ended up exploring much further than I planned, and a look at wildtreasurestore only encouraged more exploration, the kind of place where one click leads to another not through manipulative design but through genuinely interesting content is rare and worth highlighting when found like this somewhere on the open internet.
Will be back, that is the simplest way to say it, and a quick visit to primfactor reinforced the decision, this site has earned a spot in my regular rotation alongside a few other reliable places I check when I want something genuinely informative without all the usual modern web noise getting in the way.
Reading this site over the past week has changed how I evaluate content in this space, and a look at micapact extended that recalibration, the standards I bring to reading on the topic have shifted upward as a direct result of regular exposure to this kind of work and that shift will outlast any single reading session.
Honestly this was a good read, no jargon and no padding, and a short look at knackaltar kept that same feel going which I really appreciated, the writer clearly knows the topic well enough to explain it without hiding behind big words or filler that often gets used to seem clever.
A piece that took its time without dragging, and a look at bluestonerevival kept the same patient pace, the difference between unhurried and slow is a fine editorial distinction and this site has clearly found the unhurried side without slipping into the slow side which would have lost me as a reader quickly otherwise.
Now feeling something close to gratitude for the fact this site exists, and a look at mountainbloomshop extended that gratitude, the rare site that produces this kind of response is the rare site worth defending in conversations about whether the modern internet is still capable of producing genuinely valuable independent content for serious adults.
Took me back a step or two on an assumption I had been making, and a stop at globalfashioncorner pushed that reconsideration further, writing that gently corrects the reader without being aggressive about it is a rare diplomatic skill and the team here clearly knows how to land critical points without turning readers off.
Came here from another site and ended up exploring much further than I planned, and a look at findyourdirection only encouraged more exploration, the kind of place where one click leads to another not through manipulative design but through genuinely interesting content is rare and worth highlighting when found like this somewhere on the open internet.
Thank you for being clear and direct, that simple approach saves so much frustration on the reader’s end, and a stop at slowlivingessentials only made me more sure of it, the rest of the content seems to follow the same pattern which is a great sign of consistent editorial care behind the scenes.
A piece that handled the topic with appropriate weight without becoming portentous, and a look at urbanwildgrove continued that calibrated seriousness, content that takes itself seriously without becoming pompous is something this site has clearly figured out and the balance shows up in every piece I have read across multiple sessions now.
Now feeling the rare pleasure of trusting a source completely on first encounter, and a look at goldfielddesigns extended that initial trust into something more durable, the calibration of trust to evidence is something I do informally and this site has earned high trust through the cumulative weight of multiple consistently good posts already.
Worth flagging that the writing rewarded a second read more than I expected, and a look at trendypickshub produced the same second read benefit, content with hidden depths that emerge only on careful rereading is rare in the modern blog space and this site has clearly invested in that level of compositional density throughout.
Now considering carefully how to share this site with the right audience rather than broadcasting widely, and a look at draftglade extended that careful sharing impulse, content worth sharing carefully rather than spamming is content that has earned a higher kind of recommendation and this site has earned that careful shareability throughout pieces.
Glad I gave this fifteen minutes rather than the usual three minute skim, and a look at edgecommune earned the same investment, time spent on quality content is rarely wasted but the reverse is also true and learning which sites deserve which kind of attention is part of being a careful online reader.
Worth bookmarking and sharing with anyone interested in the topic, that is my honest take, and a stop at peacefulforestshop reinforces that, the kind of generous resource that makes the open web feel worth defending against the constant pressure to retreat into walled gardens and curated feeds today everywhere I look across all my devices.
Excellent execution from start to finish, the post never loses its rhythm and the points stay sharp, and a quick stop at findyourstylehub kept the same level going, consistency like this across a site is the marker of a serious operation rather than a casual side project running on autopilot somewhere else.
Worth recommending broadly to anyone who reads on the topic, and a look at mountainsageemporium only confirms that, the rare combination of accessibility and depth in this site makes it suitable for both newcomers and people who already know the area which is hard to pull off in any blog format today and rarely managed.
Felt this in a way I cannot quite explain, the topic just hit different here, and a stop at simpletrendstore continued in that vein, sometimes you find a site whose perspective lines up with how you have been thinking and reading their work feels like a small relief which I appreciated more than I expected.
Thanks for the practical examples scattered through the post rather than abstract theory only, and a look at grovefarm continued that grounded style, abstract points are easier to remember when paired with concrete situations and the writers here clearly understand how readers actually retain information from blog content reading sessions.
If I had to defend the time I spend reading independent blogs this site would feature in the defence, and a look at pinehillstudio reinforced that defensive utility, the ongoing case for non algorithmic reading is one I make to myself periodically and sites like this one provide the actual evidence that supports the case clearly.
Decent post that improved my afternoon a small amount, and a look at lobbyblossom added a bit more to that, sometimes the small wins online add up over time and a useful site like this one is the kind of place that contributes consistently to those small wins for me lately across many different topics I follow.
Honestly this hits the sweet spot between detail and brevity, no rambling and no shortcuts, and a quick visit to flickpassage kept that going across the related pages, the kind of place that respects your attention without trying to grab it through cheap tactics or attention seeking design choices that get tired fast.
Reading this prompted me to send the link to two different people for two different reasons, and a stop at freshsagecorner provided ammunition for a third share, content that suits multiple audiences without being generic enough to be useless to any of them is genuinely valuable and this site has that multi audience quality clearly.
Liked that the post left some questions open rather than pretending to settle everything, and a stop at growwithpurpose continued that intellectual honesty, content that respects the limits of its own claims is more trustworthy than content that overreaches and this site has clearly figured out which positions it can defend confidently.
I came here looking for a quick answer and ended up reading the whole post because it was actually interesting, and after mintdawn I had a much fuller picture, no stress and no confusion just a clear walk through the topic that made everything fall into place without much effort.
Closed and reopened the tab three times before finally finishing, and a stop at knackdome held my attention straight through, sometimes content fights for time against my own distraction and the times it wins say something positive about its quality and this post clearly won that fight today afternoon for me.
Recommended without hesitation if you care about careful coverage of this topic, and a stop at softskycorners reinforced the recommendation, the bar I set for unhesitating recommendations is fairly high and this site has cleared it through the cumulative weight of multiple consistently good pieces rather than through any single standout post which is meaningful.
Really thankful for posts that respect a reader’s time, this one does, and a quick look at classystyleoutlet was the same, no need to scroll through endless intros just to get to the actual content, that approach alone is enough reason to come back here regularly for the kind of writing offered.
Solid quality, the kind of work that holds up to a careful read rather than a quick skim, and a quick look at authenticglobalfinds kept that standard going strong, content that rewards attention rather than punishing it is something I appreciate more and more these days online across nearly every topic I follow.
Skipped to a specific section because I knew that was the question I had, and the answer was clean, and a stop at quillgarden similarly delivered targeted answers without burying them, content engineered for readers who arrive with specific needs rather than open ended browsing is increasingly valuable in a search heavy reading environment.
Decided to write a short note to the author if there is contact info anywhere, and a stop at softsummershoppe extended that intention, the urge to thank the writer directly is a strong signal of content quality and this site has triggered that urge in me today which is a fairly rare event for my reading.
If you asked me to point to a recent positive sign for the open web this site would be near the top, and a stop at edgecradle reinforced that designation, the few sites that serve as evidence the web can still produce quality independent content are precious and this one has clearly become one for me.
Reading this gave me a small framework I expect to use going forward, and a stop at fashionseasonhub extended that framework, content that produces transferable mental models rather than just specific facts is content with multiplicative value and this site is providing those models at a rate that justifies extra attention from me regularly.
A piece that read as the work of someone who reads carefully themselves, and a look at urbanpasturestore continued that informed feel, writers who are also serious readers produce work with a different quality and this site reads as the product of someone steeped in good writing rather than just generating content for an audience.
Bookmark earned and the bookmark feels like a permanent addition rather than a maybe, and a look at draftlake confirmed that permanent status, the difference between durable bookmarks and ephemeral ones is something I have learned to feel quickly and this site triggered the durable feeling almost immediately during my first read here.
Reading this on a difficult day was a small bright spot, and a stop at novalog extended that brightness, content that improves a hard day is content that has earned a particular kind of place in my reading habits and this site is occupying that uplifting role for me today which I appreciate clearly.
Recommended without hesitation if you care about careful coverage of this topic, and a stop at trendspotmarket reinforced the recommendation, the bar I set for unhesitating recommendations is fairly high and this site has cleared it through the cumulative weight of multiple consistently good pieces rather than through any single standout post which is meaningful.
Now realising this site has been quietly doing good work for longer than I knew, and a look at globalcraftanddesign suggested an archive worth exploring, sites with deep archives of consistent quality represent a different kind of resource than sites with viral hits and this one looks like the durable kind based on what I see.
Reading this gave me a small framework I expect to use going forward, and a stop at globalfashioncollection extended that framework, content that produces transferable mental models rather than just specific facts is content with multiplicative value and this site is providing those models at a rate that justifies extra attention from me regularly.
Reading this confirmed that the topic deserves more careful attention than it usually gets, and a stop at urbancloverhub extended that elevated framing, content that raises the appropriate weight of a subject without being preachy about it is serving a quiet but important editorial function for the broader cultural conversation about it.
My professional context would benefit from having this kind of resource available, and a look at grovepassage extended the professional applicability, the rare site that contributes meaningfully to professional work rather than just personal interest is content with multiplied value and this one is providing that professional utility consistently across multiple pieces.
Now planning to recommend this site in a context where my recommendations are taken seriously, and a stop at fashionlifestylehub confirmed I should make that recommendation soon, the small but real act of recommending content into spaces where my taste matters is something I take seriously and this site is worth the recommendation.
Different in a good way from the cookie cutter content that fills most blogs covering this area, and a stop at northernriveroutlet kept showing me why, original thoughtful writing exists if you know where to look and this site has earned a place on my short list of those rare exceptions worth defending.
Now appreciating that the post did not try to imitate any other style I might recognise, and a stop at riverleafmarket continued that distinct voice, content with its own register rather than borrowed from elsewhere is content with real authorial presence and this site has clearly developed that presence through what feels like patient editorial work.
Over the course of reading several posts here a pattern of quality has emerged, and a stop at flowlegend confirmed the pattern, the difference between sites that hit quality occasionally and sites that hit it consistently is huge and this site has clearly demonstrated the consistent kind through what I have read this morning.
Came across this looking for something else entirely and ended up reading it through twice, and a look at lobbycommune pulled me deeper into the site than I planned, the writing has a way of holding attention without resorting to manipulative cliffhangers or vague promises that never get delivered later down the page.
Reading this gave me a small jolt of recognition for an experience I thought was just mine, and a stop at pureforeststudio produced more such jolts, content that universalises private experiences without flattening them is doing genuinely useful work and this site is providing that recognition function for me reliably across topics I read.
Picked this post to share in a Slack channel where I knew it would be appreciated, and a look at wildhollowdesigns suggested I will share more from here later, content worth sharing into a professional context is content that has earned a higher kind of trust than mere personal interest and this site has it.
Closed the tab with a small sense of finality rather than the usual rushed exit, and a stop at mossbreeze produced the same considered closing, when reading ends with deliberate satisfaction rather than impatient skip you know the time was well spent and this site is producing those satisfying endings consistently across what I read.
Thanks for keeping things clear and to the point, that is honestly hard to find online these days, and after reading through knackgrove the message stayed consistent which makes me trust the information being shared more than I usually do on similar pages that cover this same kind of topic.
Thanks for the practical examples scattered through the post rather than abstract theory only, and a look at modernlivingemporium continued that grounded style, abstract points are easier to remember when paired with concrete situations and the writers here clearly understand how readers actually retain information from blog content reading sessions.
Just dropping by to say thanks for the effort, it does not go unnoticed when a writer cares this much about the reader, and after I went through evertrueharbor I was certain this is one of the better corners of the internet for this particular kind of content which is genuinely refreshing.
One of the more honest takes on the topic I have seen lately, no spin and no oversell, and a stop at dreamhavenoutlet kept that going, the kind of voice the open web could use a lot more of rather than the endless echo chamber of recycled opinions floating around every social platform these days.
Speaking from the perspective of a fairly demanding reader the writing here clears the bar consistently, and a look at edgedial continued clearing that bar, the calibration of demanding reader is something I apply to all sources and this site has been one of the few that handles the demanding reading well across pieces sampled.
Thanks for the moderate length, neither so short it skips substance nor so long it bloats, and a stop at classystyleoutlet hit the same balance, the right length is one of the hardest things to calibrate in blog writing and I appreciate when a team has clearly thought about it rather than defaulting.
Felt this in a way I cannot quite explain, the topic just hit different here, and a stop at quillglade continued in that vein, sometimes you find a site whose perspective lines up with how you have been thinking and reading their work feels like a small relief which I appreciated more than I expected.
Worth marking this site as one to come back to deliberately rather than by accident, and a stop at evercrestwoods reinforced that intention, the difference between sites I find again by chance and sites I return to on purpose is meaningful and this one has clearly moved into the deliberate return category for me.
Solid post, the structure is easy to follow and the language stays simple even when the topic gets a bit more involved, and a look at draftlog kept that same standard going, so I left feeling like the time spent here was actually worth something for once which is rare lately.
Found this via a link from another piece I was reading and the click was worth it, and a stop at grovequay extended the value across more material, the open web still rewards clicking through citations when the underlying writers care about each other work and this site clearly belongs to that network.
Learned something from this without having to dig through layers of fluff, and a stop at fashionforfamilies added a bit more context that helped tie things together for me, definitely a useful corner of the internet for anyone who wants real information without the usual marketing nonsense around it that often ruins similar pages.
A small thing but the line spacing and font choices made reading this physically pleasant, and a look at trendforless maintained the same careful design, technical choices about typography are part of what makes online reading actually comfortable and this site has clearly invested in the design layer alongside the content layer carefully.
Definitely returning here, that is decided, and a look at mountainwildcollective only made the case stronger, this is one of those rare websites that rewards regular visits rather than feeling stale after the first read which is something I cannot say about most of the places I bookmark today across all my topics.
Felt a small spark of recognition when the post named something I had been struggling to articulate, and a look at foilcommune produced more such moments, the rare service of giving readers language for fuzzy intuitions is one of the higher values that good writing can provide and this site offered several today instances.
Reading this post made me realise I had been settling for lower quality elsewhere, and a look at rarefloraemporium extended that recalibration, content that exposes how much I had been accepting in adjacent sources is content with calibrating effect on my standards and this site is performing that calibration function across topics for me reliably.
Took my time with this rather than rushing because the writing rewards attention, and after wildharborattic I had even more to absorb, the kind of content that pays back the patient reader rather than punishing them with empty filler is something I look for and rarely find in regular searches lately.
Honest take is that I will probably forget most of what I read online today but this post is one I will remember, and a stop at timbercrestgallery kept that same memorable quality going, certain writing leaves a residue in the mind in a way most content simply does not manage.
Closed the tab and immediately reopened it ten minutes later because I wanted to reread a part, and a stop at growtogetherstrong drew the same return, content that pulls you back after closing it is doing something well beyond the average and worth marking as exceptional in my mental catalogue of reliable sites.
A nicely understated post that does not shout for attention, and a look at mountglade maintained the same quiet quality, understatement is a stylistic choice that distinguishes serious writing from attention seeking writing and this site has clearly committed to the understated approach as a core editorial value rather than just a phase.
Now adding a small note in my reading log that this site is one to watch, and a look at knackpact reinforced the watch status, the few sites I track deliberately rather than encounter accidentally are sites I expect ongoing returns from and this one has cleared the bar for that elevated tracking based on what I read.
Top notch writing, every paragraph carries weight and nothing feels like filler, and a stop at oakarena reflected that same care, a rare thing on the open web these days where most pages exist for clicks rather than actual reader value or anything close to that which is honestly a real shame.
Now saved this in a way that I will actually find again rather than the casual bookmark approach, and a stop at lobbydawn earned the same careful saving, organising my reading bookmarks so that high quality sources rise to the top is something I should do more of and this site triggered that organisation today.
The clarity here is something I really appreciate, especially compared to sites that pile on jargon for no reason, and a look at futureforwardclickpinghub was the same, simple direct sentences that actually deliver information instead of dancing around the point for paragraphs at a time which wastes reader patience.
A small thing but the line spacing and font choices made reading this physically pleasant, and a look at freshtrendcollection maintained the same careful design, technical choices about typography are part of what makes online reading actually comfortable and this site has clearly invested in the design layer alongside the content layer carefully.
Worth recognising the absence of the usual blog tropes here, and a look at edgelibrary continued that fresh quality, sites that avoid the standard moves of the medium read as more original even when the content is on familiar topics and this one has clearly chosen its own path through the conventional terrain skilfully.
Came away with a small but real shift in perspective on the topic, and a stop at modernculturecollective pushed that shift a bit further, the kind of subtle reframing that good writing does to a reader without making a big deal of it is something I always appreciate when it happens which is sadly not that often.
Now adjusting my mental list of reliable sites for this topic, and a stop at brightvillagecorner reinforced the adjustment, the small ongoing curation work of maintaining trusted sources is one of the actual practical activities of careful reading and this site has earned a permanent place on my list for this particular subject.
If patience for careful reading is rare these days finding sites that reward it is rarer still, and a stop at draftport extended that rare reward, the diminishing returns on shallow content reading have made me more selective about where to spend reading time and this site is meeting the higher selectivity bar consistently.
Felt the writer was being honest with the reader which is rare enough that I want to acknowledge it, and a look at harborbreeze continued that honest feel, content built on actual knowledge rather than aggregated summaries is something I value highly and rarely come across in regular searches on the open internet these days.
Now sitting back and recognising that this was a small but real win in my reading day, and a stop at quirkbazaar extended that quiet win, the cumulative effect of small reading wins versus the cumulative effect of small reading losses is real over time and this site is contributing to the wins side of that ledger.
Reading this between two meetings turned out to be the highlight of the morning, and a stop at brightstarworkshop continued that highlight quality, content that outshines the structured parts of a working day is doing something well beyond ordinary and this site has produced multiple such highlights for me already this week alone.
Now planning to share the link with a small group of readers I trust, and a look at classystylemarket suggested more material to share with the same group, recommending content into a curated circle requires confidence in the recommendation and this site is making me confident in those personal recommendations on multiple separate occasions now.
The conclusions felt earned rather than tacked on at the end like an afterthought, and a look at everstonecorner kept that careful structure going, you can tell when a writer has thought about the shape of their post versus just letting it ramble out and hoping for the best at the end which most do.
Picked this for my morning read because the topic seemed worth the time, and a look at fashionfindshub confirmed the choice was right, my morning reading slot is precious and giving it to this site felt like a good investment rather than a waste which is a higher endorsement than I usually offer for content.
Генеральная уборка москва
If quality blog writing is dying as people sometimes claim then this site is one piece of evidence that it has not died yet, and a look at blueshoreoutlet extended that evidence, the broader cultural question about online writing has empirical answers in specific sites and this one is contributing to a more optimistic answer overall.
Quietly enthusiastic about this site after the past few hours of reading, and a stop at fondarbor extended that enthusiasm, the calibration of enthusiasm to evidence is something I try to maintain and this site has earned a calibrated quiet enthusiasm rather than the loud excitement that usually fades within a day or two of finding something.
Took a screenshot of one section to come back to later, and a stop at rainycitycollection prompted another saved tab, the urge to capture and revisit specific pieces of content is something I rarely feel but when I do it tells me the work is worth more than the average passing read for sure.
Felt the writer did the homework before publishing, the references hold up, and a look at softcloudcollective continued that documented care, content with traceable claims rather than vague assertions is the kind I trust and the lack of bald assertion in this post is one of its quietly impressive qualities for me.
Picked this for a morning recommendation in our company chat, and a look at mountoutpost suggested I will mention this site again later, recommending content into a workplace context is a small editorial act that requires confidence in the recommendation and this site is making me confident in those recommendations consistently here too.
Really like that there are no exclamation marks or all caps shouting throughout the post, and a quick visit to refinedeverydaystyle maintained the same calm voice, restraint in punctuation signals confidence in the content and this site clearly trusts its substance to do the persuading rather than relying on typographic emphasis.
Really nice to see things explained without overcomplicating the topic, the words flow naturally and stay easy to follow, and a short visit to kraftbough only added to that experience because the same simple approach is used across the rest of the page too without any change in tone.
Liked that the post resisted a sales pitch ending, and a stop at lobbyessence maintained the no pitch approach, content that ends without trying to convert me into a customer or subscriber is content that has confidence in its own value and this site is clearly playing the long game on reader trust.
Held my interest from the opening line through to the closing thought, and a stop at elitedawn did the same, content that earns sustained attention in an environment full of distractions is doing something right and this site is clearly doing several things right rather than just one or two which I really appreciate.
A thoughtful read in a week that has been mostly noisy, and a look at hazeatelier carried that thoughtful quality across more pages, finding pockets of considered writing in a week of distractions is one of the small wins of careful curation and this site is providing those pockets at a sustainable rate.
Now planning to recommend this site in a context where my recommendations are taken seriously, and a stop at driftfair confirmed I should make that recommendation soon, the small but real act of recommending content into spaces where my taste matters is something I take seriously and this site is worth the recommendation.
Started reading expecting to disagree and ended mostly nodding along, and a look at lunarforesthub continued the pattern, content that wins agreement through evidence and reasoning rather than rhetorical force is the kind that actually shifts minds and this site clearly knows how to do that across what I have read so far.
Pass this along to colleagues if the topic comes up, the framing here is sensible, and a stop at finduniqueproducts adds more useful angles to share, the kind of content that improves conversations rather than just feeding them is what makes a resource genuinely valuable in professional contexts going forward over time and across project boundaries too.
Honestly this kind of writing is why I still bother to read independent sites, and a look at brightpinefields extended that broader reflection, the few sites that justify continued attention to non algorithmic content are sites like this one and finding them periodically is enough to keep my reading habits oriented toward independent rather than aggregated content.
Took the time to read every paragraph rather than skimming for the punchline, and a quick visit to oasismeadow earned the same careful attention from me, that is the highest signal I can give about content quality because my default mode is rapid scanning rather than deliberate reading on most pages.
Well crafted post, the structure flows naturally from one point to the next without forcing transitions, and a stop at brightlakescollection kept the same flow going, you can tell when a writer has thought about how their content reads rather than just what it contains and this is one of those examples.
If I had encountered this site five years ago I would have been telling everyone about it, and a look at changeyourmindset extended that retrospective enthusiasm, the version of me who used to recommend favourite blogs frequently would have made sure friends knew about this one and that earlier enthusiasm is partially returning to me here.
Took some notes for a project I am working on, and a stop at moderntrendmarket added more raw material to those notes, content that contributes to my own creative work rather than just being interesting in the moment is the kind I value most and the kind I will keep coming back to repeatedly.
Came away with a small but real shift in perspective on the topic, and a stop at fondcluster pushed that shift a bit further, the kind of subtle reframing that good writing does to a reader without making a big deal of it is something I always appreciate when it happens which is sadly not that often.
Learned something from this without having to dig through layers of fluff, and a stop at growtogetherstrong added a bit more context that helped tie things together for me, definitely a useful corner of the internet for anyone who wants real information without the usual marketing nonsense around it that often ruins similar pages.
A welcome contrast to the loud takes that have dominated my feed lately, and a look at mountplaza extended that calm voice, content that arrives without yelling has become unusual in the modern attention economy and this site is one of the few places I have found that consistently delivers without raising its voice.
Genuine pleasure to read, and that is not something I say often after a casual click through, and a quick visit to modernartisanliving kept the same feeling going across the rest of the site, finding writing that actually feels good to spend time with rather than just functional is increasingly rare on the open web.
Reading this brought back the satisfaction I used to get from blogs ten years ago, and a stop at refinedglobalmarket kept that nostalgic quality alive, sites that capture what was good about an earlier era of internet writing are increasingly precious and this one is doing that without feeling like a deliberate throwback at all.
Skipped breakfast still reading this and finished hungry but satisfied, and a stop at lacecabin kept me past breakfast time, content that displaces basic biological needs is content with serious attentional pull and the writers here are clearly capable of producing that level of engagement which is genuinely impressive these days.
Honestly the simplicity of the explanation made the topic click for me in a way other writeups had not, and a look at urbancreststudio continued that clarity into related areas, when a writer gets the level of explanation right the reader does the heavy lifting themselves and the post just enables it.
I really like the calm tone here, it does not push anything on the reader, and after I went through elitefest I felt the same way, just steady useful content laid out without drama, which is exactly what someone trying to learn something quickly needs to find rather than aggressive marketing.
Thanks for laying this out in a way that someone newer to the topic can follow, and a stop at fashiondailychoice kept that accessibility going, writing that meets readers at different experience levels without condescending is hard to do well and the writers here have clearly thought about who they are writing for.
Bookmark added without hesitation after finishing, and a look at loopbough confirmed I should bookmark the homepage too rather than just this page, the rare site that earns category level trust rather than just single article approval is the kind I want to rely on across many different topics over time.
Honestly this hits the sweet spot between detail and brevity, no rambling and no shortcuts, and a quick visit to brightcoastgallery kept that going across the related pages, the kind of place that respects your attention without trying to grab it through cheap tactics or attention seeking design choices that get tired fast.
Reading this felt easy in the best way, no friction and no confusion at any point, and a stop at hazemill carried that same comfort across more pages, the kind of editorial flow that lets you absorb information without fighting the format which is increasingly hard to find on the open web today across topics.
Picked this up while looking for something else and ended up reading every paragraph because it was actually informative, and after mountainleafstudio I was sure I would come back, that does not happen often when most sites bury the useful parts under endless ads and pop ups today and across most categories online.
A piece that read as if the writer was thinking carefully rather than just typing fluently, and a look at duetcoast continued that considered quality, the difference between fluent typing and careful thinking shows up in writing and this site reads as the product of thought rather than just the product of language fluency apparently.
Will be back, that is the simplest way to say it, and a quick visit to ethicalcuratedgoods reinforced the decision, this site has earned a spot in my regular rotation alongside a few other reliable places I check when I want something genuinely informative without all the usual modern web noise getting in the way.
A piece that built up gradually rather than front loading its main points, and a look at noblewindemporium maintained the same gradual structure, content that trusts the reader to reach conclusions through accumulating reasoning is more persuasive than content that announces conclusions and then defends them and this site uses the persuasive approach.
Reading this gave me material for a conversation I needed to have anyway, and a stop at bravofarm added even more talking points, content that connects to upcoming social or professional needs rather than just being interesting in the abstract is the kind that earns priority placement in my attention these days routinely.
Reading this gave me material for a conversation I needed to have anyway, and a stop at truepineemporium added even more talking points, content that connects to upcoming social or professional needs rather than just being interesting in the abstract is the kind that earns priority placement in my attention these days routinely.
Started a draft response in my head and ended without publishing it because the post said it well enough, and a look at dustorchid produced the same effect, content that satisfies my urge to add to it by being complete enough on its own is rare and represents a particular kind of editorial completeness here.
Glad the writer did not feel the need to argue with imaginary critics in the post itself, and a stop at flarefoil kept the same focused approach going, defensive writing wastes the reader time and confidence on positions that did not need defending and this post has clearly avoided that common failure.
Sets a higher bar than most of what shows up in search results for this topic, and a look at irisarbor did not lower that bar at all, in fact it confirmed the impression, this is the kind of consistency that earns a place in regular rotation for serious readers instead of casual scrollers passing through.
If quality blog writing is dying as people sometimes claim then this site is one piece of evidence that it has not died yet, and a look at micapact extended that evidence, the broader cultural question about online writing has empirical answers in specific sites and this one is contributing to a more optimistic answer overall.
Generally my attention drifts on long posts but this one held it through the end, and a stop at sunridgeshoppe earned the same sustained focus, content that defeats my drift tendency is content with substantive pulling power and this site has demonstrated that pulling power across multiple pieces in a session that has now run quite long actually.
Bookmark earned, calendar reminder set, share queued, all from one good post, and a look at silverleafemporium did the same, when a single reading session triggers multiple downstream actions you know the content has actually moved me beyond the page and this site is moving me at that higher level reliably.
Just sat with this for a bit longer than I usually would because the points are worth thinking about, and after forgecabin I had even more to chew on, the kind of post that nudges your thinking forward without forcing the issue is something I have always appreciated in good writing online.
Now placing this in the small category of sites whose updates I would actually want to know about, and a stop at lunarpeakoutlet confirmed that placement, the difference between sites I want to follow and sites I just consume from is real and this one has crossed into the active follow category from the casual consumption side.
Closed the laptop after this and let the ideas settle for a few hours, and a stop at findhappinessdaily similarly rewarded reflective time, content that benefits from sitting with rather than racing past is the kind I want more of and the kind that this site appears to consistently produce week after week here.
Really appreciate the absence of stock photos that have nothing to do with the content, and a quick visit to brightcollectionhub maintained the same restraint, visual filler is a tell that the writing cannot stand on its own and the lack of it here suggests the team has confidence in their content quality alone.
Picked up a couple of new ideas here that I can actually try out, and after my visit to eliteledge I have even more notes saved, this is the kind of resource that pays you back for the time you spend on it which is rare to come across in this corner of the web.
Reading this prompted me to send the link to two different people for two different reasons, and a stop at lunacourt provided ammunition for a third share, content that suits multiple audiences without being generic enough to be useless to any of them is genuinely valuable and this site has that multi audience quality clearly.
Reading this on the train into work was a better use of the commute than my usual choices, and a stop at lacecloister extended that commute reading well, content that improves transit time rather than just filling it is content with practical benefit and this site has earned its place in my morning commute reading rotation.
A small thing but the line spacing and font choices made reading this physically pleasant, and a look at hillessence maintained the same careful design, technical choices about typography are part of what makes online reading actually comfortable and this site has clearly invested in the design layer alongside the content layer carefully.
Liked the post enough to read it twice and the second read found new things, and a stop at musebeat similarly rewarded the second look, content with hidden depths that only reveal themselves on careful rereading is the rare kind that earns lasting respect rather than fleeting first impressions only briefly held.
Genuinely useful read, the points are practical and easy to apply right away, and a quick look at fashionandstylehub confirmed that this site is consistent in that approach, looking forward to digging through the rest of it when I get the chance to sit down properly later in the week or this weekend.
A modest masterpiece in its own quiet way, and a look at duetdrive confirmed the same quiet quality across the rest of the site, calling something a masterpiece is usually overstating but for content this carefully crafted the word feels appropriate even if the writers themselves would probably resist the label honestly.
However measured this site clears the bar I set for sites I take seriously, and a stop at edendome continued clearing that bar, the metrics I use for site quality are admittedly informal but they are consistent and this site has cleared them on multiple measurements across multiple visits which is meaningful for my evaluation.
Honestly enjoyed reading this more than I expected to when I first clicked through, and a stop at irisbureau kept that pleasant surprise going, sometimes you stumble onto a site that just clicks with how you like to read and this is one of those for me right now today which is great.
Reading this gave me material for a conversation I needed to have anyway, and a stop at flareinlet added even more talking points, content that connects to upcoming social or professional needs rather than just being interesting in the abstract is the kind that earns priority placement in my attention these days routinely.
Reading this prompted me to clean up some old notes related to the topic, and a stop at ethicalcuratedgoods extended that organising urge, content that triggers personal organisation rather than just consuming attention is content with motivating energy and this site has the kind of clarity that prompts active follow up rather than passive consumption.
Decided to set a calendar reminder to revisit, and a stop at bravopier extended that revisit list, calendar entries for content are a level of commitment I rarely make but when I do they signal a higher regard than a simple bookmark and this site has earned that calendar tier of relationship from me today.
Probably worth setting aside a longer block to read more carefully than I can right now, and a stop at brightwinterstore confirmed the longer block plan, the impulse to schedule dedicated time for a sites archive is itself a measure of trust and this site has earned that scheduling impulse from me clearly today actually.
A piece that left me thinking I had been undercaring about the topic, and a look at goldensavannashop reinforced that mild concern, content that raises the appropriate weight of a subject without being preachy about it is doing important work and this site is providing that gentle elevation of attention for me consistently.
Top notch writing, every paragraph carries weight and nothing feels like filler, and a stop at glowingridgehub reflected that same care, a rare thing on the open web these days where most pages exist for clicks rather than actual reader value or anything close to that which is honestly a real shame.
Adding this site to my regular reading list, the post earned that on its own, and a quick stop at goldstreamoutlet sealed the decision, the kind of place worth checking back with from time to time because it consistently produces material that holds up against a critical reading too which I really value.
Good post, the kind that respects the reader by getting to the point quickly without skipping the details that matter, and a short look at mintdawn confirmed that approach is consistent across the site which is rare to find online these days, definitely a place I will return to soon.
Found a small mental shift after reading this, the framing here is just a bit different from the standard takes online, and a look at premiumcuratedmarket extended that fresh perspective across more material, the rare site whose voice actually changes how you think about something rather than just confirming existing beliefs.
Decided not to skim despite my usual habit and was rewarded for the discipline, and a stop at forgeoutpost earned the same patient approach, training myself to recognise sites that warrant slower reading is part of being a careful online reader and this site is the kind that helps me practice that skill regularly.
Worth marking this site as one to come back to deliberately rather than by accident, and a stop at groweverydaynow reinforced that intention, the difference between sites I find again by chance and sites I return to on purpose is meaningful and this one has clearly moved into the deliberate return category for me.
Oyun dünyasında yeni başlayan istifadəçilər bonus seçimlərini diqqətlə müqayisə etməyə üstünlük verirlər. Rəylərdə tez-tez pin-up-bonus-az.online/xos-g%c9%99lmisiniz-paketi/ keçidinin sərfəli kampaniyaları sadə formada təqdim etdiyi qeyd olunur. Təkliflərin detallı təsviri istifadəçilərin qərar verməsini daha rahat hala gətirir.
Just sat back at the end of the post and felt grateful that someone took the time to write it, and a look at brightoakcollective extended that gratitude across more of the site, recognising effort behind quality work is part of what makes the open web a community rather than just a marketplace today.
Клининговая компания спб
Worth pointing out that the post avoided the temptation to summarise everything at the end, and a look at lyricessence continued that confident closing approach, content that trusts readers to retain the substance without being reminded of it at the end is content that respects the reader and this site practices that respect.
Bookmark added in three places to make sure I do not lose the link, and a look at epicestate got the same redundant treatment, sites I am afraid to lose are the rare keepers and this is clearly one of them based on what I have read so far across this and a couple of related posts.
Beyond the immediate post itself the editorial sensibility behind the site is what struck me, and a stop at lacehelm continued displaying that sensibility, content that reveals editorial choices through accumulated reading is content with structural quality and this site has clearly developed an underlying approach worth identifying through multiple sessions of reading.
If I had to summarise the editorial sensibility of this site in a few words it would be careful and human, and a look at timberharborfinds extended that summary feeling, capturing the essence of a sites approach in brief is hard but this site has a clear enough identity that the summary comes naturally enough.
Reading this in a relaxed evening setting was a small pleasure, and a stop at yourtimeisnow extended the pleasant evening reading, content that fits the tone of relaxed time without becoming forgettable is what I look for in evening reading and this site has the right tone for that particular slot in my daily reading routine.
Now feeling confident that this site will continue producing work I will want to read, and a look at mythmanor extended that confidence into the future, projecting forward from current quality to expected future quality is something I do for sites I genuinely follow and this one has earned that forward looking trust clearly today.
Easy to recommend, the content speaks for itself without needing additional praise from me, and a stop at islemeadow only adds more reasons to send people this way, the kind of generous resource that benefits its readers without demanding anything in return is increasingly rare and worth recognising clearly today across the broader open internet.
Quietly enjoying that I have found a new site to follow for the topic, and a look at duetparish reinforced the small pleasure of the find, the discovery of new high quality sources is one of the more durable pleasures of careful internet reading and this site has been generating that discovery pleasure at multiple points already today.
Glad I gave this fifteen minutes rather than the usual three minute skim, and a look at edendune earned the same investment, time spent on quality content is rarely wasted but the reverse is also true and learning which sites deserve which kind of attention is part of being a careful online reader.
Now saved this in a way that I will actually find again rather than the casual bookmark approach, and a stop at flarequill earned the same careful saving, organising my reading bookmarks so that high quality sources rise to the top is something I should do more of and this site triggered that organisation today.
Different feel from the algorithmically optimised posts that dominate the topic, and a stop at suncrestmodern reinforced that human touch, you can tell when a site is being run by someone who reads what they publish versus someone just hitting submit and moving on quickly to the next assignment without checking the result.
Probably one of the more reliable sources I have found for this kind of careful coverage, and a look at ethicaldesignmarket reinforced the reliability, the small group of sources I would describe as reliable for a given topic is curated carefully and this site has earned a place in that small group through consistent performance.
Top quality material, deserves more attention than it probably gets, and a look at musebeat reflected the same effort across the site, a hidden gem in the modern web where most attention goes to whoever shouts loudest rather than whoever actually delivers the best content for their readers without much marketing fanfare.
Found the writing surprisingly fresh for what is by now a well covered topic, and a stop at futuregrovegallery kept that freshness going across the related pages, original perspective on familiar ground is hard to come by and this site has clearly earned its place in the conversation rather than just rehashing old ideas.
Now considering the post as evidence that careful blog writing is still possible, and a look at dreamharbortrends extended that evidence, the broader question of whether the modern web can sustain quality writing has obvious empirical answers in sites like this one and seeing them is reassuring even when they remain a minority overall today.
Just sat with this for a bit longer than I usually would because the points are worth thinking about, and after foxarbor I had even more to chew on, the kind of post that nudges your thinking forward without forcing the issue is something I have always appreciated in good writing online.
Now planning to share the link with a small group of readers I trust, and a look at lyricmeadow suggested more material to share with the same group, recommending content into a curated circle requires confidence in the recommendation and this site is making me confident in those personal recommendations on multiple separate occasions now.
Speaking honestly this is among the better discoveries of my recent browsing, and a stop at everpeakcorner reinforced that discovery quality, the ranking of recent discoveries is informal but meaningful and this site has placed near the top of that ranking based on the consistency of quality across what I have already read carefully.
Skimmed first and then went back to read carefully, and the careful read paid off in places I had missed, and a stop at epicinlet got the same treatment, the rare site whose content rewards a second pass is content I want more of in my regular rotation rather than disposable single read articles.
A piece that respected the reader by not over explaining the obvious, and a look at wildsageemporium continued that calibrated approach, finding the right level of explanation is one of the harder editorial calls and this site has clearly thought carefully about what readers will already know versus what they need help with consistently.
Reading this triggered a small reorganisation of my own thinking on the topic, and a stop at laceparish furthered that reorganisation, content that affects the shape of my mental model rather than just decorating it with new facts is content with structural rather than informational impact and this site provides that.
Reading this in a relaxed evening setting was a small pleasure, and a stop at silverbirchgallery extended the pleasant evening reading, content that fits the tone of relaxed time without becoming forgettable is what I look for in evening reading and this site has the right tone for that particular slot in my daily reading routine.
Strong recommendation from me, anyone curious about the topic should make time for this, and a look at isleparish only sharpens that recommendation further, the kind of resource that holds up against careful scrutiny rather than crumbling at the first critical question is rare and worth pointing other people toward when the topic comes up.
Came in tired from a long day and the writing held my attention anyway, and a stop at edenfair kept that going, content that can engage a fatigued reader is doing something right because most online reading happens in suboptimal conditions like that one and quality content adapts to it without complaint.
Worth pointing out that the writing reads as confident without being defensive about it, and a look at artfuldailyclickping extended that secure tone, content that does not pre emptively argue against imagined critics has a different quality from defensive writing and this site reads as written from a place of real ease.
Considered as a whole this site has developed a coherent point of view that comes through in individual pieces, and a look at flickaltar continued displaying that coherence, sites with a unified perspective rather than a grab bag of takes are sites with editorial maturity and this one has clearly developed that maturity through years of work.
Now feeling that this site is the kind I want to make sure does not disappear, and a look at dustorchid reinforced that quiet protective feeling, the rare sites whose disappearance would actually matter to me are the sites I want to support through return visits and recommendations and this one has joined that small protected list.
Genuine pleasure to read, and that is not something I say often after a casual click through, and a quick visit to neatdawn kept the same feeling going across the rest of the site, finding writing that actually feels good to spend time with rather than just functional is increasingly rare on the open web.
Looking at the surface design and the substance together this site has both right, and a look at goldenpeakartisan reinforced that integrated quality, sites where presentation and content reinforce each other rather than fighting are sites with full editorial coherence and this one has clearly invested in both layers in a balanced way.
Really appreciate that the writer did not stretch the post to hit some target word count, the points end when they are made, and a stop at mythmanor reflected the same discipline, brevity is generosity in disguise and this site has clearly figured that out far better than most blog operations have.
A particular kind of restraint shows up in the writing, and a look at yourpotentialawaits maintained the same restraint across pages, knowing what not to say is just as important as knowing what to say and this site has clearly developed strong instincts on both sides of that editorial line throughout pieces I have read.
If the topic interests you at all this is a place to spend time, and a look at modernhomeculture reinforced that recommendation, the broader question of where to invest topical reading time is one this site answers convincingly through the consistent quality across multiple pieces I have sampled during the current reading session today.
Looking at the surface design and the substance together this site has both right, and a look at moonstardesigns reinforced that integrated quality, sites where presentation and content reinforce each other rather than fighting are sites with full editorial coherence and this one has clearly invested in both layers in a balanced way.
Now adding this site to a small mental group of recommendations I keep ready for specific kinds of inquiries, and a stop at lyricoasis extended the recommendation readiness, content that I can confidently point friends and colleagues toward in specific contexts is content with real social utility and this site has that utility clearly.
Generally my comment to other readers about new sites is to wait and see but for this one I would jump to recommend now, and a look at globalmarketoutlet reinforced that early recommendation, the speed at which a site earns my recommendation is itself a quality signal and this one has earned mine quickly clearly.
Most of the time I bounce off similar pages within seconds, and a stop at etheraisle held me longer than I would have predicted, the ability to convert a likely bouncing visitor into an engaged reader is a quality signal and this site has demonstrated that conversion ability across multiple visits where I expected to bounce.
Reading this confirmed that the topic deserves more careful attention than it usually gets, and a stop at grandriverworkshop extended that elevated framing, content that raises the appropriate weight of a subject without being preachy about it is serving a quiet but important editorial function for the broader cultural conversation about it.
Now organising my browser bookmarks to give this site easier access, and a look at softdawnboutique earned the same organisational priority, the small acts of digital housekeeping I do for sites I expect to use often are themselves a measure of trust and this site has triggered the trust based housekeeping behaviour from me clearly.
Компания fastek https://fastek.by проектируем и поставляем надежные фасадные системы для коммерческих и жилых объектов, обеспечивая долговечность, энергоэффективность и безупречный внешний вид здания под ваши задачи.
Reading more of the archives is now on my plan for the weekend, and a stop at northernwavegoods confirmed the archive worth the time, the rare archive worth a dedicated reading session rather than just casual sampling is the rare archive of serious work and this site has clearly produced enough of that work to warrant the deeper exploration.
A clean piece that knew exactly what it wanted to say and said it, and a look at discovermoreoffers maintained the same clarity of intention, knowing the goal of a piece before writing is something most blog content lacks and the clarity of purpose here shows up in every paragraph for any careful reader to notice.
Worth bookmarking and sharing with anyone interested in the topic, that is my honest take, and a stop at wildroseemporium reinforces that, the kind of generous resource that makes the open web feel worth defending against the constant pressure to retreat into walled gardens and curated feeds today everywhere I look across all my devices.
Reading this slowly and letting each paragraph land before moving on, and a stop at ivypier earned the same patient approach, content that rewards slow reading rather than speed is content with real density and the writers here are clearly producing work that benefits from the careful eye rather than the rushed scan.
Came back to this an hour later to reread a specific section, and a quick visit to edgecradle also drew a second look, content that pulls you back rather than letting you move on permanently is the kind I want to fill my browser bookmarks with in 2026 and beyond as the open internet evolves.
A clean read with no irritations, and a look at flowlegend continued that frictionless quality, the absence of small irritations is something I notice only when present elsewhere and this site is one of the rare places where everything just works and lets me focus on the substance rather than fighting the format.
Now feeling the rare pleasure of trusting a source completely on first encounter, and a look at trueharborboutique extended that initial trust into something more durable, the calibration of trust to evidence is something I do informally and this site has earned high trust through the cumulative weight of multiple consistently good posts already.
Reading this fit naturally into my afternoon walk because I was reading on my phone, and a stop at neatdawn continued well in that walking format, content that survives mobile reading without becoming awkward is content with format flexibility and this site has clearly thought about how it reads across different devices today.
My reading list is short and selective and this site is now on it, and a stop at marveldeck confirmed the placement, the short list of sites I read deliberately rather than encounter accidentally is something I curate carefully and adding to it is a real act of trust which this site has earned today.
Worth pointing out the careful word choice in this post, no buzzwords and no jargon, and a look at neatglyph continued that disciplined vocabulary, sites that resist the pull of trendy language are sites that will read well in five years and this one is clearly built for that kind of long durability.
Following the post through to the end without my attention drifting once, and a look at etherfair earned the same uninterrupted attention, content that holds attention without manipulating it is content with substantive pull and this site has demonstrated that substantive pull across multiple pieces in a single reading session reliably here today.
Genuinely changed how I think about a small piece of the topic, which does not happen often online, and a look at goldenrootstudio added another nudge in the same direction, the kind of writing that earns a small mental shift rather than just confirming what you already thought before reading is a sign of careful thought.
Coming back to this one, definitely, and a quick visit to globalinspiredclickping only made me more sure of that, the kind of writing that makes you want to set aside time later rather than rushing through it now while distracted by everything else competing for attention on the screen today across so many tabs.
Мы предлагаем быстрое оформление медицинских справок для работы, учебы, спортивных секций и других целей. Наша компания делает процесс получения документов максимально удобным и понятным для каждого клиента https://afina-mc.ru/medicinskaya-spravka-ot-ginekologa/
Thanks for keeping things clear and to the point, that is honestly hard to find online these days, and after reading through freshpineemporium the message stayed consistent which makes me trust the information being shared more than I usually do on similar pages that cover this same kind of topic.
Worth pointing out that the writing reads as confident without being defensive about it, and a look at yourdealhub extended that secure tone, content that does not pre emptively argue against imagined critics has a different quality from defensive writing and this site reads as written from a place of real ease.
Sets a higher bar than most of what shows up in search results for this topic, and a look at lunacourts did not lower that bar at all, in fact it confirmed the impression, this is the kind of consistency that earns a place in regular rotation for serious readers instead of casual scrollers passing through.
Liked that there was nothing performative about the writing, and a stop at jetmanors continued that genuine quality, performative writing tries to be witnessed rather than read and the difference between performance and substance is huge for the careful reader and this site has clearly chosen substance every time clearly.
рефинансирование микрозаймов онлайн https://srnalogcon.ru
Started a draft response in my head and ended without publishing it because the post said it well enough, and a look at portpoises produced the same effect, content that satisfies my urge to add to it by being complete enough on its own is rare and represents a particular kind of editorial completeness here.
Comfortable read, finished it without realising how much time had passed, and a look at ivypiers pulled me into more pages the same way, the absence of friction in good content lets time disappear and that is one of the highest compliments I can pay any piece of writing I find online during a regular search session.
Reading this between meetings turned out to be the most useful thing I did all afternoon, and a stop at jetdome kept that productivity feeling going, content can sometimes outperform actual work in terms of what gets accomplished mentally and this site managed that today which is genuinely a high bar to clear consistently.
Liked the balance between depth and brevity, never too shallow and never too long, and a stop at meritquays kept the same balance going across the rest of the site, this is one of the harder skills in writing and the team here clearly has it figured out very well indeed across every page.
If quality blog writing is dying as people sometimes claim then this site is one piece of evidence that it has not died yet, and a look at coastalmistcorner extended that evidence, the broader cultural question about online writing has empirical answers in specific sites and this one is contributing to a more optimistic answer overall.
A welcome reminder that thoughtful writing still happens online, and a look at everwildbranch extended that reassurance, the modern web makes it easy to forget that careful writing exists and finding sites that practice it is a small antidote to the cynicism that builds up from too much exposure to algorithmic content.
Now appreciating that the post did not try to imitate any other style I might recognise, and a stop at edgedial continued that distinct voice, content with its own register rather than borrowed from elsewhere is content with real authorial presence and this site has clearly developed that presence through what feels like patient editorial work.
Now appreciating that the post did not require external context to follow, and a look at fondarbor maintained the same self contained quality, content that respects new visitors by being readable without prerequisites is content with broader accessibility and this site has clearly invested in keeping each piece reader friendly for fresh arrivals.
Now appreciating the small but real way this post improved my afternoon, and a stop at discovergiftoutlet extended that small improvement effect, content that produces measurable positive impact on the texture of a reading day is content with real value and this site is producing those small positive impacts at a sustainable rate apparently.
Reading the writers other posts after this one suggests the quality is consistent rather than peak, and a stop at rarecrestfashion confirmed the consistent quality reading, sites that hold the same level across many pieces rather than peaking on a few are sites with sustainable editorial discipline and this one has clearly developed that.
Looking at this from the perspective of someone tired of generic content the contrast is striking, and a look at globalbuyzone maintained that distinctive feel, sites with strong editorial identity stand out against the bland background of algorithmic content and this one has clearly developed an identity worth recognising through careful attention.
Closed the laptop after this and let the ideas settle for a few hours, and a stop at etherledge similarly rewarded reflective time, content that benefits from sitting with rather than racing past is the kind I want more of and the kind that this site appears to consistently produce week after week here.
Really like the way the post resists reaching for cliches that would have made it feel generic, and a quick visit to deepforestcollective kept that fresh feel going, original phrasing and unexpected metaphors are signs that the writer is actually thinking rather than just stitching together familiar phrases into the appearance of content.
Taking the time to read carefully here has been worthwhile for the past hour, and a look at rusticridgeboutique extended the worthwhile reading, the calculation of return on reading time spent is something I do informally and this site has been producing positive returns across multiple sessions during the last week of regular visits and reads.
Most posts I read end up forgotten within a day but this one is sticking, and a look at everattics extended that lingering effect, content that survives the immediate moment of reading rather than evaporating is content with genuine retention quality and this site has been producing memorable pieces at a rate notable across my reading.
Reading this triggered a small reorganisation of my own thinking on the topic, and a stop at neatlounge furthered that reorganisation, content that affects the shape of my mental model rather than just decorating it with new facts is content with structural rather than informational impact and this site provides that.
Glad the writer kept this short rather than padding it out, the points stand on their own without needing extra context, and a look at designforwardclick kept the same approach going, brevity is a sign of confidence in the substance and the team here clearly trusts their content to land without filler.
Probably the best thing I have read on this topic in the past month, and a stop at mythmanors extended that ranking, the casual ranking of recent reading is informal but real and this site has been winning those rankings for me on this topic specifically over the last several weeks of regular reading sessions.
Quality work here, the post reads cleanly and the points stay focused throughout, and a stop at jetmanor kept the standard high, you can tell the writer cares about the final result rather than just hitting publish for the sake of having something new on the page to feed the search engines.
Took a screenshot of one section to come back to later, and a stop at neatglyph prompted another saved tab, the urge to capture and revisit specific pieces of content is something I rarely feel but when I do it tells me the work is worth more than the average passing read for sure.
Reading this on the train into work was a better use of the commute than my usual choices, and a stop at forgecabin extended that commute reading well, content that improves transit time rather than just filling it is content with practical benefit and this site has earned its place in my morning commute reading rotation.
A clean piece that knew exactly what it wanted to say and said it, and a look at elitedawn maintained the same clarity of intention, knowing the goal of a piece before writing is something most blog content lacks and the clarity of purpose here shows up in every paragraph for any careful reader to notice.
The clarity here is something I really appreciate, especially compared to sites that pile on jargon for no reason, and a look at yourdailyinspiration was the same, simple direct sentences that actually deliver information instead of dancing around the point for paragraphs at a time which wastes reader patience.
Appreciated the way each section connected smoothly to the next without abrupt jumps, and a stop at brightpathcorner kept that flow going nicely, transitions are something most blog writers ignore but the difference is huge for the reader who is trying to follow a sustained line of thought today across many different topics.
Felt the post had been written without looking over its shoulder, and a look at sunrisehillcorner continued that confident posture, content written for its own sake rather than against imagined critics has a different quality and this site reads as written from a place of confidence rather than defensive justification of every claim.
Felt the writer respected me as a reader without making a show of doing so, and a look at discoverfashionhub continued that quiet respect, this is the kind of small but meaningful detail that separates the sites I bookmark from the ones I close after a single skim and never return to again no matter how interesting the headline.
Thanks for the clean writing, no broken sentences and no awkward translations like some other sites have, and a quick stop at everattic kept that polish going nicely, it really does make a difference when a reader can move through a page without tripping on every line or going back to reread.
Just want to recognise that someone clearly cared about how this turned out, and a look at ivypiers confirmed that care extends across the broader site, you can feel the difference between content shipped to hit a deadline and content released because the writer was actually proud of the result for once.
Decent post that improved my afternoon a small amount, and a look at edendunes added a bit more to that, sometimes the small wins online add up over time and a useful site like this one is the kind of place that contributes consistently to those small wins for me lately across many different topics I follow.
During a reading session that included several other sources this one stood out, and a look at epicestates continued the standout quality, the side by side comparison of sources during research is a useful exercise and this site has been winning those comparisons for me consistently across multiple research sessions during the last week.
Reading this on the train into work was a better use of the commute than my usual choices, and a stop at moonfieldboutique extended that commute reading well, content that improves transit time rather than just filling it is content with practical benefit and this site has earned its place in my morning commute reading rotation.
Just one of those reads that left me feeling slightly more capable rather than overwhelmed, and a look at deathrayvision kept that empowering feel going, the difference between content that builds the reader up and content that intimidates them is huge and this site clearly knows which side of that line to stand.
Liked the balance between depth and brevity, never too shallow and never too long, and a stop at almostfashionablemovie kept the same balance going across the rest of the site, this is one of the harder skills in writing and the team here clearly has it figured out very well indeed across every page.
Left me wanting to read more rather than feeling burned out, that is a good sign, and a look at benningtonareaartscouncil confirmed there is plenty more here to explore, the kind of writing that builds appetite rather than killing it which is a rare quality on the modern open internet today across most categories of content.
Probably one of the more reliable sources I have found for this kind of careful coverage, and a look at jammykspeaks reinforced the reliability, the small group of sources I would describe as reliable for a given topic is curated carefully and this site has earned a place in that small group through consistent performance.
If I had encountered this site five years ago I would have been telling everyone about it, and a look at palmcodexs extended that retrospective enthusiasm, the version of me who used to recommend favourite blogs frequently would have made sure friends knew about this one and that earlier enthusiasm is partially returning to me here.
If I am being honest this is the kind of site I quietly hope my own work will someday resemble, and a stop at artisanalifestylemarket extended that aspirational feeling, finding work that models what I want to produce is part of why I read carefully and this site has been performing that modelling function for me lately consistently.
Closed it feeling I had taken something away rather than just consumed something, and a stop at neatmill extended that taking away feeling, the difference between content I extract value from and content I just pass through is something I track informally and this site is consistently in the value extraction column for me.
Halfway through I knew I would finish the post, and a stop at knackdome also held me through to the end, content that signals its quality early and then sustains it is content with real internal consistency and this site has clearly figured out how to maintain quality from opening sentence through to closing thought.
Looking at this from the perspective of someone tired of generic content the contrast is striking, and a look at knightstablefoodpantry maintained that distinctive feel, sites with strong editorial identity stand out against the bland background of algorithmic content and this one has clearly developed an identity worth recognising through careful attention.
Skipped the TLDR thinking I would read everything anyway, and ended up enjoying the path through the full post, and a stop at foxarbor similarly rewarded the patient read, summaries are useful but the journey through good writing is part of what makes the destination feel earned rather than just delivered cleanly.
However casually I came to this site I have ended up reading carefully, and a look at elitefest continued earning that careful reading, the conversion from casual visitor to careful reader is something content earns rather than demands and this site has accomplished that conversion for me over the course of just a few pieces.
Felt the writer respected the topic without being precious about it, and a look at softevergreen continued that respectful but unfussy treatment, finding the right register for serious topics is hard and this site has clearly figured out how to take the topic seriously while still being readable for casual visitors regularly.
Reading this gave me a small framework I expect to use going forward, and a stop at neatmill extended that framework, content that produces transferable mental models rather than just specific facts is content with multiplicative value and this site is providing those models at a rate that justifies extra attention from me regularly.
Pleasant surprise, the post delivered more than the headline promised, and a stop at yourdailyfinds continued that pattern of under promising and over delivering, the rarest combination on the modern web where most content does the opposite by promising the world and delivering thin recycled summaries instead each time you click on something interesting.
Honestly enjoyed every minute spent here, that is not something I say lightly, and a look at fernbureau confirmed I will be back, the bar for spending time online is high for me these days but this site clears it without effort which is high praise indeed from this reader who is usually rather demanding.
Picked a friend mentally as the audience for this and decided to send the link, and a look at northerncreststudio confirmed the send was the right choice, choosing whom to share content with is a small act of curation that I take more seriously than the public sharing most platforms encourage these days online.
This filled in a gap in my understanding that I had not even noticed was there, and a stop at freshtrendstore did the same, the kind of post that gives you more than you expected when you first clicked through from somewhere else, a real find for anyone curious about the area covered here.
Now sitting back and recognising that this was a small but real win in my reading day, and a stop at riverstonecorner extended that quiet win, the cumulative effect of small reading wins versus the cumulative effect of small reading losses is real over time and this site is contributing to the wins side of that ledger.
I appreciate the clarity here, everything is explained in simple terms without unnecessary detail, and after a quick stop at leafdawns the points came together nicely for me, the writing keeps things straightforward and respects the reader from start to finish without ever talking down to anyone.
A piece that left me thinking I had been undercaring about the topic, and a look at midriverdesigns reinforced that mild concern, content that raises the appropriate weight of a subject without being preachy about it is doing important work and this site is providing that gentle elevation of attention for me consistently.
Honestly enjoyed not being sold anything for the entire duration of the post, and a look at flareaisles kept that pleasant absence going across more pages, content that exists for its own sake rather than as a funnel to a paid product is increasingly rare and worth supporting where I can find it.
Granted my mood today might be elevating my reading experience but I still think this is genuinely good, and a stop at quinttatro reinforced that even discounted assessment, controlling for the mood adjustment that affects content perception this site still reads as substantively above average across multiple pieces I have read carefully today.
займ без отказа онлайн на карту займ на карту срочно
My usual pattern is to skim and bounce but this site has reset that pattern temporarily, and a stop at lakequills maintained the slower reading mode, content that changes how I read is content with structural influence and this site has clearly nudged my reading behaviour toward something better at least for the duration of these visits.
Beats most of the alternatives on the topic by a noticeable margin, and a look at knackpact did not change that at all, this is one of the better corners of the open internet for this kind of content and I am glad I clicked through rather than skipping past quickly like I usually do.
Started imagining how I would explain the topic to someone else after reading, and a look at goldenwillowhouse gave me more material for that imagined explanation, content that improves my own ability to discuss a topic is content that has actually transferred knowledge rather than just decorating my screen for a few minutes.
Now setting aside time on my next free afternoon to read more from the archives, and a stop at masonchallengeradaptivefields confirmed that time will be well spent, the rare site whose archive deserves a dedicated reading session rather than just casual sampling is the kind of resource worth scheduling around and this one qualifies clearly.
Now feeling that this site is the kind I want to make sure does not disappear, and a look at moderncuratedessentials reinforced that quiet protective feeling, the rare sites whose disappearance would actually matter to me are the sites I want to support through return visits and recommendations and this one has joined that small protected list.
Considered against the flood of similar content this one stands apart in important ways, and a stop at freshguild extended that distinctive feel, sites that find their own corner of a crowded topic and stay there are sites worth following and this one has clearly carved out its own space and committed to defending it carefully.
Found a small mental shift after reading this, the framing here is just a bit different from the standard takes online, and a look at eliteledge extended that fresh perspective across more material, the rare site whose voice actually changes how you think about something rather than just confirming existing beliefs.
Just enjoyed the experience without needing to think about why, and a look at wildnorthoutlet kept that effortless feeling going, sometimes the best content is invisible in the sense that you forget you are reading until you reach the end and realise time has passed without you noticing it pass naturally.
Generally my attention drifts on long posts but this one held it through the end, and a stop at northdawn earned the same sustained focus, content that defeats my drift tendency is content with substantive pulling power and this site has demonstrated that pulling power across multiple pieces in a session that has now run quite long actually.
Comfortable in tone and substantive in content, that is a hard combination to land, and a look at fernpier kept that pairing alive across more material, this is what good editorial direction looks like in practice and the team here clearly has someone keeping a steady hand on the wheel across what they decide to publish.
A piece that took its time without dragging, and a look at flarefests kept the same patient pace, the difference between unhurried and slow is a fine editorial distinction and this site has clearly found the unhurried side without slipping into the slow side which would have lost me as a reader quickly otherwise.
Looking through the archives suggests this site has been doing this for a while at this level, and a look at nicholashirshon confirmed the long term consistency, sites that have maintained quality across years rather than just a recent stretch are sites with serious editorial discipline and this one has clearly been at it for a while.
Solid value packed into a relatively short post, that takes skill, and a look at goldenhorizonhub continues the dense useful content across more pages, this site clearly understands that respecting reader time is itself a form of generosity which is something most blog operations seem to have forgotten lately across the wider open web.
Honestly impressed, did not expect to find this level of care on the topic, and a stop at loopboughs cemented the impression, you can tell within the first few paragraphs whether a site is going to be worth the time and this one delivered on that early promise nicely throughout the rest of what I read.
My usual response to new bookmarks is to forget them but this one I have already returned to twice, and a look at yungbludcomic pulled me back a third time, the actual return rate to bookmarked sites is the real measure of value and this one is clearing that measure at a notable rate already.
Pass this along to anyone you know dealing with similar questions, the answers here are clear, and a stop at urbanbuycorner adds even more useful material, this is the kind of resource that deserves to circulate widely rather than getting lost in the constant churn of new content online that buries good work daily.
Generally I am cautious about recommending sites on first encounter but this one warrants the exception, and a look at lacecabin reinforced the exception making, the rare site that justifies breaking my normal cautious approach is the rare site worth flagging early and this one has prompted exactly that early flagging response from me.
займы онлайн на карту без отказа https://tbcareer.ru
Liked the way the post handled the final paragraph, no neat bow but no abrupt cutoff either, and a stop at lobbydawns continued that thoughtful ending pattern, endings are hard and most blog writers either over engineer them or skip them entirely and this site has clearly figured out a sustainable middle approach.
Reading this in three sittings because the day was fragmented, and the piece survived the fragmentation, and a stop at etheraisles held up under similar reading conditions, content engineered for continuous attention is fragile in modern conditions and this site reads as durable across the realistic ways people consume content today.
Now wondering how the writers calibrated the level of detail so well, and a stop at rockyrose continued the same calibration, the right level of detail is one of the harder editorial calls in any piece and this site has clearly developed an instinct for it through what I assume is years of careful practice publicly.
The clarity here is something I really appreciate, especially compared to sites that pile on jargon for no reason, and a look at sunlitwoodenstore was the same, simple direct sentences that actually deliver information instead of dancing around the point for paragraphs at a time which wastes reader patience.
More original than the recycled takes I keep finding on the topic elsewhere, and a quick look at frostcoast confirmed it, the kind of site that has its own voice rather than echoing whatever is trending which makes it stand out as a refreshing change from the usual rotation of generic content I see daily.
Reading this on a long flight and finding it the best thing I read across hours of trying, and a stop at epicestate kept the streak going, when content beats long flight reading you know it has substance because flight reading is a hard test of a piece given the alternatives available everywhere.
Just one of those reads that left me feeling slightly more capable rather than overwhelmed, and a look at urbanleafoutlet kept that empowering feel going, the difference between content that builds the reader up and content that intimidates them is huge and this site clearly knows which side of that line to stand.
Quietly enthusiastic about this site after the past few hours of reading, and a stop at curatedfuturemarket extended that enthusiasm, the calibration of enthusiasm to evidence is something I try to maintain and this site has earned a calibrated quiet enthusiasm rather than the loud excitement that usually fades within a day or two of finding something.
Honestly enjoyed reading this more than I expected to when I first clicked through, and a stop at softgrovecorner kept that pleasant surprise going, sometimes you stumble onto a site that just clicks with how you like to read and this is one of those for me right now today which is great.
Really clear writing, the kind that makes you want to share the link with someone who has been asking about the topic, and a quick browse through pactcliffs only made me more sure of that, the information here stays useful long after the first read is done which says a lot.
Useful read, especially because the writer did not assume too much background from the reader, and a quick look at fieldlagoon continued in the same way, a thoughtful site that meets people where they are which is something the modern web could use a lot more of for both casual and serious readers.
Наша компания предлагает удобное получение справок для физических лиц. Мы помогаем быстро подготовить необходимые документы для любых жизненных ситуаций – https://mc-spravki.site/medicinskie-spravki-dlya-sdelki-s-nedvizhimostyu/
Genuinely changed how I think about a small piece of the topic, which does not happen often online, and a look at freshtrendstore added another nudge in the same direction, the kind of writing that earns a small mental shift rather than just confirming what you already thought before reading is a sign of careful thought.
Now realising the topic deserved better treatment than it has been getting elsewhere, and a look at coastlinechoice extended that broader recognition, content that exposes the gap between actual quality and average quality elsewhere is doing the quiet work of raising standards and this site is contributing to that elevation in its own corner.
Going to share this with a friend who has been asking the same questions for a while now, and a stop at novalog added a few more pages I will pass along too, this is the kind of generous information that earns a small thank you from me right now and again later this week.
Reading this felt productive in a way most internet reading does not, and a look at christmasatthewindmill continued that productive feeling, sometimes the open web feels like a waste of time but sites like this remind me why I still bother to look around rather than retreating to old reliable sources for everything I need.
Considered against the flood of similar content this one stands apart in important ways, and a stop at puregreenoutpost extended that distinctive feel, sites that find their own corner of a crowded topic and stay there are sites worth following and this one has clearly carved out its own space and committed to defending it carefully.
Reading this gave me a small refresher on something I had partially forgotten, and a stop at trendspotstore extended the refresher, content that strengthens existing knowledge rather than just adding new is content with a particular kind of consolidating value and this site is providing that consolidating function across multiple visits.
Now setting aside time on my next free afternoon to read more from the archives, and a stop at lacehelm confirmed that time will be well spent, the rare site whose archive deserves a dedicated reading session rather than just casual sampling is the kind of resource worth scheduling around and this one qualifies clearly.
Good post, the kind that respects the reader by getting to the point quickly without skipping the details that matter, and a short look at flarefoils confirmed that approach is consistent across the site which is rare to find online these days, definitely a place I will return to soon.
Big thanks to whoever wrote this, you saved me a lot of time hunting for the same info on other sites, and a stop at electlarryarata only added more useful detail without going off topic, that kind of focus is honestly hard to come across these days when most posts wander everywhere.
A nicely understated post that does not shout for attention, and a look at boldharborstudio maintained the same quiet quality, understatement is a stylistic choice that distinguishes serious writing from attention seeking writing and this site has clearly committed to the understated approach as a core editorial value rather than just a phase.
If I were to recommend a starting point for the topic this site would be near the top of my list, and a stop at galafactor reinforced that recommendation status, the small list of starting point recommendations I keep for friends asking about topics is short and this site is now firmly on it.
Solid value for anyone willing to read carefully, and a look at covidtest-cyprus extends that value across the rest of the site, this is the kind of place that rewards return visits rather than offering everything in a single splashy post and then leaving readers nothing to come back for later which is unfortunately common.
Now feeling the post has earned a proper recommendation rather than a casual mention, and a stop at portolives reinforced the recommendation strength, the difference between mentioning and recommending is a small editorial distinction I observe in my own conversations and this site has earned the upgraded recommendation level from me confidently today.
Stayed longer than planned because each section earned the next, and a look at epicinlet kept that pulling effect going across more pages, the kind of subtle pull that good writing exerts on attention is something I find harder and harder to resist when I encounter it on the open web today.
Glad the writer did not feel compelled to cover every possible angle of the topic, focus is a virtue, and a stop at urbanmistcollective reflected the same disciplined scope, knowing what to leave out is half of what makes good writing good and this post has clearly been edited with that principle in mind.
Skipped lunch to finish reading, which says something, and a stop at draftports kept me at my desk longer than planned, when content beats the lunch impulse the writer has done something genuinely impressive in an attention environment full of immediately satisfying alternatives competing for the same finite block of reader time.
A piece that demonstrated competence without performing it, and a look at premiumhandcraftedhub maintained the same self assured but unshowy register, the gap between competence and performance of competence is one I track and this site has clearly chosen to demonstrate rather than perform which I find much more persuasive as a reader.
Adding this site to my regular reading list, the post earned that on its own, and a quick stop at firmessence sealed the decision, the kind of place worth checking back with from time to time because it consistently produces material that holds up against a critical reading too which I really value.
Worth bookmarking and sharing with anyone interested in the topic, that is my honest take, and a stop at peacelandworld reinforces that, the kind of generous resource that makes the open web feel worth defending against the constant pressure to retreat into walled gardens and curated feeds today everywhere I look across all my devices.
Really like that the writer trusts the reader to follow simple logic without restating every previous point, and a stop at grovequays kept that respect going, treating an audience as capable adults rather than as people who need constant hand holding makes a noticeable difference in the reading experience for me.
Started believing the writer knew the topic deeply by about the second paragraph, and a look at softsummerfields reinforced that confidence, the speed at which a writer establishes credibility through their writing is a useful quality signal and this writer establishes it quickly and quietly without resorting to credential dropping or self promotion.
Big thanks to whoever wrote this, you saved me a lot of time hunting for the same info on other sites, and a stop at lakelake only added more useful detail without going off topic, that kind of focus is honestly hard to come across these days when most posts wander everywhere.
Glad to find a site whose links lead somewhere worth going rather than back to itself for SEO juice, and a stop at oakarena kept that generous outbound feel, citing other peoples work with real respect rather than just for ranking signals is a sign of an honest operation worth supporting going forward.
Все самое свежее здесь: https://povario.ru
Worth pointing out that the post avoided the temptation to summarise everything at the end, and a look at epicinlets continued that confident closing approach, content that trusts readers to retain the substance without being reminded of it at the end is content that respects the reader and this site practices that respect.
Now planning to share the link with a small group of readers I trust, and a look at tinacurrin suggested more material to share with the same group, recommending content into a curated circle requires confidence in the recommendation and this site is making me confident in those personal recommendations on multiple separate occasions now.
Liked the way the post handled the final paragraph, no neat bow but no abrupt cutoff either, and a stop at gemcoast continued that thoughtful ending pattern, endings are hard and most blog writers either over engineer them or skip them entirely and this site has clearly figured out a sustainable middle approach.
Now adding the homepage to my regular check rotation rather than waiting for individual links to find me, and a stop at globalforestmart confirmed the rotation upgrade, the move from passive discovery to active checking is a vote of confidence in a sites ongoing quality and this site has earned that active engagement clearly.
Just nice to read something that does not feel like it was assembled from a content brief, and a stop at etheraisle kept that handcrafted feel going, you can tell when a real human with real understanding is behind the words versus a templated piece churned out for an algorithm to find.
Will share this on a forum I am part of where it will be appreciated by others working in the same area, and a look at everleafoutlet suggests there is more here worth passing along too, definitely a generous resource that deserves a wider audience than it probably has today across the open internet.
Started imagining how I would explain the topic to someone else after reading, and a look at domemarinas gave me more material for that imagined explanation, content that improves my own ability to discuss a topic is content that has actually transferred knowledge rather than just decorating my screen for a few minutes.
Found this through a search that was generic enough I did not expect quality results, and a look at fondarbors continued the surprisingly good experience, search engines occasionally still surface excellent independent content if you scroll past the obvious paid and high authority results which is reassuring to remember sometimes.
Took a few notes from this post, the points are easy to remember without needing to come back and check, and a look at theblackcrowesmobile added a couple more, the kind of place that sticks in the memory long after the browser tab has been closed for the day which says a lot really.
Honestly this hits the sweet spot between detail and brevity, no rambling and no shortcuts, and a quick visit to softmountainmart kept that going across the related pages, the kind of place that respects your attention without trying to grab it through cheap tactics or attention seeking design choices that get tired fast.
Beyond the immediate post itself the editorial sensibility behind the site is what struck me, and a stop at freshfindsmarket continued displaying that sensibility, content that reveals editorial choices through accumulated reading is content with structural quality and this site has clearly developed an underlying approach worth identifying through multiple sessions of reading.
If patience for careful reading is rare these days finding sites that reward it is rarer still, and a stop at modernvalueclickfront extended that rare reward, the diminishing returns on shallow content reading have made me more selective about where to spend reading time and this site is meeting the higher selectivity bar consistently.
Yesterday I was complaining about the state of online writing and today this site has temporarily fixed that complaint, and a look at lcbclosure extended that mood reversal, the short term mood improvement that comes from finding good content is real and this site has produced that improvement for me at a useful moment.
Strong recommendation from me, anyone curious about the topic should make time for this, and a look at lakequill only sharpens that recommendation further, the kind of resource that holds up against careful scrutiny rather than crumbling at the first critical question is rare and worth pointing other people toward when the topic comes up.
Just wanted to say this was useful and leave a small note of thanks, and a quick visit to brightnorthboutique earned a similar nod from me, the small acknowledgements add up over time and represent the real economy of trust that good content runs on across the open and increasingly fragmented modern internet.
Дополнительная информация: https://aromline.ru/index.php?productid=5892
Solid quality, the kind of work that holds up to a careful read rather than a quick skim, and a quick look at draftlakes kept that standard going strong, content that rewards attention rather than punishing it is something I appreciate more and more these days online across nearly every topic I follow.
Now appreciating the way the post avoided the temptation to be longer than necessary, and a look at opaldune continued that lean approach, content with the discipline to stop when finished rather than padding for length is content that respects both itself and its readers and this site has that disciplined editorial culture clearly throughout.
Reading this slowly in the morning before opening email, and a stop at ethicalpremiumstore extended that protected attention, content that earns the prime morning reading slot before the daily distractions begin is content with elevated status and this site has earned that prime slot consistently in my recent reading habits clearly.
Recommended without hesitation if you care about careful coverage of this topic, and a stop at closingamericasjobgap reinforced the recommendation, the bar I set for unhesitating recommendations is fairly high and this site has cleared it through the cumulative weight of multiple consistently good pieces rather than through any single standout post which is meaningful.
Pleasant surprise, the post delivered more than the headline promised, and a stop at etherfair continued that pattern of under promising and over delivering, the rarest combination on the modern web where most content does the opposite by promising the world and delivering thin recycled summaries instead each time you click on something interesting.
Solid quality, the kind of work that holds up to a careful read rather than a quick skim, and a quick look at irisarbors kept that standard going strong, content that rewards attention rather than punishing it is something I appreciate more and more these days online across nearly every topic I follow.
Наша компания помогает подготовить справки, получить свидетельства и оформить апостиль без лишних хлопот https://apostilium-moscow.com/apostille-on-a-certificate-from-the-registry-office/
Skipped lunch to finish reading, which says something, and a stop at wildtimbercollective kept me at my desk longer than planned, when content beats the lunch impulse the writer has done something genuinely impressive in an attention environment full of immediately satisfying alternatives competing for the same finite block of reader time.
Skipped breakfast still reading this and finished hungry but satisfied, and a stop at thefrontroomchicago kept me past breakfast time, content that displaces basic biological needs is content with serious attentional pull and the writers here are clearly capable of producing that level of engagement which is genuinely impressive these days.
If the topic interests you at all this is a place to spend time, and a look at driftfairs reinforced that recommendation, the broader question of where to invest topical reading time is one this site answers convincingly through the consistent quality across multiple pieces I have sampled during the current reading session today.
If I were grading sites on this topic this one would receive high marks, and a stop at isleparishs continued earning those high marks, the informal grading I do mentally for content sources is something I take seriously even though it is informal and this site has been receiving consistent high marks across multiple sessions today.
Наша компания предоставляет услуги по оформлению документов с учетом всех требований и стандартов, включая апостиль: https://langwee-rus.com/spravka-o-razvode/
https://www.maivona.com/uhod-za-kozhej-litsa/kak-pravilno-snimat-makiyazh-etapy-sredstva-i-sovety
Reading this confirmed that the topic deserves more careful attention than it usually gets, and a stop at larkcliff extended that elevated framing, content that raises the appropriate weight of a subject without being preachy about it is serving a quiet but important editorial function for the broader cultural conversation about it.
A piece that brought a sense of order to a topic I had been finding chaotic, and a look at naturallycraftedgoodsmarket continued that organising effect, content that imposes useful structure on messy subjects is doing genuine intellectual work and this site is providing that organisational function across multiple posts I have read recently here.
Новое в категории: https://spainslov.ru/site/word/word/%D0%9E%D0%91%D0%A3%D0%A1%D0%9B%D0%9E%D0%92%D0%9B%D0%98%D0%92%D0%90%D0%A2%D0%AC
Reading this gave me material for a conversation I needed to have anyway, and a stop at brighthavenstudio added even more talking points, content that connects to upcoming social or professional needs rather than just being interesting in the abstract is the kind that earns priority placement in my attention these days routinely.
A piece that brought a sense of order to a topic I had been finding chaotic, and a look at portmills continued that organising effect, content that imposes useful structure on messy subjects is doing genuine intellectual work and this site is providing that organisational function across multiple posts I have read recently here.
Found the post genuinely useful for something I was working on this week, and a look at etherledge added more material I will reference, content that connects to my actual life and work rather than just being interesting in the abstract is the kind I will pay attention to and return to repeatedly.
Now adjusting my mental list of reliable sites for this topic, and a stop at lacecabins reinforced the adjustment, the small ongoing curation work of maintaining trusted sources is one of the actual practical activities of careful reading and this site has earned a permanent place on my list for this particular subject.
Thank you for being clear and direct, that simple approach saves so much frustration on the reader’s end, and a stop at ct2020highschoolgrads only made me more sure of it, the rest of the content seems to follow the same pattern which is a great sign of consistent editorial care behind the scenes.
Now thinking the topic is more interesting than I had given it credit for, and a stop at pacecabin continued that elevated interest, content that revives my curiosity about subjects I had set aside is doing genuine work in the structure of my interests and this site is providing that revivifying effect today actually.
Started believing the writer knew the topic deeply by about the second paragraph, and a look at oscarthegaydog reinforced that confidence, the speed at which a writer establishes credibility through their writing is a useful quality signal and this writer establishes it quickly and quietly without resorting to credential dropping or self promotion.
A handful of memorable phrases from this one I will probably use later, and a look at robinshuteracing added a couple more, content that contributes language to my own communication rather than just facts is content with a different kind of utility and this site is providing that linguistic utility consistently across what I read.
A piece that suggested careful editing without showing the marks of the editing, and a look at moonfallboutique continued that invisible polish, the best editing disappears into the prose and this site reads as having been edited with skill that does not announce itself which is the highest compliment I can offer any blog content.
Recommended without reservation for anyone interested in the topic at any level of expertise, and a look at freshcollectionhub only strengthens that recommendation, this site clearly knows how to serve readers across a range of backgrounds without watering down the content or talking past anyone in the audience which is genuinely impressive to see.
Now realising this site has been quietly doing good work for longer than I knew, and a look at leafdawn suggested an archive worth exploring, sites with deep archives of consistent quality represent a different kind of resource than sites with viral hits and this one looks like the durable kind based on what I see.
Will be coming back to this for sure, too much good content to absorb in one sitting, and a stop at firminlets only added more pages I want to dig through, this site is going onto my regular rotation list because it consistently delivers something worth the visit lately rather than empty filler.
Started believing the writer knew the topic deeply by about the second paragraph, and a look at evermeadowgoods reinforced that confidence, the speed at which a writer establishes credibility through their writing is a useful quality signal and this writer establishes it quickly and quietly without resorting to credential dropping or self promotion.
Now noticing the careful balance the post struck between confidence and humility, and a stop at premiumethicalgoods maintained the same balance, finding the line between asserting and admitting is hard and this site has clearly developed the calibration to walk that line consistently which produces a more persuasive reading experience for me.
Working through this site has been a small antidote to the shallow content that fills most of my reading time, and a stop at pacecabins extended that antidote function, sites that quietly improve the average quality of my reading by being themselves are sites worth supporting through return visits and recommendations consistently.
Now recognising the post as a rare example of careful writing on a topic that mostly receives careless treatment, and a stop at hazemills extended that contrast with the average elsewhere, content that highlights how much the average is settling for low quality is content that has both internal merit and external value as a benchmark.
Now feeling the small relief of finding writing that does not condescend, and a stop at everattic extended that respect for readers, content that treats its audience as capable adults rather than as people to be managed produces a different reading experience and this site has clearly chosen the respectful approach across all pieces.
A clean read with no irritations, and a look at thedemocracyroadshow continued that frictionless quality, the absence of small irritations is something I notice only when present elsewhere and this site is one of the rare places where everything just works and lets me focus on the substance rather than fighting the format.
Good quality through and through, no rough edges and no signs of being rushed, and a quick look at circularatscale kept the same polish going, the kind of site that respects its own brand by maintaining consistency across pages which is something I always appreciate as a reader looking for trustworthy information online today.
Decided to set a calendar reminder to revisit, and a stop at pactcliff extended that revisit list, calendar entries for content are a level of commitment I rarely make but when I do they signal a higher regard than a simple bookmark and this site has earned that calendar tier of relationship from me today.
Читать далее: https://amaliya-parfum.ru/index.php?manufacturers_id=389
Reading this with a fresh mind in the morning brought out details I might have missed in the afternoon, and a stop at mintdawns earned the same fresh attention, content that rewards being read at full attention rather than at energy lows is content with real density and this site has that density consistently.
Reading this confirmed a small detail I had been uncertain about, and a stop at lobbydawn provided the source for further checking, content that supports verification through citations or links rather than just asserting facts is more trustworthy and this site has clearly built its credibility through that kind of verifiable approach consistently.
Reading this in a moment of low energy still kept my attention, and a stop at sunsetwoodstudio continued that engagement under suboptimal conditions, content that survives the reader being tired is content with extra reserves of pull and this site has the kind of writing that holds up even when I am not at my reading best.
Bookmark earned and folder updated to track this site separately, and a look at charitiespt confirmed the folder upgrade was the right call, organising my reading list so that good sites do not get lost in a sea of casual bookmarks is something I do more carefully now and this site warranted its own spot.
Found this via a link from another piece I was reading and the click was worth it, and a stop at globebeats extended the value across more material, the open web still rewards clicking through citations when the underlying writers care about each other work and this site clearly belongs to that network.
Worth recognising the absence of the usual blog tropes here, and a look at edenfairs continued that fresh quality, sites that avoid the standard moves of the medium read as more original even when the content is on familiar topics and this one has clearly chosen its own path through the conventional terrain skilfully.
Honest reaction is that I want to send this to a friend who would benefit from it, and a look at lakelakes added more material I will pass along too, the impulse to share is the strongest signal I have for content quality and this site is generating that impulse cleanly across multiple posts.
Came in expecting another generic take and got something with actual character instead, and a look at ethicaleverydaystyle carried that personality forward, finding a distinct voice on a saturated topic is impressive and worth pointing out when it happens because most sites end up sounding identical to their nearest competitors quickly.
Reading this slowly to absorb the structure, and the structure is doing real work alongside the words, and a look at globebeat maintained the same architectural quality, when sentence shapes and paragraph rhythms reinforce the meaning rather than just transporting words you know you are reading skilled work today.
Bookmark added without hesitation after finishing, and a look at jadenurrea confirmed I should bookmark the homepage too rather than just this page, the rare site that earns category level trust rather than just single article approval is the kind I want to rely on across many different topics over time.
Different feel from the algorithmically optimised posts that dominate the topic, and a stop at newgroveessentials reinforced that human touch, you can tell when a site is being run by someone who reads what they publish versus someone just hitting submit and moving on quickly to the next assignment without checking the result.
Appreciate how nothing here feels copied or pieced together from other places, the voice is consistent and the tone stays human, and after I checked palmcodex I noticed the same style holds, which is a small detail but it makes the whole experience feel personal rather than like another generic site.
Solid stuff, the kind of post that I will probably refer back to later this month when the topic comes up again, and a look at loopbough only confirmed I should bookmark the site as a whole rather than just this single page for future reference and use across coming weeks.
Just wanted to drop a quick note saying this was a useful read on a topic I have been circling, no fluff, and a stop at findyourbestself added a few extra points that fit the same simple style which makes the whole site feel coherent rather than thrown together by many different writers with different goals.
Considered against the flood of similar content this one stands apart in important ways, and a stop at brightgrovehub extended that distinctive feel, sites that find their own corner of a crowded topic and stay there are sites worth following and this one has clearly carved out its own space and committed to defending it carefully.
Онлайн-сервис оценки недвижимости https://shalmach.pro по фотографиям для покупки, аренды и планирования ремонта. Узнайте ориентировочную стоимость жилья, возможные вложения и рекомендации перед принятием решения.
Reading this in three sittings because the day was fragmented, and the piece survived the fragmentation, and a stop at boneclog held up under similar reading conditions, content engineered for continuous attention is fragile in modern conditions and this site reads as durable across the realistic ways people consume content today.
Felt the post had been written without using a single buzzword, and a look at edgecradles continued that clean vocabulary, content free of jargon and trendy phrases reads better and ages better and this site has clearly committed to a vocabulary that will not feel dated in three years which is impressive editorially.
A well calibrated piece that knew its scope and stayed inside it, and a look at larkcliffs maintained the same scope discipline, scope creep is one of the failure modes of long blog posts and this site has clearly invested in the editorial discipline to prevent it which shows up in tightly contained pieces.
Felt the post handled a sensitive angle of the topic with appropriate care, and a look at gemcoasts extended that careful handling across related material, sites that can navigate delicate territory without causing damage are rare and require a level of judgement that comes from experience rather than from following any clear playbook.
Reading this in a quiet hour and finding it suited the quiet, and a stop at globehaven extended the quiet reading mood, content that matches its own optimal reading conditions rather than fighting them is content that has been thoughtfully calibrated and this site reads as having a particular reading mood in mind throughout.
Felt the post handled a sensitive angle of the topic with appropriate care, and a look at oceanhaven extended that careful handling across related material, sites that can navigate delicate territory without causing damage are rare and require a level of judgement that comes from experience rather than from following any clear playbook.
Liked how the post handled an objection I was forming as I read, and a stop at modernartisanmarketplace similarly anticipated where my thinking was going next, the rare writer who can predict reader concerns and address them in advance is doing something most online content fails to do despite that being basic editorial work.
Felt the post had been quietly polished rather than aggressively styled, and a look at vuabat confirmed the same understated polish, sites whose quality reveals itself slowly rather than announcing itself loudly are the kind I trust more deeply because the trust is not based on first impressions of marketing but actual substance.
Once you start reading carefully here it is hard to go back to lower quality alternatives, and a stop at neatdawns reinforced that ratchet effect, the way good content raises standards is real over time and this site has clearly contributed to raising my expectations for what is possible in writing on the topic generally.
Reading this on a slow Sunday and finding it perfectly suited to a slow Sunday read, and a quick stop at homecovidtest kept the same gentle pace, content that fits the mood of the moment is something I notice and remember and this site has the kind of pace that suits relaxed reading sessions especially well.
Reading this prompted me to subscribe to my first newsletter in months, and a stop at lunacourt confirmed the subscribe was the right call, content that earns a newsletter signup is content that has cleared a higher trust bar than a casual visit and this site has clearly earned that level of commitment from me.
Looking at this objectively the editorial quality is hard to deny even setting aside personal taste, and a stop at palminlet maintained the same objective quality, the gap between what I personally enjoy and what is objectively well crafted exists and this site clears both bars simultaneously which is rarer than it sounds.
Reading this in three sittings because the day was fragmented, and the piece survived the fragmentation, and a stop at duetcoasts held up under similar reading conditions, content engineered for continuous attention is fragile in modern conditions and this site reads as durable across the realistic ways people consume content today.
However selective I am about new bookmarks this one made it past my filter, and a look at bookbulb confirmed the bookmark was worth the slot, the precious slots in my permanent bookmark folder are difficult to earn and this site earned one without making me think twice about whether the slot was justified by the quality.
Наша компания предоставляет услуги по оформлению справок об инвалидности с внимательным подходом к каждому обращению. Мы делаем процесс получения документов максимально удобным https://spravka-invalid.com/gde-kupit-spravku-ob-invalidnosti-mse-v-moskve/
Liked how the post handled an objection I was forming as I read, and a stop at tallpineemporium similarly anticipated where my thinking was going next, the rare writer who can predict reader concerns and address them in advance is doing something most online content fails to do despite that being basic editorial work.
Reading this on the train into work was a better use of the commute than my usual choices, and a stop at goldmanors extended that commute reading well, content that improves transit time rather than just filling it is content with practical benefit and this site has earned its place in my morning commute reading rotation.
Now appreciating that the post did not require external context to follow, and a look at moderninspiredgoods maintained the same self contained quality, content that respects new visitors by being readable without prerequisites is content with broader accessibility and this site has clearly invested in keeping each piece reader friendly for fresh arrivals.
Glad to find something on this topic that does not start with three paragraphs of throat clearing before getting to the point, and a stop at suzgilliessmith also dives right in, respect for the readers time shows up in small editorial choices like this and they add up to a real difference quickly.
Now feeling the rare pleasure of trusting a source completely on first encounter, and a look at meritquay extended that initial trust into something more durable, the calibration of trust to evidence is something I do informally and this site has earned high trust through the cumulative weight of multiple consistently good posts already.
Reading this slowly in the morning before opening email, and a stop at palminlets extended that protected attention, content that earns the prime morning reading slot before the daily distractions begin is content with elevated status and this site has earned that prime slot consistently in my recent reading habits clearly.
Now setting aside time on my next free afternoon to read more from the archives, and a stop at findnewhorizons confirmed that time will be well spent, the rare site whose archive deserves a dedicated reading session rather than just casual sampling is the kind of resource worth scheduling around and this one qualifies clearly.
Working through this site has been a small antidote to the shallow content that fills most of my reading time, and a stop at opaldune extended that antidote function, sites that quietly improve the average quality of my reading by being themselves are sites worth supporting through return visits and recommendations consistently.
Just want to say thank you for putting this together, posts like these make searching online actually worth it sometimes, and a quick look at palmmill kept that going, useful and easy to read without any of the tricks that ruin most blog comment sections lately on the wider open web.
Reading this slowly in the morning before opening email, and a stop at fayettecountydrt extended that protected attention, content that earns the prime morning reading slot before the daily distractions begin is content with elevated status and this site has earned that prime slot consistently in my recent reading habits clearly.
Really appreciate that the writer did not assume I would read every other related post first, and a look at opaldunes kept that self contained feel going where each piece can stand alone, accessibility for new readers is a sign of generous editorial thinking and this site has clearly invested in that approach.
Beyond the topic at hand this site reads as a small ongoing project of taking writing seriously, and a look at deanclip reinforced that project quality, sites that treat publishing as an ongoing serious practice rather than as content production for traffic are sites worth supporting and this one has clearly chosen the serious approach.
Closed three other tabs to focus on this one and never opened them again, and a stop at irisbureaus similarly held attention exclusively, content that crowds out other reading from working memory is content with real density and this site has demonstrated that density across multiple pages I have visited so far this morning.
Comfortable in tone and substantive in content, that is a hard combination to land, and a look at ablebonus kept that pairing alive across more material, this is what good editorial direction looks like in practice and the team here clearly has someone keeping a steady hand on the wheel across what they decide to publish.
Pass this along to colleagues if the topic comes up, the framing here is sensible, and a stop at bauxable adds more useful angles to share, the kind of content that improves conversations rather than just feeding them is what makes a resource genuinely valuable in professional contexts going forward over time and across project boundaries too.
Useful enough to recommend to several people I know who would appreciate it, and a stop at micapact added more material I will pass along too, the kind of writing that earns word of mouth is the kind that actually delivers on its promises which is what this site does without any drama or fanfare attached.
Just wanted to say this was useful and leave a small note of thanks, and a quick visit to grant-jt earned a similar nod from me, the small acknowledgements add up over time and represent the real economy of trust that good content runs on across the open and increasingly fragmented modern internet.
Now planning to share the link with a small group of readers I trust, and a look at northdawns suggested more material to share with the same group, recommending content into a curated circle requires confidence in the recommendation and this site is making me confident in those personal recommendations on multiple separate occasions now.
Reading this in my last reading slot of the day was a good way to end, and a stop at dazzquays provided a satisfying close to the reading session, content that ends a day well rather than agitating it before sleep is the kind I value increasingly and this site fits that role for me consistently now.
Loved the writing voice here, friendly without being fake and confident without being arrogant, and a stop at conexbuilt carried the same tone forward, the kind of personality that makes a reader feel welcome rather than lectured at which is a balance plenty of writers struggle to find no matter how long they have been at it.
Got something practical out of this that I can apply later this week, and a stop at refinedcommerceplatform added more details to think about, this is exactly the kind of content I bookmark for future reference rather than the throwaway listicles that dominate most search results these days for almost any common topic.
Now feeling mildly impressed in a way I do not quite remember feeling about a blog in a while, and a stop at crustcocoa extended that mild impression, content that produces specific positive emotional responses rather than just neutral information transfer is content with extra dimensions and this site has those extra dimensions clearly.
Now feeling confident enough in this site to use it as a reference point for evaluating others on the same topic, and a look at astrebee continued the comparison friendly quality, sites that serve as quality benchmarks for their topic are precious and this one has clearly become a benchmark for me on this particular subject area.
Bookmark earned and folder updated to track this site separately, and a look at bookbulb confirmed the folder upgrade was the right call, organising my reading list so that good sites do not get lost in a sea of casual bookmarks is something I do more carefully now and this site warranted its own spot.
Liked the way the post handled the final paragraph, no neat bow but no abrupt cutoff either, and a stop at buffbaron continued that thoughtful ending pattern, endings are hard and most blog writers either over engineer them or skip them entirely and this site has clearly figured out a sustainable middle approach.
кино онлайн смотреть бесплатно новинки кино онлайн в хорошем качестве
Now noticing the post fit a particular gap in my reading without my having articulated the gap before, and a look at clockcard extended that gap filling effect, content that meets needs I had not consciously formulated is content with reader insight and this site has clearly developed that anticipatory editorial sense across many pieces.
Compared to the usual results for this kind of search this site stands well above the average, and a quick visit to edendomes kept the standard high, you can tell within seconds whether a site is going to waste your time or actually deliver and this one clearly delivers without any false starts.
Glad the writer kept this short rather than padding it out, the points stand on their own without needing extra context, and a look at portguild kept the same approach going, brevity is a sign of confidence in the substance and the team here clearly trusts their content to land without filler.
Came here from another site and ended up exploring much further than I planned, and a look at deepchord only encouraged more exploration, the kind of place where one click leads to another not through manipulative design but through genuinely interesting content is rare and worth highlighting when found like this somewhere on the open internet.
Just enjoyed the experience without needing to think about why, and a look at suncrestcrafthouse kept that effortless feeling going, sometimes the best content is invisible in the sense that you forget you are reading until you reach the end and realise time has passed without you noticing it pass naturally.
Now setting up a small reminder to revisit the site on a slow day, and a stop at chordaria confirmed the reminder was a good idea, planning return visits is a small organisational act that signals trust in ongoing quality and this site has earned that planned return through consistent performance across the pieces I have read so far.
Generally I do not leave comments but this post merits a small note, and a stop at aeonbrawn extended that comment worthy quality, the urge to actively contribute to a sites community rather than passively consume from it is something specific content provokes and this site has provoked that engagement urge from me today.
During a reading session that included several other sources this one stood out, and a look at bauxable continued the standout quality, the side by side comparison of sources during research is a useful exercise and this site has been winning those comparisons for me consistently across multiple research sessions during the last week.
Solid value packed into a relatively short post, that takes skill, and a look at globehavens continues the dense useful content across more pages, this site clearly understands that respecting reader time is itself a form of generosity which is something most blog operations seem to have forgotten lately across the wider open web.
Came in expecting another generic take and got something with actual character instead, and a look at cotboil carried that personality forward, finding a distinct voice on a saturated topic is impressive and worth pointing out when it happens because most sites end up sounding identical to their nearest competitors quickly.
One of the more thoughtful posts I have read recently on this topic, and a stop at cryptbeach added even more weight to that impression, this is genuinely good content that holds its own against far better known sites in the same space without trying to imitate any of them at all which I appreciate.
Generally I find the content on similar topics frustrating in specific ways and this post avoided all of them, and a look at pacecabin continued that frustration free experience, content that sidesteps the standard failure modes of its genre is content with editorial awareness and this site has clearly studied what fails elsewhere consistently.
Picked up a couple of new ideas here that I can actually try out, and after my visit to thespeakeasybuffalo I have even more notes saved, this is the kind of resource that pays you back for the time you spend on it which is rare to come across in this corner of the web.
Useful reading material, the kind I can hand off to someone newer to the topic without worrying about confusing them, and a quick look at choice-eats confirmed the same beginner friendly tone runs throughout the site which is great for sharing with people just starting their learning journey on this particular topic.
Coming back tomorrow when I can give this a proper read, the post deserves better attention than I can give right now, and a look at findhappinessdaily suggests there is plenty more here that deserves the same treatment, definitely a site I will be exploring properly over the next few days when I can.
Going to share this with a friend who has been asking the same questions for a while now, and a stop at intentionalhomeandstyle added a few more pages I will pass along too, this is the kind of generous information that earns a small thank you from me right now and again later this week.
Really grateful for content like this, it does not waste my time and it does not insult my intelligence either, and a quick look at buffbey was the same, balanced respectful writing that makes a person feel welcome rather than rushed through pages of forced engagement just to keep clicking around.
Started forming counter examples to test the claims and the post handled most of them implicitly, and a look at astrebee continued that anticipatory style, writers who think two steps ahead of the critical reader save themselves from a lot of follow up work and this writer has clearly internalised that habit consistently.
Liked that the post landed without needing to manufacture controversy or take a contrarian stance for attention, and a stop at etherfairs continued that grounded approach, content that earns attention through quality rather than provocation is the kind that builds long term trust rather than burning it on quick wins.
Worth saying that the writing carries a particular kind of authority without making any explicit claims to it, and a stop at boneclog extended that earned authority feeling, sites that demonstrate expertise through the quality of their explanations rather than by stating credentials are sites I trust most and this site has it.
Bookmarked the page and the homepage too because clearly there is more to explore here, and a quick stop at jetdomes only made that more obvious, this is the kind of place I want to dig through over a weekend rather than rushing through during a coffee break tomorrow morning before getting back to work.
The post made the topic feel approachable without making it feel trivial, that is a fine balance, and a stop at aeoncraft maintained the same balance, finding the middle ground between welcoming and serious is genuinely difficult and the writers here have clearly figured out how to consistently hit it well across many different posts.
Now adjusting my mental list of reliable sites for this topic, and a stop at defcoast reinforced the adjustment, the small ongoing curation work of maintaining trusted sources is one of the actual practical activities of careful reading and this site has earned a permanent place on my list for this particular subject.
Worth saying this site reads better than most paid newsletters I have tried, and a stop at cocoaborn confirmed that comparison, the bar for free content is often lower than for paid but this site clears the paid bar consistently and that says something about the editorial approach behind the work being published here regularly.
Now recognising that the post handled the topic with appropriate technical precision without becoming dry, and a stop at draftlogs continued that balance, technical precision and readability are often in tension and this site has clearly figured out how to maintain both at once which is one of the harder editorial achievements in the form.
If I had to summarise the editorial sensibility of this site in a few words it would be careful and human, and a look at portmill extended that summary feeling, capturing the essence of a sites approach in brief is hard but this site has a clear enough identity that the summary comes naturally enough.
Справка о несудимости может потребоваться в самых разных жизненных ситуациях. Мы предлагаем удобный сервис для быстрого получения документа https://law-moscow.com/mozhno-li-kupit-spravku-ob-otsutstvii-sudimosti/
Definitely a recommend from me, anyone curious about the topic should check this out, and a look at bauxauras adds even more reason for that, the depth and quality combine to make this site one I will be pointing people toward whenever similar conversations come up over the months ahead at work or socially.
Once you find a site like this the search for similar voices begins, and a look at curiopacts extended the search energy, finding a high quality reference point makes the gap between it and adjacent sources visible in a way it was not before and this site has provided that high reference point across multiple recent visits.
A piece that was confident enough to leave some questions open rather than forcing closure, and a look at cotchoice continued that intellectual honesty, content that admits the limits of its scope is more trustworthy than content that pretends to total understanding and this site has the right calibration on certainty consistently.
Now appreciating that the post did not try to imitate any other style I might recognise, and a stop at cryptbuilt continued that distinct voice, content with its own register rather than borrowed from elsewhere is content with real authorial presence and this site has clearly developed that presence through what feels like patient editorial work.
https://kubsell.ru/
Took longer than expected to finish because I kept stopping to think, and a stop at 1091m2love did the same to me, content that provokes thought rather than just delivering information is in a different category and the team here is clearly working at that higher level rather than just cranking out posts.
Felt the writer was being honest with the reader which is rare enough that I want to acknowledge it, and a look at burlauras continued that honest feel, content built on actual knowledge rather than aggregated summaries is something I value highly and rarely come across in regular searches on the open internet these days.
Looking back on this reading session it stands as one of the better ones recently, and a look at premiumglobalessentials extended that ranking, the informal ranking of reading sessions against each other is something I do mentally and this session ranks high largely because of this site and a couple of related pages here.
The pacing of the post was just right, never rushed and never dragged out unnecessarily, and a look at astrebeige maintained the same rhythm, you can tell the writer has experience because the difficult skill of pacing is something only practiced writers manage to handle well in long form content over time and across formats.
Skipped past the first paragraph thinking it was setup and had to come back when the rest referenced it, and a stop at apexhelms similarly rewarded careful reading from the start, content where every paragraph carries weight is content I now know to read from the beginning rather than skipping ahead.
Adding this site to my regular reading list, the post earned that on its own, and a quick stop at bookbulb sealed the decision, the kind of place worth checking back with from time to time because it consistently produces material that holds up against a critical reading too which I really value.
Walked away in a slightly better mood than when I started reading, that says something about the writing, and a stop at chordaria kept that going, content that leaves you feeling more capable rather than overwhelmed is the kind I keep coming back to again and again over the years and across many topics.
Now adjusting my mental list of reliable sites for this topic, and a stop at palmmills reinforced the adjustment, the small ongoing curation work of maintaining trusted sources is one of the actual practical activities of careful reading and this site has earned a permanent place on my list for this particular subject.
Now adjusting my mental model of how the topic fits into the broader landscape, and a look at aerobound extended that adjustment, content that affects my structural understanding rather than just my factual knowledge is content with deeper impact and this site is providing those structural updates at a meaningful rate consistently across topics.
A well calibrated piece that knew its scope and stayed inside it, and a look at harryandeddies maintained the same scope discipline, scope creep is one of the failure modes of long blog posts and this site has clearly invested in the editorial discipline to prevent it which shows up in tightly contained pieces.
Now noticing how rare it is to find a site that does not feel rushed, and a look at goldenbranchmart extended that calm pace, content produced without time pressure has a different quality than content shipped to meet a deadline and this site reads as written without urgency which produces a different and better experience for readers.
Reading this between meetings turned out to be the most useful thing I did all afternoon, and a stop at dewcarve kept that productivity feeling going, content can sometimes outperform actual work in terms of what gets accomplished mentally and this site managed that today which is genuinely a high bar to clear consistently.
Decided to write a short note to the author if there is contact info anywhere, and a stop at pactcliff extended that intention, the urge to thank the writer directly is a strong signal of content quality and this site has triggered that urge in me today which is a fairly rare event for my reading.
Comfortable reading experience throughout, no jarring tone shifts and no awkward formatting, and a look at bauxbee kept that smooth feel going, the kind of editorial polish that goes unnoticed when present but glaring when absent is something this site has clearly invested in across the broader content as well which deserves recognition.
Reading carefully this time rather than scanning, and the depth shows up in places I missed first time around, and a look at frostcoasts rewarded the same careful approach, content that holds up to multiple reads is content I want more of in my regular rotation rather than disposable scroll fodder daily.
Compared to the usual results for this kind of search this site stands well above the average, and a quick visit to cotcircle kept the standard high, you can tell within seconds whether a site is going to waste your time or actually deliver and this one clearly delivers without any false starts.
Now recognising the editorial wisdom of letting some questions remain open at the end, and a look at cubeasana continued that intellectual honesty, content that does not force closure on contested questions is content that respects the limits of knowledge and this site has clearly developed the maturity to know when to leave space.
Over the course of reading several posts here a pattern of quality has emerged, and a stop at portolive confirmed the pattern, the difference between sites that hit quality occasionally and sites that hit it consistently is huge and this site has clearly demonstrated the consistent kind through what I have read this morning.
Now feeling confident that this site will continue producing work I will want to read, and a look at coilbliss extended that confidence into the future, projecting forward from current quality to expected future quality is something I do for sites I genuinely follow and this one has earned that forward looking trust clearly today.
Closed my email tab so I could read this without interruption, and a stop at findamazingoffers earned the same protected attention, when content is good enough to defend against the usual digital distractions you know it deserves better than the half attention most online reading gets in a typical busy day.
Solid information that lines up with what I have been hearing from other reliable sources, and after my visit to berrybombselfiespot I was even more certain of that, this site checks out which is something I value highly when so many places online play loose with the facts to chase a quick click.
Reading this gave me a small jolt of recognition for an experience I thought was just mine, and a stop at burlclip produced more such jolts, content that universalises private experiences without flattening them is doing genuinely useful work and this site is providing that recognition function for me reliably across topics I read.
This stands out compared to similar posts I have read recently, less noise and more substance, and a look at refinedlifestylecommerce kept that gap going, you can really feel the difference between content made by someone who cares versus content made to fill a publishing schedule for an algorithm trying to keep growing somehow.
Different feel from the algorithmically optimised posts that dominate the topic, and a stop at astrebulb reinforced that human touch, you can tell when a site is being run by someone who reads what they publish versus someone just hitting submit and moving on quickly to the next assignment without checking the result.
Worth pointing out that the writer made the topic feel more interesting than I had been expecting, and a look at airycargo continued that elevation effect, content that improves the apparent quality of its subject through skilled treatment is doing something real and this site has clearly developed that kind of editorial alchemy throughout.
Held my interest from the opening line through to the closing thought, and a stop at clippoises did the same, content that earns sustained attention in an environment full of distractions is doing something right and this site is clearly doing several things right rather than just one or two which I really appreciate.
Felt the post handled a sensitive angle of the topic with appropriate care, and a look at domelegends extended that careful handling across related material, sites that can navigate delicate territory without causing damage are rare and require a level of judgement that comes from experience rather than from following any clear playbook.
Appreciated that the writer trusted the reader to follow along without constant restating of earlier points, and a look at graingroves continued that respect for the reader, treating an audience as capable adults rather than as people to be hand held through every paragraph is something I notice and value highly across the open internet today.
Reading this in my last reading slot of the day was a good way to end, and a stop at bauxcircle provided a satisfying close to the reading session, content that ends a day well rather than agitating it before sleep is the kind I value increasingly and this site fits that role for me consistently now.
Reading this brought back the satisfaction I used to get from blogs ten years ago, and a stop at bookcliff kept that nostalgic quality alive, sites that capture what was good about an earlier era of internet writing are increasingly precious and this one is doing that without feeling like a deliberate throwback at all.
Appreciated the way each section connected smoothly to the next without abrupt jumps, and a stop at dewchase kept that flow going nicely, transitions are something most blog writers ignore but the difference is huge for the reader who is trying to follow a sustained line of thought today across many different topics.
Speaking honestly this is among the better discoveries of my recent browsing, and a stop at fernpiers reinforced that discovery quality, the ranking of recent discoveries is informal but meaningful and this site has placed near the top of that ranking based on the consistency of quality across what I have already read carefully.
Picked a friend mentally as the audience for this and decided to send the link, and a look at cultbotany confirmed the send was the right choice, choosing whom to share content with is a small act of curation that I take more seriously than the public sharing most platforms encourage these days online.
Glad I gave this fifteen minutes rather than the usual three minute skim, and a look at cotcloud earned the same investment, time spent on quality content is rarely wasted but the reverse is also true and learning which sites deserve which kind of attention is part of being a careful online reader.
Liked that there was nothing performative about the writing, and a stop at portpoise continued that genuine quality, performative writing tries to be witnessed rather than read and the difference between performance and substance is huge for the careful reader and this site has clearly chosen substance every time clearly.
Now planning to share the link with a small group of readers I trust, and a look at nighttoshineatlanta suggested more material to share with the same group, recommending content into a curated circle requires confidence in the recommendation and this site is making me confident in those personal recommendations on multiple separate occasions now.
Reading this gave me something to think about for the rest of the afternoon, and after shemplymade I had even more to mull over, the kind of post that lingers in the background of your day rather than evaporating immediately is genuinely valuable in an attention economy that punishes depth rather than rewarding it.
Worth recommending broadly to anyone who reads on the topic, and a look at chordbase only confirms that, the rare combination of accessibility and depth in this site makes it suitable for both newcomers and people who already know the area which is hard to pull off in any blog format today and rarely managed.
A relief to read something where I did not have to fact check every claim mentally, and a look at coilbyrd continued that reliable feeling, sites where I can lower my guard and trust the content are rare and this one is earning that trust paragraph by paragraph through consistent careful work behind the scenes.
Quality you can feel from the first paragraph, the writer clearly knows the topic and how to share it, and a quick look at pactpalace confirmed the same depth runs throughout the rest of the site as well which is rare and worth pointing out when it happens online for any reader passing through.
Started a draft response in my head and ended without publishing it because the post said it well enough, and a look at amidbrawn produced the same effect, content that satisfies my urge to add to it by being complete enough on its own is rare and represents a particular kind of editorial completeness here.
Spent a few minutes here and came away with a clearer picture of the topic, the writing keeps things simple without dumbing them down, and after a stop at byrdbrig the rest of the points lined up neatly which is something I appreciate when I am short on time and need answers fast.
Appreciate the work that went into laying this out so clearly, every section earns its place without filler, and a look at apexhelm confirmed the same care, definitely the kind of place that deserves a return visit when the topic comes up again later in the future or for any related question.
The pacing of the post was just right, never rushed and never dragged out unnecessarily, and a look at softbreezeoutlet maintained the same rhythm, you can tell the writer has experience because the difficult skill of pacing is something only practiced writers manage to handle well in long form content over time and across formats.
Glad I gave this a chance rather than scrolling past, and a stop at bauxclay confirmed I made the right call, sometimes the best content is hidden behind unassuming headlines that do not scream for attention and learning to slow down and check those out has paid off many times now across years of reading.
Now noticing that the post avoided the temptation to be funny in places where humour would have undermined the substance, and a stop at bravofarms maintained the same restraint, knowing when to be serious is a rare editorial virtue and this site has clearly developed it through what I assume is careful editorial practice over years.
Liked how the post handled an objection I was forming as I read, and a stop at astrebull similarly anticipated where my thinking was going next, the rare writer who can predict reader concerns and address them in advance is doing something most online content fails to do despite that being basic editorial work.
Took a few notes from this post, the points are easy to remember without needing to come back and check, and a look at dewchip added a couple more, the kind of place that sticks in the memory long after the browser tab has been closed for the day which says a lot really.
Honestly this was a good read, no jargon and no padding, and a short look at knackdomes kept that same feel going which I really appreciated, the writer clearly knows the topic well enough to explain it without hiding behind big words or filler that often gets used to seem clever.
Easy to recommend, the content speaks for itself without needing additional praise from me, and a stop at flickaltars only adds more reasons to send people this way, the kind of generous resource that benefits its readers without demanding anything in return is increasingly rare and worth recognising clearly today across the broader open internet.
Reading this prompted me to send the link to two different people for two different reasons, and a stop at curbcliff provided ammunition for a third share, content that suits multiple audiences without being generic enough to be useless to any of them is genuinely valuable and this site has that multi audience quality clearly.
During a reading session that included several other sources this one stood out, and a look at covebeck continued the standout quality, the side by side comparison of sources during research is a useful exercise and this site has been winning those comparisons for me consistently across multiple research sessions during the last week.
Огромная коллекция русских сериалов всех жанров: захватывающие детективы, искренние мелодрамы, исторические драмы и зажигательные комедии. Любимые актёры, узнаваемые истории и тёплая атмосфера. Без подписки и регистрации – просто включай и наслаждайся: русские сериалы сайт
Closed my email tab so I could read this without interruption, and a stop at boomastro earned the same protected attention, when content is good enough to defend against the usual digital distractions you know it deserves better than the half attention most online reading gets in a typical busy day.
Found this really helpful, the explanations are simple but they actually answer the questions a normal reader would have, and after I followed trendloversplace I had a clearer sense of the topic, no extra fluff just useful points laid out in a sensible order that made the time worth it.
Most of the time I feel the open web is in decline and then I find a site like this, and a stop at explorewithoutlimits reinforced that mood lift, the cumulative effect of finding occasional excellent independent content versus the cumulative effect of finding mostly mediocre content is real for the long term reader maintaining web habits today.
Reading this gave me confidence to make a decision I had been putting off, and a stop at goldmanor reinforced that confidence, content that translates into action in my own life rather than just informing it is content with the highest practical value and this site is generating that action level utility for me lately.
Glad to find something on this topic that does not start with three paragraphs of throat clearing before getting to the point, and a stop at amidbull also dives right in, respect for the readers time shows up in small editorial choices like this and they add up to a real difference quickly.
Clean writing, easy to read, and never tries too hard to impress, that combination is harder to find than people think, and after my time on stacoa I am sure this site treats its readers well, no flashy tricks just useful content done right which is honestly all I want online.
Now sitting with the thoughts the post triggered rather than rushing on to the next thing, and a stop at byrdbush extended that reflective pause, content that earns time for thought after closing the tab is content of higher value than the merely interesting and this site has clearly produced that lasting effect today.
A thoughtful read in a week that has been mostly noisy, and a look at freshguilds carried that thoughtful quality across more pages, finding pockets of considered writing in a week of distractions is one of the small wins of careful curation and this site is providing those pockets at a sustainable rate.
Reading this with my morning coffee turned into reading the related posts with my morning coffee, and a stop at beckarrow stretched the morning further, content that pulls breakfast into a reading session rather than just accompanying it is content that has earned a higher claim on my attention than the average article does.
Reading this on a long flight and finding it the best thing I read across hours of trying, and a stop at flarequills kept the streak going, when content beats long flight reading you know it has substance because flight reading is a hard test of a piece given the alternatives available everywhere.
Now understanding why someone recommended this site to me a while back, and a stop at dewcoat explained the recommendation, sometimes recommendations make sense only after experience and this site has finally clicked into place as the kind of resource I now understand was being recommended for sound editorial reasons by my friend.
Just nice to read something that does not feel like it was assembled from a content brief, and a stop at strengththroughstrides kept that handcrafted feel going, you can tell when a real human with real understanding is behind the words versus a templated piece churned out for an algorithm to find.
Reading this on a difficult day was a small bright spot, and a stop at ethicalstyleandliving extended that brightness, content that improves a hard day is content that has earned a particular kind of place in my reading habits and this site is occupying that uplifting role for me today which I appreciate clearly.
Highly recommend to anyone looking for a sensible take on this topic without the usual marketing nonsense, and a look at curbcomet kept that grounded approach going, sites that stay focused on serving readers rather than monetising every click are rare and this is clearly one of those rare ones I really appreciate finding.
This one is staying open in a tab for the rest of the day so I can come back and re read certain parts, and a look at coilcab suggests I will be doing the same with a few more pages here too, this is going to be a deep dive over the coming hours.
A piece that suggested careful editing without showing the marks of the editing, and a look at covecanal continued that invisible polish, the best editing disappears into the prose and this site reads as having been edited with skill that does not announce itself which is the highest compliment I can offer any blog content.
Honest take is that I will probably forget most of what I read online today but this post is one I will remember, and a stop at astrecanal kept that same memorable quality going, certain writing leaves a residue in the mind in a way most content simply does not manage.
Felt energised after reading rather than drained, which is unusual for online content these days, and a look at galafactors continued that good feeling, content that leaves you better than it found you is rare and worth bookmarking when you stumble across it for the first time today or any other day really.
Closed several other tabs to focus on this one as I read, and a stop at boomclove held my undivided attention the same way, content that earns full focus in an attention environment full of competing pulls is content doing something genuinely well and the team behind it deserves recognition for that achievement consistently.
Thanks for the moderate length, neither so short it skips substance nor so long it bloats, and a stop at inspiredhomelifestyle hit the same balance, the right length is one of the hardest things to calibrate in blog writing and I appreciate when a team has clearly thought about it rather than defaulting.
Closed several other tabs to focus on this one as I read, and a stop at chordcircle held my undivided attention the same way, content that earns full focus in an attention environment full of competing pulls is content doing something genuinely well and the team behind it deserves recognition for that achievement consistently.
Such writing is increasingly rare and worth supporting through attention, and a stop at amidcarve extended that supportive attention across more pages, the conscious choice to spend time on sites that produce careful work rather than convenient consumption is itself a small form of patronage and this site is receiving that conscious patronage from me.
My reading list is short and selective and this site is now on it, and a stop at graingrove confirmed the placement, the short list of sites I read deliberately rather than encounter accidentally is something I curate carefully and adding to it is a real act of trust which this site has earned today.
Good clean post, no errors and no awkward phrasing that breaks the reading flow, and a stop at trendandbuy kept the same standard, definitely the kind of editorial care that earns a return visit because it tells me the writer is paying attention to details that matter to readers rather than just rushing publication.
Glad I gave this a chance instead of bouncing on the headline, and after refinedclickpingexperience I was certain I had made the right call, snap judgements based on titles miss a lot of good content and this is a reminder to slow down and check things out before scrolling past in a hurry.
Honest take is that this was better than I expected when I clicked through, and a look at brightorchardhub reinforced that, the bar for online content has dropped so much that finding something thoughtful and well constructed feels almost noteworthy now which says more about the average than about this site itself.
However casually I came to this site I have ended up reading carefully, and a look at beechbraid continued earning that careful reading, the conversion from casual visitor to careful reader is something content earns rather than demands and this site has accomplished that conversion for me over the course of just a few pieces.
Reading this gave me confidence to make a decision I had been putting off, and a stop at byrdcipher reinforced that confidence, content that translates into action in my own life rather than just informing it is content with the highest practical value and this site is generating that action level utility for me lately.
Reading this prompted me to subscribe to my first newsletter in months, and a stop at gailcooperspeaker confirmed the subscribe was the right call, content that earns a newsletter signup is content that has cleared a higher trust bar than a casual visit and this site has clearly earned that level of commitment from me.
Appreciated how the post felt complete without overstaying its welcome, and a stop at refinedlivingessentials confirmed that economical approach runs across the site, knowing when to stop is a skill many writers never develop but here the discipline is obvious and welcome from the perspective of a busy reader trying to learn things efficiently.
Useful read, especially because the writer did not assume too much background from the reader, and a quick look at carefullybuiltcommerce continued in the same way, a thoughtful site that meets people where they are which is something the modern web could use a lot more of for both casual and serious readers.
Reading this brought back an idea I had set aside months ago, and a stop at curatedfuturegoods added more substance to that idea, content that revives dormant projects in my own thinking is content with serious creative value and this site is contributing to my own work in ways I had not expected when first clicking through.
Now adding the homepage to my regular check rotation rather than waiting for individual links to find me, and a stop at autumnriverattic confirmed the rotation upgrade, the move from passive discovery to active checking is a vote of confidence in a sites ongoing quality and this site has earned that active engagement clearly.
Felt the writer respected me as a reader without making a show of doing so, and a look at craftcanal continued that quiet respect, this is the kind of small but meaningful detail that separates the sites I bookmark from the ones I close after a single skim and never return to again no matter how interesting the headline.
Genuinely glad I clicked through to read this rather than skipping past, and a stop at astroboard confirmed I should keep clicking through to more pages here, the kind of resource that justifies its place in my browser history rather than feeling like wasted time which is the highest compliment I offer any site online today.
Now realising the post solved a small problem I had been carrying for weeks, and a look at coilclose extended that problem solving function, content that connects to specific unresolved questions in my own life rather than just providing general interest is content with real practical impact and this site is providing that practical value.
I learned more from this short post than from longer articles I read earlier today, and a stop at amplebench added even more useful detail without going off topic, this site clearly knows how to keep things focused without sacrificing depth which is a hard balance to strike for any writer.
Reading this prompted a small note in my reference file, and a stop at everydaytrendhub prompted another, the rare site that contributes useful nuggets to my own working knowledge rather than just consuming my attention is worth the time investment many times over compared to the usual pile of forgettable scroll content.
Started reading without much expectation and ended on a high note, and a look at grippalace continued that arc, content that builds rather than peaks early is a sign of a writer who knows how to structure a piece for sustained reader engagement rather than relying on a strong hook to do all the work.
Reading this with a notebook open turned out to be the right move, and a stop at peoplesprotectiveequipment added more material to the notes, content that justifies active note taking from a passive reader is content with real informational density and this site is producing notes worthy material at a high rate consistently.
Refreshing to find writing that does not try to manipulate the reader into clicking onto the next page through cliffhangers and forced engagement, and a stop at intentionalmodernmarket continued in the same respectful way, this is what reader first design actually looks like in practice rather than just in marketing copy that sounds nice.
Genuinely well crafted writing, the kind that makes the topic look easier than it actually is, and a look at boundboard added even more depth, you can feel the experience behind every line which is something only writers who have been at this for a while can pull off with this level of grace.
Easy to recommend without reservations, the site delivers on every promise it implicitly makes, and a look at futurelivingcollections kept that same standard going, the kind of consistency that earns trust over time rather than chasing it through aggressive marketing is what I see here and it is appreciated greatly by this particular reader today.
Probably one of the more reliable sources I have found for this kind of careful coverage, and a look at dustorchids reinforced the reliability, the small group of sources I would describe as reliable for a given topic is curated carefully and this site has earned a place in that small group through consistent performance.
My professional context would benefit from having this kind of resource available, and a look at cormira extended the professional applicability, the rare site that contributes meaningfully to professional work rather than just personal interest is content with multiplied value and this one is providing that professional utility consistently across multiple pieces.
Reading this confirmed a hunch I had been carrying about the topic without having articulated it, and a stop at beechcell extended the confirmation, content that gives shape to fuzzy intuitions is doing the rare work of making private thoughts public and this site is providing that articulating service consistently for me lately.
Now appreciating that the post did not require me to agree with the writer to find it valuable, and a look at etherledges maintained the same useful regardless of agreement quality, content that informs even when it does not convince is content with broader utility and this site reads as useful even when I disagree.
Honestly enjoyed every minute spent here, that is not something I say lightly, and a look at orqanta confirmed I will be back, the bar for spending time online is high for me these days but this site clears it without effort which is high praise indeed from this reader who is usually rather demanding.
Solid recommendation from me to anyone working in the area, the perspective here is grounded, and a look at ethicalconsumercollective adds even more useful angles, the kind of site that becomes a reference rather than just a one time read which is a higher bar than most blogs ever reach today on the modern web.
Reading this post made me realise I had been settling for lower quality elsewhere, and a look at byrdclap extended that recalibration, content that exposes how much I had been accepting in adjacent sources is content with calibrating effect on my standards and this site is performing that calibration function across topics for me reliably.
Took a screenshot of one section to come back to later, and a stop at staycuriousandcreative prompted another saved tab, the urge to capture and revisit specific pieces of content is something I rarely feel but when I do it tells me the work is worth more than the average passing read for sure.
Walked away in a slightly better mood than when I started reading, that says something about the writing, and a stop at autumnbay kept that going, content that leaves you feeling more capable rather than overwhelmed is the kind I keep coming back to again and again over the years and across many topics.
A relief to read something where I did not have to fact check every claim mentally, and a look at carefullybuiltcommerce continued that reliable feeling, sites where I can lower my guard and trust the content are rare and this one is earning that trust paragraph by paragraph through consistent careful work behind the scenes.
Now adding the homepage to my regular check rotation rather than waiting for individual links to find me, and a stop at ehajjumrahtours confirmed the rotation upgrade, the move from passive discovery to active checking is a vote of confidence in a sites ongoing quality and this site has earned that active engagement clearly.
Now feeling the post has earned a proper recommendation rather than a casual mention, and a stop at authenticlivingmarket reinforced the recommendation strength, the difference between mentioning and recommending is a small editorial distinction I observe in my own conversations and this site has earned the upgraded recommendation level from me confidently today.
A clear case of writing that does not try to do too much in one post, and a look at craterbase maintained the same scoped discipline, posts that try to cover too much end up covering nothing well and this site has clearly chosen scope discipline as a core editorial principle which shows up clearly in what I read.
A piece that reads as if the writer trusted readers to fill in obvious gaps, and a look at brightfallstudio continued that respectful approach, content that does not over explain what the reader can infer is content that respects intelligence and this site has clearly chosen to write to capable readers rather than to the lowest common denominator.
Reading this site over the past week has changed how I evaluate content in this space, and a look at churnburst extended that recalibration, the standards I bring to reading on the topic have shifted upward as a direct result of regular exposure to this kind of work and that shift will outlast any single reading session.
Now sitting with the thoughts the post triggered rather than rushing on to the next thing, and a stop at amplebey extended that reflective pause, content that earns time for thought after closing the tab is content of higher value than the merely interesting and this site has clearly produced that lasting effect today.
Decided after reading this that I would check this site weekly going forward, and a stop at astrobrunch reinforced that commitment, deciding to add a site to a regular rotation requires meeting a quality bar that very few places clear and this one cleared it cleanly without any noticeable effort or marketing push behind it.
A quiet piece that did not try to compete on volume, and a look at globallysourcedstylehouse maintained that selective approach, sites that publish less but better are increasingly rare in an environment that rewards volume and this one has clearly chosen quality cadence over quantity which is a brave editorial decision in current conditions.
Now wishing more sites covered topics with this level of care, and a look at grovefarm extended that wish across more subjects, the rarity of careful coverage on most topics is a problem and this site is one of the small antidotes to that broader pattern of casual or surface treatment of complex subjects.
Bookmark folder created specifically for this site, and a look at ravenvendor confirmed the dedicated folder was the right call, dedicated folders for individual sites are a level of organisation I rarely deploy and this site has earned that level of dedicated tracking based on the consistency I have seen so far across sessions.
Now wishing more sites covered topics with this level of care, and a look at lunarharvestmart extended that wish across more subjects, the rarity of careful coverage on most topics is a problem and this site is one of the small antidotes to that broader pattern of casual or surface treatment of complex subjects.
Worth flagging this site to a few specific friends who would appreciate the editorial sensibility, and a look at beechclue added more pages I will mention to them, recommending sites to specific people requires understanding both the site and the person and this site is making those personalised recommendations easy and natural for me.
A slim post with substantial content per word, and a look at modernvalueclickping maintained the same density, the content per word ratio is something I track informally and this site scores high on that ratio compared to most sources I read regularly which is a quiet indicator of careful editorial work behind the scenes.
On reflection this is the kind of writing that improves my taste for what is possible in the format, and a look at timbercart continued raising that bar, content that elevates my expectations rather than lowering them is doing important work in calibrating my standards and this site is participating in that elevation reliably.
Big thanks to whoever wrote this, you saved me a lot of time hunting for the same info on other sites, and a stop at coilcolt only added more useful detail without going off topic, that kind of focus is honestly hard to come across these days when most posts wander everywhere.
займ без отказа онлайн на карту https://tbcareer.ru
Now thinking I want more sites built on this kind of editorial foundation, and a stop at boundburst extended that wish into a broader hope, sites built on substance and care rather than on metrics and growth are the kind of sites I want to see more of and this one is a small example worth supporting.
Clean writing, easy to read, and never tries too hard to impress, that combination is harder to find than people think, and after my time on premiumlivinghub I am sure this site treats its readers well, no flashy tricks just useful content done right which is honestly all I want online.
Once I had read three posts the editorial pattern was clear, and a look at cabinboss confirmed the pattern from a fourth angle, sites where the underlying approach reveals itself through accumulated reading rather than being announced are sites with real depth and this one has that quality clearly visible across multiple pieces consistently.
Came away with some new perspectives I had not considered before, and after edgedials those ideas felt more complete, the kind of content that stays with you a little while after reading rather than slipping out the moment you switch tabs and move on with your day to whatever comes next.
Now considering the post as evidence that careful blog writing is still possible, and a look at globalpremiumcollective extended that evidence, the broader question of whether the modern web can sustain quality writing has obvious empirical answers in sites like this one and seeing them is reassuring even when they remain a minority overall today.
Worth recognising that this site does not chase the daily news cycle, and a stop at modernheritagemarket confirmed the longer publication arc, sites that resist the pressure to comment on every passing event are sites with genuine editorial discipline and this one has clearly chosen depth over volume which I respect deeply.
Decided this was the kind of site I would defend in a discussion about good blog content, and a stop at craterbook reinforced that, very few sites earn active defence rather than passive consumption and this one has clearly crossed that threshold for me without needing any explicit pitch from the writers themselves either.
Now setting up a small reminder to revisit the site on a slow day, and a stop at autumnbay confirmed the reminder was a good idea, planning return visits is a small organisational act that signals trust in ongoing quality and this site has earned that planned return through consistent performance across the pieces I have read so far.
Reading this on a phone at a coffee shop and finding it perfectly suited to that context, and a stop at asianspeedd8 continued the comfortable mobile experience, content that works across reading conditions without compromising on substance is increasingly important and this site has clearly thought about the whole reader experience here.
Came across this looking for something else entirely and ended up reading it through twice, and a look at jamesonforct pulled me deeper into the site than I planned, the writing has a way of holding attention without resorting to manipulative cliffhangers or vague promises that never get delivered later down the page.
Reading this confirmed that my time researching the topic in other places had not been wasted, and a stop at amplebuff extended the confirmation, when independent sources agree that is a useful signal and this site is one of the more reliable sources I have found for cross checking what I read elsewhere on similar subjects.
Appreciate how nothing here feels copied or pieced together from other places, the voice is consistent and the tone stays human, and after I checked urbanvibeemporium I noticed the same style holds, which is a small detail but it makes the whole experience feel personal rather than like another generic site.
Felt the post had been quietly polished rather than aggressively styled, and a look at ethicalmodernliving confirmed the same understated polish, sites whose quality reveals itself slowly rather than announcing itself loudly are the kind I trust more deeply because the trust is not based on first impressions of marketing but actual substance.
I really like the calm tone here, it does not push anything on the reader, and after I went through glarniq I felt the same way, just steady useful content laid out without drama, which is exactly what someone trying to learn something quickly needs to find rather than aggressive marketing.
Probably the kind of site that should be more widely read than it appears to be, and a look at everydayshoppingoutlet reinforced that quiet wish, the gap between a sites quality and its apparent reach is sometimes large and that gap exists for this site in a way that makes me want to mention it more.
Found this via a link from another piece I was reading and the click was worth it, and a stop at astrobush extended the value across more material, the open web still rewards clicking through citations when the underlying writers care about each other work and this site clearly belongs to that network.
Most posts I read end up forgotten within a day but this one is sticking, and a look at grovequay extended that lingering effect, content that survives the immediate moment of reading rather than evaporating is content with genuine retention quality and this site has been producing memorable pieces at a rate notable across my reading.
Better than most of the writing I have come across on this topic recently, simpler and more direct, and a look at contemporaryglobalgoods continued in that same way, a real outlier in a crowded space full of repetitive content that says little while taking up a lot of reader time today which is unfortunate.
Honestly this was the highlight of my reading queue today, and a look at sorniq extended that across more pages I will return to, ranking what I read against what else I read each day is something I do informally and this site keeps moving up in those rankings the more I explore it.
Now adding the writer to a small mental list of voices I want to follow, and a look at beigeastro reinforced that follow intention, the few writers whose work I actively track are writers who have demonstrated sustained quality and this writer has clearly demonstrated that sustained quality across the pieces I have sampled here today.
Worth flagging that the post handled an angle of the topic I had not seen elsewhere, and a look at lacehelms extended that fresh treatment, content that finds underexplored corners of well covered subjects is genuinely valuable and this site has demonstrated that exploratory editorial approach across multiple pieces in my reading sessions today.
Probably one of the more reliable sources I have found for this kind of careful coverage, and a look at refinedglobalstore reinforced the reliability, the small group of sources I would describe as reliable for a given topic is curated carefully and this site has earned a place in that small group through consistent performance.
Granted I am giving this site more credit than I usually give new finds, and a look at cabinbrick continued earning that credit, the calibration of how much trust to extend after limited exposure is something I do carefully and this site has earned more trust on shorter exposure than most due to consistent quality across.
Worth saying that the writing carries a particular kind of authority without making any explicit claims to it, and a stop at boundchee extended that earned authority feeling, sites that demonstrate expertise through the quality of their explanations rather than by stating credentials are sites I trust most and this site has it.
Appreciate the practical examples, they made the abstract points easier to grasp, and a stop at cratercoil added more of the same, this site clearly understands that real examples beat empty theory every single time which is the mark of a writer who knows their audience well and respects their time.
A piece that read as the work of someone who reads carefully themselves, and a look at globalinspiredmarket continued that informed feel, writers who are also serious readers produce work with a different quality and this site reads as the product of someone steeped in good writing rather than just generating content for an audience.
Appreciated that the writer trusted the reader to follow along without constant restating of earlier points, and a look at coltable continued that respect for the reader, treating an audience as capable adults rather than as people to be hand held through every paragraph is something I notice and value highly across the open internet today.
Honestly this hits the sweet spot between detail and brevity, no rambling and no shortcuts, and a quick visit to portguilds kept that going across the related pages, the kind of place that respects your attention without trying to grab it through cheap tactics or attention seeking design choices that get tired fast.
Skipped past the first paragraph thinking it was setup and had to come back when the rest referenced it, and a stop at cipherbeach similarly rewarded careful reading from the start, content where every paragraph carries weight is content I now know to read from the beginning rather than skipping ahead.
Now adjusting my expectations upward for the topic based on this post, and a stop at cherrycrate continued that bar raising effect, content that resets what I think is possible on a subject is doing real work in shaping my standards and this site is providing those bar raising experiences at a notable rate during sessions.
Worth recognising that the post did not pretend to be the final word on the topic, and a stop at thoughtfulmodernclick continued that humility, content that admits its own scope and limits is more trustworthy than content that overreaches and this site has clearly developed the editorial maturity to know what it can and cannot claim well.
The way the post stayed on topic throughout without going on tangents was really refreshing, and a look at ampleclam kept that focused approach going, discipline like this in writing is rare and worth recognising because most writers cannot resist wandering off into related subjects that dilute their main point and confuse readers along the way.
Will be coming back to this for sure, too much good content to absorb in one sitting, and a stop at velvetvendorx only added more pages I want to dig through, this site is going onto my regular rotation list because it consistently delivers something worth the visit lately rather than empty filler.
Reading this in the time it took to drink half a cup of coffee, and a stop at modernwellbeingstore fit naturally into the second half, content that respects the rhythms of a typical morning is content with practical fit and this site has the kind of length and pacing that works for the way I actually read.
Liked the post enough to read it twice and the second read found new things, and a stop at hazemill similarly rewarded the second look, content with hidden depths that only reveal themselves on careful rereading is the rare kind that earns lasting respect rather than fleeting first impressions only briefly held.
Came across this through a roundabout path and now it is on my regular rotation, and a stop at handcraftedglobalcollections sealed that decision, the open web still produces serendipitous discoveries when you let the citations and references guide you rather than relying purely on algorithmic feeds for new content recommendations always.
Speaking honestly this is among the better discoveries of my recent browsing, and a stop at oakandriver reinforced that discovery quality, the ranking of recent discoveries is informal but meaningful and this site has placed near the top of that ranking based on the consistency of quality across what I have already read carefully.
Beyond the topic at hand this site reads as a small ongoing project of taking writing seriously, and a look at wildriveremporium reinforced that project quality, sites that treat publishing as an ongoing serious practice rather than as content production for traffic are sites worth supporting and this one has clearly chosen the serious approach.
Skipped to a specific section because I knew that was the question I had, and the answer was clean, and a stop at frostaisle similarly delivered targeted answers without burying them, content engineered for readers who arrive with specific needs rather than open ended browsing is increasingly valuable in a search heavy reading environment.
Worth pointing out that the writing reads as confident without being defensive about it, and a look at mastriano4congress extended that secure tone, content that does not pre emptively argue against imagined critics has a different quality from defensive writing and this site reads as written from a place of real ease.
However casually I came to this site I have ended up reading carefully, and a look at beigeblink continued earning that careful reading, the conversion from casual visitor to careful reader is something content earns rather than demands and this site has accomplished that conversion for me over the course of just a few pieces.
рефинансирование микрозаймов https://rusel-garant.ru
I appreciate the clarity here, everything is explained in simple terms without unnecessary detail, and after a quick stop at astrocloth the points came together nicely for me, the writing keeps things straightforward and respects the reader from start to finish without ever talking down to anyone.
Came back to this an hour later to reread a specific section, and a quick visit to premiumglobalmarketplace also drew a second look, content that pulls you back rather than letting you move on permanently is the kind I want to fill my browser bookmarks with in 2026 and beyond as the open internet evolves.
Recommended to anyone working in or curious about this area, the depth and clarity combine well, and a look at crazeborn keeps that going across more pages, the kind of site that earns regular visits rather than chasing trends has my respect because it suggests genuine commitment to the topic itself rather than to chasing trends.
Came here from another site and ended up exploring much further than I planned, and a look at cabinbull only encouraged more exploration, the kind of place where one click leads to another not through manipulative design but through genuinely interesting content is rare and worth highlighting when found like this somewhere on the open internet.
Liked that the post left some questions open rather than pretending to settle everything, and a stop at boundclan continued that intellectual honesty, content that respects the limits of its own claims is more trustworthy than content that overreaches and this site has clearly figured out which positions it can defend confidently.
Reading this on a phone at a coffee shop and finding it perfectly suited to that context, and a stop at merchglow continued the comfortable mobile experience, content that works across reading conditions without compromising on substance is increasingly important and this site has clearly thought about the whole reader experience here.
Now sitting back and recognising that this was a small but real win in my reading day, and a stop at handpickedqualitycollections extended that quiet win, the cumulative effect of small reading wins versus the cumulative effect of small reading losses is real over time and this site is contributing to the wins side of that ledger.
Reading this fit naturally into my afternoon walk because I was reading on my phone, and a stop at ampleclove continued well in that walking format, content that survives mobile reading without becoming awkward is content with format flexibility and this site has clearly thought about how it reads across different devices today.
Took the time to read the comments on this post too and they were also worth reading, and a stop at amberbazaar suggested the community quality matches the content quality, when the conversation around a piece is as good as the piece itself you know you have found a real corner of the internet.
Came across this through a roundabout path and now it is on my regular rotation, and a stop at sustainabledesignstore sealed that decision, the open web still produces serendipitous discoveries when you let the citations and references guide you rather than relying purely on algorithmic feeds for new content recommendations always.
A clear cut above the usual noise on the subject, and a look at briskolives only made that gap wider in my view, the kind of place that earns its visitors through quality rather than through aggressive marketing or sponsored placements which is increasingly the only way most sites stay afloat across the modern web.
Reading this site over the past week has changed how I evaluate content in this space, and a look at modernlivingcollective extended that recalibration, the standards I bring to reading on the topic have shifted upward as a direct result of regular exposure to this kind of work and that shift will outlast any single reading session.
Will be back, that is the simplest way to say it, and a quick visit to coltbrig reinforced the decision, this site has earned a spot in my regular rotation alongside a few other reliable places I check when I want something genuinely informative without all the usual modern web noise getting in the way.
Found the use of subheadings really helpful for scanning back through the post later, and a stop at refinedmoderncollections kept that reader friendly approach going, navigation is something many blog writers ignore but small structural choices make a noticeable difference for someone returning to find a specific point again days or weeks later.
Following the post through to the end without my attention drifting once, and a look at dreamshopworld earned the same uninterrupted attention, content that holds attention without manipulating it is content with substantive pull and this site has demonstrated that substantive pull across multiple pieces in a single reading session reliably here today.
Glad to have another data point on a question I am still thinking through, and a look at kovique added two more, content that acknowledges its place in a wider conversation rather than pretending to settle the question alone is intellectually honest in a way that I wish was more common across the open web.
The post made the topic feel approachable without making it feel trivial, that is a fine balance, and a stop at cadetgrails maintained the same balance, finding the middle ground between welcoming and serious is genuinely difficult and the writers here have clearly figured out how to consistently hit it well across many different posts.
Started thinking about my own writing differently after reading, and a look at beigecanal continued that reflective effect, content that influences how I work rather than just informing what I know is content with the highest kind of impact and this site has triggered some of that reflective influence today on me.
Thanks for a post that does not try to be funny when it is not the moment for it, and a stop at wildstonegallery maintained the same appropriate seriousness, knowing when humour helps and when it just signals desperation for engagement is a sign of editorial maturity that many blogs have not developed yet.
Refreshing to read something where the words actually mean something instead of filling space, and a stop at contemporarydesignhub kept that going, the writing here trusts the reader to follow along without endless repetition or constant reminders of what was already said earlier in the post which I appreciate.
Reading this gave me the rare experience of fully agreeing with all the conclusions, and a stop at crazechip continued that agreement pattern, content that aligns with my existing views without seeming designed to do so is just content that happens to be reasonable and this site reads as reasonable rather than ideological mostly.
Looking through other posts here the consistency is what makes the site valuable rather than any single piece, and a stop at birchvista extended that consistency observation, sites whose value lies in the ongoing pattern rather than in standout posts are sites I trust more deeply and this one has clearly built that kind of trust.
Better signal to noise ratio than most places I check on this kind of topic, and a look at cipherbow kept that going, every paragraph here carries something worth reading rather than padding out the page to hit some arbitrary length target that search engines reward but readers ignore as soon as they notice it.
Now adjusting my mental model of how the topic fits into the broader landscape, and a look at auralbrick extended that adjustment, content that affects my structural understanding rather than just my factual knowledge is content with deeper impact and this site is providing those structural updates at a meaningful rate consistently across topics.
Honestly enjoyed not being sold anything for the entire duration of the post, and a look at calmbyrd kept that pleasant absence going across more pages, content that exists for its own sake rather than as a funnel to a paid product is increasingly rare and worth supporting where I can find it.
Closed several other tabs to focus on this one as I read, and a stop at androblink held my undivided attention the same way, content that earns full focus in an attention environment full of competing pulls is content doing something genuinely well and the team behind it deserves recognition for that achievement consistently.
A welcome reminder that thoughtful writing still happens online, and a look at creativehomeandstyle extended that reassurance, the modern web makes it easy to forget that careful writing exists and finding sites that practice it is a small antidote to the cynicism that builds up from too much exposure to algorithmic content.
Now planning to come back when I have the right kind of attention to read carefully, and a stop at intentionalstylehub reinforced that plan, choosing the right moment to read certain content is a quiet form of respect for the work and this site is generating those careful planning behaviours from me consistently as a reader.
Learned something from this without having to dig through layers of fluff, and a stop at arpunishersfb added a bit more context that helped tie things together for me, definitely a useful corner of the internet for anyone who wants real information without the usual marketing nonsense around it that often ruins similar pages.
A welcome reminder that thoughtful writing still happens online, and a look at boundcliff extended that reassurance, the modern web makes it easy to forget that careful writing exists and finding sites that practice it is a small antidote to the cynicism that builds up from too much exposure to algorithmic content.
Will be passing this along to a few people who would benefit from the perspective shared here, and a stop at ulnova only added to what I will be sharing, this kind of generous content deserves to circulate widely rather than getting buried in some search engine algorithm tweak that pushes it down the rankings.
The use of plain language without dumbing down the topic was really well done, and a look at curatedmodernlifestyle continued in that same accessible style, this is something many technical writers fail at because they either confuse their readers or condescend to them but here neither problem appears at all which is impressive really.
Did not expect much when I clicked through but ended up reading the whole thing carefully, and a stop at cobaltcrate kept that engagement going, sometimes the unassuming sites turn out to deliver more than the flashy ones which is something I have learned to look out for over time online lately and across topics.
If you asked me to point to a recent positive sign for the open web this site would be near the top, and a stop at urbanwillowcorner reinforced that designation, the few sites that serve as evidence the web can still produce quality independent content are precious and this one has clearly become one for me.
A slim post with substantial content per word, and a look at beltbrunch maintained the same density, the content per word ratio is something I track informally and this site scores high on that ratio compared to most sources I read regularly which is a quiet indicator of careful editorial work behind the scenes.
Without overstating it this is a quietly excellent post, and a look at globalethicalclickping extended that quiet excellence, content that earns superlatives without demanding them through marketing language is content that has truly earned them through the substance and this site has clearly produced work in that earned excellence category today.
Just want to acknowledge that the writing here is doing something right, and a quick visit to intentionalglobalstore confirmed the same standards run across the broader site, recognising good work is something I try to do when I find it because the alternative is silence and silence rewards mediocrity.
Really liked the calm tone running through the post, no shouting and no urgency forced into the writing, and a look at kettlemarket kept that quiet confidence going, the kind of voice that makes the reader feel respected rather than yelled at which is depressingly common across most modern blog content these days.
Quietly building a case in my head for why this site deserves more attention than it currently seems to receive, and a look at compassbraid reinforced the case, the gap between quality and recognition is a recurring frustration in independent online content and this site is one of the cases that seems particularly egregious to me today.
Liked how the writer used real examples instead of theoretical ones to make the points stick, and a stop at crazecocoa added even more concrete examples, this is the kind of practical approach that respects readers who actually want to apply what they learn rather than just nodding along passively without doing anything useful.
Reading this gave me a small sense of progress on a topic I have been slowly working through, and a stop at mossytrailmarket added another step forward, learning happens in small increments across many sources and finding sources that consistently contribute is the actual practical value of careful curation in an information rich world.
The use of plain language without dumbing down the topic was really well done, and a look at ardenbeach continued in that same accessible style, this is something many technical writers fail at because they either confuse their readers or condescend to them but here neither problem appears at all which is impressive really.
Picked this up between two other things I was doing and got drawn in completely, and after globaldesignmarketplace my original tasks were completely forgotten for a while, content that derails a workflow in a positive way by being more interesting than what you were already doing is rare and worth recognising clearly.
One of the more honest takes on the topic I have seen lately, no spin and no oversell, and a stop at cantclap kept that going, the kind of voice the open web could use a lot more of rather than the endless echo chamber of recycled opinions floating around every social platform these days.
However selective I am about new bookmarks this one made it past my filter, and a look at designledclickping confirmed the bookmark was worth the slot, the precious slots in my permanent bookmark folder are difficult to earn and this site earned one without making me think twice about whether the slot was justified by the quality.
Solid stuff, the kind of post that I will probably refer back to later this month when the topic comes up again, and a look at carefullycuratedfinds only confirmed I should bookmark the site as a whole rather than just this single page for future reference and use across coming weeks.
Found this really helpful, the explanations are simple but they actually answer the questions a normal reader would have, and after I followed auralbrig I had a clearer sense of the topic, no extra fluff just useful points laid out in a sensible order that made the time worth it.
Recommend this to anyone who values clear thinking over flashy presentation, and a stop at prairievendor continued in the same understated way, this site has its priorities in the right place which makes it worth supporting through repeat visits and recommendations rather than just one passing read today before moving on quickly elsewhere.
A genuine pleasure to find a site that publishes at a sustainable cadence rather than chasing the daily content treadmill, and a look at pebblevendor confirmed the careful publication rhythm, sites that prioritise quality over frequency are rare and this one has clearly chosen the slower pace which I appreciate as a reader.
Found the use of subheadings really helpful for scanning back through the post later, and a stop at boundcling kept that reader friendly approach going, navigation is something many blog writers ignore but small structural choices make a noticeable difference for someone returning to find a specific point again days or weeks later.
Felt mildly happier after reading, which sounds silly but is true, and a look at islemeadows extended that small mood lift, content that improves rather than degrades my mental state is content I want more of and the cumulative effect of reading sites that lift versus sites that drag is real over time.
A piece that reads like it was written for me without claiming to be written for me, and a look at berylbuff produced the same fit, when the writer audience match clicks naturally without being engineered through demographic targeting you know the writing is solid and this site has that natural fit consistently for me.
A particular kind of restraint shows up in the writing, and a look at timbervendor maintained the same restraint across pages, knowing what not to say is just as important as knowing what to say and this site has clearly developed strong instincts on both sides of that editorial line throughout pieces I have read.
Solid quality, the kind of work that holds up to a careful read rather than a quick skim, and a quick look at ethicalmodernmarketplace kept that standard going strong, content that rewards attention rather than punishing it is something I appreciate more and more these days online across nearly every topic I follow.
Honestly this hits the sweet spot between detail and brevity, no rambling and no shortcuts, and a quick visit to spikeisland2020 kept that going across the related pages, the kind of place that respects your attention without trying to grab it through cheap tactics or attention seeking design choices that get tired fast.
SEO является одним из самых востребованных инструментов интернет маркетинга. Поисковая оптимизация помогает увеличить органический трафик и снизить зависимость от платной рекламы https://msk.mihaylov.digital/prodvizhenie-sajta-mebeli/
A thoughtful piece that did not strain to be thoughtful, and a look at civicbrisk continued that effortless quality, when thinking shows up in writing without the writer drawing attention to it you know you are reading something genuinely considered rather than something performing the appearance of consideration which is also common online.
Picked this up between two other things I was doing and got drawn in completely, and after ardenbrisk my original tasks were completely forgotten for a while, content that derails a workflow in a positive way by being more interesting than what you were already doing is rare and worth recognising clearly.
My professional context would benefit from having this kind of resource available, and a look at crestbulb extended the professional applicability, the rare site that contributes meaningfully to professional work rather than just personal interest is content with multiplied value and this one is providing that professional utility consistently across multiple pieces.
Beats most of the alternatives on the topic by a noticeable margin, and a look at creativecommercecollective did not change that at all, this is one of the better corners of the open internet for this kind of content and I am glad I clicked through rather than skipping past quickly like I usually do.
If quality blog writing is dying as people sometimes claim then this site is one piece of evidence that it has not died yet, and a look at softleafmarket extended that evidence, the broader cultural question about online writing has empirical answers in specific sites and this one is contributing to a more optimistic answer overall.
Stands out for actually being useful instead of just being long, and a look at slowcraftedlifestyle kept that going, length without value is the default mode of most blogs these days but this site has clearly chosen a different path which I respect a lot as a reader who values careful editing decisions like that.
Reading this gave me material for a conversation I needed to have anyway, and a stop at compassbulb added even more talking points, content that connects to upcoming social or professional needs rather than just being interesting in the abstract is the kind that earns priority placement in my attention these days routinely.
Thanks for treating the topic with the seriousness it deserves without becoming pompous about it, and a stop at ethicalglobalmarket continued that balanced treatment, the gap between earnest and self serious is huge and writers who can stay on the right side of it earn my respect when I find them online today.
Definitely returning here, that is decided, and a look at everydaypremiumessentials only made the case stronger, this is one of those rare websites that rewards regular visits rather than feeling stale after the first read which is something I cannot say about most of the places I bookmark today across all my topics.
Took longer than expected to finish because I kept stopping to think, and a stop at silkvendor did the same to me, content that provokes thought rather than just delivering information is in a different category and the team here is clearly working at that higher level rather than just cranking out posts.
Came in skeptical of the angle and left mostly persuaded, and a stop at larkvendor pushed me a bit further in the same direction, content that can move a critical reader by argument rather than rhetoric is rare and worth pointing out because it indicates real substance underneath the surface presentation here.
Going to share this with a friend who has been asking the same questions for a while now, and a stop at trueautumnmarket added a few more pages I will pass along too, this is the kind of generous information that earns a small thank you from me right now and again later this week.
Top notch writing, every paragraph carries weight and nothing feels like filler, and a stop at valuewhisper reflected that same care, a rare thing on the open web these days where most pages exist for clicks rather than actual reader value or anything close to that which is honestly a real shame.
Felt like the writer was speaking directly to someone with my level of curiosity, neither talking down nor showing off, and a stop at berylcalm kept that comfortable matching going, finding writing that meets you where you are rather than asking you to climb up or stoop down feels great every time it happens.
Now adding the homepage to my regular check rotation rather than waiting for individual links to find me, and a stop at auralcleat confirmed the rotation upgrade, the move from passive discovery to active checking is a vote of confidence in a sites ongoing quality and this site has earned that active engagement clearly.
Looking at this objectively the editorial quality is hard to deny even setting aside personal taste, and a stop at intentionalmarketplacehub maintained the same objective quality, the gap between what I personally enjoy and what is objectively well crafted exists and this site clears both bars simultaneously which is rarer than it sounds.
Granted my mood today might be elevating my reading experience but I still think this is genuinely good, and a stop at ardenburst reinforced that even discounted assessment, controlling for the mood adjustment that affects content perception this site still reads as substantively above average across multiple pieces I have read carefully today.
Now saved this in a way that I will actually find again rather than the casual bookmark approach, and a stop at boundcoil earned the same careful saving, organising my reading bookmarks so that high quality sources rise to the top is something I should do more of and this site triggered that organisation today.
A piece that left me thinking I had been undercaring about the topic, and a look at crocboard reinforced that mild concern, content that raises the appropriate weight of a subject without being preachy about it is doing important work and this site is providing that gentle elevation of attention for me consistently.
Reading more of the archives is now on my plan for the weekend, and a stop at thoughtfullyselectedproducts confirmed the archive worth the time, the rare archive worth a dedicated reading session rather than just casual sampling is the rare archive of serious work and this site has clearly produced enough of that work to warrant the deeper exploration.
Worth flagging this post as worth a careful read rather than a casual skim, and a stop at intentionalclickpingcollective earned the same careful approach, the few sites that warrant slower reading are sites I now treat differently from the daily content stream and this one has clearly moved into that elevated treatment category.
Glad the writer kept this short rather than padding it out, the points stand on their own without needing extra context, and a look at contemporarylivingstore kept the same approach going, brevity is a sign of confidence in the substance and the team here clearly trusts their content to land without filler.
Walked away with a clearer head than I had before reading this, and a quick visit to timberlineattic only sharpened that, the writing has a way of cutting through the noise that surrounds most topics online which is something I will definitely remember the next time I am searching for an answer to anything.
This stands out compared to similar posts I have read recently, less noise and more substance, and a look at zestvendor kept that gap going, you can really feel the difference between content made by someone who cares versus content made to fill a publishing schedule for an algorithm trying to keep growing somehow.
A piece that read as the work of someone who reads carefully themselves, and a look at myvetcoach continued that informed feel, writers who are also serious readers produce work with a different quality and this site reads as the product of someone steeped in good writing rather than just generating content for an audience.
Just dropping by to say thanks for the effort, it does not go unnoticed when a writer cares this much about the reader, and after I went through mistmarket I was certain this is one of the better corners of the internet for this particular kind of content which is genuinely refreshing.
Highly recommend to anyone looking for a sensible take on this topic without the usual marketing nonsense, and a look at forgecabins kept that grounded approach going, sites that stay focused on serving readers rather than monetising every click are rare and this is clearly one of those rare ones I really appreciate finding.
A genuine compliment to the writer for keeping the post focused on what mattered, and a look at blazeclose continued that disciplined focus, focus is a editorial choice that compounds across many small decisions and this site has clearly made those small decisions consistently across what I have read so far this week here.
Polished and informative without feeling overproduced, that is the sweet spot, and a look at saucierstudio hit it again, you can tell when a site has been built with care versus thrown together for the sake of having something to put online and this is clearly the former approach taken by the team.
Useful enough to recommend to several people I know who would appreciate it, and a stop at timelessdesignsandgoods added more material I will pass along too, the kind of writing that earns word of mouth is the kind that actually delivers on its promises which is what this site does without any drama or fanfare attached.
A piece that built up gradually rather than front loading its main points, and a look at compasscabin maintained the same gradual structure, content that trusts the reader to reach conclusions through accumulating reasoning is more persuasive than content that announces conclusions and then defends them and this site uses the persuasive approach.
Solid little post, the kind that does not need to be flashy because the substance is doing the work, and a look at civiccask kept that quiet confidence going across the site, this is what writing looks like when the writer trusts the content to land on its own without theatrics or unnecessary attention seeking behaviour.
Decided I would read the archives over the weekend, and a stop at consciousconsumerhub confirmed that the archives would be worth the time, very few sites have archives I would actively read through but this one has earned that level of interest based on the consistent quality across what I have sampled so far.
Reading this in segments because the day was busy, and the post survived the fragmented attention well, and a stop at ariabee held up similarly under interrupted reading, content that can withstand modern distracted reading patterns rather than requiring a perfect block of focused time is increasingly the kind I prefer.
During the time spent here I noticed the absence of the usual distractions, and a stop at balticarrow extended that distraction free experience, content that does not fight my attention with pop ups and modals and aggressive prompts is content that respects me and this site has clearly chosen the respectful approach throughout.
Appreciated the way each section connected smoothly to the next without abrupt jumps, and a stop at croccocoa kept that flow going nicely, transitions are something most blog writers ignore but the difference is huge for the reader who is trying to follow a sustained line of thought today across many different topics.
Glad I gave this fifteen minutes rather than the usual three minute skim, and a look at artfulhomeessentials earned the same investment, time spent on quality content is rarely wasted but the reverse is also true and learning which sites deserve which kind of attention is part of being a careful online reader.
Found a couple of useful angles in here I had not considered before reading carefully, and a quick stop at urbaninspiredlivingstore added more, this is one of those sites where the value compounds the more you read rather than peaking at one viral post and then offering nothing else of substance afterwards which is common.
Glad I gave this a chance instead of bouncing on the headline, and after bowbotany I was certain I had made the right call, snap judgements based on titles miss a lot of good content and this is a reminder to slow down and check things out before scrolling past in a hurry.
Closed the tab feeling I had spent the time well, and a stop at upvendor extended that feeling across more pages, the test of whether time on a site was well spent is one I apply silently after closing tabs and very few sites pass it but this one passed it cleanly today afternoon clearly.
A piece that reads as if the writer trusted readers to fill in obvious gaps, and a look at vaultbasket continued that respectful approach, content that does not over explain what the reader can infer is content that respects intelligence and this site has clearly chosen to write to capable readers rather than to the lowest common denominator.
Refreshing change from the usual sites covering this topic, no clickbait and no padding, and a stop at thoughtfulclickpingplatform confirmed the difference, this place clearly has its own voice rather than copying the formulas everyone else uses to chase clicks online which is becoming increasingly rare these days across nearly every popular subject.
Bookmark added with a small note about why, and a look at honestgrovecorner prompted another bookmark with another note, the bookmarks I annotate are the ones I expect to return to deliberately rather than stumble into and this site is generating annotated bookmarks at a higher rate than my usual content sources by some margin.
Picked up a couple of new ideas here that I can actually try out, and after my visit to blissbrick I have even more notes saved, this is the kind of resource that pays you back for the time you spend on it which is rare to come across in this corner of the web.
Really liked the calm tone running through the post, no shouting and no urgency forced into the writing, and a look at softwillowcorner kept that quiet confidence going, the kind of voice that makes the reader feel respected rather than yelled at which is depressingly common across most modern blog content these days.
Мы предлагаем комплексную помощь при оформлении документов. Клиенты могут получить медицинские справки, восстановить свидетельства и подготовить официальные бумаги для подачи в различные инстанции https://spravka-service.com/med-spravki/meditsinskaya-spravka-082-u-dlya-vyezda-za-granitsu/
Closed and reopened the tab three times before finally finishing, and a stop at alpinevendor held my attention straight through, sometimes content fights for time against my own distraction and the times it wins say something positive about its quality and this post clearly won that fight today afternoon for me.
Bookmark added with a small note about why, and a look at intentionalconsumerstore prompted another bookmark with another note, the bookmarks I annotate are the ones I expect to return to deliberately rather than stumble into and this site is generating annotated bookmarks at a higher rate than my usual content sources by some margin.
Easy to recommend, the content speaks for itself without needing additional praise from me, and a stop at ariabrawn only adds more reasons to send people this way, the kind of generous resource that benefits its readers without demanding anything in return is increasingly rare and worth recognising clearly today across the broader open internet.
Quality you can feel from the first paragraph, the writer clearly knows the topic and how to share it, and a quick look at curateddesignandliving confirmed the same depth runs throughout the rest of the site as well which is rare and worth pointing out when it happens online for any reader passing through.
Reading this fit naturally into my afternoon walk because I was reading on my phone, and a stop at capeasana continued well in that walking format, content that survives mobile reading without becoming awkward is content with format flexibility and this site has clearly thought about how it reads across different devices today.
A piece that exhibited the kind of patience that good writing requires, and a look at crustbeige continued that patient quality, hurried writing is easy to spot and this site reads as having been written without time pressure which produces a different feel than the rushed content that dominates much of the modern blog space.
Reading this confirmed something I had been suspecting about the topic, and a look at conchbook pushed that confirmation toward greater confidence, content that lines up with independently held intuitions earns a special kind of trust and I will return to writers who consistently land that way for me without overselling positions.
Now appreciating that I did not feel exhausted after reading, and a stop at purposefulclickpingexperience extended that energising quality, content that leaves me with more attention than it consumed is rare and the gap between draining and energising content is real over the course of a typical day spent reading widely online.
Now realising the topic deserved better treatment than it has been getting elsewhere, and a look at minimalmodernclickping extended that broader recognition, content that exposes the gap between actual quality and average quality elsewhere is doing the quiet work of raising standards and this site is contributing to that elevation in its own corner.
Got something practical out of this that I can apply later this week, and a stop at stageofnations added more details to think about, this is exactly the kind of content I bookmark for future reference rather than the throwaway listicles that dominate most search results these days for almost any common topic.
Цены на клининг спб
Over the course of reading several posts here a pattern of quality has emerged, and a stop at balticbull confirmed the pattern, the difference between sites that hit quality occasionally and sites that hit it consistently is huge and this site has clearly demonstrated the consistent kind through what I have read this morning.
Now adjusting my expectations upward for the topic based on this post, and a stop at wickerlane continued that bar raising effect, content that resets what I think is possible on a subject is doing real work in shaping my standards and this site is providing those bar raising experiences at a notable rate during sessions.
If you scroll past this site without looking carefully you will miss something, and a stop at nervora extended that mild warning, the surface of the site does not advertise its quality loudly which means careful attention is required to recognise what is being offered here which is itself a kind of editorial signal.
Liked that there was nothing performative about the writing, and a stop at elevatedhomeandstyle continued that genuine quality, performative writing tries to be witnessed rather than read and the difference between performance and substance is huge for the careful reader and this site has clearly chosen substance every time clearly.
Reading this prompted a small redirection in something I was working on, and a stop at yovrisa extended that redirecting influence, content that affects my actual work rather than just my thinking has the highest practical impact and this site is providing that level of influence for me at a sustainable rate apparently.
Felt the writer respected the topic without being precious about it, and a look at jewelvendor continued that respectful but unfussy treatment, finding the right register for serious topics is hard and this site has clearly figured out how to take the topic seriously while still being readable for casual visitors regularly.
Thank you for keeping the writing honest and the points easy to verify against your own experience, and a stop at bowcask reflected the same approach, no exaggeration just steady useful content that I can take with me into my own work without second guessing every sentence I happen to read here.
The post made the topic feel approachable without making it feel trivial, that is a fine balance, and a stop at blitzbraid maintained the same balance, finding the middle ground between welcoming and serious is genuinely difficult and the writers here have clearly figured out how to consistently hit it well across many different posts.
Reading this slowly to give it the attention it deserved, and a stop at micapacts earned the same slow read, choosing to read slowly is a small act of respect for content quality and very few sites earn that respect from me but this one did so without any explicit ask which is the cleanest way.
Picked a friend mentally as the audience for this and decided to send the link, and a look at fiberiron confirmed the send was the right choice, choosing whom to share content with is a small act of curation that I take more seriously than the public sharing most platforms encourage these days online.
Thanks for keeping the writing direct without losing the warmth that makes content feel human, and a stop at clamable carried both qualities forward, balancing professionalism and personality is a rare skill and the writers here have clearly figured out how to consistently land it across many posts which I notice.
Skipped the related products section because there was none, and a stop at elveecho also lacked any aggressive monetisation, content that is not constantly trying to convert me into a customer or subscriber is content that has confidence in its own value and that confidence shows up as a different reading experience.
Closed it feeling slightly more competent in the topic than I started, and a stop at arialcamp reinforced that competence boost, real learning is rare in casual online reading but it does happen sometimes and this site managed to make it happen for me today which is genuinely worth pausing to acknowledge.
Reading this in pieces over a coffee break and finding it consistently rewarding, and a stop at refinedeverydaynecessities extended that into related material I will return to later, the kind of site that fits naturally into small reading windows without requiring a long uninterrupted block is genuinely useful for how I actually browse.
Reading this brought back the satisfaction I used to get from blogs ten years ago, and a stop at merniva kept that nostalgic quality alive, sites that capture what was good about an earlier era of internet writing are increasingly precious and this one is doing that without feeling like a deliberate throwback at all.
A piece that reads like it was written for me without claiming to be written for me, and a look at refineddailycommerce produced the same fit, when the writer audience match clicks naturally without being engineered through demographic targeting you know the writing is solid and this site has that natural fit consistently for me.
Reading this confirmed something I had been suspecting about the topic, and a look at wildleafstudio pushed that confirmation toward greater confidence, content that lines up with independently held intuitions earns a special kind of trust and I will return to writers who consistently land that way for me without overselling positions.
Reading this in the time it took to drink half a cup of coffee, and a stop at crustborn fit naturally into the second half, content that respects the rhythms of a typical morning is content with practical fit and this site has the kind of length and pacing that works for the way I actually read.
Really grateful for content like this, it does not waste my time and it does not insult my intelligence either, and a quick look at cargocomet was the same, balanced respectful writing that makes a person feel welcome rather than rushed through pages of forced engagement just to keep clicking around.
Coming to this with low expectations and being pleasantly surprised by the substance, and a stop at timbermarket continued exceeding expectations, the recalibration of expectations upward across multiple positive readings is one of the actual rewards of careful browsing and this site is providing that recalibration at a steady rate apparently.
Found the writing surprisingly fresh for what is by now a well covered topic, and a stop at harbormint kept that freshness going across the related pages, original perspective on familiar ground is hard to come by and this site has clearly earned its place in the conversation rather than just rehashing old ideas.
Found this through a friend who recommended it and now I see why, and a look at iciclecrate only strengthened that recommendation in my own mind, word of mouth still works for content that actually delivers and this site is clearly earning recommendations the old fashioned way through quality rather than marketing.
Felt no urge to argue with the conclusions even though I started the post slightly skeptical, and a look at globalmodernessentials maintained that pattern, writing that earns agreement through clarity of argument rather than rhetorical pressure is the kind I find most persuasive and the kind I want to read more of these days.
Loved the writing voice here, friendly without being fake and confident without being arrogant, and a stop at conchclove carried the same tone forward, the kind of personality that makes a reader feel welcome rather than lectured at which is a balance plenty of writers struggle to find no matter how long they have been at it.
Held my interest from the opening line through to the closing thought, and a stop at boneblot did the same, content that earns sustained attention in an environment full of distractions is doing something right and this site is clearly doing several things right rather than just one or two which I really appreciate.
Now planning a longer reading session for the archives, and a stop at everdunegoods confirmed the archives are worth that longer commitment, sites with archives I want to read deliberately rather than just sample are rare and this one has clearly earned that level of interest based on the consistency of what I have already read.
Took a chance on the headline and was rewarded, and a stop at premiumhandpickedgoods kept the rewards coming as I clicked through, the kind of place where every link leads somewhere worth the click is a small luxury on the modern web where so many sites are mostly empty calories disguised as content.
Took a few notes from this post, the points are easy to remember without needing to come back and check, and a look at balticcape added a couple more, the kind of place that sticks in the memory long after the browser tab has been closed for the day which says a lot really.
Reading this prompted a brief but useful conversation with a colleague who happened to walk by, and a stop at orderquill extended that conversational seed, content that becomes a starting point for in person discussion rather than ending in solitary reading is content with social generative energy and this site has plenty of it apparently.
Worth recognising the specific care that went into how this post ended, and a look at norigamihq maintained the same careful conclusions, endings are where most blog content falls apart and this site has clearly invested in the closing stretches of its pieces rather than letting them simply trail off when energy fades.
Worth recommending broadly to anyone who reads on the topic, and a look at ethicalhomeandlifestyle only confirms that, the rare combination of accessibility and depth in this site makes it suitable for both newcomers and people who already know the area which is hard to pull off in any blog format today and rarely managed.
Liked that the post left some questions open rather than pretending to settle everything, and a stop at amberdock continued that intellectual honesty, content that respects the limits of its own claims is more trustworthy than content that overreaches and this site has clearly figured out which positions it can defend confidently.
Reading this confirmed that my time researching the topic in other places had not been wasted, and a stop at modernheritagegoods extended the confirmation, when independent sources agree that is a useful signal and this site is one of the more reliable sources I have found for cross checking what I read elsewhere on similar subjects.
Really clear writing, the kind that makes you want to share the link with someone who has been asking about the topic, and a quick browse through bowclub only made me more sure of that, the information here stays useful long after the first read is done which says a lot.
Started reading without much expectation and ended on a high note, and a look at basketwharf continued that arc, content that builds rather than peaks early is a sign of a writer who knows how to structure a piece for sustained reader engagement rather than relying on a strong hook to do all the work.
Reading this in segments because the day was busy, and the post survived the fragmented attention well, and a stop at fifeholm held up similarly under interrupted reading, content that can withstand modern distracted reading patterns rather than requiring a perfect block of focused time is increasingly the kind I prefer.
Worth flagging this site to a few specific friends who would appreciate the editorial sensibility, and a look at crustcleve added more pages I will mention to them, recommending sites to specific people requires understanding both the site and the person and this site is making those personalised recommendations easy and natural for me.
Started thinking about my own writing differently after reading, and a look at cartcab continued that reflective effect, content that influences how I work rather than just informing what I know is content with the highest kind of impact and this site has triggered some of that reflective influence today on me.
If I were grading sites on this topic this one would receive high marks, and a stop at shopmeadow continued earning those high marks, the informal grading I do mentally for content sources is something I take seriously even though it is informal and this site has been receiving consistent high marks across multiple sessions today.
Quietly enthusiastic about this site after the past few hours of reading, and a stop at jollymart extended that enthusiasm, the calibration of enthusiasm to evidence is something I try to maintain and this site has earned a calibrated quiet enthusiasm rather than the loud excitement that usually fades within a day or two of finding something.
Now noticing that the post benefited from being neither too short nor too long for its content, and a look at futurelivingmarketplace continued that calibration of length, sites that match length to content rather than padding to hit some target are sites that respect both their material and their readers and this site does both.
Came away with some new perspectives I had not considered before, and after bonebow those ideas felt more complete, the kind of content that stays with you a little while after reading rather than slipping out the moment you switch tabs and move on with your day to whatever comes next.
Found a small mental shift after reading this, the framing here is just a bit different from the standard takes online, and a look at claycargo extended that fresh perspective across more material, the rare site whose voice actually changes how you think about something rather than just confirming existing beliefs.
This stands out compared to similar posts I have read recently, less noise and more substance, and a look at fernbureaus kept that gap going, you can really feel the difference between content made by someone who cares versus content made to fill a publishing schedule for an algorithm trying to keep growing somehow.
Loved the writing voice here, friendly without being fake and confident without being arrogant, and a stop at loftcrate carried the same tone forward, the kind of personality that makes a reader feel welcome rather than lectured at which is a balance plenty of writers struggle to find no matter how long they have been at it.
Easy to recommend, the content speaks for itself without needing additional praise from me, and a stop at curatedethicalcommerce only adds more reasons to send people this way, the kind of generous resource that benefits its readers without demanding anything in return is increasingly rare and worth recognising clearly today across the broader open internet.
Decided to read this site for a while before forming a verdict, and the verdict after several pages is positive, and a stop at carefullychosenluxury continued that pattern, judging a site requires more than one post and giving sites a fair sample is something I try to do for promising candidates rather than rushing to dismiss.
Honest reaction is that this is the kind of writing I would defend in a conversation about good blog content, and a look at yorventa reinforced that, the rare site whose work I would actively recommend rather than just tolerate is the kind I want to support through return visits regularly.
Liked that the post landed without needing to manufacture controversy or take a contrarian stance for attention, and a stop at balticclose continued that grounded approach, content that earns attention through quality rather than provocation is the kind that builds long term trust rather than burning it on quick wins.
Took some notes for a project I am working on, and a stop at intentionalclickpinghub added more raw material to those notes, content that contributes to my own creative work rather than just being interesting in the moment is the kind I value most and the kind I will keep coming back to repeatedly.
Comfortable read, finished it without realising how much time had passed, and a look at fifejuno pulled me into more pages the same way, the absence of friction in good content lets time disappear and that is one of the highest compliments I can pay any piece of writing I find online during a regular search session.
Looking forward to seeing what gets published next month, and a look at cerlix extended that anticipation across the broader site, finding myself looking forward to a sites future content rather than just consuming its existing content is a stronger commitment level than I usually reach with new finds and this site triggered that.
Closed the tab with a small sense of finality rather than the usual rushed exit, and a stop at bowclutch produced the same considered closing, when reading ends with deliberate satisfaction rather than impatient skip you know the time was well spent and this site is producing those satisfying endings consistently across what I read.
Decided to subscribe to the RSS feed if there is one, and a stop at caskcloud confirmed that decision, content that I want delivered to me proactively rather than just remembered when I have time is content that has earned a higher level of commitment from me as a reader looking for reliable sources.
Worth flagging that the writing rewarded a second read more than I expected, and a look at elvegorge produced the same second read benefit, content with hidden depths that emerge only on careful rereading is rare in the modern blog space and this site has clearly invested in that level of compositional density throughout.
Quality work here, the post reads cleanly and the points stay focused throughout, and a stop at shorevendor kept the standard high, you can tell the writer cares about the final result rather than just hitting publish for the sake of having something new on the page to feed the search engines.
crazy time 20000x [url=http://www.crazytimeee.com]https://crazytimeee.com/[/url]
Liked the balance between depth and brevity, never too shallow and never too long, and a stop at kindvendor kept the same balance going across the rest of the site, this is one of the harder skills in writing and the team here clearly has it figured out very well indeed across every page.
casino scores monopoly live vegas winners [url=http://monopoly-live-bd.com/]https://monopoly-live-bd.com/[/url]
monopoly big result today live [url=http://monopoly-live-bangladesh.com/]https://monopoly-live-bangladesh.com/[/url]
Felt like the post had been edited rather than just drafted and published, and a stop at goldencrestartisan suggested the same care across the site, the difference between edited and unedited content is enormous for the reader and this site has clearly invested in the editing pass that most blogs skip entirely which really does show up.
A piece that prompted a small mental rearrangement of how I order related ideas, and a look at frostrack extended that rearranging effect, content that affects the structure of my thinking rather than just adding to it is content with the deepest kind of impact and this site is reaching that depth for me today.
solana online casino [url=http://www.solanagxy.com/]https://solanagxy.com/[/url]
crazy time bonus benvenuto [url=http://crazy-timez.com/]https://crazy-timez.com/[/url]
Glad I clicked through from where I did because this turned out to be worth the time spent, and after marketwhim I had a fuller picture, the kind of content that earns its visitors through delivering value rather than chasing them through aggressive advertising or constant pop ups appearing everywhere on the screen lately.
888az [url=https://colindaylinks.com]https://colindaylinks.com/[/url]
A piece that read smoothly because the writer understood how readers actually move through prose, and a look at elevatedconsumerexperience maintained the same reader awareness, writers who think about the reading experience as much as the writing experience produce better work and this site has clearly made that shift in editorial approach.
Thank you for not assuming the reader already knows everything, the explanations meet me where I am, and a look at designconsciousmarket did the same, that consideration is what makes a site feel welcoming rather than gatekeepy which is sadly the default mood across the modern web today for most subjects covered.
Left me wanting to read more rather than feeling burned out, that is a good sign, and a look at figfeat confirmed there is plenty more here to explore, the kind of writing that builds appetite rather than killing it which is a rare quality on the modern open internet today across most categories of content.
Bookmarking this for later, the kind of resource I want to keep nearby, and a quick look at xenialcart confirmed the rest of the site is worth the same treatment, definitely going into my reference folder for the next time the topic comes up at work or in conversation with someone who asks.
Skipped the comments section but might come back to read it, and a stop at baroncleat hinted at a quality reader community, sites where the comments are worth reading separately from the post are increasingly rare and signal a particular kind of audience that has grown around the editorial vision over time gradually.
The way the post stayed on topic throughout without going on tangents was really refreshing, and a look at aerlune kept that focused approach going, discipline like this in writing is rare and worth recognising because most writers cannot resist wandering off into related subjects that dilute their main point and confuse readers along the way.
However many similar pages I have read this one taught me something new, and a stop at itemwhisper added more new material, content that contributes genuinely fresh information rather than recycling what is already widely available is content with real informational value and this site is providing that informational freshness at a notable rate.
Skipped the related products section because there was none, and a stop at caspiboil also lacked any aggressive monetisation, content that is not constantly trying to convert me into a customer or subscriber is content that has confidence in its own value and that confidence shows up as a different reading experience.
Appreciate the thoughtful approach, the writer clearly took time to make this readable for someone who is not already an expert, and a look at clearbrick kept that going nicely, easy on the eyes and easy on the brain which is always a winning combination when reading on a busy day.
Found a couple of useful angles in here I had not considered before reading carefully, and a quick stop at sernix added more, this is one of those sites where the value compounds the more you read rather than peaking at one viral post and then offering nothing else of substance afterwards which is common.
Took something from this I did not expect to find, and a stop at artisandesigncollective added another unexpected useful piece, content that exceeds expectations rather than just meeting them is the kind that builds enthusiasm and earns repeat visits without any explicit ask from the writer or platform behind the work being read.
Honestly impressed by the consistency of voice across what I have read so far, and a quick visit to duetparishs continued that consistent feel, when a site reads like one careful person rather than a committee the experience is more rewarding for the reader who notices these subtle editorial details over time.
Spent a few minutes here and came away with a clearer picture of the topic, the writing keeps things simple without dumbing them down, and after a stop at epicfife the rest of the points lined up neatly which is something I appreciate when I am short on time and need answers fast.
Came in for one specific question and got answers to three I had not even thought to ask, and a look at opalwharf extended that bonus value pattern, the kind of resource that anticipates reader needs rather than just answering the literal question asked is the gold standard and this site reaches it.
Now thinking about how this post will age over the coming years, and a stop at elegantdailyessentials suggested the same durability, content built to age well rather than to capture the attention of the moment is content with a different kind of value and this site has clearly chosen the long horizon over the short one.
Worth pointing out that the writing reads as confident without being defensive about it, and a look at designfocusedclickping extended that secure tone, content that does not pre emptively argue against imagined critics has a different quality from defensive writing and this site reads as written from a place of real ease.
Definitely a recommend from me, anyone curious about the topic should check this out, and a look at finchfiber adds even more reason for that, the depth and quality combine to make this site one I will be pointing people toward whenever similar conversations come up over the months ahead at work or socially.
Pass this along to colleagues if the topic comes up, the framing here is sensible, and a stop at emberbasket adds more useful angles to share, the kind of content that improves conversations rather than just feeding them is what makes a resource genuinely valuable in professional contexts going forward over time and across project boundaries too.
The post made the topic feel approachable without making it feel trivial, that is a fine balance, and a stop at xolveta maintained the same balance, finding the middle ground between welcoming and serious is genuinely difficult and the writers here have clearly figured out how to consistently hit it well across many different posts.
Following a few of the internal links revealed more posts of similar quality, and a stop at morningcrate added more to that growing pile, sites where internal links lead to more good content rather than to more of the same recycled material are sites with depth and this one has clearly built that depth carefully.
A piece that took its time without dragging, and a look at itemcove kept the same patient pace, the difference between unhurried and slow is a fine editorial distinction and this site has clearly found the unhurried side without slipping into the slow side which would have lost me as a reader quickly otherwise.
Now thinking the topic is more interesting than I had given it credit for, and a stop at zarnita continued that elevated interest, content that revives my curiosity about subjects I had set aside is doing genuine work in the structure of my interests and this site is providing that revivifying effect today actually.
Comfortable in tone and substantive in content, that is a hard combination to land, and a look at basteastro kept that pairing alive across more material, this is what good editorial direction looks like in practice and the team here clearly has someone keeping a steady hand on the wheel across what they decide to publish.
Appreciate how nothing here feels copied or pieced together from other places, the voice is consistent and the tone stays human, and after I checked dreamleafgallery I noticed the same style holds, which is a small detail but it makes the whole experience feel personal rather than like another generic site.
Reading this triggered a small change in how I think about the topic going forward, and a stop at cedarchime reinforced that subtle shift, the rare content that actually moves my thinking rather than just confirming or filling it is the kind I most value and this site is providing that kind of impact today.
Skipped the related links section thinking I had read enough and then came back to it later when curiosity got the better of me, and a stop at modernpurposefulmarket confirmed I should have just read it first, every section of this site appears to deserve careful attention rather than skipping past lazily.
Adding this to my list of go to references for the topic, and a stop at retailglow confirmed the rest of the site deserves the same, definitely the kind of resource that earns its place rather than getting forgotten the moment the next interesting article shows up in my feed somewhere else on the web.
A piece that brought a sense of order to a topic I had been finding chaotic, and a look at globalartisanfinds continued that organising effect, content that imposes useful structure on messy subjects is doing genuine intellectual work and this site is providing that organisational function across multiple posts I have read recently here.
I really like the calm tone here, it does not push anything on the reader, and after I went through equakoala I felt the same way, just steady useful content laid out without drama, which is exactly what someone trying to learn something quickly needs to find rather than aggressive marketing.
Профессиональная дезинфекция помогла привести помещение в порядок и обеспечить дополнительную санитарную безопасность. Работа выполнена аккуратно и без задержек – https://dezinfection-v-spb.click/deratizaciya/ot-krys/
Easily one of the better explanations I have read on the topic, and a stop at finkglaze pushed it even higher in my mental ranking of useful resources, the kind of site that beats the average not by trying harder but by simply caring more about what it puts out daily which always shows.
Now feeling confident that this site will continue producing work I will want to read, and a look at premiumvalueclick extended that confidence into the future, projecting forward from current quality to expected future quality is something I do for sites I genuinely follow and this one has earned that forward looking trust clearly today.
Honestly enjoyed every minute spent here, that is not something I say lightly, and a look at parcelwhimsy confirmed I will be back, the bar for spending time online is high for me these days but this site clears it without effort which is high praise indeed from this reader who is usually rather demanding.
Worth saying that this is one of the better things I have read on the topic in months, and a stop at dapperaisle reinforced that ranking, the topic is well covered by many sources but few do it with this level of care and the few that do deserve to be flagged so other readers can find them.
https://buyankina.ru/
Picked this site to mention to a colleague who would benefit, and a look at clearcoast added more material I will pass along, recommending sites to colleagues is a higher bar than recommending to friends because the professional context demands more careful curation and this site cleared the professional bar without me having to think.
Compared to the usual results for this kind of search this site stands well above the average, and a quick visit to yornix kept the standard high, you can tell within seconds whether a site is going to waste your time or actually deliver and this one clearly delivers without any false starts.
Glad the writer did not feel the need to argue with imaginary critics in the post itself, and a stop at bravopiers kept the same focused approach going, defensive writing wastes the reader time and confidence on positions that did not need defending and this post has clearly avoided that common failure.
A small thank you note from me to the team behind this work, the post earned it, and a stop at thoughtfullybuiltmarket suggested more thanks would be in order over time, recognising the people who do good writing online is something I try to remember to do because the alternative is silence and silence rewards mediocrity unfortunately.
Came in for one specific question and got answers to three I had not even thought to ask, and a look at tallycove extended that bonus value pattern, the kind of resource that anticipates reader needs rather than just answering the literal question asked is the gold standard and this site reaches it.
Started believing the writer knew the topic deeply by about the second paragraph, and a look at chipbrick reinforced that confidence, the speed at which a writer establishes credibility through their writing is a useful quality signal and this writer establishes it quickly and quietly without resorting to credential dropping or self promotion.
Solid stuff, the kind of post that I will probably refer back to later this month when the topic comes up again, and a look at lemoncrate only confirmed I should bookmark the site as a whole rather than just this single page for future reference and use across coming weeks.
Appreciate that you did not pad this with fluff to hit a word count, the post says what it needs to say and stops, and a look at basteclay did the same, brevity here feels intentional not lazy which is a distinction many writers miss completely sometimes when they are working under deadlines.
Thanks for keeping the writing direct without losing the warmth that makes content feel human, and a stop at refinedconsumerhub carried both qualities forward, balancing professionalism and personality is a rare skill and the writers here have clearly figured out how to consistently land it across many posts which I notice.
Worth saying this site reads better than most paid newsletters I have tried, and a stop at finkglint confirmed that comparison, the bar for free content is often lower than for paid but this site clears the paid bar consistently and that says something about the editorial approach behind the work being published here regularly.
Now feeling slightly more committed to my own careful reading practices having read this, and a stop at eurohilt reinforced that commitment, content that models the kind of attention it deserves is content that calibrates the reader and this site has clearly raised my own bar for what to bring to good writing today.
Going to come back when I have more time to read carefully, the post deserves more than a quick scan, and a stop at lorvana reinforced that, this is the kind of site that rewards a slower read which is hard to find in this fast paced corner of the internet but really worthwhile.
Now noticing the post fit a particular gap in my reading without my having articulated the gap before, and a look at xernita extended that gap filling effect, content that meets needs I had not consciously formulated is content with reader insight and this site has clearly developed that anticipatory editorial sense across many pieces.
Closed the tab and immediately reopened it ten minutes later because I wanted to reread a part, and a stop at brassmarket drew the same return, content that pulls you back after closing it is doing something well beyond the average and worth marking as exceptional in my mental catalogue of reliable sites.
Most of my reading time goes to a small number of trusted sources and this one is now joining that group, and a stop at emberwharf reinforced the group membership, the few sites that earn a place in my regular rotation are sites I expect ongoing returns from and this one has earned that elevated position consistently.
Over the course of reading several posts here a pattern of quality has emerged, and a stop at refinedclickpinghub confirmed the pattern, the difference between sites that hit quality occasionally and sites that hit it consistently is huge and this site has clearly demonstrated the consistent kind through what I have read this morning.
https://stabiline.ru/
Reading the writers other posts after this one suggests the quality is consistent rather than peak, and a stop at curatedpremiumfinds confirmed the consistent quality reading, sites that hold the same level across many pieces rather than peaking on a few are sites with sustainable editorial discipline and this one has clearly developed that.
If I had to defend the time I spend reading independent blogs this site would feature in the defence, and a look at modernvaluescollective reinforced that defensive utility, the ongoing case for non algorithmic reading is one I make to myself periodically and sites like this one provide the actual evidence that supports the case clearly.
Reading this gave me the rare experience of fully agreeing with all the conclusions, and a stop at finkgulf continued that agreement pattern, content that aligns with my existing views without seeming designed to do so is just content that happens to be reasonable and this site reads as reasonable rather than ideological mostly.
During a quiet evening reading session this provided just the right depth without being heavy, and a stop at quickvendor maintained the same evening appropriate weight, content with depth that does not exhaust the reader is content with editorial calibration and this site has clearly figured out how to be substantial without being demanding all the time.
A slim post with substantial content per word, and a look at basteclose maintained the same density, the content per word ratio is something I track informally and this site scores high on that ratio compared to most sources I read regularly which is a quiet indicator of careful editorial work behind the scenes.
Came across this and immediately thought of a friend who would enjoy it, and a stop at everjumbo also reminded me of someone, content that triggers the urge to share is content that has earned my recommendation and this site has earned multiple from me already across different conversations during the week.
Held my interest from the opening line through to the closing thought, and a stop at nookharbor did the same, content that earns sustained attention in an environment full of distractions is doing something right and this site is clearly doing several things right rather than just one or two which I really appreciate.
Useful reading material, the kind I can hand off to someone newer to the topic without worrying about confusing them, and a quick look at cleatbox confirmed the same beginner friendly tone runs throughout the site which is great for sharing with people just starting their learning journey on this particular topic.
Left me wanting to read more rather than feeling burned out, that is a good sign, and a look at nobleaisle confirmed there is plenty more here to explore, the kind of writing that builds appetite rather than killing it which is a rare quality on the modern open internet today across most categories of content.
Thanks for not padding this with the usual filler intros and outros that every other blog seems to require, and a quick visit to premiumlivingstorefront continued that lean approach across more posts, content stripped of waste is content that respects you and I will always come back to that kind of approach.
уборка после ремонта
Came in tired from a long day and the writing held my attention anyway, and a stop at globalinspiredstorefront kept that going, content that can engage a fatigued reader is doing something right because most online reading happens in suboptimal conditions like that one and quality content adapts to it without complaint.
Better than most of the writing I have come across on this topic recently, simpler and more direct, and a look at firhex continued in that same way, a real outlier in a crowded space full of repetitive content that says little while taking up a lot of reader time today which is unfortunate.
Очень благодарны специалистам службы дезинфекции за оперативную помощь. Все было организовано быстро, без лишней бюрократии и длительного ожидания. Результатом остались довольны https://dezinfection-v-spb.click/deratizaciya/podvalov/
Now feeling the quiet pleasure of finding writing that takes itself seriously without being self serious, and a stop at neatmills extended that subtle pleasure, the gap between earnest and pretentious is fine and this site has clearly chosen to land on the earnest side without slipping over into pretentious which is impressive.
Easily one of the better explanations I have read on the topic, and a stop at quelnix pushed it even higher in my mental ranking of useful resources, the kind of site that beats the average not by trying harder but by simply caring more about what it puts out daily which always shows.
Worth flagging that the post handled an angle of the topic I had not seen elsewhere, and a look at bracechord extended that fresh treatment, content that finds underexplored corners of well covered subjects is genuinely valuable and this site has demonstrated that exploratory editorial approach across multiple pieces in my reading sessions today.
Looking through the archives suggests this site has been doing this for a while at this level, and a look at fairfinch confirmed the long term consistency, sites that have maintained quality across years rather than just a recent stretch are sites with serious editorial discipline and this one has clearly been at it for a while.
Found the post genuinely useful for something I was working on this week, and a look at caramelmarket added more material I will reference, content that connects to my actual life and work rather than just being interesting in the abstract is the kind I will pay attention to and return to repeatedly.
Skipped the TLDR thinking I would read everything anyway, and ended up enjoying the path through the full post, and a stop at gablejuno similarly rewarded the patient read, summaries are useful but the journey through good writing is part of what makes the destination feel earned rather than just delivered cleanly.
Just one of those reads that left me feeling slightly more capable rather than overwhelmed, and a look at hopiron kept that empowering feel going, the difference between content that builds the reader up and content that intimidates them is huge and this site clearly knows which side of that line to stand.
Reading this on a difficult day was a small bright spot, and a stop at grebeheron extended that brightness, content that improves a hard day is content that has earned a particular kind of place in my reading habits and this site is occupying that uplifting role for me today which I appreciate clearly.
Now recognising the editorial wisdom of letting some questions remain open at the end, and a look at yourtradingmentor continued that intellectual honesty, content that does not force closure on contested questions is content that respects the limits of knowledge and this site has clearly developed the maturity to know when to leave space.
Once I had read three posts the editorial pattern was clear, and a look at heliofine confirmed the pattern from a fourth angle, sites where the underlying approach reveals itself through accumulated reading rather than being announced are sites with real depth and this one has that quality clearly visible across multiple pieces consistently.
Now feeling mildly impressed in a way I do not quite remember feeling about a blog in a while, and a stop at glazeflask extended that mild impression, content that produces specific positive emotional responses rather than just neutral information transfer is content with extra dimensions and this site has those extra dimensions clearly.
Picked up something useful for a side project, and a look at knollgull added another piece I will incorporate, content that connects to specific projects I am working on is content with practical utility and the practical utility of this site is showing up across multiple posts I have read in the last hour or so.
Picked this post to share in a Slack channel where I knew it would be appreciated, and a look at premiumeverydaygoods suggested I will share more from here later, content worth sharing into a professional context is content that has earned a higher kind of trust than mere personal interest and this site has it.
Felt the writer was being honest with the reader which is rare enough that I want to acknowledge it, and a look at firhush continued that honest feel, content built on actual knowledge rather than aggregated summaries is something I value highly and rarely come across in regular searches on the open internet these days.
Статья о душевых трапах: линейных, точечных и пристенных решениях для душевой зоны без поддона. Разбираются устройство, сухой и мокрый затвор, уклон пола, гидроизоляция, высота монтажа и ошибки, которые приводят к запахам, плохому сливу и протечкам: https://santexnik-market.ru/sliv/dushevye-trapy-ustrojstvo-vidy-i-pravilnyj-montazh-v-dushevoj-zone/
Felt like the writer was speaking directly to someone with my level of curiosity, neither talking down nor showing off, and a stop at modernconsciousmarket kept that comfortable matching going, finding writing that meets you where you are rather than asking you to climb up or stoop down feels great every time it happens.
Top notch writing, every paragraph carries weight and nothing feels like filler, and a stop at celnova reflected that same care, a rare thing on the open web these days where most pages exist for clicks rather than actual reader value or anything close to that which is honestly a real shame.
https://wchf.ru
Worth a quiet moment of recognition for the consistency I have noticed across multiple posts, and a stop at jetivory continued that consistent quality, sites that maintain quality across many pieces rather than peaking on one viral post are sites with real editorial discipline and this one has clearly developed that discipline carefully.
A piece that reads like it was written for me without claiming to be written for me, and a look at flockfine produced the same fit, when the writer audience match clicks naturally without being engineered through demographic targeting you know the writing is solid and this site has that natural fit consistently for me.
Worth flagging that this approach to the topic is fresh without being contrarian, and a stop at clevebound extended the same fresh angle, finding original perspective on familiar subjects is rare and this site has clearly developed its own way of seeing rather than echoing the dominant takes from elsewhere consistently.
Looking at this from the perspective of someone tired of generic content the contrast is striking, and a look at hueheron maintained that distinctive feel, sites with strong editorial identity stand out against the bland background of algorithmic content and this one has clearly developed an identity worth recognising through careful attention.
Reading this in segments because the day was busy, and the post survived the fragmented attention well, and a stop at gablejuno held up similarly under interrupted reading, content that can withstand modern distracted reading patterns rather than requiring a perfect block of focused time is increasingly the kind I prefer.
I appreciate the clarity here, everything is explained in simple terms without unnecessary detail, and after a quick stop at dewdawns the points came together nicely for me, the writing keeps things straightforward and respects the reader from start to finish without ever talking down to anyone.
In the middle of an otherwise scattered day this post landed as a moment of focus, and a stop at grebeknot extended that focused feeling across more pages, content that anchors a fragmented day rather than contributing to the fragmentation is content with real centring effect and this site is providing that anchoring function for me.
My friends would appreciate a few of these posts and I will be sending links accordingly, and a look at protraderacademy added more pages to my share queue, content that earns shares to specific people in specific contexts is content with social utility and this site is generating those targeted shares from me consistently lately.
Generally my comment to other readers about new sites is to wait and see but for this one I would jump to recommend now, and a look at bracecloth reinforced that early recommendation, the speed at which a site earns my recommendation is itself a quality signal and this one has earned mine quickly clearly.
A piece that reads as if the writer trusted readers to fill in obvious gaps, and a look at falconfern continued that respectful approach, content that does not over explain what the reader can infer is content that respects intelligence and this site has clearly chosen to write to capable readers rather than to the lowest common denominator.
A clear case of writing that does not try to do too much in one post, and a look at koalaglade maintained the same scoped discipline, posts that try to cover too much end up covering nothing well and this site has clearly chosen scope discipline as a core editorial principle which shows up clearly in what I read.
Glad I gave this fifteen minutes rather than the usual three minute skim, and a look at heliogust earned the same investment, time spent on quality content is rarely wasted but the reverse is also true and learning which sites deserve which kind of attention is part of being a careful online reader.
Liked the way the post got out of its own way, and a stop at firjuno extended that invisible craft, the best writing you barely notice while reading because it is doing its work without drawing attention to itself and this site has clearly mastered that disappearing act across the pieces I have read.
Really like that the writer trusts the reader to follow simple logic without restating every previous point, and a stop at gleamjuly kept that respect going, treating an audience as capable adults rather than as people who need constant hand holding makes a noticeable difference in the reading experience for me.
Наша компания предлагает удобное оформление справок без очередей и длительного ожидания: https://mc-spravki.site/medicinskaya-spravka-297/
Solid endorsement from me, the writing earns it, and a look at modernlifestylecommerce continues to earn it across the broader site too, the kind of operation that maintains quality across many pages rather than just one viral post is a sign of serious commitment and that is what I see here clearly across what I read.
Skipped the TLDR thinking I would read everything anyway, and ended up enjoying the path through the full post, and a stop at huejuly similarly rewarded the patient read, summaries are useful but the journey through good writing is part of what makes the destination feel earned rather than just delivered cleanly.
Closed it feeling slightly more competent in the topic than I started, and a stop at galagull reinforced that competence boost, real learning is rare in casual online reading but it does happen sometimes and this site managed to make it happen for me today which is genuinely worth pausing to acknowledge.
Glad I stumbled across this post, the explanations actually make sense without needing background knowledge to follow along, and after a stop at modernvaluecorner the same was true there, no assumptions about the reader just clear writing that anyone can understand from the first line right through to the end.
Different in a good way from the cookie cutter content that fills most blogs covering this area, and a stop at bayvendor kept showing me why, original thoughtful writing exists if you know where to look and this site has earned a place on my short list of those rare exceptions worth defending.
Found this via a link from another piece I was reading and the click was worth it, and a stop at grecofinch extended the value across more material, the open web still rewards clicking through citations when the underlying writers care about each other work and this site clearly belongs to that network.
Honestly this hits the sweet spot between detail and brevity, no rambling and no shortcuts, and a quick visit to jetivory kept that going across the related pages, the kind of place that respects your attention without trying to grab it through cheap tactics or attention seeking design choices that get tired fast.
Liked that the post resisted a sales pitch ending, and a stop at flockfine maintained the no pitch approach, content that ends without trying to convert me into a customer or subscriber is content that has confidence in its own value and this site is clearly playing the long game on reader trust.
However measured this site clears the bar I set for sites I take seriously, and a stop at kraftgroove continued clearing that bar, the metrics I use for site quality are admittedly informal but they are consistent and this site has cleared them on multiple measurements across multiple visits which is meaningful for my evaluation.
Comfortable in tone and substantive in content, that is a hard combination to land, and a look at firkit kept that pairing alive across more material, this is what good editorial direction looks like in practice and the team here clearly has someone keeping a steady hand on the wheel across what they decide to publish.
Now organising my browser bookmarks to give this site easier access, and a look at foxarbors earned the same organisational priority, the small acts of digital housekeeping I do for sites I expect to use often are themselves a measure of trust and this site has triggered the trust based housekeeping behaviour from me clearly.
Started reading and ended an hour later without realising the time had passed, and a look at heliohex produced the same time dilation effect, when content makes time feel different the writer has achieved something well beyond the average and this site is producing that experience for me reliably across multiple readings.
Most blog writing on this subject reaches for the same handful of arguments and this post avoided them, and a look at quickcarton continued the original treatment, content that finds its own path through territory other writers have flattened is content with real authorial energy and this site has plenty of that distinctive energy.
Bookmark added without hesitation after finishing, and a look at brinkbeige confirmed I should bookmark the homepage too rather than just this page, the rare site that earns category level trust rather than just single article approval is the kind I want to rely on across many different topics over time.
Easy to recommend without reservations, the site delivers on every promise it implicitly makes, and a look at falconflame kept that same standard going, the kind of consistency that earns trust over time rather than chasing it through aggressive marketing is what I see here and it is appreciated greatly by this particular reader today.
Bookmark added without hesitation after finishing, and a look at glenfir confirmed I should bookmark the homepage too rather than just this page, the rare site that earns category level trust rather than just single article approval is the kind I want to rely on across many different topics over time.
Genuinely well crafted writing, the kind that makes the topic look easier than it actually is, and a look at cliffbeck added even more depth, you can feel the experience behind every line which is something only writers who have been at this for a while can pull off with this level of grace.
Now feeling confident enough in this site to use it as a reference point for evaluating others on the same topic, and a look at hullgale continued the comparison friendly quality, sites that serve as quality benchmarks for their topic are precious and this one has clearly become a benchmark for me on this particular subject area.
Рекомендую ресурс, посвящённый теме вариаторов, их обслуживанию и ремонту. На портале можно найти общие сведения об устройстве этой трансмиссии, возможных неисправностях и методах их диагностики. В материалах сайта рассматриваются различные аспекты эксплуатации вариаторов, что может быть полезно для общего понимания их работы – p1890 honda hr v
Thanks for the breakdown, it gave me a clearer picture of something I had been confused about for a while now, and a stop at galeember closed the remaining gaps in my understanding nicely, no need to hunt around twenty other articles to put the pieces together which is a real time saver.
Quiet confidence runs through the whole post, no need to shout to make the points stick, and a stop at connectforprogress carried that same restrained voice forward, content that respects the reader by trusting its own substance rather than dressing it up in theatrical language is what I look for online and rarely actually find these days.
Honestly enjoyed not being sold anything for the entire duration of the post, and a look at grecoglobe kept that pleasant absence going across more pages, content that exists for its own sake rather than as a funnel to a paid product is increasingly rare and worth supporting where I can find it.
Остались довольны сотрудничеством со службой дезинфекции. Специалисты внимательно отнеслись к нашей ситуации, предложили эффективное решение и качественно выполнили обработку помещения – https://dezinfection-v-spb.click/dezinsekciya/ot-komarov/
Picked this up between two other things I was doing and got drawn in completely, and after modernpurposegoods my original tasks were completely forgotten for a while, content that derails a workflow in a positive way by being more interesting than what you were already doing is rare and worth recognising clearly.
Reading this gave me a quiet moment of intellectual pleasure that I had not been expecting, and a stop at flameeden extended that pleasure across more pages, the unexpected reward of stumbling into careful writing is one of the small ongoing pleasures of reading the open web and this site is delivering it reliably.
Now planning to recommend this site in a context where my recommendations are taken seriously, and a stop at kraftkale confirmed I should make that recommendation soon, the small but real act of recommending content into spaces where my taste matters is something I take seriously and this site is worth the recommendation.
Found this through a search that was generic enough I did not expect quality results, and a look at heliojuly continued the surprisingly good experience, search engines occasionally still surface excellent independent content if you scroll past the obvious paid and high authority results which is reassuring to remember sometimes.
Thanks for keeping the writing direct without losing the warmth that makes content feel human, and a stop at jibfig carried both qualities forward, balancing professionalism and personality is a rare skill and the writers here have clearly figured out how to consistently land it across many posts which I notice.
If quality blog writing is dying as people sometimes claim then this site is one piece of evidence that it has not died yet, and a look at humgrain extended that evidence, the broader cultural question about online writing has empirical answers in specific sites and this one is contributing to a more optimistic answer overall.
Now adding this to a list of sites I want to see flourish, and a stop at globeflame reinforced that wish, the few sites I actively root for are sites that produce the kind of work I want more of in the world and this one has joined that small list based on what I have read so far.
Following a few of the internal links revealed more posts of similar quality, and a stop at falconkite added more to that growing pile, sites where internal links lead to more good content rather than to more of the same recycled material are sites with depth and this one has clearly built that depth carefully.
Closed the tab feeling I had spent the time well, and a stop at eliteledges extended that feeling across more pages, the test of whether time on a site was well spent is one I apply silently after closing tabs and very few sites pass it but this one passed it cleanly today afternoon clearly.
Reading this on a long flight and finding it the best thing I read across hours of trying, and a stop at galehelm kept the streak going, when content beats long flight reading you know it has substance because flight reading is a hard test of a piece given the alternatives available everywhere.
Beats most of the alternatives on the topic by a noticeable margin, and a look at flockgala did not change that at all, this is one of the better corners of the open internet for this kind of content and I am glad I clicked through rather than skipping past quickly like I usually do.
Honestly this hits the sweet spot between detail and brevity, no rambling and no shortcuts, and a quick visit to purebeautyoutlet kept that going across the related pages, the kind of place that respects your attention without trying to grab it through cheap tactics or attention seeking design choices that get tired fast.
Felt the writer did the homework before publishing, the references hold up, and a look at gridivory continued that documented care, content with traceable claims rather than vague assertions is the kind I trust and the lack of bald assertion in this post is one of its quietly impressive qualities for me.
Thank you for the genuine effort here, it shows in every paragraph and not just the headline, and after my visit to granitevendor I was sure this site cares about getting things right rather than chasing clicks, which is the main reason I will come back later this week to read more.
Really like that there are no exclamation marks or all caps shouting throughout the post, and a quick visit to knicknook maintained the same calm voice, restraint in punctuation signals confidence in the content and this site clearly trusts its substance to do the persuading rather than relying on typographic emphasis.
Очень понравился профессиональный подход к продвижению сайта. Специалисты не использовали шаблонные решения, а разработали стратегию именно под наш проект. Уже через несколько месяцев сайт начал приносить больше заявок: https://msk.mihaylov.digital/marketingovyj-audit-sajta/
Appreciate the thoughtful approach, the writer clearly took time to make this readable for someone who is not already an expert, and a look at flankgate kept that going nicely, easy on the eyes and easy on the brain which is always a winning combination when reading on a busy day.
Big thanks to whoever wrote this, you saved me a lot of time hunting for the same info on other sites, and a stop at kraftkilt only added more useful detail without going off topic, that kind of focus is honestly hard to come across these days when most posts wander everywhere.
A particular kind of restraint shows up in the writing, and a look at intentionalconsumerexperience maintained the same restraint across pages, knowing what not to say is just as important as knowing what to say and this site has clearly developed strong instincts on both sides of that editorial line throughout pieces I have read.
Closed and reopened the tab three times before finally finishing, and a stop at humivy held my attention straight through, sometimes content fights for time against my own distraction and the times it wins say something positive about its quality and this post clearly won that fight today afternoon for me.
Glad I gave this a chance instead of bouncing on the headline, and after clingchee I was certain I had made the right call, snap judgements based on titles miss a lot of good content and this is a reminder to slow down and check things out before scrolling past in a hurry.
Solid value packed into a relatively short post, that takes skill, and a look at galekraft continues the dense useful content across more pages, this site clearly understands that respecting reader time is itself a form of generosity which is something most blog operations seem to have forgotten lately across the wider open web.
Quietly the writers approach to the topic differs from the dominant takes I have been encountering, and a stop at helioketo extended that distinctive approach, content that maintains a different perspective without explicitly arguing against the dominant ones is content with confident editorial identity and this site has that confidence throughout pieces.
Glad to find a site whose links lead somewhere worth going rather than back to itself for SEO juice, and a stop at glyphfig kept that generous outbound feel, citing other peoples work with real respect rather than just for ranking signals is a sign of an honest operation worth supporting going forward.
However casually I came to this site I have ended up reading carefully, and a look at fancyfinal continued earning that careful reading, the conversion from casual visitor to careful reader is something content earns rather than demands and this site has accomplished that conversion for me over the course of just a few pieces.
I learned more from this short post than from longer articles I read earlier today, and a stop at brightcartfusion added even more useful detail without going off topic, this site clearly knows how to keep things focused without sacrificing depth which is a hard balance to strike for any writer.
Now sitting with the thoughts the post triggered rather than rushing on to the next thing, and a stop at grifffume extended that reflective pause, content that earns time for thought after closing the tab is content of higher value than the merely interesting and this site has clearly produced that lasting effect today.
Really appreciate the confidence to make a clear point rather than hedging everything, and a quick visit to jouleforge maintained the same direct stance, writing that takes positions rather than equivocating is more useful even when the positions are debatable because at least the reader has something to react to clearly.
I learned more from this short post than from longer articles I read earlier today, and a stop at duetdrives added even more useful detail without going off topic, this site clearly knows how to keep things focused without sacrificing depth which is a hard balance to strike for any writer.
уборка после ремонта спб
Reading this prompted me to clean up some old notes related to the topic, and a stop at flankhaven extended that organising urge, content that triggers personal organisation rather than just consuming attention is content with motivating energy and this site has the kind of clarity that prompts active follow up rather than passive consumption.
However casually I came to this site I have ended up reading carefully, and a look at maplevendor continued earning that careful reading, the conversion from casual visitor to careful reader is something content earns rather than demands and this site has accomplished that conversion for me over the course of just a few pieces.
Reading this in the morning set a good tone for the day, and a quick visit to huskgenie kept that good tone going, content can do that sometimes when it hits the right notes and finding sites that consistently strike that tone is something I have learned to recognise and reward with regular visits.
A piece that was confident enough to leave some questions open rather than forcing closure, and a look at krillflume continued that intellectual honesty, content that admits the limits of its scope is more trustworthy than content that pretends to total understanding and this site has the right calibration on certainty consistently.
Glad the writer did not feel compelled to cover every possible angle of the topic, focus is a virtue, and a stop at tealvendor reflected the same disciplined scope, knowing what to leave out is half of what makes good writing good and this post has clearly been edited with that principle in mind.
Spent a few minutes here and came away with a clearer picture of the topic, the writing keeps things simple without dumbing them down, and after a stop at floeiron the rest of the points lined up neatly which is something I appreciate when I am short on time and need answers fast.
Now wondering how the writers calibrated the level of detail so well, and a stop at galloheron continued the same calibration, the right level of detail is one of the harder editorial calls in any piece and this site has clearly developed an instinct for it through what I assume is years of careful practice publicly.
Worth pointing out the careful word choice in this post, no buzzwords and no jargon, and a look at consciouslivingmarketplace continued that disciplined vocabulary, sites that resist the pull of trendy language are sites that will read well in five years and this one is clearly built for that kind of long durability.
The way the post stayed on topic throughout without going on tangents was really refreshing, and a look at heliokindle kept that focused approach going, discipline like this in writing is rare and worth recognising because most writers cannot resist wandering off into related subjects that dilute their main point and confuse readers along the way.
Reading this with my morning coffee turned into reading the related posts with my morning coffee, and a stop at silverharborvendorparlor stretched the morning further, content that pulls breakfast into a reading session rather than just accompanying it is content that has earned a higher claim on my attention than the average article does.
Easy to recommend without reservations, the site delivers on every promise it implicitly makes, and a look at groovehale kept that same standard going, the kind of consistency that earns trust over time rather than chasing it through aggressive marketing is what I see here and it is appreciated greatly by this particular reader today.
Came here from another site and ended up exploring much further than I planned, and a look at gnarfrost only encouraged more exploration, the kind of place where one click leads to another not through manipulative design but through genuinely interesting content is rare and worth highlighting when found like this somewhere on the open internet.
Spent a few minutes here and came away with a clearer picture of the topic, the writing keeps things simple without dumbing them down, and after a stop at marketpearl the rest of the points lined up neatly which is something I appreciate when I am short on time and need answers fast.
Closed the tab and immediately reopened it ten minutes later because I wanted to reread a part, and a stop at fancyhale drew the same return, content that pulls you back after closing it is doing something well beyond the average and worth marking as exceptional in my mental catalogue of reliable sites.
Going to share this with a friend who has been asking the same questions for a while now, and a stop at pebbleaisle added a few more pages I will pass along too, this is the kind of generous information that earns a small thank you from me right now and again later this week.
Worth saying this site reads better than most paid newsletters I have tried, and a stop at flankisle confirmed that comparison, the bar for free content is often lower than for paid but this site clears the paid bar consistently and that says something about the editorial approach behind the work being published here regularly.
Now noticing that the post benefited from being neither too short nor too long for its content, and a look at harborlark continued that calibration of length, sites that match length to content rather than padding to hit some target are sites that respect both their material and their readers and this site does both.
Considered alongside other sources I have been reading this one consistently rises to the top, and a stop at grovefarms maintained that top ranking, the informal ongoing comparison between sources is something I do whenever reading on a topic and this site keeps coming out near the top of those comparisons over many sessions.
Just want to flag that this was useful and not bury the appreciation in caveats, and a look at kudosember earned the same direct praise, recognising good work without hedging it with criticism is something I try to practice because over qualified compliments tend to read as backhanded and miss the point sometimes.
Found the section structure particularly thoughtful, and a stop at mistvendor suggested the same care across the broader site, structural choices guide the reader through the material in ways most people do not consciously notice but feel the absence of when those choices are made carelessly or not at all.
Sets a higher bar than most of what shows up in search results for this topic, and a look at joustglade did not lower that bar at all, in fact it confirmed the impression, this is the kind of consistency that earns a place in regular rotation for serious readers instead of casual scrollers passing through.
Reading this on a difficult day was a small bright spot, and a stop at gallohex extended that brightness, content that improves a hard day is content that has earned a particular kind of place in my reading habits and this site is occupying that uplifting role for me today which I appreciate clearly.
Now appreciating that the post did not require me to agree with the writer to find it valuable, and a look at clingclasp maintained the same useful regardless of agreement quality, content that informs even when it does not convince is content with broader utility and this site reads as useful even when I disagree.
генеральная уборка
Really appreciate the lack of pop ups, modals, cookie banners stacking on top of each other, and a quick visit to maplegrovemarketparlor confirmed the same clean approach across the rest of the site, technical decisions about user experience are part of what makes content actually pleasant to engage with for sure.
Took a screenshot of one section to come back to later, and a stop at helmkit prompted another saved tab, the urge to capture and revisit specific pieces of content is something I rarely feel but when I do it tells me the work is worth more than the average passing read for sure.
Took some notes for a project I am working on, and a stop at thoughtfulcommerceplatform added more raw material to those notes, content that contributes to my own creative work rather than just being interesting in the moment is the kind I value most and the kind I will keep coming back to repeatedly.
Bookmarking this for later, the kind of resource I want to keep nearby, and a quick look at grovefalcon confirmed the rest of the site is worth the same treatment, definitely going into my reference folder for the next time the topic comes up at work or in conversation with someone who asks.
Thanks for the clean writing, no broken sentences and no awkward translations like some other sites have, and a quick stop at gnarkit kept that polish going nicely, it really does make a difference when a reader can move through a page without tripping on every line or going back to reread.
Pass this along to anyone you know dealing with similar questions, the answers here are clear, and a stop at flumelake adds even more useful material, this is the kind of resource that deserves to circulate widely rather than getting lost in the constant churn of new content online that buries good work daily.
Better signal to noise ratio than most places I check on this kind of topic, and a look at iconflank kept that going, every paragraph here carries something worth reading rather than padding out the page to hit some arbitrary length target that search engines reward but readers ignore as soon as they notice it.
Выбор сценария для новогоднего корпоратива
Really appreciate that the writer did not stretch the post to hit some target word count, the points end when they are made, and a stop at flankivory reflected the same discipline, brevity is generosity in disguise and this site has clearly figured that out far better than most blog operations have.
A thoughtful read in a week that has been mostly noisy, and a look at iciclemart carried that thoughtful quality across more pages, finding pockets of considered writing in a week of distractions is one of the small wins of careful curation and this site is providing those pockets at a sustainable rate.
Reading this on a phone at a coffee shop and finding it perfectly suited to that context, and a stop at clevergoodszone continued the comfortable mobile experience, content that works across reading conditions without compromising on substance is increasingly important and this site has clearly thought about the whole reader experience here.
Skipped breakfast still reading this and finished hungry but satisfied, and a stop at gambitfort kept me past breakfast time, content that displaces basic biological needs is content with serious attentional pull and the writers here are clearly capable of producing that level of engagement which is genuinely impressive these days.
Worth recognising the absence of the usual blog tropes here, and a look at fawnetch continued that fresh quality, sites that avoid the standard moves of the medium read as more original even when the content is on familiar topics and this one has clearly chosen its own path through the conventional terrain skilfully.
Well done, the kind of post that makes you slow down and actually read instead of skimming for keywords, and a look at honeymarket kept me reading carefully too, that is a sign of writing that has been crafted rather than churned out for an algorithm to see today and tomorrow.
Glad to find something on this topic that does not start with three paragraphs of throat clearing before getting to the point, and a stop at draftglades also dives right in, respect for the readers time shows up in small editorial choices like this and they add up to a real difference quickly.
Now recognising the post as a rare example of careful writing on a topic that mostly receives careless treatment, and a stop at silkgrovevendorroom extended that contrast with the average elsewhere, content that highlights how much the average is settling for low quality is content that has both internal merit and external value as a benchmark.
Как организовать корпоративное мероприятие для большой компании
A nicely understated post that does not shout for attention, and a look at guavaflank maintained the same quiet quality, understatement is a stylistic choice that distinguishes serious writing from attention seeking writing and this site has clearly committed to the understated approach as a core editorial value rather than just a phase.
Taking the time to read carefully here has been worthwhile for the past hour, and a look at depotglow extended the worthwhile reading, the calculation of return on reading time spent is something I do informally and this site has been producing positive returns across multiple sessions during the last week of regular visits and reads.
Took something from this I did not expect to find, and a stop at herbfife added another unexpected useful piece, content that exceeds expectations rather than just meeting them is the kind that builds enthusiasm and earns repeat visits without any explicit ask from the writer or platform behind the work being read.
Now adding this to a short list of sites I would defend in a conversation about the modern web, and a look at idleflint reinforced that defence list, the few sites that serve as evidence the web can still produce good things are precious and this one has clearly joined that small list of exemplary sites.
Now thinking the topic is more interesting than I had given it credit for, and a stop at flaskkelp continued that elevated interest, content that revives my curiosity about subjects I had set aside is doing genuine work in the structure of my interests and this site is providing that revivifying effect today actually.
Picked a single sentence from this post to remember, and a look at oasiscrate gave me another to keep, content that produces memorable lines is doing more than just transferring information and the small selection of sentences I keep from each reading session is one of the actual returns I get from reading carefully.
Felt the writer respected the topic without being precious about it, and a look at globalcuratedgoods continued that respectful but unfussy treatment, finding the right register for serious topics is hard and this site has clearly figured out how to take the topic seriously while still being readable for casual visitors regularly.
клининг после ремонта москва
Worth flagging that the writing rewarded a second read more than I expected, and a look at gambitgulf produced the same second read benefit, content with hidden depths that emerge only on careful rereading is rare in the modern blog space and this site has clearly invested in that level of compositional density throughout.
Closed it feeling slightly more competent in the topic than I started, and a stop at bettershoppingchoice reinforced that competence boost, real learning is rare in casual online reading but it does happen sometimes and this site managed to make it happen for me today which is genuinely worth pausing to acknowledge.
Quietly building a case in my head for why this site deserves more attention than it currently seems to receive, and a look at gildvendor reinforced the case, the gap between quality and recognition is a recurring frustration in independent online content and this site is one of the cases that seems particularly egregious to me today.
Quietly the post solved something I had been turning over without quite knowing how to phrase the question, and a look at clipchime extended that quiet solving, content that addresses unformulated needs is content with reader insight and this site has demonstrated that insight at a high rate across the pieces I have read recently.
Got pulled in by the headline and stayed because the content actually delivered on the promise, and a stop at olivevendor kept that trust intact, when a site lives up to its own framing it earns the right to keep showing up in my browser tabs going forward indefinitely from here on out really.
Reading more of the archives is now on my plan for the weekend, and a stop at fernbureau confirmed the archive worth the time, the rare archive worth a dedicated reading session rather than just casual sampling is the rare archive of serious work and this site has clearly produced enough of that work to warrant the deeper exploration.
Better than the average post on this subject by some distance, and a look at fluxhusk reinforced that, you can tell within the first paragraph that the writer here actually cares about the topic rather than just covering it for the sake of having something to publish that week or that day.
Now thinking the topic is more interesting than I had given it credit for, and a stop at orchardharborvendorparlor continued that elevated interest, content that revives my curiosity about subjects I had set aside is doing genuine work in the structure of my interests and this site is providing that revivifying effect today actually.
Now appreciating that I did not feel exhausted after reading, and a stop at fawngate extended that energising quality, content that leaves me with more attention than it consumed is rare and the gap between draining and energising content is real over the course of a typical day spent reading widely online.
Thanks for taking the time to write this, it is clear that some thought went into how each point would land, and after I went through domelounges I had a better grip on the topic, real value without the usual marketing noise people have to put up with online when searching for answers.
Really appreciate the lack of pop ups, modals, cookie banners stacking on top of each other, and a quick visit to idleketo confirmed the same clean approach across the rest of the site, technical decisions about user experience are part of what makes content actually pleasant to engage with for sure.
I really like the calm tone here, it does not push anything on the reader, and after I went through guavahilt I felt the same way, just steady useful content laid out without drama, which is exactly what someone trying to learn something quickly needs to find rather than aggressive marketing.
Как получить социальную помощь на похороны в Московской области
Just enjoyed the experience without needing to think about why, and a look at flintgala kept that effortless feeling going, sometimes the best content is invisible in the sense that you forget you are reading until you reach the end and realise time has passed without you noticing it pass naturally.
Bookmark earned and folder updated to track this site separately, and a look at seothread confirmed the folder upgrade was the right call, organising my reading list so that good sites do not get lost in a sea of casual bookmarks is something I do more carefully now and this site warranted its own spot.
Beats most of the alternatives on the topic by a noticeable margin, and a look at herbharp did not change that at all, this is one of the better corners of the open internet for this kind of content and I am glad I clicked through rather than skipping past quickly like I usually do.
Generally I am cautious about recommending sites on first encounter but this one warrants the exception, and a look at livzaro reinforced the exception making, the rare site that justifies breaking my normal cautious approach is the rare site worth flagging early and this one has prompted exactly that early flagging response from me.
Honestly enjoyed reading this more than I expected to when I first clicked through, and a stop at gambithusk kept that pleasant surprise going, sometimes you stumble onto a site that just clicks with how you like to read and this is one of those for me right now today which is great.
Granted my mood today might be elevating my reading experience but I still think this is genuinely good, and a stop at intentionallysourcedgoods reinforced that even discounted assessment, controlling for the mood adjustment that affects content perception this site still reads as substantively above average across multiple pieces I have read carefully today.
statistiche live crazy time [url=https://crazytimeee.com/]https://crazytimeee.com/[/url]
online casino monopoly live [url=https://www.monopoly-live-bd.com/]https://monopoly-live-bd.com/[/url]
monopoly big win today result live youtube [url=http://monopoly-live-bangladesh.com/]https://monopoly-live-bangladesh.com/[/url]
Worth a quiet moment of recognition for the consistency I have noticed across multiple posts, and a stop at discovernewworld continued that consistent quality, sites that maintain quality across many pieces rather than peaking on one viral post are sites with real editorial discipline and this one has clearly developed that discipline carefully.
crazy time account [url=https://crazy-timez.com/]https://crazy-timez.com/[/url]
Worth marking this site as one to come back to deliberately rather than by accident, and a stop at urbanmixo reinforced that intention, the difference between sites I find again by chance and sites I return to on purpose is meaningful and this one has clearly moved into the deliberate return category for me.
solana casino online [url=solanagxy.com]https://solanagxy.com/[/url]
A piece that demonstrated competence without performing it, and a look at venxari maintained the same self assured but unshowy register, the gap between competence and performance of competence is one I track and this site has clearly chosen to demonstrate rather than perform which I find much more persuasive as a reader.
Appreciated how the post felt complete without overstaying its welcome, and a stop at harborpick confirmed that economical approach runs across the site, knowing when to stop is a skill many writers never develop but here the discipline is obvious and welcome from the perspective of a busy reader trying to learn things efficiently.
Picked this up between two other things I was doing and got drawn in completely, and after dealvilo my original tasks were completely forgotten for a while, content that derails a workflow in a positive way by being more interesting than what you were already doing is rare and worth recognising clearly.
crazy time live demo [url=https://crazy-time-rome.com/]crazy time live demo[/url].
Thanks for the readable length, I finished it without checking how much was left, and a stop at lunarvendor kept me reading the same way, when I stop noticing the length of a piece because the content is engaging enough to sustain attention without willpower the writer has done their job well today.
The whole experience of reading this was pleasant from start to finish, no pop ups and no annoying interruptions, and a look at rovnero continued that clean experience, technical choices about page design matter for the reader and this site clearly cares about the small details that add up to comfort across multiple visits.
Took a screenshot of one section to come back to later, and a stop at melvizo prompted another saved tab, the urge to capture and revisit specific pieces of content is something I rarely feel but when I do it tells me the work is worth more than the average passing read for sure.
Came across this through a roundabout path and now it is on my regular rotation, and a stop at fernpier sealed that decision, the open web still produces serendipitous discoveries when you let the citations and references guide you rather than relying purely on algorithmic feeds for new content recommendations always.
888starz casino [url=https://colindaylinks.com/]https://colindaylinks.com/[/url]
Now thinking about how to apply some of this to a project I have been planning, and a look at boldcartstation added more material for the planning, content that connects to my actual creative work rather than just being interesting in the abstract is the kind that earns priority placement in my reading rotation consistently going forward.
Pass this along to colleagues if the topic comes up, the framing here is sensible, and a stop at igloohaze adds more useful angles to share, the kind of content that improves conversations rather than just feeding them is what makes a resource genuinely valuable in professional contexts going forward over time and across project boundaries too.
Glad the writer kept this short rather than padding it out, the points stand on their own without needing extra context, and a look at gulfflux kept the same approach going, brevity is a sign of confidence in the substance and the team here clearly trusts their content to land without filler.
Easy to recommend, the content speaks for itself without needing additional praise from me, and a stop at flockergo only adds more reasons to send people this way, the kind of generous resource that benefits its readers without demanding anything in return is increasingly rare and worth recognising clearly today across the broader open internet.
Recommended to anyone working in or curious about this area, the depth and clarity combine well, and a look at bazariox keeps that going across more pages, the kind of site that earns regular visits rather than chasing trends has my respect because it suggests genuine commitment to the topic itself rather than to chasing trends.
Генеральная уборка
Appreciate the practical examples, they made the abstract points easier to grasp, and a stop at walnutvendor added more of the same, this site clearly understands that real examples beat empty theory every single time which is the mark of a writer who knows their audience well and respects their time.
Skipped to a specific section because I knew that was the question I had, and the answer was clean, and a stop at knackpacts similarly delivered targeted answers without burying them, content engineered for readers who arrive with specific needs rather than open ended browsing is increasingly valuable in a search heavy reading environment.
During a reading session that included several other sources this one stood out, and a look at molzino continued the standout quality, the side by side comparison of sources during research is a useful exercise and this site has been winning those comparisons for me consistently across multiple research sessions during the last week.
Now recognising the specific pleasure of reading writing that shows real care for sentence shapes, and a look at feathalo extended that craft pleasure, sentence level writing quality is something most blog content ignores entirely and this site has clearly invested in the prose layer alongside the substance which is rare today.
Speaking as someone who reads a lot on this topic this site has earned a high position in my source rankings, and a stop at gamerember reinforced that ranking, the informal ranking of sources for a topic is something I maintain mentally and this site has moved into the upper portion of those rankings clearly.
Worth every minute of the time spent reading, and a stop at qarnexo extends that value across more pages, in a media environment where most content is engineered to waste attention this site stands out by treating reader time as something valuable rather than something to be exploited and stretched as far as possible.
Honestly impressed, did not expect to find this level of care on the topic, and a stop at lomqiro cemented the impression, you can tell within the first few paragraphs whether a site is going to be worth the time and this one delivered on that early promise nicely throughout the rest of what I read.
Speaking as someone who reads a lot on this topic this site has earned a high position in my source rankings, and a stop at foamhull reinforced that ranking, the informal ranking of sources for a topic is something I maintain mentally and this site has moved into the upper portion of those rankings clearly.
Now appreciating that the post did not require me to agree with the writer to find it valuable, and a look at heronfoil maintained the same useful regardless of agreement quality, content that informs even when it does not convince is content with broader utility and this site reads as useful even when I disagree.
Took the time to read every paragraph rather than skimming for the punchline, and a quick visit to clipchoice earned the same careful attention from me, that is the highest signal I can give about content quality because my default mode is rapid scanning rather than deliberate reading on most pages.
Really appreciate that the writer did not assume I would read every other related post first, and a look at urbanrivo kept that self contained feel going where each piece can stand alone, accessibility for new readers is a sign of generous editorial thinking and this site has clearly invested in that approach.
Glad I stumbled across this post, the explanations actually make sense without needing background knowledge to follow along, and after a stop at boldtrendmarket the same was true there, no assumptions about the reader just clear writing that anyone can understand from the first line right through to the end.
Great work on keeping things readable, the post never drags or repeats itself which I really appreciate, and a stop at venxari added a bit more context that fit naturally with what was already said here, no need to read everything twice to get the point being made today.
Reading this prompted a small redirection in something I was working on, and a stop at yieldmart extended that redirecting influence, content that affects my actual work rather than just my thinking has the highest practical impact and this site is providing that level of influence for me at a sustainable rate apparently.
Worth pointing out that the writer made the topic feel more interesting than I had been expecting, and a look at elevateddailyclickping continued that elevation effect, content that improves the apparent quality of its subject through skilled treatment is doing something real and this site has clearly developed that kind of editorial alchemy throughout.
Reading this gave me confidence to make a decision I had been putting off, and a stop at firminlet reinforced that confidence, content that translates into action in my own life rather than just informing it is content with the highest practical value and this site is generating that action level utility for me lately.
Felt the writer respected me as a reader without making a show of doing so, and a look at clevercartcorner continued that quiet respect, this is the kind of small but meaningful detail that separates the sites I bookmark from the ones I close after a single skim and never return to again no matter how interesting the headline.
Took a quick scan first and then went back to read properly because the post deserved it, and a stop at groveaisle kept me reading carefully too, the kind of writing that earns a slower second pass rather than getting skimmed and forgotten is something I value highly when I happen to find it.
A piece that read as if the writer was thinking carefully rather than just typing fluently, and a look at irisetch continued that considered quality, the difference between fluent typing and careful thinking shows up in writing and this site reads as the product of thought rather than just the product of language fluency apparently.
Pleasant surprise, the post delivered more than the headline promised, and a stop at dealvilo continued that pattern of under promising and over delivering, the rarest combination on the modern web where most content does the opposite by promising the world and delivering thin recycled summaries instead each time you click on something interesting.
Decided after reading this that I would check this site weekly going forward, and a stop at rovqino reinforced that commitment, deciding to add a site to a regular rotation requires meeting a quality bar that very few places clear and this one cleared it cleanly without any noticeable effort or marketing push behind it.
Honestly enjoyed not being sold anything for the entire duration of the post, and a look at gulfholm kept that pleasant absence going across more pages, content that exists for its own sake rather than as a funnel to a paid product is increasingly rare and worth supporting where I can find it.
Halfway through reading I knew this would be one to bookmark, and a look at bazmora confirmed that early intuition, when bookmark intent forms before finishing a post you know the writing has cleared a quality bar that most content fails to clear and this site has cleared it on multiple visits already.
During a quiet evening reading session this provided just the right depth without being heavy, and a stop at melvizo maintained the same evening appropriate weight, content with depth that does not exhaust the reader is content with editorial calibration and this site has clearly figured out how to be substantial without being demanding all the time.
Honestly enjoyed every minute spent here, that is not something I say lightly, and a look at gapherb confirmed I will be back, the bar for spending time online is high for me these days but this site clears it without effort which is high praise indeed from this reader who is usually rather demanding.
Ended up here on a wandering afternoon and was glad I stayed for the read, and a stop at lorqiro extended the wandering into a proper exploration of the site, the kind of place that rewards aimless clicking with something genuinely interesting rather than the shallow content that mostly populates the modern open web.
Well structured and easy to read, that combination is rarer than people think, and a stop at urbanrova confirmed the same standard runs across the rest of the site, definitely the kind of place I will be coming back to when this topic comes up in conversation later again over the weeks ahead.
Клининговые услуги москва
Выбор ритуальных услуг и составление договора
Ended up here on a wandering afternoon and was glad I stayed for the read, and a stop at buyplusshop extended the wandering into a proper exploration of the site, the kind of place that rewards aimless clicking with something genuinely interesting rather than the shallow content that mostly populates the modern open web.
A piece that exhibited the kind of patience that good writing requires, and a look at neatglyphs continued that patient quality, hurried writing is easy to spot and this site reads as having been written without time pressure which produces a different feel than the rushed content that dominates much of the modern blog space.
Strong recommendation from me, anyone curious about the topic should make time for this, and a look at herongait only sharpens that recommendation further, the kind of resource that holds up against careful scrutiny rather than crumbling at the first critical question is rare and worth pointing other people toward when the topic comes up.
Speaking as someone who reads a lot on this topic this site has earned a high position in my source rankings, and a stop at vinmora reinforced that ranking, the informal ranking of sources for a topic is something I maintain mentally and this site has moved into the upper portion of those rankings clearly.
Different in a good way from the cookie cutter content that fills most blogs covering this area, and a stop at irisgusto kept showing me why, original thoughtful writing exists if you know where to look and this site has earned a place on my short list of those rare exceptions worth defending.
Genuinely well crafted writing, the kind that makes the topic look easier than it actually is, and a look at featlake added even more depth, you can feel the experience behind every line which is something only writers who have been at this for a while can pull off with this level of grace.
If I had to summarise the editorial sensibility of this site in a few words it would be careful and human, and a look at shopwidestore extended that summary feeling, capturing the essence of a sites approach in brief is hard but this site has a clear enough identity that the summary comes naturally enough.
The tone stayed consistent across the whole post which is harder than it looks for longer pieces, and a look at flareaisle continued the same voice, this kind of editorial consistency is a sign of either a single careful writer or a tightly run team and either is impressive today across the broader media environment.
A small thank you note from me to the team behind this work, the post earned it, and a stop at tidevendor suggested more thanks would be in order over time, recognising the people who do good writing online is something I try to remember to do because the alternative is silence and silence rewards mediocrity unfortunately.
Comfortable read, finished it without realising how much time had passed, and a look at baznora pulled me into more pages the same way, the absence of friction in good content lets time disappear and that is one of the highest compliments I can pay any piece of writing I find online during a regular search session.
Worth saying that the quiet confidence of the writing is what landed first, and a look at globalculturemarket continued that quiet quality, confident writing without the loud display of confidence is a rare combination and this site has clearly developed both the knowledge and the editorial restraint to land that combination consistently.
Liked the natural conversational tone throughout, never stiff and never overly casual either, and a stop at foilfrost kept that comfortable middle ground going, finding a tone that respects the reader without becoming distant or overly familiar is harder than it sounds and this site nails that balance consistently across many different pieces.
Speaking as someone who reads a lot on this topic this site has earned a high position in my source rankings, and a stop at gulfkoala reinforced that ranking, the informal ranking of sources for a topic is something I maintain mentally and this site has moved into the upper portion of those rankings clearly.
Now setting aside time on my next free afternoon to read more from the archives, and a stop at shoprova confirmed that time will be well spent, the rare site whose archive deserves a dedicated reading session rather than just casual sampling is the kind of resource worth scheduling around and this one qualifies clearly.
A piece that built up gradually rather than front loading its main points, and a look at gapjumbo maintained the same gradual structure, content that trusts the reader to reach conclusions through accumulating reasoning is more persuasive than content that announces conclusions and then defends them and this site uses the persuasive approach.
Came away with a small but real shift in perspective on the topic, and a stop at dealzaro pushed that shift a bit further, the kind of subtle reframing that good writing does to a reader without making a big deal of it is something I always appreciate when it happens which is sadly not that often.
Stands out for actually being useful instead of just being long, and a look at molzino kept that going, length without value is the default mode of most blogs these days but this site has clearly chosen a different path which I respect a lot as a reader who values careful editing decisions like that.
Generally I do not leave comments but this post merits a small note, and a stop at lorzavi extended that comment worthy quality, the urge to actively contribute to a sites community rather than passively consume from it is something specific content provokes and this site has provoked that engagement urge from me today.
Worth pointing out that the writer made the topic feel more interesting than I had been expecting, and a look at mapleaisle continued that elevation effect, content that improves the apparent quality of its subject through skilled treatment is doing something real and this site has clearly developed that kind of editorial alchemy throughout.
Came across this looking for something else entirely and ended up reading it through twice, and a look at qavlizo pulled me deeper into the site than I planned, the writing has a way of holding attention without resorting to manipulative cliffhangers or vague promises that never get delivered later down the page.
Reading this in a moment of low energy still kept my attention, and a stop at clockbrace continued that engagement under suboptimal conditions, content that survives the reader being tired is content with extra reserves of pull and this site has the kind of writing that holds up even when I am not at my reading best.
Quality writing that respects the reader’s intelligence without overloading them, and a quick look at urbanso reflected that approach, a balanced thoughtful site that earns trust by being consistent rather than by shouting about how trustworthy it is which is the usual approach online sadly across most content categories.
Found the post genuinely useful for something I was working on this week, and a look at easybuyingcorner added more material I will reference, content that connects to my actual life and work rather than just being interesting in the abstract is the kind I will pay attention to and return to repeatedly.
Glad the writer did not feel compelled to cover every possible angle of the topic, focus is a virtue, and a stop at ironfleet reflected the same disciplined scope, knowing what to leave out is half of what makes good writing good and this post has clearly been edited with that principle in mind.
Speaking carefully because I do not want to overstate things this site is genuinely above average across multiple measurements, and a stop at vuzmixo continued the above average performance, the calibration of judgement against potential overstatement is something I take seriously and this site clears the higher bar even after that calibration applies.
Speaking as someone who reads a lot on this topic this site has earned a high position in my source rankings, and a stop at herongrip reinforced that ranking, the informal ranking of sources for a topic is something I maintain mentally and this site has moved into the upper portion of those rankings clearly.
Adding this to my list of go to references for the topic, and a stop at mexqiro confirmed the rest of the site deserves the same, definitely the kind of resource that earns its place rather than getting forgotten the moment the next interesting article shows up in my feed somewhere else on the web.
Glad to find a site whose links lead somewhere worth going rather than back to itself for SEO juice, and a stop at freshcartoptions kept that generous outbound feel, citing other peoples work with real respect rather than just for ranking signals is a sign of an honest operation worth supporting going forward.
Started thinking about my own writing differently after reading, and a look at flarefest continued that reflective effect, content that influences how I work rather than just informing what I know is content with the highest kind of impact and this site has triggered some of that reflective influence today on me.
My time on this site has now extended past what I had budgeted, and a stop at elitefests keeps extending it further, content that overstays its budget in my schedule is content that has earned the extra time and this site has been earning extra time across multiple visits to the point where my schedule needs adjustment.
Now thinking about whether the writer might publish a longer form work I would buy, and a look at buymixo suggested the same depth would translate, content that makes me want to pay for related work in other formats is content that has earned commercial trust as well as attention trust and this site has both clearly.
A piece that ended with a clean landing rather than fading out, and a look at fairvendor maintained the same crisp conclusions, endings that resolve rather than dissolve are a sign of careful structural thinking and this site has clearly invested in how its pieces conclude rather than letting them simply run out of energy.
Now appreciating the way the post avoided the temptation to be longer than necessary, and a look at gullgoal continued that lean approach, content with the discipline to stop when finished rather than padding for length is content that respects both itself and its readers and this site has that disciplined editorial culture clearly throughout.
Genuine reaction is that I will probably think about this on and off for a few days, and a look at feltglen added fuel to that, the best content lingers in your head after you close the tab rather than evaporating immediately and this site clearly knows how to write that kind of memorable content.
маска для лица сколько держать
Different feel from the algorithmically optimised posts that dominate the topic, and a stop at gapkraft reinforced that human touch, you can tell when a site is being run by someone who reads what they publish versus someone just hitting submit and moving on quickly to the next assignment without checking the result.
Worth saying that this is one of the better things I have read on the topic in months, and a stop at thoughtfuldesigncollective reinforced that ranking, the topic is well covered by many sources but few do it with this level of care and the few that do deserve to be flagged so other readers can find them.
Liked everything about the experience, from the opening through to the closing notes, and a stop at lovqaro extended that into more pages, finding a site where the editorial vision shows through every choice rather than feeling random is an increasingly rare experience and one I am glad to have today during this particular reading session.
After reading several posts back to back the consistent voice across them is impressive, and a stop at shopvato continued that voice consistency, sites that maintain a single coherent voice across many pieces by potentially many writers represent serious editorial discipline and this one has clearly developed the institutional consistency needed for that.
Just sat with this for a bit longer than I usually would because the points are worth thinking about, and after urbantix I had even more to chew on, the kind of post that nudges your thinking forward without forcing the issue is something I have always appreciated in good writing online.
Reading this in the time it took to drink half a cup of coffee, and a stop at ironkrill fit naturally into the second half, content that respects the rhythms of a typical morning is content with practical fit and this site has the kind of length and pacing that works for the way I actually read.
Looking at the surface design and the substance together this site has both right, and a look at kalqavo reinforced that integrated quality, sites where presentation and content reinforce each other rather than fighting are sites with full editorial coherence and this one has clearly invested in both layers in a balanced way.
Going to come back when I have more time to read carefully, the post deserves more than a quick scan, and a stop at fashiondailychoice reinforced that, this is the kind of site that rewards a slower read which is hard to find in this fast paced corner of the internet but really worthwhile.
The use of plain language without dumbing down the topic was really well done, and a look at vuznaro continued in that same accessible style, this is something many technical writers fail at because they either confuse their readers or condescend to them but here neither problem appears at all which is impressive really.
Reading this prompted a small redirection in something I was working on, and a stop at foilgenie extended that redirecting influence, content that affects my actual work rather than just my thinking has the highest practical impact and this site is providing that level of influence for me at a sustainable rate apparently.
Идеи для тематической свадьбы ретро
High quality writing, no marketing speak and no buzzwords that mean nothing, and a stop at dailyshoppinghub kept that going, simple direct content that actually communicates something is harder to find than it should be and this is one of the rare places that gets it right consistently across many different posts.
Thanks for the clean writing, no broken sentences and no awkward translations like some other sites have, and a quick stop at buyrova kept that polish going nicely, it really does make a difference when a reader can move through a page without tripping on every line or going back to reread.
Stands apart from similar pages by actually being useful, that is high praise these days, and a look at heronhilt kept that standard going, you can tell when a site is built around the reader versus around metrics and this one clearly belongs to the first category for sure based on what I read.
Now feeling slightly more committed to my own careful reading practices having read this, and a stop at wavevendor reinforced that commitment, content that models the kind of attention it deserves is content that calibrates the reader and this site has clearly raised my own bar for what to bring to good writing today.
Easy to recommend, the content speaks for itself without needing additional praise from me, and a stop at gullkindle only adds more reasons to send people this way, the kind of generous resource that benefits its readers without demanding anything in return is increasingly rare and worth recognising clearly today across the broader open internet.
Felt the post had been quietly polished rather than aggressively styled, and a look at mexvoro confirmed the same understated polish, sites whose quality reveals itself slowly rather than announcing itself loudly are the kind I trust more deeply because the trust is not based on first impressions of marketing but actual substance.
Came here from another site and ended up exploring much further than I planned, and a look at elitedawns only encouraged more exploration, the kind of place where one click leads to another not through manipulative design but through genuinely interesting content is rare and worth highlighting when found like this somewhere on the open internet.
Now adding this site to a small mental group of recommendations I keep ready for specific kinds of inquiries, and a stop at gaussfawn extended the recommendation readiness, content that I can confidently point friends and colleagues toward in specific contexts is content with real social utility and this site has that utility clearly.
Most of my reading time goes to a small number of trusted sources and this one is now joining that group, and a stop at morqino reinforced the group membership, the few sites that earn a place in my regular rotation are sites I expect ongoing returns from and this one has earned that elevated position consistently.
Skipped the social share buttons but might come back to actually use one later, and a stop at lovzari extended that share urge, content that triggers genuine sharing impulses rather than performative ones is content that has actually moved me and not many posts in a typical week do that for me actually.
Now setting aside time on my next free afternoon to read more from the archives, and a stop at qavmizo confirmed that time will be well spent, the rare site whose archive deserves a dedicated reading session rather than just casual sampling is the kind of resource worth scheduling around and this one qualifies clearly.
Appreciate that you did not pad this with fluff to hit a word count, the post says what it needs to say and stops, and a look at ironkudos did the same, brevity here feels intentional not lazy which is a distinction many writers miss completely sometimes when they are working under deadlines.
Как выбрать свадебный ликер и напитки для банкета
Just want to say thank you for putting this together, posts like these make searching online actually worth it sometimes, and a quick look at eagerkilt kept that going, useful and easy to read without any of the tricks that ruin most blog comment sections lately on the wider open web.
Useful enough to recommend to several people I know who would appreciate it, and a stop at urbanvani added more material I will pass along too, the kind of writing that earns word of mouth is the kind that actually delivers on its promises which is what this site does without any drama or fanfare attached.
However measured this site clears the bar I set for sites I take seriously, and a stop at modernartisancommerce continued clearing that bar, the metrics I use for site quality are admittedly informal but they are consistent and this site has cleared them on multiple measurements across multiple visits which is meaningful for my evaluation.
Reading this felt easy in the best way, no friction and no confusion at any point, and a stop at festglade carried that same comfort across more pages, the kind of editorial flow that lets you absorb information without fighting the format which is increasingly hard to find on the open web today across topics.
Bookmark earned and folder updated to track this site separately, and a look at discovergiftoutlet confirmed the folder upgrade was the right call, organising my reading list so that good sites do not get lost in a sea of casual bookmarks is something I do more carefully now and this site warranted its own spot.
Following the post through to the end without my attention drifting once, and a look at xarmizo earned the same uninterrupted attention, content that holds attention without manipulating it is content with substantive pull and this site has demonstrated that substantive pull across multiple pieces in a single reading session reliably here today.
Honest take is that this was better than I expected when I clicked through, and a look at shopvilo reinforced that, the bar for online content has dropped so much that finding something thoughtful and well constructed feels almost noteworthy now which says more about the average than about this site itself.
Really nice to see things explained without overcomplicating the topic, the words flow naturally and stay easy to follow, and a short visit to buyvani only added to that experience because the same simple approach is used across the rest of the page too without any change in tone.
Reading this in my last reading slot of the day was a good way to end, and a stop at quickcartsolutions provided a satisfying close to the reading session, content that ends a day well rather than agitating it before sleep is the kind I value increasingly and this site fits that role for me consistently now.
как быстро убрать синяки под глазами
Glad I gave this fifteen minutes rather than the usual three minute skim, and a look at kanqiro earned the same investment, time spent on quality content is rarely wasted but the reverse is also true and learning which sites deserve which kind of attention is part of being a careful online reader.
Reading this gave me a quiet moment of intellectual pleasure that I had not been expecting, and a stop at heronjoust extended that pleasure across more pages, the unexpected reward of stumbling into careful writing is one of the small ongoing pleasures of reading the open web and this site is delivering it reliably.
If I had to defend the time I spend reading independent blogs this site would feature in the defence, and a look at haleforge reinforced that defensive utility, the ongoing case for non algorithmic reading is one I make to myself periodically and sites like this one provide the actual evidence that supports the case clearly.
Honestly slowed down to read this carefully which is not my default, and a look at gausskite kept me in that careful reading mode, the kind of writing that demands attention by being worth attention is rare in a media environment full of content engineered to be skimmed not read with any real focus today.
Really grateful for content like this, it does not waste my time and it does not insult my intelligence either, and a quick look at gingercrate was the same, balanced respectful writing that makes a person feel welcome rather than rushed through pages of forced engagement just to keep clicking around.
If I had to summarise the editorial sensibility of this site in a few words it would be careful and human, and a look at islegoal extended that summary feeling, capturing the essence of a sites approach in brief is hard but this site has a clear enough identity that the summary comes naturally enough.
My professional context would benefit from having this kind of resource available, and a look at forgefeat extended the professional applicability, the rare site that contributes meaningfully to professional work rather than just personal interest is content with multiplied value and this one is providing that professional utility consistently across multiple pieces.
Looking for similar voices elsewhere has come up empty in my recent searches, and a stop at luxdeck extended the search frustration, the rare site that does what no other does in quite the same way is precious and this one has clearly developed a particular approach that I have not been able to find duplicates of.
Granted I am giving this site more credit than I usually give new finds, and a look at musebeats continued earning that credit, the calibration of how much trust to extend after limited exposure is something I do carefully and this site has earned more trust on shorter exposure than most due to consistent quality across.
Reading this on a slow Sunday and finding it perfectly suited to a slow Sunday read, and a quick stop at urbanvilo kept the same gentle pace, content that fits the mood of the moment is something I notice and remember and this site has the kind of pace that suits relaxed reading sessions especially well.
Found the use of subheadings really helpful for scanning back through the post later, and a stop at minqaro kept that reader friendly approach going, navigation is something many blog writers ignore but small structural choices make a noticeable difference for someone returning to find a specific point again days or weeks later.
Skipped the TLDR thinking I would read everything anyway, and ended up enjoying the path through the full post, and a stop at buyvilo similarly rewarded the patient read, summaries are useful but the journey through good writing is part of what makes the destination feel earned rather than just delivered cleanly.
Genuinely useful read, the points are practical and easy to apply right away, and a quick look at ultrashophub confirmed that this site is consistent in that approach, looking forward to digging through the rest of it when I get the chance to sit down properly later in the week or this weekend.
Now considering whether the post would translate well into a different form, and a look at packpeak suggested similar versatility, content that could move into other media without losing its substance is content that has been built around ideas rather than around format and this site reads as idea first throughout posts.
If I had encountered this site five years ago I would have been telling everyone about it, and a look at xarvilo extended that retrospective enthusiasm, the version of me who used to recommend favourite blogs frequently would have made sure friends knew about this one and that earlier enthusiasm is partially returning to me here.
My professional context would benefit from having this kind of resource available, and a look at intentionalstyleandhome extended the professional applicability, the rare site that contributes meaningfully to professional work rather than just personal interest is content with multiplied value and this one is providing that professional utility consistently across multiple pieces.
Где купить готовые торговые павильоны в Подмосковье
Beyond the topic at hand this site reads as a small ongoing project of taking writing seriously, and a look at fibergrid reinforced that project quality, sites that treat publishing as an ongoing serious practice rather than as content production for traffic are sites worth supporting and this one has clearly chosen the serious approach.
Just one of those reads that left me feeling slightly more capable rather than overwhelmed, and a look at shopzaro kept that empowering feel going, the difference between content that builds the reader up and content that intimidates them is huge and this site clearly knows which side of that line to stand.
Reading this gave me a small jolt of recognition for an experience I thought was just mine, and a stop at gemglobe produced more such jolts, content that universalises private experiences without flattening them is doing genuinely useful work and this site is providing that recognition function for me reliably across topics I read.
Now thinking about whether the writer might publish a longer form work I would buy, and a look at havenfoam suggested the same depth would translate, content that makes me want to pay for related work in other formats is content that has earned commercial trust as well as attention trust and this site has both clearly.
Took longer than expected to finish because I kept stopping to think, and a stop at hickorygrid did the same to me, content that provokes thought rather than just delivering information is in a different category and the team here is clearly working at that higher level rather than just cranking out posts.
If I had to summarise the editorial sensibility of this site in a few words it would be careful and human, and a look at jadeflax extended that summary feeling, capturing the essence of a sites approach in brief is hard but this site has a clear enough identity that the summary comes naturally enough.
Now thinking I want more sites built on this kind of editorial foundation, and a stop at northvendor extended that wish into a broader hope, sites built on substance and care rather than on metrics and growth are the kind of sites I want to see more of and this one is a small example worth supporting.
Pleasant surprise, the post delivered more than the headline promised, and a stop at luxmixo continued that pattern of under promising and over delivering, the rarest combination on the modern web where most content does the opposite by promising the world and delivering thin recycled summaries instead each time you click on something interesting.
If you asked me to point to a recent positive sign for the open web this site would be near the top, and a stop at morxavi reinforced that designation, the few sites that serve as evidence the web can still produce quality independent content are precious and this one has clearly become one for me.
Reading more of the archives is now on my plan for the weekend, and a stop at qelmizo confirmed the archive worth the time, the rare archive worth a dedicated reading session rather than just casual sampling is the rare archive of serious work and this site has clearly produced enough of that work to warrant the deeper exploration.
Now considering whether the post would translate well into a different form, and a look at ygavexaudition2024 suggested similar versatility, content that could move into other media without losing its substance is content that has been built around ideas rather than around format and this site reads as idea first throughout posts.
Found a couple of useful angles in here I had not considered before reading carefully, and a quick stop at windyforestfinds added more, this is one of those sites where the value compounds the more you read rather than peaking at one viral post and then offering nothing else of substance afterwards which is common.
Genuine reaction is that I will probably think about this on and off for a few days, and a look at urbanvo added fuel to that, the best content lingers in your head after you close the tab rather than evaporating immediately and this site clearly knows how to write that kind of memorable content.
Easily one of the better explanations I have read on the topic, and a stop at eastglaze pushed it even higher in my mental ranking of useful resources, the kind of site that beats the average not by trying harder but by simply caring more about what it puts out daily which always shows.
Came in skeptical and left mostly convinced, that is the highest praise I can offer, and a look at cartluma pushed me further in the same direction, content that survives a critical first read is rare and worth recognising because most blog posts crumble under any real scrutiny these days when you actually pay attention closely.
Now sitting back and recognising that this was a small but real win in my reading day, and a stop at brightfuturedeals extended that quiet win, the cumulative effect of small reading wins versus the cumulative effect of small reading losses is real over time and this site is contributing to the wins side of that ledger.
Closed and reopened the tab three times before finally finishing, and a stop at discoverfashionhub held my attention straight through, sometimes content fights for time against my own distraction and the times it wins say something positive about its quality and this post clearly won that fight today afternoon for me.
Top tier post, the kind that makes you want to share the link with friends working in the same area, and a stop at oakarenas only made me more confident in doing that, this site is one of the better resources I have seen on the topic recently across both new and older posts.
A piece that did not require external context to follow, and a look at zenvani maintained the same self contained quality, content that stands alone without forcing readers to chase prerequisites is more accessible and this site has clearly thought about how each piece can serve a fresh visitor rather than only existing members.
Reading this gave me a small framework I expect to use going forward, and a stop at xavlumo extended that framework, content that produces transferable mental models rather than just specific facts is content with multiplicative value and this site is providing those models at a rate that justifies extra attention from me regularly.
Looking at this objectively the editorial quality is hard to deny even setting aside personal taste, and a stop at liegepenny maintained the same objective quality, the gap between what I personally enjoy and what is objectively well crafted exists and this site clears both bars simultaneously which is rarer than it sounds.
Now appreciating the way the post avoided the temptation to be longer than necessary, and a look at wattedge continued that lean approach, content with the discipline to stop when finished rather than padding for length is content that respects both itself and its readers and this site has that disciplined editorial culture clearly throughout.
Клининговая компания спб
Felt the writer was speaking my language without trying to imitate it, and a look at mivqaro continued that natural fit, when a writers default voice happens to match what you find easy to read the experience feels frictionless and that is something I notice and remember about specific sites going forward.
After several visits I am now confident this site is one to follow seriously, and a stop at fortfalcon reinforced that confidence, the gradual building of trust through repeated quality exposures is the only sustainable way to develop reader loyalty and this site is building that loyalty in me through patient consistent work consistently.
Comfortable in tone and substantive in content, that is a hard combination to land, and a look at genieframe kept that pairing alive across more material, this is what good editorial direction looks like in practice and the team here clearly has someone keeping a steady hand on the wheel across what they decide to publish.
Bookmark earned and folder updated to track this site separately, and a look at jetfrost confirmed the folder upgrade was the right call, organising my reading list so that good sites do not get lost in a sea of casual bookmarks is something I do more carefully now and this site warranted its own spot.
Even from a single post the editorial care is clear, and a stop at hazegloss extended that care across more pages, the kind of attention to quality that shows up in every paragraph is what separates serious sites from the rest and this one has clearly invested in that paragraph level attention across what I have read.
Appreciated how the writer anticipated the questions a reader might have along the way, and a stop at styleluma continued that thoughtful approach, you can tell when content has been edited with the reader in mind versus just published as a first draft and this is clearly the former approach across what I read.
Компания fastek https://fastek.by проектируем и поставляем надежные фасадные системы для коммерческих и жилых объектов, обеспечивая долговечность, энергоэффективность и безупречный внешний вид здания под ваши задачи.
Reading this in the time it took to drink half a cup of coffee, and a stop at hiltgable fit naturally into the second half, content that respects the rhythms of a typical morning is content with practical fit and this site has the kind of length and pacing that works for the way I actually read.
Felt slightly impressed without being able to point to one specific reason, and a look at palmbazaar continued that diffuse positive feeling, when content works at a level you cannot easily articulate the writer is doing something with craft rather than just delivering information and that is something I have learned to recognise.
Even just sampling a few posts the consistency is what stands out, and a look at luxrivo confirmed the broader pattern, sites where every piece I sample lives up to the standard set by the others are sites with serious quality control and this one has clearly invested in whatever editorial process produces that consistency reliably.
A handful of memorable phrases from this one I will probably use later, and a look at julyelm added a couple more, content that contributes language to my own communication rather than just facts is content with a different kind of utility and this site is providing that linguistic utility consistently across what I read.
Appreciate the practical examples, they made the abstract points easier to grasp, and a stop at ivoryvendor added more of the same, this site clearly understands that real examples beat empty theory every single time which is the mark of a writer who knows their audience well and respects their time.
A piece that reads as if the writer trusted readers to fill in obvious gaps, and a look at urbanzaro continued that respectful approach, content that does not over explain what the reader can infer is content that respects intelligence and this site has clearly chosen to write to capable readers rather than to the lowest common denominator.
Generally I am cautious about recommending sites on first encounter but this one warrants the exception, and a look at talents-affinity reinforced the exception making, the rare site that justifies breaking my normal cautious approach is the rare site worth flagging early and this one has prompted exactly that early flagging response from me.
If I had to summarise the editorial sensibility of this site in a few words it would be careful and human, and a look at cartmixo extended that summary feeling, capturing the essence of a sites approach in brief is hard but this site has a clear enough identity that the summary comes naturally enough.
Recommended without hesitation if you care about careful coverage of this topic, and a stop at timbertowncorner reinforced the recommendation, the bar I set for unhesitating recommendations is fairly high and this site has cleared it through the cumulative weight of multiple consistently good pieces rather than through any single standout post which is meaningful.
Top notch writing, every paragraph carries weight and nothing feels like filler, and a stop at seovista reflected that same care, a rare thing on the open web these days where most pages exist for clicks rather than actual reader value or anything close to that which is honestly a real shame.
Thanks for treating the topic with the seriousness it deserves without becoming pompous about it, and a stop at lullneon continued that balanced treatment, the gap between earnest and self serious is huge and writers who can stay on the right side of it earn my respect when I find them online today.
On reflection this is the kind of writing that improves my taste for what is possible in the format, and a look at discovermoreoffers continued raising that bar, content that elevates my expectations rather than lowering them is doing important work in calibrating my standards and this site is participating in that elevation reliably.
Excellent post, balanced and well organised without showing off, and a stop at zenvaxo continued in that same vein, this site has clearly figured out the formula for content that works for readers rather than for search engine ranking signals which is harder than it sounds today and worth real recognition from anyone.
Reading this on a difficult day was a small bright spot, and a stop at xavnora extended that brightness, content that improves a hard day is content that has earned a particular kind of place in my reading habits and this site is occupying that uplifting role for me today which I appreciate clearly.
Now I want to find more sites like this but I suspect they are rare, and a look at dewdawns extended that thought, the few sites that meet this quality bar are precious specifically because they are rare and finding others like them is one of the ongoing projects of careful internet curation across the years.
Bookmark moved to my permanent reference folder rather than the casual maybe later folder, and a look at gladfir earned the same upgrade, the distinction between casual interest and lasting reference is something I track carefully and very few sites cross that threshold but this one did so without much effort apparently.
Honest reaction is that I want to send this to a friend who would benefit from it, and a look at wattedge added more material I will pass along too, the impulse to share is the strongest signal I have for content quality and this site is generating that impulse cleanly across multiple posts.
Honest take is that I will probably forget most of what I read online today but this post is one I will remember, and a stop at curlbento kept that same memorable quality going, certain writing leaves a residue in the mind in a way most content simply does not manage.
A piece that handled a controversial angle without becoming heated, and a look at hazeherb continued that calm engagement, content that can address contested topics without inflaming them is doing rare diplomatic work and this site has clearly developed the editorial maturity to handle sensitive material with the appropriate temperature of writing throughout.
клининговые услуги
Came away with a small but real shift in perspective on the topic, and a stop at luxrova pushed that shift a bit further, the kind of subtle reframing that good writing does to a reader without making a big deal of it is something I always appreciate when it happens which is sadly not that often.
Торговый киоск «под ключ»: от проекта до запуска
A thoughtful read in a week that has been mostly noisy, and a look at movlino carried that thoughtful quality across more pages, finding pockets of considered writing in a week of distractions is one of the small wins of careful curation and this site is providing those pockets at a sustainable rate.
A piece that reads as if the writer trusted readers to fill in obvious gaps, and a look at modcove continued that respectful approach, content that does not over explain what the reader can infer is content that respects intelligence and this site has clearly chosen to write to capable readers rather than to the lowest common denominator.
Worth saying that the quiet confidence of the writing is what landed first, and a look at stylemixo continued that quiet quality, confident writing without the loud display of confidence is a rare combination and this site has clearly developed both the knowledge and the editorial restraint to land that combination consistently.
Honestly impressed by how much useful content sits in such a small post, and a stop at qenmora confirmed the rest of the site packs a similar punch, density without confusion is a hard balance to strike and this site has clearly cracked the code on it across many different topic areas covered.
Reading this slowly in the morning before opening email, and a stop at mintvendor extended that protected attention, content that earns the prime morning reading slot before the daily distractions begin is content with elevated status and this site has earned that prime slot consistently in my recent reading habits clearly.
My usual pattern is to skim and bounce but this site has reset that pattern temporarily, and a stop at hiltgem maintained the slower reading mode, content that changes how I read is content with structural influence and this site has clearly nudged my reading behaviour toward something better at least for the duration of these visits.
Felt the writer respected me as a reader without making a show of doing so, and a look at cartrivo continued that quiet respect, this is the kind of small but meaningful detail that separates the sites I bookmark from the ones I close after a single skim and never return to again no matter how interesting the headline.
Taking the time to read carefully here has been worthwhile for the past hour, and a look at fossera extended the worthwhile reading, the calculation of return on reading time spent is something I do informally and this site has been producing positive returns across multiple sessions during the last week of regular visits and reads.
Now feeling the rare pleasure of trusting a source completely on first encounter, and a look at thirtymale extended that initial trust into something more durable, the calibration of trust to evidence is something I do informally and this site has earned high trust through the cumulative weight of multiple consistently good posts already.
Worth marking this site as one to come back to deliberately rather than by accident, and a stop at ebonfig reinforced that intention, the difference between sites I find again by chance and sites I return to on purpose is meaningful and this one has clearly moved into the deliberate return category for me.
Reading this site over the past week has changed how I evaluate content in this space, and a look at urbivio extended that recalibration, the standards I bring to reading on the topic have shifted upward as a direct result of regular exposure to this kind of work and that shift will outlast any single reading session.
Picked up a couple of new ideas here that I can actually try out, and after my visit to seotrail I have even more notes saved, this is the kind of resource that pays you back for the time you spend on it which is rare to come across in this corner of the web.
Reading this triggered a small reorganisation of my own thinking on the topic, and a stop at mutelion furthered that reorganisation, content that affects the shape of my mental model rather than just decorating it with new facts is content with structural rather than informational impact and this site provides that.
Reading this in a quiet coffee shop matched the calm energy of the writing, and a stop at zevarko extended that environmental match, content that has its own ambient quality which can match or clash with surroundings is content with a personality and this site has the kind of personality that suits calm reading.
Now feeling the rare pleasure of trusting a source completely on first encounter, and a look at fashionfindshub extended that initial trust into something more durable, the calibration of trust to evidence is something I do informally and this site has earned high trust through the cumulative weight of multiple consistently good posts already.
Worth recognising the specific care that went into how this post ended, and a look at xelvani maintained the same careful conclusions, endings are where most blog content falls apart and this site has clearly invested in the closing stretches of its pieces rather than letting them simply trail off when energy fades.
Liked the way the post handled the final paragraph, no neat bow but no abrupt cutoff either, and a stop at softspringemporium continued that thoughtful ending pattern, endings are hard and most blog writers either over engineer them or skip them entirely and this site has clearly figured out a sustainable middle approach.
Following a few of the internal links revealed more posts of similar quality, and a stop at jumbohelm added more to that growing pile, sites where internal links lead to more good content rather than to more of the same recycled material are sites with depth and this one has clearly built that depth carefully.
Thanks for treating the topic with the seriousness it deserves without becoming pompous about it, and a stop at gladhalo continued that balanced treatment, the gap between earnest and self serious is huge and writers who can stay on the right side of it earn my respect when I find them online today.
Approaching this site through a casual link click and being surprised by what I found, and a look at milknorth extended the surprise, the rare experience of stumbling into excellent independent content rather than predictable mediocrity is one of the actual remaining pleasures of casual web browsing and this site provided it cleanly.
Worth saying that the prose reads naturally without straining for style, and a stop at wattarc maintained the same unforced quality, writing that achieves elegance without effort is the highest tier and this site has clearly worked out how to land that effortless quality consistently rather than only on the writers best days.
More substantial than most of what I find searching for this topic online, and a stop at palmbranch kept that quality consistent, this is one of those sites where the writing actually rewards careful reading rather than punishing the patient reader with empty filler stretched out across long paragraphs that say very little.
Took the time to read every paragraph rather than skimming for the punchline, and a quick visit to heathfoam earned the same careful attention from me, that is the highest signal I can give about content quality because my default mode is rapid scanning rather than deliberate reading on most pages.
A genuinely unexpected highlight of my reading week, and a look at curlbyrd extended that pattern, the surprise of finding excellent content rather than the predictable mediocre is one of the few real pleasures of casual web browsing and this site delivered that surprise cleanly today which I really do appreciate.
Liked the way the post got out of its own way, and a stop at luxvilo extended that invisible craft, the best writing you barely notice while reading because it is doing its work without drawing attention to itself and this site has clearly mastered that disappearing act across the pieces I have read.
Reading this gave me a small mental break from the heavier reading I had been doing, and a stop at myrrhlens extended that lighter feel, content that provides relief without becoming trivial is harder to produce than people realise and this site has clearly figured out how to be light without being shallow at all.
Following the post through to the end without my attention drifting once, and a look at cartrova earned the same uninterrupted attention, content that holds attention without manipulating it is content with substantive pull and this site has demonstrated that substantive pull across multiple pieces in a single reading session reliably here today.
Наша компания предлагает профессиональный подход к оформлению медицинских справок. Мы ценим время клиентов и обеспечиваем быстрое получение документов https://afina-mc.ru/medicinskaya-spravka-o-privivke-ot-vetryanoy-ospy/
I appreciate the clarity here, everything is explained in simple terms without unnecessary detail, and after a quick stop at saveaustinneighborhoods the points came together nicely for me, the writing keeps things straightforward and respects the reader from start to finish without ever talking down to anyone.
Bookmark added with a small mental note that this is a site to keep, and a look at stylerivo reinforced the keep status, the verb keep rather than visit captures something about how I think about this kind of site and it is a higher tier of relationship than I have with most places online today.
Now appreciating the way the post avoided the temptation to be longer than necessary, and a look at hilthive continued that lean approach, content with the discipline to stop when finished rather than padding for length is content that respects both itself and its readers and this site has that disciplined editorial culture clearly throughout.
Reading more of the archives is now on my plan for the weekend, and a stop at zimlora confirmed the archive worth the time, the rare archive worth a dedicated reading session rather than just casual sampling is the rare archive of serious work and this site has clearly produced enough of that work to warrant the deeper exploration.
Coming back to this one, definitely, and a quick visit to lullpebble only made me more sure of that, the kind of writing that makes you want to set aside time later rather than rushing through it now while distracted by everything else competing for attention on the screen today across so many tabs.
Found the post genuinely useful for something I was working on this week, and a look at nextleveltrading added more material I will reference, content that connects to my actual life and work rather than just being interesting in the abstract is the kind I will pay attention to and return to repeatedly.
Quietly the writers approach to the topic differs from the dominant takes I have been encountering, and a stop at moddeck extended that distinctive approach, content that maintains a different perspective without explicitly arguing against the dominant ones is content with confident editorial identity and this site has that confidence throughout pieces.
If I had to summarise the editorial sensibility of this site in a few words it would be careful and human, and a look at xelzino extended that summary feeling, capturing the essence of a sites approach in brief is hard but this site has a clear enough identity that the summary comes naturally enough.
Just wanted to drop a quick note saying this was a useful read on a topic I have been circling, no fluff, and a stop at grippalaces added a few extra points that fit the same simple style which makes the whole site feel coherent rather than thrown together by many different writers with different goals.
Started believing the writer knew the topic deeply by about the second paragraph, and a look at wildduneessentials reinforced that confidence, the speed at which a writer establishes credibility through their writing is a useful quality signal and this writer establishes it quickly and quietly without resorting to credential dropping or self promotion.
Now thinking I want more sites built on this kind of editorial foundation, and a stop at vividmesh extended that wish into a broader hope, sites built on substance and care rather than on metrics and growth are the kind of sites I want to see more of and this one is a small example worth supporting.
Reading more of the archives is now on my plan for the weekend, and a stop at fossgusto confirmed the archive worth the time, the rare archive worth a dedicated reading session rather than just casual sampling is the rare archive of serious work and this site has clearly produced enough of that work to warrant the deeper exploration.
Now planning to recommend this site in a context where my recommendations are taken seriously, and a stop at curlclap confirmed I should make that recommendation soon, the small but real act of recommending content into spaces where my taste matters is something I take seriously and this site is worth the recommendation.
Closed three other tabs to focus on this one and never opened them again, and a stop at luzqiro similarly held attention exclusively, content that crowds out other reading from working memory is content with real density and this site has demonstrated that density across multiple pages I have visited so far this morning.
Strong recommendation from me, anyone curious about the topic should make time for this, and a look at navmixo only sharpens that recommendation further, the kind of resource that holds up against careful scrutiny rather than crumbling at the first critical question is rare and worth pointing other people toward when the topic comes up.
Reading this brought back the satisfaction I used to get from blogs ten years ago, and a stop at myrrhomen kept that nostalgic quality alive, sites that capture what was good about an earlier era of internet writing are increasingly precious and this one is doing that without feeling like a deliberate throwback at all.
Probably going to mention this site in a write up I am working on later this month, and a stop at jumbokelp provided more material for that potential mention, content worth referencing in my own published work rather than just personal reading is content with the highest endorsement level and this site has earned that endorsement.
Found the rhythm of the prose particularly enjoyable on this read through, and a look at nudgeneedle kept that musical quality going across the related pages, sentence rhythm is something most blog writers ignore but it makes a real difference in how content lands with the careful reader who cares.
Strong recommendation, anyone interested in this topic owes themselves a visit, and a stop at qinmora extends that recommendation across more of the site, this is the kind of resource that makes me more optimistic about the state of the open web than I usually am these days actually for once which is genuinely refreshing.
Liked how the writer used real examples instead of theoretical ones to make the points stick, and a stop at ponyosier added even more concrete examples, this is the kind of practical approach that respects readers who actually want to apply what they learn rather than just nodding along passively without doing anything useful.
Felt the post had been written without looking over its shoulder, and a look at perfectmill continued that confident posture, content written for its own sake rather than against imagined critics has a different quality and this site reads as written from a place of confidence rather than defensive justification of every claim.
Reading this gave me something to think about for the rest of the afternoon, and after cartvani I had even more to mull over, the kind of post that lingers in the background of your day rather than evaporating immediately is genuinely valuable in an attention economy that punishes depth rather than rewarding it.
Came here from another site and ended up exploring much further than I planned, and a look at pacerlucid only encouraged more exploration, the kind of place where one click leads to another not through manipulative design but through genuinely interesting content is rare and worth highlighting when found like this somewhere on the open internet.
Now thinking about whether the writer might publish a longer form work I would buy, and a look at ebongreen suggested the same depth would translate, content that makes me want to pay for related work in other formats is content that has earned commercial trust as well as attention trust and this site has both clearly.
Picked this up between two other things I was doing and got drawn in completely, and after zimqano my original tasks were completely forgotten for a while, content that derails a workflow in a positive way by being more interesting than what you were already doing is rare and worth recognising clearly.
Glad to have another data point on a question I am still thinking through, and a look at thermonuclearwar added two more, content that acknowledges its place in a wider conversation rather than pretending to settle the question alone is intellectually honest in a way that I wish was more common across the open web.
Going to come back when I have more time to read carefully, the post deserves more than a quick scan, and a stop at hiltkindle reinforced that, this is the kind of site that rewards a slower read which is hard to find in this fast paced corner of the internet but really worthwhile.
A clean read with no irritations, and a look at palmcodex continued that frictionless quality, the absence of small irritations is something I notice only when present elsewhere and this site is one of the rare places where everything just works and lets me focus on the substance rather than fighting the format.
Just want to recognise that someone clearly cared about how this turned out, and a look at stylerova confirmed that care extends across the broader site, you can feel the difference between content shipped to hit a deadline and content released because the writer was actually proud of the result for once.
High quality writing, no marketing speak and no buzzwords that mean nothing, and a stop at xinvexa kept that going, simple direct content that actually communicates something is harder to find than it should be and this is one of the rare places that gets it right consistently across many different posts.
Adding to the bookmarks now before I forget, that is how good this is, and a look at valzino confirmed the rest of the site is worth saving too, this is one of those rare finds that justifies the time spent searching the web for once which is a relief in the current environment.
Really nice to see things explained without overcomplicating the topic, the words flow naturally and stay easy to follow, and a short visit to flareinlets only added to that experience because the same simple approach is used across the rest of the page too without any change in tone.
Наша компания предлагает удобное оформление медицинских справок без длительного ожидания и сложных процедур. Мы стремимся обеспечить клиентам качественный сервис и экономию времени – https://afina-mc.ru/medicinskaya-spravka-ob-ehpidokruzhenii/
Got something practical out of this that I can apply later this week, and a stop at trivent added more details to think about, this is exactly the kind of content I bookmark for future reference rather than the throwaway listicles that dominate most search results these days for almost any common topic.
Reading this on a phone at a coffee shop and finding it perfectly suited to that context, and a stop at goldenrootboutique continued the comfortable mobile experience, content that works across reading conditions without compromising on substance is increasingly important and this site has clearly thought about the whole reader experience here.
гигиена рта https://otbelivanie-zubov-chernogoriya.com
Honestly enjoyed every minute spent here, that is not something I say lightly, and a look at nagapinto confirmed I will be back, the bar for spending time online is high for me these days but this site clears it without effort which is high praise indeed from this reader who is usually rather demanding.
Came away with a slightly better mental model of the topic than I started with, and a stop at mallivo sharpened that further, content that improves the reader thinking apparatus rather than just dumping facts into it is the rare kind I genuinely value and seek out when I have time to read carefully.
A piece that handled a controversial angle without becoming heated, and a look at curatedglobalcommerce continued that calm engagement, content that can address contested topics without inflaming them is doing rare diplomatic work and this site has clearly developed the editorial maturity to handle sensitive material with the appropriate temperature of writing throughout.
My time on this site has now extended past what I had budgeted, and a stop at nuggetotter keeps extending it further, content that overstays its budget in my schedule is content that has earned the extra time and this site has been earning extra time across multiple visits to the point where my schedule needs adjustment.
Found the use of subheadings really helpful for scanning back through the post later, and a stop at curvecalm kept that reader friendly approach going, navigation is something many blog writers ignore but small structural choices make a noticeable difference for someone returning to find a specific point again days or weeks later.
A piece that did not require external context to follow, and a look at poppymedal maintained the same self contained quality, content that stands alone without forcing readers to chase prerequisites is more accessible and this site has clearly thought about how each piece can serve a fresh visitor rather than only existing members.
Reading this on a difficult day was a small bright spot, and a stop at cartvilo extended that brightness, content that improves a hard day is content that has earned a particular kind of place in my reading habits and this site is occupying that uplifting role for me today which I appreciate clearly.
Appreciated how the post felt complete without overstaying its welcome, and a stop at modloop confirmed that economical approach runs across the site, knowing when to stop is a skill many writers never develop but here the discipline is obvious and welcome from the perspective of a busy reader trying to learn things efficiently.
Honest reaction is that this is the kind of writing I would defend in a conversation about good blog content, and a look at pianoledge reinforced that, the rare site whose work I would actively recommend rather than just tolerate is the kind I want to support through return visits regularly.
Skipped breakfast still reading this and finished hungry but satisfied, and a stop at millpeach kept me past breakfast time, content that displaces basic biological needs is content with serious attentional pull and the writers here are clearly capable of producing that level of engagement which is genuinely impressive these days.
Skipped the comments to avoid spoilers and came back later to find them genuinely worth reading, and a stop at padreledge extended that surprised respect, when the discussion below a post matches the quality of the post itself you have found something special and this site appears to attract that kind of audience.
This one is staying open in a tab for the rest of the day so I can come back and re read certain parts, and a look at lushmarble suggests I will be doing the same with a few more pages here too, this is going to be a deep dive over the coming hours.
white water adventures rafting experience in Europe
Now feeling mildly impressed in a way I do not quite remember feeling about a blog in a while, and a stop at queenmshop extended that mild impression, content that produces specific positive emotional responses rather than just neutral information transfer is content with extra dimensions and this site has those extra dimensions clearly.
Left me wanting to read more rather than feeling burned out, that is a good sign, and a look at purplemilk confirmed there is plenty more here to explore, the kind of writing that builds appetite rather than killing it which is a rare quality on the modern open internet today across most categories of content.
Now noticing that the post avoided the temptation to be funny in places where humour would have undermined the substance, and a stop at framegable maintained the same restraint, knowing when to be serious is a rare editorial virtue and this site has clearly developed it through what I assume is careful editorial practice over years.
Reading this as part of my evening winding down routine fit perfectly, and a stop at holmglobe extended the wind down nicely, content that calms rather than agitates is what I want at the end of the day and this site provides that calming reading experience reliably which is increasingly rare across the modern web.
On reflection this is the kind of writing that improves my taste for what is possible in the format, and a look at juncokudos continued raising that bar, content that elevates my expectations rather than lowering them is doing important work in calibrating my standards and this site is participating in that elevation reliably.
High quality writing, no marketing speak and no buzzwords that mean nothing, and a stop at xinvoro kept that going, simple direct content that actually communicates something is harder to find than it should be and this is one of the rare places that gets it right consistently across many different posts.
Skipped the comments section but might come back to read it, and a stop at stylevani hinted at a quality reader community, sites where the comments are worth reading separately from the post are increasingly rare and signal a particular kind of audience that has grown around the editorial vision over time gradually.
Reading this between meetings turned out to be the most useful thing I did all afternoon, and a stop at narrowlake kept that productivity feeling going, content can sometimes outperform actual work in terms of what gets accomplished mentally and this site managed that today which is genuinely a high bar to clear consistently.
доски объявлений https://www.prodazhi-na-avito.ru
Now wishing I had found this site sooner, and a look at numenoat extended that mild regret, the calculation of how many years of good content I missed by not finding the right sources earlier is one I try not to make too often but it does come up sometimes when I find sites this good.
Reading carefully here has reminded me what reading carefully feels like, and a look at navqiro extended that reminder, the experience of careful reading versus skimming is different in ways I had partially forgotten and this site has clearly refreshed my memory of what attention feels like when content rewards it consistently.
Compared to the usual results for this kind of search this site stands well above the average, and a quick visit to mavlizo kept the standard high, you can tell within seconds whether a site is going to waste your time or actually deliver and this one clearly delivers without any false starts.
Now adding a small note in my reading log that this site is one to watch, and a look at xenoframe reinforced the watch status, the few sites I track deliberately rather than encounter accidentally are sites I expect ongoing returns from and this one has cleared the bar for that elevated tracking based on what I read.
The conclusions felt earned rather than tacked on at the end like an afterthought, and a look at vankiro kept that careful structure going, you can tell when a writer has thought about the shape of their post versus just letting it ramble out and hoping for the best at the end which most do.
Left me wanting to read more rather than feeling burned out, that is a good sign, and a look at qinzavo confirmed there is plenty more here to explore, the kind of writing that builds appetite rather than killing it which is a rare quality on the modern open internet today across most categories of content.
Decided to write a short note to the author if there is contact info anywhere, and a stop at potterlily extended that intention, the urge to thank the writer directly is a strong signal of content quality and this site has triggered that urge in me today which is a fairly rare event for my reading.
A piece that did not waste any of its substance on sales or promotion, and a look at cartzaro continued that pure content focus, sites that resist the urge to monetise every paragraph are increasingly rare and this one has clearly made the editorial choice to keep the writing clean from commercial intrusion which I value highly.
Worth every minute of the time spent reading, and a stop at cadetarenas extends that value across more pages, in a media environment where most content is engineered to waste attention this site stands out by treating reader time as something valuable rather than something to be exploited and stretched as far as possible.
Любимые программы всегда под рукой! Развлекательные ток-шоу, кулинарные баттлы, музыкальные конкурсы, реалити и интеллектуальные игры — всё в одном месте. Свежие выпуски, архив прошлых сезонов и эксклюзивные проекты. Включай в любое время, без рекламы и регистрации: тв шоу про проверки ресторанов
Coming to this with low expectations and being pleasantly surprised by the substance, and a stop at pianoloud continued exceeding expectations, the recalibration of expectations upward across multiple positive readings is one of the actual rewards of careful browsing and this site is providing that recalibration at a steady rate apparently.
Anyone curious about this topic would do well to start here, the foundation laid is solid, and a stop at contemporarygoodsmarket would round out their understanding nicely, this is the kind of resource I would point a friend toward without hesitation if they asked me where to begin learning about anything in this area.
Honestly the simplicity of the explanation made the topic click for me in a way other writeups had not, and a look at curvecatch continued that clarity into related areas, when a writer gets the level of explanation right the reader does the heavy lifting themselves and the post just enables it.
Even on a quick first read the substance of the post comes through, and a look at palminlet reinforced that immediate quality, content that does not require a slow careful read to demonstrate value but rewards one anyway is content with real depth and this site has produced work of that demanding depth class.
The clarity here is something I really appreciate, especially compared to sites that pile on jargon for no reason, and a look at padreorchid was the same, simple direct sentences that actually deliver information instead of dancing around the point for paragraphs at a time which wastes reader patience.
My time on this site has now extended past what I had budgeted, and a stop at ebonkoala keeps extending it further, content that overstays its budget in my schedule is content that has earned the extra time and this site has been earning extra time across multiple visits to the point where my schedule needs adjustment.
Decent post that improved my afternoon a small amount, and a look at minimmoss added a bit more to that, sometimes the small wins online add up over time and a useful site like this one is the kind of place that contributes consistently to those small wins for me lately across many different topics I follow.
Now realising the post solved a small problem I had been carrying for weeks, and a look at purplemilk extended that problem solving function, content that connects to specific unresolved questions in my own life rather than just providing general interest is content with real practical impact and this site is providing that practical value.
Now setting aside time on my next free afternoon to read more from the archives, and a stop at n3rdmarket confirmed that time will be well spent, the rare site whose archive deserves a dedicated reading session rather than just casual sampling is the kind of resource worth scheduling around and this one qualifies clearly.
local travel experts car rental Montenegro https://montenegro-car-rental-hire.com
A clear cut above the usual noise on the subject, and a look at xomvani only made that gap wider in my view, the kind of place that earns its visitors through quality rather than through aggressive marketing or sponsored placements which is increasingly the only way most sites stay afloat across the modern web.
A piece that demonstrated competence without performing it, and a look at narrowmotor maintained the same self assured but unshowy register, the gap between competence and performance of competence is one I track and this site has clearly chosen to demonstrate rather than perform which I find much more persuasive as a reader.
Liked the careful selection of which details to include and which to skip, and a stop at modluma reflected the same editorial judgement, knowing what to leave out is just as important as knowing what to include and this site has clearly figured out where that line sits for the topics it covers regularly.
During a reading session that included several other sources this one stood out, and a look at nylonmoss continued the standout quality, the side by side comparison of sources during research is a useful exercise and this site has been winning those comparisons for me consistently across multiple research sessions during the last week.
Picked this up while looking for something else and ended up reading every paragraph because it was actually informative, and after mavlumo I was sure I would come back, that does not happen often when most sites bury the useful parts under endless ads and pop ups today and across most categories online.
Now planning to write about the topic myself eventually using this post as a reference, and a look at stylevilo would also serve in that future piece, content that becomes raw material for my own writing rather than just informing my reading is content with multiplicative value and this site is generating that multiplicative effect.
Solid little post, the kind that does not need to be flashy because the substance is doing the work, and a look at prairiemyrrh kept that quiet confidence going across the site, this is what writing looks like when the writer trusts the content to land on its own without theatrics or unnecessary attention seeking behaviour.
Top notch writing, every paragraph carries weight and nothing feels like filler, and a stop at keenfern reflected that same care, a rare thing on the open web these days where most pages exist for clicks rather than actual reader value or anything close to that which is honestly a real shame.
Appreciated that the writer trusted the reader to follow along without constant restating of earlier points, and a look at maplecresttradingcorner continued that respect for the reader, treating an audience as capable adults rather than as people to be hand held through every paragraph is something I notice and value highly across the open internet today.
Honestly this was the highlight of my reading queue today, and a look at dealdeck extended that across more pages I will return to, ranking what I read against what else I read each day is something I do informally and this site keeps moving up in those rankings the more I explore it.
Started reading skeptically because the headline seemed overconfident, and the post earned the headline by the end, and a look at frescoheron continued that pattern of earning its claims, sites that can back up their headlines without overpromising are rare and this one has clearly developed editorial calibration on that front consistently.
Came back to this twice now in the same week which is unusual for me, and a look at pillowmanor suggested I will keep coming back, the kind of post that earns repeated visits rather than one and done reading is the gold standard for content quality and this site clearly hit that standard.
Grateful for posts like this one, they remind me there are still places online run by people who care about quality, and a look at lushpassion reflected the same standards, you can tell the difference between content made for readers and content made just for search engines today and this is the former.
сайт о цветах
kush in prague cbd weed in prague
My usual response to new bookmarks is to forget them but this one I have already returned to twice, and a look at thoughtfullydesignedstore pulled me back a third time, the actual return rate to bookmarked sites is the real measure of value and this one is clearing that measure at a notable rate already.
I appreciate the clarity here, everything is explained in simple terms without unnecessary detail, and after a quick stop at vanlizo the points came together nicely for me, the writing keeps things straightforward and respects the reader from start to finish without ever talking down to anyone.
Now recognising that this site has earned a place in the small group of resources I treat as authoritative, and a stop at pagodamatrix confirmed that placement, the difference between resources I trust and resources I just consume is real and this site has clearly moved into the trusted category through consistent quality over time.
Felt the post handled a sensitive angle of the topic with appropriate care, and a look at dabbyrd extended that careful handling across related material, sites that can navigate delicate territory without causing damage are rare and require a level of judgement that comes from experience rather than from following any clear playbook.
Honestly enjoyed every minute spent here, that is not something I say lightly, and a look at purpleorbit confirmed I will be back, the bar for spending time online is high for me these days but this site clears it without effort which is high praise indeed from this reader who is usually rather demanding.
Picked a single sentence from this post to remember, and a look at alfornephilly gave me another to keep, content that produces memorable lines is doing more than just transferring information and the small selection of sentences I keep from each reading session is one of the actual returns I get from reading carefully.
Liked that the post left some questions open rather than pretending to settle everything, and a stop at nationmagma continued that intellectual honesty, content that respects the limits of its own claims is more trustworthy than content that overreaches and this site has clearly figured out which positions it can defend confidently.
A slim post with substantial content per word, and a look at minimparch maintained the same density, the content per word ratio is something I track informally and this site scores high on that ratio compared to most sources I read regularly which is a quiet indicator of careful editorial work behind the scenes.
Now planning to come back when I have the right kind of attention to read carefully, and a stop at xovmora reinforced that plan, choosing the right moment to read certain content is a quiet form of respect for the work and this site is generating those careful planning behaviours from me consistently as a reader.
Picked something concrete from the post that I will use immediately, and a look at nylonplain added another concrete piece, content that produces immediately useful output rather than just abstract appreciation is content that earns its place in my regular rotation without needing any further evaluation from me at this point honestly.
Now planning to share the link with a small group of readers I trust, and a look at nexcove suggested more material to share with the same group, recommending content into a curated circle requires confidence in the recommendation and this site is making me confident in those personal recommendations on multiple separate occasions now.
Genuine reaction is that I will probably think about this on and off for a few days, and a look at mavnero added fuel to that, the best content lingers in your head after you close the tab rather than evaporating immediately and this site clearly knows how to write that kind of memorable content.
Came in skeptical and left mostly convinced, that is the highest praise I can offer, and a look at presslatte pushed me further in the same direction, content that survives a critical first read is rare and worth recognising because most blog posts crumble under any real scrutiny these days when you actually pay attention closely.
High quality writing, no marketing speak and no buzzwords that mean nothing, and a stop at dealenzo kept that going, simple direct content that actually communicates something is harder to find than it should be and this is one of the rare places that gets it right consistently across many different posts.
Came in confused about the topic and left with a much firmer grasp on it, and after palmmeadow I felt I could explain this to someone else without hesitation, that is the gold standard for any educational content and most sites simply fail to reach it ever which is unfortunate but true.
Thanks for the simple approach, too many sites bury the actual point under layers of unnecessary words, but here every line earns its place, and a look at qivlumo showed the same care for the reader which is something I will remember the next time I need answers on a topic.
Now planning to come back when I have the right kind of attention to read carefully, and a stop at pillownebula reinforced that plan, choosing the right moment to read certain content is a quiet form of respect for the work and this site is generating those careful planning behaviours from me consistently as a reader.
Genuinely glad I clicked through to read this rather than skipping past, and a stop at honeymeadowmarketgallery confirmed I should keep clicking through to more pages here, the kind of resource that justifies its place in my browser history rather than feeling like wasted time which is the highest compliment I offer any site online today.
Appreciate that you did not pad this with fluff to hit a word count, the post says what it needs to say and stops, and a look at stylezaro did the same, brevity here feels intentional not lazy which is a distinction many writers miss completely sometimes when they are working under deadlines.
Now noticing that the post benefited from being neither too short nor too long for its content, and a look at modmixo continued that calibration of length, sites that match length to content rather than padding to hit some target are sites that respect both their material and their readers and this site does both.
Reading this prompted a brief but useful conversation with a colleague who happened to walk by, and a stop at elaniris extended that conversational seed, content that becomes a starting point for in person discussion rather than ending in solitary reading is content with social generative energy and this site has plenty of it apparently.
Skipped lunch to finish reading, which says something, and a stop at quaintotter kept me at my desk longer than planned, when content beats the lunch impulse the writer has done something genuinely impressive in an attention environment full of immediately satisfying alternatives competing for the same finite block of reader time.
Now considering the post as evidence that careful blog writing is still possible, and a look at palettemanor extended that evidence, the broader question of whether the modern web can sustain quality writing has obvious empirical answers in sites like this one and seeing them is reassuring even when they remain a minority overall today.
A clean piece that knew exactly what it wanted to say and said it, and a look at nectarmocha maintained the same clarity of intention, knowing the goal of a piece before writing is something most blog content lacks and the clarity of purpose here shows up in every paragraph for any careful reader to notice.
Well done, the writing is professional without being stiff, and the topic is treated with care, and a look at keenfoil reflected that approach, the kind of site I would point a colleague to if they asked for a reliable starting point on this topic in the future without any hesitation at all.
zoonuans.ru
Любимые программы всегда под рукой! Развлекательные ток-шоу, кулинарные баттлы, музыкальные конкурсы, реалити и интеллектуальные игры — всё в одном месте. Свежие выпуски, архив прошлых сезонов и эксклюзивные проекты. Включай в любое время, без рекламы и регистрации: https://kinogo-tv-shou.top/
Closed the post with a small satisfied sigh, and a stop at sleepcinemahotel produced the same gentle exhale, content that ends well is content that respects the rhythm of reading and the writers here have clearly thought about how their pieces close rather than just trailing off when they run out of things to say.
Granted I am giving this site more credit than I usually give new finds, and a look at danebase continued earning that credit, the calibration of how much trust to extend after limited exposure is something I do carefully and this site has earned more trust on shorter exposure than most due to consistent quality across.
Looking forward to seeing what gets published next month, and a look at duetdrive extended that anticipation across the broader site, finding myself looking forward to a sites future content rather than just consuming its existing content is a stronger commitment level than I usually reach with new finds and this site triggered that.
Worth flagging that the writing rewarded a second read more than I expected, and a look at domelounges produced the same second read benefit, content with hidden depths that emerge only on careful rereading is rare in the modern blog space and this site has clearly invested in that level of compositional density throughout.
Took a screenshot of one section to come back to later, and a stop at frondketo prompted another saved tab, the urge to capture and revisit specific pieces of content is something I rarely feel but when I do it tells me the work is worth more than the average passing read for sure.
Coming back to this one, definitely, and a quick visit to octanenebula only made me more sure of that, the kind of writing that makes you want to set aside time later rather than rushing through it now while distracted by everything else competing for attention on the screen today across so many tabs.
Without comparing too aggressively to other sources this one stands out for the right reasons, and a look at xunmora continued that distinctive quality, content that distinguishes itself through substance rather than style tricks is content with lasting differentiation and this site has clearly chosen substance based differentiation as its core editorial strategy.
Купить земельный участок https://novoesonino.ru в коттеджном поселке «Новое Сонино». Земли ИЖС с электричеством, дорогами и перспективой комфортного проживания за городом. Отличное место для строительства загородного дома в городском округе Домодедово.
Over the course of reading several posts here a pattern of quality has emerged, and a stop at minutemotel confirmed the pattern, the difference between sites that hit quality occasionally and sites that hit it consistently is huge and this site has clearly demonstrated the consistent kind through what I have read this morning.
Reading this confirmed a small detail I had been uncertain about, and a stop at presslaurel provided the source for further checking, content that supports verification through citations or links rather than just asserting facts is more trustworthy and this site has clearly built its credibility through that kind of verifiable approach consistently.
Beats most of the alternatives on the topic by a noticeable margin, and a look at mavqino did not change that at all, this is one of the better corners of the open internet for this kind of content and I am glad I clicked through rather than skipping past quickly like I usually do.
A well calibrated piece that knew its scope and stayed inside it, and a look at zirnora maintained the same scope discipline, scope creep is one of the failure modes of long blog posts and this site has clearly invested in the editorial discipline to prevent it which shows up in tightly contained pieces.
Now recognising the editorial wisdom of letting some questions remain open at the end, and a look at dealluma continued that intellectual honesty, content that does not force closure on contested questions is content that respects the limits of knowledge and this site has clearly developed the maturity to know when to leave space.
Took a screenshot of one section to come back to later, and a stop at pilotlobe prompted another saved tab, the urge to capture and revisit specific pieces of content is something I rarely feel but when I do it tells me the work is worth more than the average passing read for sure.
Decided this was the best thing I had read all morning, and a stop at lyrelinden kept that ranking intact, ranking my reading is something I do mentally throughout the day and the top rank is competitive and not easily won but this site won it without needing to overstate its claims for that.
Thanks for putting in the work to make this approachable, plenty of sites cover the same ground but most do it badly, and a quick visit to rangermemo confirmed this one stands apart, simple language and useful examples without anyone trying to sell me anything along the way which I really appreciated.
However measured this site clears the bar I set for sites I take seriously, and a stop at plumcovegoodsroom continued clearing that bar, the metrics I use for site quality are admittedly informal but they are consistent and this site has cleared them on multiple measurements across multiple visits which is meaningful for my evaluation.
However many similar pages I have read this one taught me something new, and a stop at tavlizo added more new material, content that contributes genuinely fresh information rather than recycling what is already widely available is content with real informational value and this site is providing that informational freshness at a notable rate.
Now feeling confident enough in this site to use it as a reference point for evaluating others on the same topic, and a look at needlematrix continued the comparison friendly quality, sites that serve as quality benchmarks for their topic are precious and this one has clearly become a benchmark for me on this particular subject area.
Now realising the post solved a small problem I had been carrying for weeks, and a look at quarknebula extended that problem solving function, content that connects to specific unresolved questions in my own life rather than just providing general interest is content with real practical impact and this site is providing that practical value.
Reading this prompted a brief but useful conversation with a colleague who happened to walk by, and a stop at palettemauve extended that conversational seed, content that becomes a starting point for in person discussion rather than ending in solitary reading is content with social generative energy and this site has plenty of it apparently.
edibles shop in prague hashish shop in prague
A nicely understated post that does not shout for attention, and a look at savennkga maintained the same quiet quality, understatement is a stylistic choice that distinguishes serious writing from attention seeking writing and this site has clearly committed to the understated approach as a core editorial value rather than just a phase.
One of the more thoughtful posts I have read recently on this topic, and a stop at danebox added even more weight to that impression, this is genuinely good content that holds its own against far better known sites in the same space without trying to imitate any of them at all which I appreciate.
Honestly the simplicity is what makes this work, the topic is not buried under filler words or overly complex examples, and a quick look at octanepinto showed the same sensible style, I left with what I came for and no headache from over reading which is a real win these days.
diazepam online uk
Reading this triggered a small reorganisation of my own thinking on the topic, and a stop at palmmill furthered that reorganisation, content that affects the shape of my mental model rather than just decorating it with new facts is content with structural rather than informational impact and this site provides that.
Now recognising that this site has earned a place in the small group of resources I treat as authoritative, and a stop at duetparish confirmed that placement, the difference between resources I trust and resources I just consume is real and this site has clearly moved into the trusted category through consistent quality over time.
Came here from a search and stayed for the side links because they were that interesting, and a stop at xunqiro took me even further into the site, the kind of organic exploration that good content invites is something most sites kill through aggressive interlinking and pushy navigation choices rather than relying on quality.
Granted I am giving this site more credit than I usually give new finds, and a look at nexdeck continued earning that credit, the calibration of how much trust to extend after limited exposure is something I do carefully and this site has earned more trust on shorter exposure than most due to consistent quality across.
Glad I clicked through from where I did because this turned out to be worth the time spent, and after knackpacts I had a fuller picture, the kind of content that earns its visitors through delivering value rather than chasing them through aggressive advertising or constant pop ups appearing everywhere on the screen lately.
Honestly impressed, did not expect to find this level of care on the topic, and a stop at pressparsec cemented the impression, you can tell within the first few paragraphs whether a site is going to be worth the time and this one delivered on that early promise nicely throughout the rest of what I read.
Reading this between meetings turned out to be the most useful thing I did all afternoon, and a stop at mavquro kept that productivity feeling going, content can sometimes outperform actual work in terms of what gets accomplished mentally and this site managed that today which is genuinely a high bar to clear consistently.
Different feel from the algorithmically optimised posts that dominate the topic, and a stop at designledmarketplace reinforced that human touch, you can tell when a site is being run by someone who reads what they publish versus someone just hitting submit and moving on quickly to the next assignment without checking the result.
More substantial than most of what I find searching for this topic online, and a stop at zirqano kept that quality consistent, this is one of those sites where the writing actually rewards careful reading rather than punishing the patient reader with empty filler stretched out across long paragraphs that say very little.
Even from a single post the editorial care is clear, and a stop at qivmora extended that care across more pages, the kind of attention to quality that shows up in every paragraph is what separates serious sites from the rest and this one has clearly invested in that paragraph level attention across what I have read.
Reading this on the train into work was a better use of the commute than my usual choices, and a stop at modrivo extended that commute reading well, content that improves transit time rather than just filling it is content with practical benefit and this site has earned its place in my morning commute reading rotation.
A memorable post for me on a topic I had thought I was tired of, and a look at dealmixo suggested the same site can refresh other tired topics, sites that can revive my interest in subjects I had written off as exhausted are doing rare work and this one is clearly doing that for me today.
A clean read with no irritations, and a look at kelpfancy continued that frictionless quality, the absence of small irritations is something I notice only when present elsewhere and this site is one of the rare places where everything just works and lets me focus on the substance rather than fighting the format.
Looking at this objectively the editorial quality is hard to deny even setting aside personal taste, and a stop at pipmyrrh maintained the same objective quality, the gap between what I personally enjoy and what is objectively well crafted exists and this site clears both bars simultaneously which is rarer than it sounds.
Looking for similar voices elsewhere has come up empty in my recent searches, and a stop at mirelogic extended the search frustration, the rare site that does what no other does in quite the same way is precious and this one has clearly developed a particular approach that I have not been able to find duplicates of.
Easy to recommend, the content speaks for itself without needing additional praise from me, and a stop at plumvendor only adds more reasons to send people this way, the kind of generous resource that benefits its readers without demanding anything in return is increasingly rare and worth recognising clearly today across the broader open internet.
Reading this confirmed a small detail I had been uncertain about, and a stop at vanqiro provided the source for further checking, content that supports verification through citations or links rather than just asserting facts is more trustworthy and this site has clearly built its credibility through that kind of verifiable approach consistently.
Will be back, that is the simplest way to say it, and a quick visit to fumefig reinforced the decision, this site has earned a spot in my regular rotation alongside a few other reliable places I check when I want something genuinely informative without all the usual modern web noise getting in the way.
Looking back on this reading session it stands as one of the better ones recently, and a look at rangerorca extended that ranking, the informal ranking of reading sessions against each other is something I do mentally and this session ranks high largely because of this site and a couple of related pages here.
Cuts through the usual marketing fluff that dominates this topic online, and a stop at lakepeach kept the same clean approach going, this is the kind of writing that respects the reader’s time rather than wasting it on repetitive setups before finally getting to the point at hand which is what most sites do.
Decided this was the kind of site I would defend in a discussion about good blog content, and a stop at neonmotel reinforced that, very few sites earn active defence rather than passive consumption and this one has clearly crossed that threshold for me without needing any explicit pitch from the writers themselves either.
Most of the time I feel the open web is in decline and then I find a site like this, and a stop at elffleet reinforced that mood lift, the cumulative effect of finding occasional excellent independent content versus the cumulative effect of finding mostly mediocre content is real for the long term reader maintaining web habits today.
adult monopoly [url=https://www.imonopoly.live]https://imonopoly.live/[/url]
casino scores monopoly live india [url=https://monopolylives.com/]casino scores monopoly live india[/url].
monopoly apk [url=http://www.monopoly-live-bd.com]https://monopoly-live-bd.com/[/url]
Genuinely useful read, the points are practical and easy to apply right away, and a quick look at quarkpivot confirmed that this site is consistent in that approach, looking forward to digging through the rest of it when I get the chance to sit down properly later in the week or this weekend.
vulkan vegas casino online vulkanvegas [url=https://www.play24-vulkan.com]https://play24-vulkan.com/[/url]
A welcome reminder that thoughtful writing still happens online, and a look at tavmixo extended that reassurance, the modern web makes it easy to forget that careful writing exists and finding sites that practice it is a small antidote to the cynicism that builds up from too much exposure to algorithmic content.
online casino vulkan vegas [url=http://vulkan-casino3.com/]https://vulkan-casino3.com/[/url]
vulkan kasyno pl [url=https://vulkan-casino-onlayn.com/]https://vulkan-casino-onlayn.com/[/url]
solana online casino [url=https://solanagxy.com/]solana online casino[/url].
A piece that suggested careful editing without showing the marks of the editing, and a look at pansyoboe continued that invisible polish, the best editing disappears into the prose and this site reads as having been edited with skill that does not announce itself which is the highest compliment I can offer any blog content.
Felt the post was written for someone like me without explicitly addressing me, and a look at odelatte produced the same fit, when content lands on its target without pandering you know the writer has done careful audience thinking rather than relying on demographic targeting or interest signals to do the work of editorial decisions.
888 [url=multitaskingmaven.com]https://multitaskingmaven.com/[/url]
Polished and informative without feeling overproduced, that is the sweet spot, and a look at zalqino hit it again, you can tell when a site has been built with care versus thrown together for the sake of having something to put online and this is clearly the former approach taken by the team.
Liked that the post landed without needing to manufacture controversy or take a contrarian stance for attention, and a stop at primpivot continued that grounded approach, content that earns attention through quality rather than provocation is the kind that builds long term trust rather than burning it on quick wins.
Generally I do not leave comments but this post merits a small note, and a stop at fernbureau extended that comment worthy quality, the urge to actively contribute to a sites community rather than passively consume from it is something specific content provokes and this site has provoked that engagement urge from me today.
Reading this in a quiet coffee shop matched the calm energy of the writing, and a stop at mavtoro extended that environmental match, content that has its own ambient quality which can match or clash with surroundings is content with a personality and this site has the kind of personality that suits calm reading.
Honestly this was the highlight of my reading queue today, and a look at darebulb extended that across more pages I will return to, ranking what I read against what else I read each day is something I do informally and this site keeps moving up in those rankings the more I explore it.
Now feeling the small relief of finding writing that does not condescend, and a stop at zirqiro extended that respect for readers, content that treats its audience as capable adults rather than as people to be managed produces a different reading experience and this site has clearly chosen the respectful approach across all pieces.
A piece that left me thinking I had been undercaring about the topic, and a look at dealrova reinforced that mild concern, content that raises the appropriate weight of a subject without being preachy about it is doing important work and this site is providing that gentle elevation of attention for me consistently.
Now realising the post solved a small problem I had been carrying for weeks, and a look at macrolush extended that problem solving function, content that connects to specific unresolved questions in my own life rather than just providing general interest is content with real practical impact and this site is providing that practical value.
Reading this fit naturally into my afternoon walk because I was reading on my phone, and a stop at pippierce continued well in that walking format, content that survives mobile reading without becoming awkward is content with format flexibility and this site has clearly thought about how it reads across different devices today.
Reading this site over the past week has changed how I evaluate content in this space, and a look at nervemuscat extended that recalibration, the standards I bring to reading on the topic have shifted upward as a direct result of regular exposure to this kind of work and that shift will outlast any single reading session.
A piece that handled multiple complications without becoming confused, and a look at mirthlinnet continued that organisational clarity, holding multiple threads in a single piece without losing any of them is a sign of skilled writing and this site has clearly developed the editorial discipline to manage complexity without sacrificing readability throughout.
Genuinely useful read, the points are practical and easy to apply right away, and a quick look at neatglyphs confirmed that this site is consistent in that approach, looking forward to digging through the rest of it when I get the chance to sit down properly later in the week or this weekend.
Рекомендую ресурс, посвящённый теме вариаторов, их обслуживанию и ремонту. На портале можно найти общие сведения об устройстве этой трансмиссии, возможных неисправностях и методах их диагностики. В материалах сайта рассматриваются различные аспекты эксплуатации вариаторов, что может быть полезно для общего понимания их работы – https://provariatory.ru/
Reading this slowly to give it the attention it deserved, and a stop at lanellama earned the same slow read, choosing to read slowly is a small act of respect for content quality and very few sites earn that respect from me but this one did so without any explicit ask which is the cleanest way.
Decided to subscribe to the RSS feed if there is one, and a stop at realmmercy confirmed that decision, content that I want delivered to me proactively rather than just remembered when I have time is content that has earned a higher level of commitment from me as a reader looking for reliable sources.
Thanks for the clean writing, no broken sentences and no awkward translations like some other sites have, and a quick stop at premiumdesignandliving kept that polish going nicely, it really does make a difference when a reader can move through a page without tripping on every line or going back to reread.
Speaking as someone who used to recommend blogs frequently and got out of the habit this site is rekindling that impulse, and a look at vanquro extended the rekindling, the recovery of an old habit triggered by encountering work that justifies it is itself a small kind of pleasure and this site is providing that recovery experience.
diazepam online uk
In the middle of an otherwise scattered day this post landed as a moment of focus, and a stop at peonyolive extended that focused feeling across more pages, content that anchors a fragmented day rather than contributing to the fragmentation is content with real centring effect and this site is providing that anchoring function for me.
Started reading and ended an hour later without realising the time had passed, and a look at kelpgrip produced the same time dilation effect, when content makes time feel different the writer has achieved something well beyond the average and this site is producing that experience for me reliably across multiple readings.
Even from a single post the editorial care is clear, and a stop at quaymicro extended that care across more pages, the kind of attention to quality that shows up in every paragraph is what separates serious sites from the rest and this one has clearly invested in that paragraph level attention across what I have read.
My friends would appreciate a few of these posts and I will be sending links accordingly, and a look at pantheroffer added more pages to my share queue, content that earns shares to specific people in specific contexts is content with social utility and this site is generating those targeted shares from me consistently lately.
Now realising this site has been quietly doing good work for longer than I knew, and a look at nexmixo suggested an archive worth exploring, sites with deep archives of consistent quality represent a different kind of resource than sites with viral hits and this one looks like the durable kind based on what I see.
Bookmark earned and shared the link with one specific person who would care, and a look at tavnero got the same targeted share, sharing carefully rather than broadcasting is a discipline I try to maintain and this site is generating shares from me at a sustainable rate rather than the spam rate of viral content.
Honest assessment is that this is one of the better short reads I have had this week, and a look at fumefinch reinforced that, the bar for short content is low because most of it sacrifices substance for brevity but this site manages both at once which is harder than it sounds for most writers attempting it.
Honestly this was a good read, no jargon and no padding, and a short look at prismplanet kept that same feel going which I really appreciated, the writer clearly knows the topic well enough to explain it without hiding behind big words or filler that often gets used to seem clever.
Купить квартиру https://kupi-kvartiruspb.ru или апартаменты в Курортный район Санкт-Петербурга. Жилые комплексы рядом с Финским заливом, парками и зонами отдыха. Комфортные планировки, современные дома и удобная транспортная доступность.
However selective I am about new bookmarks this one made it past my filter, and a look at melqavo confirmed the bookmark was worth the slot, the precious slots in my permanent bookmark folder are difficult to earn and this site earned one without making me think twice about whether the slot was justified by the quality.
Reading this slowly to give it the attention it deserved, and a stop at zarqiro earned the same slow read, choosing to read slowly is a small act of respect for content quality and very few sites earn that respect from me but this one did so without any explicit ask which is the cleanest way.
Solid stuff, the kind of post that I will probably refer back to later this month when the topic comes up again, and a look at qivnaro only confirmed I should bookmark the site as a whole rather than just this single page for future reference and use across coming weeks.
Нужен участок? новое растуново участки отличное решение для строительства загородного дома. Участки ИЖС, удобный подъезд, электричество и развитая инфраструктура. Комфортное место для постоянного проживания недалеко от Москвы.
Walked away with a clearer head than I had before reading this, and a quick visit to modrova only sharpened that, the writing has a way of cutting through the noise that surrounds most topics online which is something I will definitely remember the next time I am searching for an answer to anything.
Sets a higher bar than most of what shows up in search results for this topic, and a look at piscesmyrtle did not lower that bar at all, in fact it confirmed the impression, this is the kind of consistency that earns a place in regular rotation for serious readers instead of casual scrollers passing through.
Decided not to skim despite my usual habit and was rewarded for the discipline, and a stop at fernpier earned the same patient approach, training myself to recognise sites that warrant slower reading is part of being a careful online reader and this site is the kind that helps me practice that skill regularly.
Reading this between meetings turned out to be the most useful thing I did all afternoon, and a stop at findinspirationdaily kept that productivity feeling going, content can sometimes outperform actual work in terms of what gets accomplished mentally and this site managed that today which is genuinely a high bar to clear consistently.
Started reading skeptically because the headline seemed overconfident, and the post earned the headline by the end, and a look at zirvani continued that pattern of earning its claims, sites that can back up their headlines without overpromising are rare and this one has clearly developed editorial calibration on that front consistently.
Рекомендую ресурс, посвящённый теме вариаторов, их обслуживанию и ремонту. На портале можно найти общие сведения об устройстве этой трансмиссии, возможных неисправностях и методах их диагностики. В материалах сайта рассматриваются различные аспекты эксплуатации вариаторов, что может быть полезно для общего понимания их работы https://provariatory.ru/
Excellent post, balanced and well organised without showing off, and a stop at darechip continued in that same vein, this site has clearly figured out the formula for content that works for readers rather than for search engine ranking signals which is harder than it sounds today and worth real recognition from anyone.
Now noticing that the post never raised its voice even when making a strong point, and a look at nickelpearl continued that calm volume, content that can make important points without resorting to typographic emphasis or emotional appeal is content that trusts its substance to do the work and this site has that confidence consistently.
Top notch writing, every paragraph carries weight and nothing feels like filler, and a stop at trendworldmarket reflected that same care, a rare thing on the open web these days where most pages exist for clicks rather than actual reader value or anything close to that which is honestly a real shame.
Adding to the bookmarks now before I forget, that is how good this is, and a look at elmhex confirmed the rest of the site is worth saving too, this is one of those rare finds that justifies the time spent searching the web for once which is a relief in the current environment.
Reading this gave me a small framework I expect to use going forward, and a stop at larksmemo extended that framework, content that produces transferable mental models rather than just specific facts is content with multiplicative value and this site is providing those models at a rate that justifies extra attention from me regularly.
Bookmark earned, calendar reminder set, share queued, all from one good post, and a look at modelmetro did the same, when a single reading session triggers multiple downstream actions you know the content has actually moved me beyond the page and this site is moving me at that higher level reliably.
Now placing this in the same category as a few other sites I have come to trust, and a look at jovenix continued the placement decision, the small category of fully trusted sites is one I extend rarely and only after multiple positive reading sessions and this site has earned the category placement methodically over time.
Glad the writer kept this short rather than padding it out, the points stand on their own without needing extra context, and a look at realmplaid kept the same approach going, brevity is a sign of confidence in the substance and the team here clearly trusts their content to land without filler.
Stands apart from similar pages by actually being useful, that is high praise these days, and a look at queenmanor kept that standard going, you can tell when a site is built around the reader versus around metrics and this one clearly belongs to the first category for sure based on what I read.
Learned something from this without having to dig through layers of fluff, and a stop at elitefests added a bit more context that helped tie things together for me, definitely a useful corner of the internet for anyone who wants real information without the usual marketing nonsense around it that often ruins similar pages.
Decided to read this site for a while before forming a verdict, and the verdict after several pages is positive, and a stop at velxari continued that pattern, judging a site requires more than one post and giving sites a fair sample is something I try to do for promising candidates rather than rushing to dismiss.
Reading this in segments because the day was busy, and the post survived the fragmented attention well, and a stop at parademiso held up similarly under interrupted reading, content that can withstand modern distracted reading patterns rather than requiring a perfect block of focused time is increasingly the kind I prefer.
Reading this triggered a small change in how I think about the topic going forward, and a stop at privetplain reinforced that subtle shift, the rare content that actually moves my thinking rather than just confirming or filling it is the kind I most value and this site is providing that kind of impact today.
Мы помогаем получить справки об инвалидности без лишней бюрократии и длительного ожидания https://spravka-invalid.com/kontakty/
A piece that did not require external context to follow, and a look at magmalong maintained the same self contained quality, content that stands alone without forcing readers to chase prerequisites is more accessible and this site has clearly thought about how each piece can serve a fresh visitor rather than only existing members.
Will share this on a forum I am part of where it will be appreciated by others working in the same area, and a look at zelqiro suggests there is more here worth passing along too, definitely a generous resource that deserves a wider audience than it probably has today across the open internet.
Solid post, the structure is easy to follow and the language stays simple even when the topic gets a bit more involved, and a look at pivotllama kept that same standard going, so I left feeling like the time spent here was actually worth something for once which is rare lately.
Reading this in the time it took to drink half a cup of coffee, and a stop at explorenewopportunities fit naturally into the second half, content that respects the rhythms of a typical morning is content with practical fit and this site has the kind of length and pacing that works for the way I actually read.
Liked the post enough to read it twice and the second read found new things, and a stop at kelpherb similarly rewarded the second look, content with hidden depths that only reveal themselves on careful rereading is the rare kind that earns lasting respect rather than fleeting first impressions only briefly held.
Even from a single post the editorial care is clear, and a stop at tavqino extended that care across more pages, the kind of attention to quality that shows up in every paragraph is what separates serious sites from the rest and this one has clearly invested in that paragraph level attention across what I have read.
ЖК премиум-класса https://kvartiry-spb78.ru от застройщика — современные квартиры с продуманными планировками, высоким уровнем комфорта и развитой инфраструктурой. Закрытая территория, подземный паркинг, благоустроенные дворы и престижное расположение для комфортной жизни.
Нужна декоративная лепнина? лепнина стильный декоративный элемент для интерьера. Карнизы, молдинги, колонны и розетки помогают создавать выразительный дизайн помещений. Материал устойчив к влаге, долговечен и легко устанавливается.
Honestly informative, the writer covers the ground without showing off, and a look at noonlinnet reflected the same humility, content that respects the reader rather than trying to dazzle them is something I always appreciate and rarely come across in this corner of the internet today across the topics I usually read.
If I were to recommend a starting point for the topic this site would be near the top of my list, and a stop at firminlet reinforced that recommendation status, the small list of starting point recommendations I keep for friends asking about topics is short and this site is now firmly on it.
Genuine pleasure to read, and that is not something I say often after a casual click through, and a quick visit to portatelier kept the same feeling going across the rest of the site, finding writing that actually feels good to spend time with rather than just functional is increasingly rare on the open web.
Felt the writer was speaking my language without trying to imitate it, and a look at fumegrove continued that natural fit, when a writers default voice happens to match what you find easy to read the experience feels frictionless and that is something I notice and remember about specific sites going forward.
A piece that prompted a small mental rearrangement of how I order related ideas, and a look at datacabin extended that rearranging effect, content that affects the structure of my thinking rather than just adding to it is content with the deepest kind of impact and this site is reaching that depth for me today.
Liked how the post handled an objection I was forming as I read, and a stop at zorkavi similarly anticipated where my thinking was going next, the rare writer who can predict reader concerns and address them in advance is doing something most online content fails to do despite that being basic editorial work.
Now adding a small note in my reading log that this site is one to watch, and a look at lattepinto reinforced the watch status, the few sites I track deliberately rather than encounter accidentally are sites I expect ongoing returns from and this one has cleared the bar for that elevated tracking based on what I read.
Really appreciate this kind of writing, no shouting and no clickbait headlines just steady useful content, and a quick look at trendandfashion kept that going, definitely a site I will be returning to whenever I need a sensible take on similar topics in the days ahead and also during slower work weeks.
Well structured and easy to read, that combination is rarer than people think, and a stop at questloft confirmed the same standard runs across the rest of the site, definitely the kind of place I will be coming back to when this topic comes up in conversation later again over the weeks ahead.
Skipped the comments section but might come back to read it, and a stop at nexmuzo hinted at a quality reader community, sites where the comments are worth reading separately from the post are increasingly rare and signal a particular kind of audience that has grown around the editorial vision over time gradually.
A piece that reads as if the writer trusted readers to fill in obvious gaps, and a look at mossmute continued that respectful approach, content that does not over explain what the reader can infer is content that respects intelligence and this site has clearly chosen to write to capable readers rather than to the lowest common denominator.
Solid post, the structure is easy to follow and the language stays simple even when the topic gets a bit more involved, and a look at briskolive kept that same standard going, so I left feeling like the time spent here was actually worth something for once which is rare lately.
Glad to find a site whose links lead somewhere worth going rather than back to itself for SEO juice, and a stop at modtora kept that generous outbound feel, citing other peoples work with real respect rather than just for ranking signals is a sign of an honest operation worth supporting going forward.
After reading several posts back to back the consistent voice across them is impressive, and a stop at probelucid continued that voice consistency, sites that maintain a single coherent voice across many pieces by potentially many writers represent serious editorial discipline and this one has clearly developed the institutional consistency needed for that.
A piece that ended with a clean landing rather than fading out, and a look at parchmodel maintained the same crisp conclusions, endings that resolve rather than dissolve are a sign of careful structural thinking and this site has clearly invested in how its pieces conclude rather than letting them simply run out of energy.
Now sitting with the thoughts the post triggered rather than rushing on to the next thing, and a stop at qivzaro extended that reflective pause, content that earns time for thought after closing the tab is content of higher value than the merely interesting and this site has clearly produced that lasting effect today.
Most of the time I bounce off similar pages within seconds, and a stop at connectgrowachieve held me longer than I would have predicted, the ability to convert a likely bouncing visitor into an engaged reader is a quality signal and this site has demonstrated that conversion ability across multiple visits where I expected to bounce.
Skipped the related links section thinking I had read enough and then came back to it later when curiosity got the better of me, and a stop at velzaro confirmed I should have just read it first, every section of this site appears to deserve careful attention rather than skipping past lazily.
Now feeling mildly impressed in a way I do not quite remember feeling about a blog in a while, and a stop at plantmedal extended that mild impression, content that produces specific positive emotional responses rather than just neutral information transfer is content with extra dimensions and this site has those extra dimensions clearly.
Now realising the post has been quietly doing important work in my mind for the past hour, and a stop at elitedawns extended that quiet processing, content that continues to do work after I close the tab is content with afterlife in the mind and this site is producing those long lived effects at a meaningful rate.
The lack of unnecessary jargon made the post accessible without sacrificing accuracy, and a look at zelzavo continued in the same accessible style, technical topics often hide behind specialised vocabulary but here the writer trusts the reader to keep up with plain language and that trust pays off nicely throughout the entire post.
Мы помогаем оформить необходимые документы без лишних сложностей, включая справки, свидетельства и апостиль https://langwee-rus.com/soglasie-na-vyezd-rebenka/
Частные детские сады https://razvitie21vek.com в Москва для детей от раннего возраста. Развивающие программы, безопасная среда, квалифицированные воспитатели и подготовка к школе. Комфортные условия для обучения, общения и всестороннего развития ребенка.
Quietly the post solved something I had been turning over without quite knowing how to phrase the question, and a look at tavquro extended that quiet solving, content that addresses unformulated needs is content with reader insight and this site has demonstrated that insight at a high rate across the pieces I have read recently.
Reading this prompted me to subscribe to my first newsletter in months, and a stop at flareaisle confirmed the subscribe was the right call, content that earns a newsletter signup is content that has cleared a higher trust bar than a casual visit and this site has clearly earned that level of commitment from me.
Glad I gave this fifteen minutes rather than the usual three minute skim, and a look at elmhilt earned the same investment, time spent on quality content is rarely wasted but the reverse is also true and learning which sites deserve which kind of attention is part of being a careful online reader.
A quiet piece that did not try to compete on volume, and a look at whimharbor maintained that selective approach, sites that publish less but better are increasingly rare in an environment that rewards volume and this one has clearly chosen quality cadence over quantity which is a brave editorial decision in current conditions.
A relief to read something where I did not have to fact check every claim mentally, and a look at ketohale continued that reliable feeling, sites where I can lower my guard and trust the content are rare and this one is earning that trust paragraph by paragraph through consistent careful work behind the scenes.
Even just sampling a few posts the consistency is what stands out, and a look at quilllava confirmed the broader pattern, sites where every piece I sample lives up to the standard set by the others are sites with serious quality control and this one has clearly invested in whatever editorial process produces that consistency reliably.
Now appreciating the way the post avoided the temptation to be longer than necessary, and a look at dealbrawn continued that lean approach, content with the discipline to stop when finished rather than padding for length is content that respects both itself and its readers and this site has that disciplined editorial culture clearly throughout.
Reading this in segments because the day was busy, and the post survived the fragmented attention well, and a stop at laurelleap held up similarly under interrupted reading, content that can withstand modern distracted reading patterns rather than requiring a perfect block of focused time is increasingly the kind I prefer.
Now recognising the specific pleasure of reading writing that shows real care for sentence shapes, and a look at zorlumo extended that craft pleasure, sentence level writing quality is something most blog content ignores entirely and this site has clearly invested in the prose layer alongside the substance which is rare today.
Bookmark folder created specifically for this site, and a look at probemason confirmed the dedicated folder was the right call, dedicated folders for individual sites are a level of organisation I rarely deploy and this site has earned that level of dedicated tracking based on the consistency I have seen so far across sessions.
Steam Desktop Authenticator https://sdasteam.com (SDA). It allows you to generate account login codes and automatically confirm trades or item sales on the Community Market without using your smartphone.
Honestly enjoyed reading this more than I expected to when I first clicked through, and a stop at makernavy kept that pleasant surprise going, sometimes you stumble onto a site that just clicks with how you like to read and this is one of those for me right now today which is great.
Came away feeling slightly smarter than I was when I started, that is a real win, and a stop at cadetarena added a bit more to that, the rare site that actually transfers some of its knowledge to the reader in a way that sticks rather than just creating an illusion of learning briefly.
If I were to recommend a starting point for the topic this site would be near the top of my list, and a stop at createfuturepossibilities reinforced that recommendation status, the small list of starting point recommendations I keep for friends asking about topics is short and this site is now firmly on it.
I learned more from this short post than from longer articles I read earlier today, and a stop at plasmapiano added even more useful detail without going off topic, this site clearly knows how to keep things focused without sacrificing depth which is a hard balance to strike for any writer.
Honestly this kind of writing is why I still bother to read independent sites, and a look at parcohm extended that broader reflection, the few sites that justify continued attention to non algorithmic content are sites like this one and finding them periodically is enough to keep my reading habits oriented toward independent rather than aggregated content.
Good post, the kind that respects the reader by getting to the point quickly without skipping the details that matter, and a short look at fumehull confirmed that approach is consistent across the site which is rare to find online these days, definitely a place I will return to soon.
Beyond the immediate post itself the editorial sensibility behind the site is what struck me, and a stop at motelmorel continued displaying that sensibility, content that reveals editorial choices through accumulated reading is content with structural quality and this site has clearly developed an underlying approach worth identifying through multiple sessions of reading.
This filled in a gap in my understanding that I had not even noticed was there, and a stop at venluzo did the same, the kind of post that gives you more than you expected when you first clicked through from somewhere else, a real find for anyone curious about the area covered here.
Polished and informative without feeling overproduced, that is the sweet spot, and a look at musebeats hit it again, you can tell when a site has been built with care versus thrown together for the sake of having something to put online and this is clearly the former approach taken by the team.
Мы помогаем клиентам избежать лишней бюрократии при оформлении справок, свидетельств и апостиля https://langwee-rus.com/spravka-o-razvode/
Справки об инвалидности востребованы при оформлении пенсий, льгот и социальных программ. Наша компания помогает оперативно подготовить документы и сэкономить время клиентов https://spravka-invalid.com/o-kompanii/
Picked this up while looking for something else and ended up reading every paragraph because it was actually informative, and after tavzoro I was sure I would come back, that does not happen often when most sites bury the useful parts under endless ads and pop ups today and across most categories online.
Steam Desktop Authenticator https://authenticatorsteamdesktop.com is a PC app that lets you use the Steam Mobile Authenticator on your computer. It supports trade confirmation, account security, and managing two-factor authentication codes without using your smartphone.
Going to come back when I have more time to read carefully, the post deserves more than a quick scan, and a stop at flarefest reinforced that, this is the kind of site that rewards a slower read which is hard to find in this fast paced corner of the internet but really worthwhile.
Started imagining how I would explain the topic to someone else after reading, and a look at modvani gave me more material for that imagined explanation, content that improves my own ability to discuss a topic is content that has actually transferred knowledge rather than just decorating my screen for a few minutes.
Came here from a search and stayed for the side links because they were that interesting, and a stop at quincenarrow took me even further into the site, the kind of organic exploration that good content invites is something most sites kill through aggressive interlinking and pushy navigation choices rather than relying on quality.
Decided not to skim despite my usual habit and was rewarded for the discipline, and a stop at probemound earned the same patient approach, training myself to recognise sites that warrant slower reading is part of being a careful online reader and this site is the kind that helps me practice that skill regularly.
Reading this gave me material for a conversation I needed to have anyway, and a stop at nexzaro added even more talking points, content that connects to upcoming social or professional needs rather than just being interesting in the abstract is the kind that earns priority placement in my attention these days routinely.
Came in for one specific question and got answers to three I had not even thought to ask, and a look at deanburst extended that bonus value pattern, the kind of resource that anticipates reader needs rather than just answering the literal question asked is the gold standard and this site reaches it.
More substantial than most of what I find searching for this topic online, and a stop at qonzavi kept that quality consistent, this is one of those sites where the writing actually rewards careful reading rather than punishing the patient reader with empty filler stretched out across long paragraphs that say very little.
Once I had read three posts the editorial pattern was clear, and a look at platenavy confirmed the pattern from a fourth angle, sites where the underlying approach reveals itself through accumulated reading rather than being announced are sites with real depth and this one has that quality clearly visible across multiple pieces consistently.
Thanks for treating the topic with the seriousness it deserves without becoming pompous about it, and a stop at cadetgrail continued that balanced treatment, the gap between earnest and self serious is huge and writers who can stay on the right side of it earn my respect when I find them online today.
Glad I gave this a chance rather than scrolling past, and a stop at embervendor confirmed I made the right call, sometimes the best content is hidden behind unassuming headlines that do not scream for attention and learning to slow down and check those out has paid off many times now across years of reading.
Reading this in a moment of low energy still kept my attention, and a stop at ketojib continued that engagement under suboptimal conditions, content that survives the reader being tired is content with extra reserves of pull and this site has the kind of writing that holds up even when I am not at my reading best.
Felt slightly impressed without being able to point to one specific reason, and a look at moundlong continued that diffuse positive feeling, when content works at a level you cannot easily articulate the writer is doing something with craft rather than just delivering information and that is something I have learned to recognise.
Получение справок и свидетельств может занимать много времени. Наша компания помогает ускорить процесс и при необходимости организует проставление апостиля на документы https://apostilium-msk.com/spravka-s-mesta-raboty/
Honestly informative, the writer covers the ground without showing off, and a look at venmizo reflected the same humility, content that respects the reader rather than trying to dazzle them is something I always appreciate and rarely come across in this corner of the internet today across the topics I usually read.
Reading this gave me a small jolt of recognition for an experience I thought was just mine, and a stop at oakarenas produced more such jolts, content that universalises private experiences without flattening them is doing genuinely useful work and this site is providing that recognition function for me reliably across topics I read.
Skipped a meeting reminder to finish the post, and a stop at furlkale held me past another reminder, when content beats meetings the writer is doing something extraordinary because meetings have institutional support behind them and yet good writing can still occasionally win that competition for attention which I find heartening today.
This filled in a gap in my understanding that I had not even noticed was there, and a stop at micapacts did the same, the kind of post that gives you more than you expected when you first clicked through from somewhere else, a real find for anyone curious about the area covered here.
Looking forward to seeing what gets published next month, and a look at promparsley extended that anticipation across the broader site, finding myself looking forward to a sites future content rather than just consuming its existing content is a stronger commitment level than I usually reach with new finds and this site triggered that.
Looking for similar voices elsewhere has come up empty in my recent searches, and a stop at quiverllama extended the search frustration, the rare site that does what no other does in quite the same way is precious and this one has clearly developed a particular approach that I have not been able to find duplicates of.
Excellent execution from start to finish, the post never loses its rhythm and the points stay sharp, and a quick stop at tilvexa kept the same level going, consistency like this across a site is the marker of a serious operation rather than a casual side project running on autopilot somewhere else.
Loved the writing voice here, friendly without being fake and confident without being arrogant, and a stop at mallowmorel carried the same tone forward, the kind of personality that makes a reader feel welcome rather than lectured at which is a balance plenty of writers struggle to find no matter how long they have been at it.
A piece that read as if the writer was thinking carefully rather than just typing fluently, and a look at plazaomega continued that considered quality, the difference between fluent typing and careful thinking shows up in writing and this site reads as the product of thought rather than just the product of language fluency apparently.
Reading this brought back the satisfaction I used to get from blogs ten years ago, and a stop at lumvanta kept that nostalgic quality alive, sites that capture what was good about an earlier era of internet writing are increasingly precious and this one is doing that without feeling like a deliberate throwback at all.
Granted my mood today might be elevating my reading experience but I still think this is genuinely good, and a stop at clippoise reinforced that even discounted assessment, controlling for the mood adjustment that affects content perception this site still reads as substantively above average across multiple pieces I have read carefully today.
Picked up something useful for a side project, and a look at venqaro added another piece I will incorporate, content that connects to specific projects I am working on is content with practical utility and the practical utility of this site is showing up across multiple posts I have read in the last hour or so.
A slim post with substantial content per word, and a look at mountmorel maintained the same density, the content per word ratio is something I track informally and this site scores high on that ratio compared to most sources I read regularly which is a quiet indicator of careful editorial work behind the scenes.
Just wanted to drop a quick note saying this was a useful read on a topic I have been circling, no fluff, and a stop at modvilo added a few extra points that fit the same simple style which makes the whole site feel coherent rather than thrown together by many different writers with different goals.
Over the course of reading several posts here a pattern of quality has emerged, and a stop at ketojuly confirmed the pattern, the difference between sites that hit quality occasionally and sites that hit it consistently is huge and this site has clearly demonstrated the consistent kind through what I have read this morning.
Thanks for taking the time to write this, it is clear that some thought went into how each point would land, and after I went through modernpremiumhub I had a better grip on the topic, real value without the usual marketing noise people have to put up with online when searching for answers.
Following a few of the internal links revealed more posts of similar quality, and a stop at propelmural added more to that growing pile, sites where internal links lead to more good content rather than to more of the same recycled material are sites with depth and this one has clearly built that depth carefully.
Honestly this hits the sweet spot between detail and brevity, no rambling and no shortcuts, and a quick visit to nolvexa kept that going across the related pages, the kind of place that respects your attention without trying to grab it through cheap tactics or attention seeking design choices that get tired fast.
Decided I would read the archives over the weekend, and a stop at rabbitmaple confirmed that the archives would be worth the time, very few sites have archives I would actively read through but this one has earned that level of interest based on the consistent quality across what I have sampled so far.
Will be sharing this with a couple of people who care about the topic, and a stop at fernbureaus added more material worth passing along, the kind of site that is generous with quality content and does not make you jump through hoops to access it which is appreciated more than the team probably realises.
Steam Desktop Authenticator https://steamdesktopauthenticator.net is a popular solution for Steam users who need access to Steam Guard features on their computer. It conveniently verifies actions, protects your account, and manages authentication in a single app.
Reading this confirmed that my time researching the topic in other places had not been wasted, and a stop at ploverlily extended the confirmation, when independent sources agree that is a useful signal and this site is one of the more reliable sources I have found for cross checking what I read elsewhere on similar subjects.
Honest assessment is that this is one of the better short reads I have had this week, and a look at qorlino reinforced that, the bar for short content is low because most of it sacrifices substance for brevity but this site manages both at once which is harder than it sounds for most writers attempting it.
уборка квартир в москве
Заказывали восстановление свидетельства о рождении и оформление апостиля. Работа выполнена оперативно, все документы были подготовлены в соответствии с требованиями https://apostilium-msk.com/konsulskaya-legalizaciya/
Comfortable reading experience throughout, no jarring tone shifts and no awkward formatting, and a look at quickmeadow kept that smooth feel going, the kind of editorial polish that goes unnoticed when present but glaring when absent is something this site has clearly invested in across the broader content as well which deserves recognition.
Generally I find the content on similar topics frustrating in specific ways and this post avoided all of them, and a look at curiopact continued that frustration free experience, content that sidesteps the standard failure modes of its genre is content with editorial awareness and this site has clearly studied what fails elsewhere consistently.
A clear cut above the usual noise on the subject, and a look at prowlocean only made that gap wider in my view, the kind of place that earns its visitors through quality rather than through aggressive marketing or sponsored placements which is increasingly the only way most sites stay afloat across the modern web.
Now I want to find more sites like this but I suspect they are rare, and a look at muffinmarble extended that thought, the few sites that meet this quality bar are precious specifically because they are rare and finding others like them is one of the ongoing projects of careful internet curation across the years.
Thanks for the practical examples scattered through the post rather than abstract theory only, and a look at markpillow continued that grounded style, abstract points are easier to remember when paired with concrete situations and the writers here clearly understand how readers actually retain information from blog content reading sessions.
Took something from this I did not expect to find, and a stop at modernmindfulliving added another unexpected useful piece, content that exceeds expectations rather than just meeting them is the kind that builds enthusiasm and earns repeat visits without any explicit ask from the writer or platform behind the work being read.
Picked up a couple of new ideas here that I can actually try out, and after my visit to rabbitokra I have even more notes saved, this is the kind of resource that pays you back for the time you spend on it which is rare to come across in this corner of the web.
Клининговые услуги
Quietly enthusiastic about this site after the past few hours of reading, and a stop at ploverpatio extended that enthusiasm, the calibration of enthusiasm to evidence is something I try to maintain and this site has earned a calibrated quiet enthusiasm rather than the loud excitement that usually fades within a day or two of finding something.
Worth saying this site reads better than most paid newsletters I have tried, and a stop at duetparishs confirmed that comparison, the bar for free content is often lower than for paid but this site clears the paid bar consistently and that says something about the editorial approach behind the work being published here regularly.
Honestly this was a good read, no jargon and no padding, and a short look at khakifrost kept that same feel going which I really appreciated, the writer clearly knows the topic well enough to explain it without hiding behind big words or filler that often gets used to seem clever.
Sets a higher bar than most of what shows up in search results for this topic, and a look at modzaro did not lower that bar at all, in fact it confirmed the impression, this is the kind of consistency that earns a place in regular rotation for serious readers instead of casual scrollers passing through.
Picked something concrete from the post that I will use immediately, and a look at lilacneedle added another concrete piece, content that produces immediately useful output rather than just abstract appreciation is content that earns its place in my regular rotation without needing any further evaluation from me at this point honestly.
Felt the writer respected me as a reader without making a show of doing so, and a look at hovanta continued that quiet respect, this is the kind of small but meaningful detail that separates the sites I bookmark from the ones I close after a single skim and never return to again no matter how interesting the headline.
Генеральная уборка москва
A piece that did not waste any of its substance on sales or promotion, and a look at pruneoval continued that pure content focus, sites that resist the urge to monetise every paragraph are increasingly rare and this one has clearly made the editorial choice to keep the writing clean from commercial intrusion which I value highly.
Even just sampling a few posts the consistency is what stands out, and a look at dazzquay confirmed the broader pattern, sites where every piece I sample lives up to the standard set by the others are sites with serious quality control and this one has clearly invested in whatever editorial process produces that consistency reliably.
Bookmarking this for later, the kind of resource I want to keep nearby, and a quick look at noqvani confirmed the rest of the site is worth the same treatment, definitely going into my reference folder for the next time the topic comes up at work or in conversation with someone who asks.
Bookmark earned and shared the link with one specific person who would care, and a look at rabbitpale got the same targeted share, sharing carefully rather than broadcasting is a discipline I try to maintain and this site is generating shares from me at a sustainable rate rather than the spam rate of viral content.
Felt like the post had been edited rather than just drafted and published, and a stop at plumbpacer suggested the same care across the site, the difference between edited and unedited content is enormous for the reader and this site has clearly invested in the editing pass that most blogs skip entirely which really does show up.
Vague feelings of recognition kept surfacing as I read because the writing names things I have been thinking, and a look at qorzino produced more of those recognition moments, content that gives shape to private intuitions is content that makes me feel less alone in my own thinking and this site has that effect.
Really clear writing, the kind that makes you want to share the link with someone who has been asking about the topic, and a quick browse through mulchlens only made me more sure of that, the information here stays useful long after the first read is done which says a lot.
Now organising my browser bookmarks to give this site easier access, and a look at noonmyrrh earned the same organisational priority, the small acts of digital housekeeping I do for sites I expect to use often are themselves a measure of trust and this site has triggered the trust based housekeeping behaviour from me clearly.
Now adding this to a short list of sites I would defend in a conversation about the modern web, and a look at bravopiers reinforced that defence list, the few sites that serve as evidence the web can still produce good things are precious and this one has clearly joined that small list of exemplary sites.
заказать песок карьерный купить песок карьерный с доставкой цена
Now noticing how rare it is to find a site that does not feel rushed, and a look at lilacneon extended that calm pace, content produced without time pressure has a different quality than content shipped to meet a deadline and this site reads as written without urgency which produces a different and better experience for readers.
Thanks for keeping things clear and to the point, that is honestly hard to find online these days, and after reading through pueblonorth the message stayed consistent which makes me trust the information being shared more than I usually do on similar pages that cover this same kind of topic.
Picked this site to mention to a colleague who would benefit, and a look at khakikite added more material I will pass along, recommending sites to colleagues is a higher bar than recommending to friends because the professional context demands more careful curation and this site cleared the professional bar without me having to think.
Recommended without reservation for anyone interested in the topic at any level of expertise, and a look at marshplate only strengthens that recommendation, this site clearly knows how to serve readers across a range of backgrounds without watering down the content or talking past anyone in the audience which is genuinely impressive to see.
Took a screenshot of one section to come back to later, and a stop at radiusmill prompted another saved tab, the urge to capture and revisit specific pieces of content is something I rarely feel but when I do it tells me the work is worth more than the average passing read for sure.
Glad I stumbled across this post, the explanations actually make sense without needing background knowledge to follow along, and after a stop at plumbplanet the same was true there, no assumptions about the reader just clear writing that anyone can understand from the first line right through to the end.
This stands out compared to similar posts I have read recently, less noise and more substance, and a look at dewdawn kept that gap going, you can really feel the difference between content made by someone who cares versus content made to fill a publishing schedule for an algorithm trying to keep growing somehow.
Picked this site to mention to a colleague who would benefit, and a look at novelnoon added more material I will pass along, recommending sites to colleagues is a higher bar than recommending to friends because the professional context demands more careful curation and this site cleared the professional bar without me having to think.
If patience for careful reading is rare these days finding sites that reward it is rarer still, and a stop at molnexo extended that rare reward, the diminishing returns on shallow content reading have made me more selective about where to spend reading time and this site is meeting the higher selectivity bar consistently.
Felt the writer was speaking my language without trying to imitate it, and a look at muralmend continued that natural fit, when a writers default voice happens to match what you find easy to read the experience feels frictionless and that is something I notice and remember about specific sites going forward.
Thanks for the readable length, I finished it without checking how much was left, and a stop at dewdawns kept me reading the same way, when I stop noticing the length of a piece because the content is engaging enough to sustain attention without willpower the writer has done their job well today.
High quality writing, no marketing speak and no buzzwords that mean nothing, and a stop at lilynugget kept that going, simple direct content that actually communicates something is harder to find than it should be and this is one of the rare places that gets it right consistently across many different posts.
Курсы ораторского мастерства https://kultura-rechi.ru для развития навыков общения и публичных выступлений. Практика, упражнения на дикцию, управление голосом, преодоление страха сцены и умение удерживать внимание слушателей.
Now appreciating the way the post avoided the temptation to be longer than necessary, and a look at purplelinnet continued that lean approach, content with the discipline to stop when finished rather than padding for length is content that respects both itself and its readers and this site has that disciplined editorial culture clearly throughout.
Top notch writing, every paragraph carries weight and nothing feels like filler, and a stop at norlizo reflected that same care, a rare thing on the open web these days where most pages exist for clicks rather than actual reader value or anything close to that which is honestly a real shame.
Solid little post, the kind that does not need to be flashy because the substance is doing the work, and a look at plumbplasma kept that quiet confidence going across the site, this is what writing looks like when the writer trusts the content to land on its own without theatrics or unnecessary attention seeking behaviour.
Now considering the post as evidence that careful blog writing is still possible, and a look at radiusnerve extended that evidence, the broader question of whether the modern web can sustain quality writing has obvious empirical answers in sites like this one and seeing them is reassuring even when they remain a minority overall today.
A modest masterpiece in its own quiet way, and a look at nuartlinnet confirmed the same quiet quality across the rest of the site, calling something a masterpiece is usually overstating but for content this carefully crafted the word feels appropriate even if the writers themselves would probably resist the label honestly.
Really thankful for posts that respect a reader’s time, this one does, and a quick look at qulmora was the same, no need to scroll through endless intros just to get to the actual content, that approach alone is enough reason to come back here regularly for the kind of writing offered.
Thanks for the honest framing without exaggerated claims that the topic will change my life, and a stop at domelegend kept the same modest tone, restraint in marketing language signals trustworthiness and the writers here are clearly playing the long game by building credibility rather than chasing immediate clicks through hyperbole.
Skipped lunch to finish reading, which says something, and a stop at kitidle kept me at my desk longer than planned, when content beats the lunch impulse the writer has done something genuinely impressive in an attention environment full of immediately satisfying alternatives competing for the same finite block of reader time.
Glad to have another data point on a question I am still thinking through, and a look at lionneon added two more, content that acknowledges its place in a wider conversation rather than pretending to settle the question alone is intellectually honest in a way that I wish was more common across the open web.
Big thanks to whoever wrote this, you saved me a lot of time hunting for the same info on other sites, and a stop at foxarbors only added more useful detail without going off topic, that kind of focus is honestly hard to come across these days when most posts wander everywhere.
Steam Desktop Authenticator https://sdasteam.com (SDA). It allows you to generate account login codes and automatically confirm trades or item sales on the Community Market without using your smartphone.
A satisfying piece in the way that good meals are satisfying rather than just filling, and a look at muralpastry extended that satisfaction, the metaphor between content and meals is one I find useful and this site reads as a satisfying meal rather than the empty calories that most content provides for casual readers.
Liked that the post left some questions open rather than pretending to settle everything, and a stop at purplemarsh continued that intellectual honesty, content that respects the limits of its own claims is more trustworthy than content that overreaches and this site has clearly figured out which positions it can defend confidently.
Such writing is increasingly rare and worth supporting through attention, and a stop at masonmelon extended that supportive attention across more pages, the conscious choice to spend time on sites that produce careful work rather than convenient consumption is itself a small form of patronage and this site is receiving that conscious patronage from me.
Steam Desktop Authenticator https://steamdesktopauthenticator.net is a popular solution for Steam users who need access to Steam Guard features on their computer. It conveniently verifies actions, protects your account, and manages authentication in a single app.
Recommended without hesitation if you care about careful coverage of this topic, and a stop at nuartlion reinforced the recommendation, the bar I set for unhesitating recommendations is fairly high and this site has cleared it through the cumulative weight of multiple consistently good pieces rather than through any single standout post which is meaningful.
Top notch writing, every paragraph carries weight and nothing feels like filler, and a stop at ponymedal reflected that same care, a rare thing on the open web these days where most pages exist for clicks rather than actual reader value or anything close to that which is honestly a real shame.
Honestly enjoyed not being sold anything for the entire duration of the post, and a look at rafterpeach kept that pleasant absence going across more pages, content that exists for its own sake rather than as a funnel to a paid product is increasingly rare and worth supporting where I can find it.
Bookmark earned, calendar reminder set, share queued, all from one good post, and a look at domelounge did the same, when a single reading session triggers multiple downstream actions you know the content has actually moved me beyond the page and this site is moving me at that higher level reliably.
Felt the post had been written without using a single buzzword, and a look at molqiro continued that clean vocabulary, content free of jargon and trendy phrases reads better and ages better and this site has clearly committed to a vocabulary that will not feel dated in three years which is impressive editorially.
Took longer than expected to finish because I kept stopping to think, and a stop at lionpilot did the same to me, content that provokes thought rather than just delivering information is in a different category and the team here is clearly working at that higher level rather than just cranking out posts.
Just nice to read something that does not feel like it was assembled from a content brief, and a stop at eliteledges kept that handcrafted feel going, you can tell when a real human with real understanding is behind the words versus a templated piece churned out for an algorithm to find.
Looking at this from the perspective of someone tired of generic content the contrast is striking, and a look at norqavo maintained that distinctive feel, sites with strong editorial identity stand out against the bland background of algorithmic content and this one has clearly developed an identity worth recognising through careful attention.
Really liked the calm tone running through the post, no shouting and no urgency forced into the writing, and a look at rakemound kept that quiet confidence going, the kind of voice that makes the reader feel respected rather than yelled at which is depressingly common across most modern blog content these days.
During the time spent here I noticed the absence of the usual distractions, and a stop at muralpeony extended that distraction free experience, content that does not fight my attention with pop ups and modals and aggressive prompts is content that respects me and this site has clearly chosen the respectful approach throughout.
Found this through a search that was generic enough I did not expect quality results, and a look at qunvero continued the surprisingly good experience, search engines occasionally still surface excellent independent content if you scroll past the obvious paid and high authority results which is reassuring to remember sometimes.
Honestly slowed down to read this carefully which is not my default, and a look at liquidnudge kept me in that careful reading mode, the kind of writing that demands attention by being worth attention is rare in a media environment full of content engineered to be skimmed not read with any real focus today.
Felt slightly impressed without being able to point to one specific reason, and a look at domemarina continued that diffuse positive feeling, when content works at a level you cannot easily articulate the writer is doing something with craft rather than just delivering information and that is something I have learned to recognise.
Found the use of subheadings really helpful for scanning back through the post later, and a stop at masonotter kept that reader friendly approach going, navigation is something many blog writers ignore but small structural choices make a noticeable difference for someone returning to find a specific point again days or weeks later.
Glad to find a site whose links lead somewhere worth going rather than back to itself for SEO juice, and a stop at duetdrives kept that generous outbound feel, citing other peoples work with real respect rather than just for ranking signals is a sign of an honest operation worth supporting going forward.
Felt the post had been written without using a single buzzword, and a look at studiotrader continued that clean vocabulary, content free of jargon and trendy phrases reads better and ages better and this site has clearly committed to a vocabulary that will not feel dated in three years which is impressive editorially.
Just dropping by to say thanks for the effort, it does not go unnoticed when a writer cares this much about the reader, and after I went through rampantpilot I was certain this is one of the better corners of the internet for this particular kind of content which is genuinely refreshing.
Well done, the writing is professional without being stiff, and the topic is treated with care, and a look at molvani reflected that approach, the kind of site I would point a colleague to if they asked for a reliable starting point on this topic in the future without any hesitation at all.
Came in confused about the topic and left with a much firmer grasp on it, and after shamrockswan I felt I could explain this to someone else without hesitation, that is the gold standard for any educational content and most sites simply fail to reach it ever which is unfortunate but true.
Now placing this in the small category of sites whose updates I would actually want to know about, and a stop at tinklesaddle confirmed that placement, the difference between sites I want to follow and sites I just consume from is real and this one has crossed into the active follow category from the casual consumption side.
A small thing but the line spacing and font choices made reading this physically pleasant, and a look at lithelight maintained the same careful design, technical choices about typography are part of what makes online reading actually comfortable and this site has clearly invested in the design layer alongside the content layer carefully.
Adding this to my list of go to references for the topic, and a stop at twainsilica confirmed the rest of the site deserves the same, definitely the kind of resource that earns its place rather than getting forgotten the moment the next interesting article shows up in my feed somewhere else on the web.
Really like that the writer trusts the reader to follow simple logic without restating every previous point, and a stop at muscatlarch kept that respect going, treating an audience as capable adults rather than as people who need constant hand holding makes a noticeable difference in the reading experience for me.
Easy to recommend, the content speaks for itself without needing additional praise from me, and a stop at draftglade only adds more reasons to send people this way, the kind of generous resource that benefits its readers without demanding anything in return is increasingly rare and worth recognising clearly today across the broader open internet.
Approaching this with the usual skepticism I bring to new sites and being slowly persuaded, and a stop at salutestitch continued that gradual persuasion, the careful path from skeptical reader to genuine fan is the only one I trust and this site has walked me along that path through patient consistent quality across pieces.
Useful read, especially because the writer did not assume too much background from the reader, and a quick look at scenictrader continued in the same way, a thoughtful site that meets people where they are which is something the modern web could use a lot more of for both casual and serious readers.
Now sitting with the thoughts the post triggered rather than rushing on to the next thing, and a stop at stashserif extended that reflective pause, content that earns time for thought after closing the tab is content of higher value than the merely interesting and this site has clearly produced that lasting effect today.
Reading this triggered a small but real correction in something I had assumed, and a stop at snaretoga extended that corrective effect, content that updates my beliefs through evidence rather than rhetoric is content with intellectual integrity and this site has earned that label consistently across the pieces I have read so far today.
Bookmark added in three places to make sure I do not lose the link, and a look at storksnooze got the same redundant treatment, sites I am afraid to lose are the rare keepers and this is clearly one of them based on what I have read so far across this and a couple of related posts.
A relief to read something where I did not have to fact check every claim mentally, and a look at norzavo continued that reliable feeling, sites where I can lower my guard and trust the content are rare and this one is earning that trust paragraph by paragraph through consistent careful work behind the scenes.
A satisfying piece in the way that good meals are satisfying rather than just filling, and a look at safaritriton extended that satisfaction, the metaphor between content and meals is one I find useful and this site reads as a satisfying meal rather than the empty calories that most content provides for casual readers.
Reading this with my morning coffee turned into reading the related posts with my morning coffee, and a stop at spryring stretched the morning further, content that pulls breakfast into a reading session rather than just accompanying it is content that has earned a higher claim on my attention than the average article does.
Thanks for laying this out in a way that someone newer to the topic can follow, and a stop at sodatorch kept that accessibility going, writing that meets readers at different experience levels without condescending is hard to do well and the writers here have clearly thought about who they are writing for.
Liked the way the post balanced confidence and humility, and a stop at grovefarms maintained the same balance, knowing when to assert and when to acknowledge uncertainty is a sign of mature thinking and the writers here have clearly developed that calibration through what I assume is years of careful work on their craft.
Reading this felt productive in a way most internet reading does not, and a look at ranchomen continued that productive feeling, sometimes the open web feels like a waste of time but sites like this remind me why I still bother to look around rather than retreating to old reliable sources for everything I need.
Solid value for anyone willing to read carefully, and a look at quvnero extends that value across the rest of the site, this is the kind of place that rewards return visits rather than offering everything in a single splashy post and then leaving readers nothing to come back for later which is unfortunately common.
Bookmark added with a small note about why, and a look at solotoffee prompted another bookmark with another note, the bookmarks I annotate are the ones I expect to return to deliberately rather than stumble into and this site is generating annotated bookmarks at a higher rate than my usual content sources by some margin.
This filled in a gap in my understanding that I had not even noticed was there, and a stop at vinyltrophy did the same, the kind of post that gives you more than you expected when you first clicked through from somewhere else, a real find for anyone curious about the area covered here.
Stayed longer than planned because each section earned the next, and a look at llamapatio kept that pulling effect going across more pages, the kind of subtle pull that good writing exerts on attention is something I find harder and harder to resist when I encounter it on the open web today.
Thanks for taking the time to write this, it is clear that some thought went into how each point would land, and after I went through sodasalt I had a better grip on the topic, real value without the usual marketing noise people have to put up with online when searching for answers.
Worth a slow read rather than the fast scan I usually default to, and a look at mastlarch earned the same slower pace from me, content that resets my reading speed downward is content with substance worth absorbing and this site has produced that effect on me multiple times now over the last week here.
Time spent here today felt productive in the way that good reading sessions sometimes do, and a stop at draftlake extended that productive feeling across the rest of the morning, the difference between productive reading and merely passing time is real and this site is consistently on the productive side for me lately.
Solid information that lines up with what I have been hearing from other reliable sources, and after my visit to siennathrift I was even more certain of that, this site checks out which is something I value highly when so many places online play loose with the facts to chase a quick click.
Bookmark folder reorganised slightly to make this site easier to find, and a look at muscatlumen earned the same accessibility upgrade, the small organisational moves I make for sites I expect to return to often are themselves a signal of how much I trust them and this site triggered those moves naturally.
Came away with a slightly better mental model of the topic than I started with, and a stop at solidvector sharpened that further, content that improves the reader thinking apparatus rather than just dumping facts into it is the rare kind I genuinely value and seek out when I have time to read carefully.
Generally I bookmark sparingly to avoid building up a bookmark graveyard but this one earned a permanent slot, and a stop at solostarlit extended that permanence designation, the few sites I keep permanent bookmarks for are sites I expect to use repeatedly and this one has clearly cleared that expectation bar today.
In the middle of an otherwise scattered day this post landed as a moment of focus, and a stop at tractshade extended that focused feeling across more pages, content that anchors a fragmented day rather than contributing to the fragmentation is content with real centring effect and this site is providing that anchoring function for me.
Got something practical out of this that I can apply later this week, and a stop at summitshire added more details to think about, this is exactly the kind of content I bookmark for future reference rather than the throwaway listicles that dominate most search results these days for almost any common topic.
Honestly enjoyed every minute spent here, that is not something I say lightly, and a look at molzari confirmed I will be back, the bar for spending time online is high for me these days but this site clears it without effort which is high praise indeed from this reader who is usually rather demanding.
Worth recognising the absence of the usual blog tropes here, and a look at tulipsedan continued that fresh quality, sites that avoid the standard moves of the medium read as more original even when the content is on familiar topics and this one has clearly chosen its own path through the conventional terrain skilfully.
Just wanted to say this was useful and leave a small note of thanks, and a quick visit to draftglades earned a similar nod from me, the small acknowledgements add up over time and represent the real economy of trust that good content runs on across the open and increasingly fragmented modern internet.
Skipped the comments section but might come back to read it, and a stop at solacevelour hinted at a quality reader community, sites where the comments are worth reading separately from the post are increasingly rare and signal a particular kind of audience that has grown around the editorial vision over time gradually.
Definitely a recommend from me, anyone curious about the topic should check this out, and a look at logicllama adds even more reason for that, the depth and quality combine to make this site one I will be pointing people toward whenever similar conversations come up over the months ahead at work or socially.
Now thinking about how this post will age over the coming years, and a stop at studiosalute suggested the same durability, content built to age well rather than to capture the attention of the moment is content with a different kind of value and this site has clearly chosen the long horizon over the short one.
Looking back on this reading session it stands as one of the better ones recently, and a look at shrinetender extended that ranking, the informal ranking of reading sessions against each other is something I do mentally and this session ranks high largely because of this site and a couple of related pages here.
Comfortable in tone and substantive in content, that is a hard combination to land, and a look at sparkcast kept that pairing alive across more material, this is what good editorial direction looks like in practice and the team here clearly has someone keeping a steady hand on the wheel across what they decide to publish.
Now wishing I had found this site sooner, and a look at sheentiny extended that mild regret, the calculation of how many years of good content I missed by not finding the right sources earlier is one I try not to make too often but it does come up sometimes when I find sites this good.
Decided this was the best thing I had read all morning, and a stop at draftlog kept that ranking intact, ranking my reading is something I do mentally throughout the day and the top rank is competitive and not easily won but this site won it without needing to overstate its claims for that.
Thanks for putting in the work to make this approachable, plenty of sites cover the same ground but most do it badly, and a quick visit to qalmizo confirmed this one stands apart, simple language and useful examples without anyone trying to sell me anything along the way which I really appreciated.
Genuine reaction is that I will probably think about this on and off for a few days, and a look at muscatneedle added fuel to that, the best content lingers in your head after you close the tab rather than evaporating immediately and this site clearly knows how to write that kind of memorable content.
Came back to this twice now in the same week which is unusual for me, and a look at relqano suggested I will keep coming back, the kind of post that earns repeated visits rather than one and done reading is the gold standard for content quality and this site clearly hit that standard.
Reading this slowly to give it the attention it deserved, and a stop at shadowtrojan earned the same slow read, choosing to read slowly is a small act of respect for content quality and very few sites earn that respect from me but this one did so without any explicit ask which is the cleanest way.
Just wanted to say this was useful and leave a small note of thanks, and a quick visit to temposofa earned a similar nod from me, the small acknowledgements add up over time and represent the real economy of trust that good content runs on across the open and increasingly fragmented modern internet.
A piece that exhibited the kind of patience that good writing requires, and a look at thatchvista continued that patient quality, hurried writing is easy to spot and this site reads as having been written without time pressure which produces a different feel than the rushed content that dominates much of the modern blog space.
Skipped the comments to avoid spoilers and came back later to find them genuinely worth reading, and a stop at loneload extended that surprised respect, when the discussion below a post matches the quality of the post itself you have found something special and this site appears to attract that kind of audience.
The clarity here is something I really appreciate, especially compared to sites that pile on jargon for no reason, and a look at tigerteacup was the same, simple direct sentences that actually deliver information instead of dancing around the point for paragraphs at a time which wastes reader patience.
Found the rhythm of the prose particularly enjoyable on this read through, and a look at simbasienna kept that musical quality going across the related pages, sentence rhythm is something most blog writers ignore but it makes a real difference in how content lands with the careful reader who cares.
Worth your time, that is the simplest endorsement I can give, and a stop at voguestrait extends that endorsement across the rest of the site, this is one of those increasingly rare places that delivers on what it promises rather than over selling the content and under delivering on substance every time which I find frustrating elsewhere.
Really appreciate that the writer did not assume I would read every other related post first, and a look at silovault kept that self contained feel going where each piece can stand alone, accessibility for new readers is a sign of generous editorial thinking and this site has clearly invested in that approach.
Now considering the post as evidence that careful blog writing is still possible, and a look at mauvepeach extended that evidence, the broader question of whether the modern web can sustain quality writing has obvious empirical answers in sites like this one and seeing them is reassuring even when they remain a minority overall today.
A particular kind of restraint shows up in the writing, and a look at snippetvamp maintained the same restraint across pages, knowing what not to say is just as important as knowing what to say and this site has clearly developed strong instincts on both sides of that editorial line throughout pieces I have read.
Started thinking about my own writing differently after reading, and a look at stencilveto continued that reflective effect, content that influences how I work rather than just informing what I know is content with the highest kind of impact and this site has triggered some of that reflective influence today on me.
Now thinking about whether the writer might publish a longer form work I would buy, and a look at draftport suggested the same depth would translate, content that makes me want to pay for related work in other formats is content that has earned commercial trust as well as attention trust and this site has both clearly.
Now wishing more sites covered topics with this level of care, and a look at tundrasyrup extended that wish across more subjects, the rarity of careful coverage on most topics is a problem and this site is one of the small antidotes to that broader pattern of casual or surface treatment of complex subjects.
Now appreciating that the post did not try to imitate any other style I might recognise, and a stop at tagbyte continued that distinct voice, content with its own register rather than borrowed from elsewhere is content with real authorial presence and this site has clearly developed that presence through what feels like patient editorial work.
Choosing the right siding for your house not only improves curb appeal but also protects against weather and moisture damage. Learn the key benefits in this complete guide.
Reading this gave me a small refresher on something I had partially forgotten, and a stop at sodasherpa extended the refresher, content that strengthens existing knowledge rather than just adding new is content with a particular kind of consolidating value and this site is providing that consolidating function across multiple visits.
Closed the post with a small satisfied sigh, and a stop at loneohm produced the same gentle exhale, content that ends well is content that respects the rhythm of reading and the writers here have clearly thought about how their pieces close rather than just trailing off when they run out of things to say.
A piece that read as the work of someone who reads carefully themselves, and a look at saddleswamp continued that informed feel, writers who are also serious readers produce work with a different quality and this site reads as the product of someone steeped in good writing rather than just generating content for an audience.
Worth marking this site as one to come back to deliberately rather than by accident, and a stop at goldenknack reinforced that intention, the difference between sites I find again by chance and sites I return to on purpose is meaningful and this one has clearly moved into the deliberate return category for me.
Decided to set aside time later to read more carefully, and a stop at trendandfashion reinforced that decision, content that earns a calendar entry rather than just a passing read is in a different tier altogether and this site is clearly working at that elevated level which I really do appreciate as a reader today.
Will share this on a forum I am part of where it will be appreciated by others working in the same area, and a look at vinylslogan suggests there is more here worth passing along too, definitely a generous resource that deserves a wider audience than it probably has today across the open internet.
микрозайм оформить https://money-trans.ru
Looking forward to seeing what gets published next month, and a look at uppersharp extended that anticipation across the broader site, finding myself looking forward to a sites future content rather than just consuming its existing content is a stronger commitment level than I usually reach with new finds and this site triggered that.
This one is staying open in a tab for the rest of the day so I can come back and re read certain parts, and a look at saddlevicar suggests I will be doing the same with a few more pages here too, this is going to be a deep dive over the coming hours.
Now adding the writer to a small mental list of voices I want to follow, and a look at qalnexo reinforced that follow intention, the few writers whose work I actively track are writers who have demonstrated sustained quality and this writer has clearly demonstrated that sustained quality across the pieces I have sampled here today.
Started believing the writer knew the topic deeply by about the second paragraph, and a look at sonarsandal reinforced that confidence, the speed at which a writer establishes credibility through their writing is a useful quality signal and this writer establishes it quickly and quietly without resorting to credential dropping or self promotion.
взять займ без отказа на карту оформить займ
Thanks for keeping things clear and to the point, that is honestly hard to find online these days, and after reading through driftfair the message stayed consistent which makes me trust the information being shared more than I usually do on similar pages that cover this same kind of topic.
Solid recommendation from me to anyone working in the area, the perspective here is grounded, and a look at discoverlimitlessoptions adds even more useful angles, the kind of site that becomes a reference rather than just a one time read which is a higher bar than most blogs ever reach today on the modern web.
Working through this site has been a small antidote to the shallow content that fills most of my reading time, and a stop at tundratoken extended that antidote function, sites that quietly improve the average quality of my reading by being themselves are sites worth supporting through return visits and recommendations consistently.
Time spent here today felt productive in the way that good reading sessions sometimes do, and a stop at rivqiro extended that productive feeling across the rest of the morning, the difference between productive reading and merely passing time is real and this site is consistently on the productive side for me lately.
Reading this confirmed that my time researching the topic in other places had not been wasted, and a stop at laurelmallow extended the confirmation, when independent sources agree that is a useful signal and this site is one of the more reliable sources I have found for cross checking what I read elsewhere on similar subjects.
Reading more of the archives is now on my plan for the weekend, and a stop at parsleymulch confirmed the archive worth the time, the rare archive worth a dedicated reading session rather than just casual sampling is the rare archive of serious work and this site has clearly produced enough of that work to warrant the deeper exploration.
Came in skeptical of the angle and left mostly persuaded, and a stop at skifftornado pushed me a bit further in the same direction, content that can move a critical reader by argument rather than rhetoric is rare and worth pointing out because it indicates real substance underneath the surface presentation here.
A piece that respected the reader by not over explaining the obvious, and a look at zornexo continued that calibrated approach, finding the right level of explanation is one of the harder editorial calls and this site has clearly thought carefully about what readers will already know versus what they need help with consistently.
микрозайм без отказа https://dengi-nakartu.ru
Great work on keeping things readable, the post never drags or repeats itself which I really appreciate, and a stop at tallysubdue added a bit more context that fit naturally with what was already said here, no need to read everything twice to get the point being made today.
Now appreciating the way the post avoided the temptation to be longer than necessary, and a look at meadochre continued that lean approach, content with the discipline to stop when finished rather than padding for length is content that respects both itself and its readers and this site has that disciplined editorial culture clearly throughout.
Now thinking about how to apply some of this to a project I have been planning, and a look at villageswan added more material for the planning, content that connects to my actual creative work rather than just being interesting in the abstract is the kind that earns priority placement in my reading rotation consistently going forward.
Once I trust a site this much I tend to read everything they publish and that is the trajectory I am on with this one, and a stop at gondoenvoy confirmed the trajectory, the rare progression from interested reader to comprehensive reader is something only certain sites earn and this one is earning that progression rapidly.
Now feeling that this site is the kind I want to make sure does not disappear, and a look at twainverge reinforced that quiet protective feeling, the rare sites whose disappearance would actually matter to me are the sites I want to support through return visits and recommendations and this one has joined that small protected list.
Thanks for keeping things clear and to the point, that is honestly hard to find online these days, and after reading through swirllink the message stayed consistent which makes me trust the information being shared more than I usually do on similar pages that cover this same kind of topic.
Quietly the post solved something I had been turning over without quite knowing how to phrase the question, and a look at voguesage extended that quiet solving, content that addresses unformulated needs is content with reader insight and this site has demonstrated that insight at a high rate across the pieces I have read recently.
Skipped the TLDR thinking I would read everything anyway, and ended up enjoying the path through the full post, and a stop at trendandbuy similarly rewarded the patient read, summaries are useful but the journey through good writing is part of what makes the destination feel earned rather than just delivered cleanly.
Easy to recommend, the content speaks for itself without needing additional praise from me, and a stop at turbinevault only adds more reasons to send people this way, the kind of generous resource that benefits its readers without demanding anything in return is increasingly rare and worth recognising clearly today across the broader open internet.
Bookmark added in three places to make sure I do not lose the link, and a look at unlockyourfullpotential got the same redundant treatment, sites I am afraid to lose are the rare keepers and this is clearly one of them based on what I have read so far across this and a couple of related posts.
Felt the writer did the homework before publishing, the references hold up, and a look at thriftsundae continued that documented care, content with traceable claims rather than vague assertions is the kind I trust and the lack of bald assertion in this post is one of its quietly impressive qualities for me.
Delicious – here: Gauguin in Palermo: Two Tahitian Women
Reading this slowly because the writing rewards a slower pace, and a stop at duetcoast did the same, the pace at which I read content is something I now use as a quality signal and writing that earns a slower pace earns my attention as a reader looking for substance these days.
The examples really helped me grasp the points faster than abstract descriptions would have, and a stop at tallysmoke added a few more practical illustrations that drove the message home, the kind of writing that knows its readers learn better through concrete situations rather than vague generalities is rare and worth recognising clearly.
Honestly the simplicity of the explanation made the topic click for me in a way other writeups had not, and a look at passionload continued that clarity into related areas, when a writer gets the level of explanation right the reader does the heavy lifting themselves and the post just enables it.
My reading list is short and selective and this site is now on it, and a stop at leafpatio confirmed the placement, the short list of sites I read deliberately rather than encounter accidentally is something I curate carefully and adding to it is a real act of trust which this site has earned today.
monopoly live casino [url=monopolylive-in.com]https://monopolylive-in.com/[/url]
Most of the time I feel the open web is in decline and then I find a site like this, and a stop at vaultvelour reinforced that mood lift, the cumulative effect of finding occasional excellent independent content versus the cumulative effect of finding mostly mediocre content is real for the long term reader maintaining web habits today.
Семейный юрист https://semeinyi-urist-moskva.ru в Москве: развод, раздел имущества, алименты, определение места жительства детей. Опыт 20+ лет. Знаем и умеем делить ипотечные квартиры, бизнес, коммерческую недвижимость, ИИ и ООО. Индивидуальный подход. Конфиденциально.
Honestly the simplicity of the explanation made the topic click for me in a way other writeups had not, and a look at zorvilo continued that clarity into related areas, when a writer gets the level of explanation right the reader does the heavy lifting themselves and the post just enables it.
Found this really helpful, the explanations are simple but they actually answer the questions a normal reader would have, and after I followed qanlivo I had a clearer sense of the topic, no extra fluff just useful points laid out in a sensible order that made the time worth it.
Excellent execution from start to finish, the post never loses its rhythm and the points stay sharp, and a quick stop at umbravista kept the same level going, consistency like this across a site is the marker of a serious operation rather than a casual side project running on autopilot somewhere else.
Now I want to find more sites like this but I suspect they are rare, and a look at gondoiris extended that thought, the few sites that meet this quality bar are precious specifically because they are rare and finding others like them is one of the ongoing projects of careful internet curation across the years.
Reading this prompted a small redirection in something I was working on, and a stop at makeprogressforward extended that redirecting influence, content that affects my actual work rather than just my thinking has the highest practical impact and this site is providing that level of influence for me at a sustainable rate apparently.
Liked the careful word choice throughout, every term seemed picked for a reason rather than thrown in casually, and a stop at tealsilver continued that precise style, this kind of attention to small details is what separates careful writing from the usual rushed content that dominates blog spaces today across pretty much every topic I follow.
Kitchen cabinets furniture kitchen cabinets Tampa Bay
Nice to see a post that does not try to overcomplicate the basics for the sake of looking smart, and once I looked at uptonstarlit the same direct tone was there too, which honestly makes a difference when you are short on time and want answers without long pointless intros.
Really like that the writer trusts the reader to follow simple logic without restating every previous point, and a stop at timelessgroovehub kept that respect going, treating an audience as capable adults rather than as people who need constant hand holding makes a noticeable difference in the reading experience for me.
After several visits I am now confident this site is one to follow seriously, and a stop at rivzavo reinforced that confidence, the gradual building of trust through repeated quality exposures is the only sustainable way to develop reader loyalty and this site is building that loyalty in me through patient consistent work consistently.
Now feeling confident that this site will continue producing work I will want to read, and a look at tagzip extended that confidence into the future, projecting forward from current quality to expected future quality is something I do for sites I genuinely follow and this one has earned that forward looking trust clearly today.
A piece that brought a sense of order to a topic I had been finding chaotic, and a look at tornadovapor continued that organising effect, content that imposes useful structure on messy subjects is doing genuine intellectual work and this site is providing that organisational function across multiple posts I have read recently here.
Solid quality, the kind of work that holds up to a careful read rather than a quick skim, and a quick look at pastrylevee kept that standard going strong, content that rewards attention rather than punishing it is something I appreciate more and more these days online across nearly every topic I follow.
A nicely understated post that does not shout for attention, and a look at meltmyrtle maintained the same quiet quality, understatement is a stylistic choice that distinguishes serious writing from attention seeking writing and this site has clearly committed to the understated approach as a core editorial value rather than just a phase.
Now planning a longer reading session for the archives, and a stop at leapminor confirmed the archives are worth that longer commitment, sites with archives I want to read deliberately rather than just sample are rare and this one has clearly earned that level of interest based on the consistency of what I have already read.
Better than the average post on this subject by some distance, and a look at sculptsilver reinforced that, you can tell within the first paragraph that the writer here actually cares about the topic rather than just covering it for the sake of having something to publish that week or that day.
Thanks for keeping the writing direct without losing the warmth that makes content feel human, and a stop at sambasavor carried both qualities forward, balancing professionalism and personality is a rare skill and the writers here have clearly figured out how to consistently land it across many posts which I notice.
Now considering writing a longer note about the post somewhere, and a look at tasseltennis added more material for that note, content that prompts me to write rather than just consume is content with generative energy and this site is producing that generative effect for me at a higher rate than most sources.
Безопасность модульных домов
Well done, the kind of post that makes you slow down and actually read instead of skimming for keywords, and a look at zulmora kept me reading carefully too, that is a sign of writing that has been crafted rather than churned out for an algorithm to see today and tomorrow.
Good quality through and through, no rough edges and no signs of being rushed, and a quick look at stashsuperb kept the same polish going, the kind of site that respects its own brand by maintaining consistency across pages which is something I always appreciate as a reader looking for trustworthy information online today.
Saving the link for sure, this one is a keeper, and a look at tarmacstork confirmed I should bookmark the entire site rather than just this page, the consistency across what I have seen so far suggests there is a lot more here worth coming back for soon when I have more time.
песок карьерный с доставкой 1 м3 песок карьерный с доставкой
A particular kind of restraint shows up in the writing, and a look at fiabush maintained the same restraint across pages, knowing what not to say is just as important as knowing what to say and this site has clearly developed strong instincts on both sides of that editorial line throughout pieces I have read.
This one is staying open in a tab for the rest of the day so I can come back and re read certain parts, and a look at sabertorch suggests I will be doing the same with a few more pages here too, this is going to be a deep dive over the coming hours.
Picked this for my morning read because the topic seemed worth the time, and a look at gongflora confirmed the choice was right, my morning reading slot is precious and giving it to this site felt like a good investment rather than a waste which is a higher endorsement than I usually offer for content.
Reading this slowly to give it the attention it deserved, and a stop at nuartplate earned the same slow read, choosing to read slowly is a small act of respect for content quality and very few sites earn that respect from me but this one did so without any explicit ask which is the cleanest way.
Saving this link for the next time someone asks me about this topic, and a look at versavamp expanded what I will be sharing with them, this is the kind of resource that makes a real difference when you are trying to point a friend to something useful and reliable rather than generic marketing pages.
xbet
Big thanks to whoever wrote this, you saved me a lot of time hunting for the same info on other sites, and a stop at patioleaf only added more useful detail without going off topic, that kind of focus is honestly hard to come across these days when most posts wander everywhere.
Beyond the topic at hand this site reads as a small ongoing project of taking writing seriously, and a look at flyburn reinforced that project quality, sites that treat publishing as an ongoing serious practice rather than as content production for traffic are sites worth supporting and this one has clearly chosen the serious approach.
Reading this slowly and letting each paragraph land before moving on, and a stop at swapvenom earned the same patient approach, content that rewards slow reading rather than speed is content with real density and the writers here are clearly producing work that benefits from the careful eye rather than the rushed scan.
Quietly impressive in a way that does not announce itself, and a stop at sketchstamp extended that quiet impressiveness, the kind of quality that emerges through sustained attention rather than first impressions is the kind I trust more deeply and this site has been earning that deeper trust across multiple sessions over time consistently.
Reading this brought back the satisfaction I used to get from blogs ten years ago, and a stop at timberfieldcorner kept that nostalgic quality alive, sites that capture what was good about an earlier era of internet writing are increasingly precious and this one is doing that without feeling like a deliberate throwback at all.
A piece that exhibited the kind of patience that good writing requires, and a look at leappalette continued that patient quality, hurried writing is easy to spot and this site reads as having been written without time pressure which produces a different feel than the rushed content that dominates much of the modern blog space.
Now thinking about how to apply some of this to a project I have been planning, and a look at broblur added more material for the planning, content that connects to my actual creative work rather than just being interesting in the abstract is the kind that earns priority placement in my reading rotation consistently going forward.
Now planning to come back when I have the right kind of attention to read carefully, and a stop at tracetroop reinforced that plan, choosing the right moment to read certain content is a quiet form of respect for the work and this site is generating those careful planning behaviours from me consistently as a reader.
Without comparing too aggressively to other sources this one stands out for the right reasons, and a look at ilonox continued that distinctive quality, content that distinguishes itself through substance rather than style tricks is content with lasting differentiation and this site has clearly chosen substance based differentiation as its core editorial strategy.
Now wishing I had found this site sooner, and a look at qanviro extended that mild regret, the calculation of how many years of good content I missed by not finding the right sources earlier is one I try not to make too often but it does come up sometimes when I find sites this good.
A piece that left me thinking I had been undercaring about the topic, and a look at startyournextjourney reinforced that mild concern, content that raises the appropriate weight of a subject without being preachy about it is doing important work and this site is providing that gentle elevation of attention for me consistently.
Took longer than expected to finish because I kept stopping to think, and a stop at tagtorch did the same to me, content that provokes thought rather than just delivering information is in a different category and the team here is clearly working at that higher level rather than just cranking out posts.
Reading this gave me material for a conversation I needed to have anyway, and a stop at velourudon added even more talking points, content that connects to upcoming social or professional needs rather than just being interesting in the abstract is the kind that earns priority placement in my attention these days routinely.
Decided to subscribe to the RSS feed if there is one, and a stop at ibacane confirmed that decision, content that I want delivered to me proactively rather than just remembered when I have time is content that has earned a higher level of commitment from me as a reader looking for reliable sources.
Found the writing surprisingly fresh for what is by now a well covered topic, and a stop at halbelt kept that freshness going across the related pages, original perspective on familiar ground is hard to come by and this site has clearly earned its place in the conversation rather than just rehashing old ideas.
I learned more from this short post than from longer articles I read earlier today, and a stop at zulqaro added even more useful detail without going off topic, this site clearly knows how to keep things focused without sacrificing depth which is a hard balance to strike for any writer.
Reading this in my last reading slot of the day was a good way to end, and a stop at hoxaero provided a satisfying close to the reading session, content that ends a day well rather than agitating it before sleep is the kind I value increasingly and this site fits that role for me consistently now.
Beyond the topic at hand this site reads as a small ongoing project of taking writing seriously, and a look at souptrigger reinforced that project quality, sites that treat publishing as an ongoing serious practice rather than as content production for traffic are sites worth supporting and this one has clearly chosen the serious approach.
A piece that demonstrated competence without performing it, and a look at meownoon maintained the same self assured but unshowy register, the gap between competence and performance of competence is one I track and this site has clearly chosen to demonstrate rather than perform which I find much more persuasive as a reader.
Closed the tab with a small sense of finality rather than the usual rushed exit, and a stop at gonggrip produced the same considered closing, when reading ends with deliberate satisfaction rather than impatient skip you know the time was well spent and this site is producing those satisfying endings consistently across what I read.
Reading this prompted a brief but useful conversation with a colleague who happened to walk by, and a stop at tundraturtle extended that conversational seed, content that becomes a starting point for in person discussion rather than ending in solitary reading is content with social generative energy and this site has plenty of it apparently.
I really like how the writer keeps the tone friendly without sounding fake or overly polished, and after a stop at tokenudon the same calm pace was there, no rushing to make a point and no padding either, just clean honest writing that I can respect and come back to later again.
Thanks for the readable length, I finished it without checking how much was left, and a stop at fribrag kept me reading the same way, when I stop noticing the length of a piece because the content is engaging enough to sustain attention without willpower the writer has done their job well today.
Reading this felt easy in the best way, no friction and no confusion at any point, and a stop at pebblelemon carried that same comfort across more pages, the kind of editorial flow that lets you absorb information without fighting the format which is increasingly hard to find on the open web today across topics.
Found this useful, the points line up well with what I have been thinking about lately, and a stop at lemonode added some angles I had not considered yet, definitely walking away with more than I came for which is the best outcome from time spent reading online for any kind of topic.
Found this useful, the points line up well with what I have been thinking about lately, and a stop at surgetarmac added some angles I had not considered yet, definitely walking away with more than I came for which is the best outcome from time spent reading online for any kind of topic.
Appreciate that you did not pad this with fluff to hit a word count, the post says what it needs to say and stops, and a look at brofix did the same, brevity here feels intentional not lazy which is a distinction many writers miss completely sometimes when they are working under deadlines.
The post made the topic feel approachable without making it feel trivial, that is a fine balance, and a stop at exploreinnovativeconcepts maintained the same balance, finding the middle ground between welcoming and serious is genuinely difficult and the writers here have clearly figured out how to consistently hit it well across many different posts.
The clarity here is something I really appreciate, especially compared to sites that pile on jargon for no reason, and a look at storkumber was the same, simple direct sentences that actually deliver information instead of dancing around the point for paragraphs at a time which wastes reader patience.
If you asked me to point to a recent positive sign for the open web this site would be near the top, and a stop at tidalurchin reinforced that designation, the few sites that serve as evidence the web can still produce quality independent content are precious and this one has clearly become one for me.
Worth flagging that this approach to the topic is fresh without being contrarian, and a stop at voguestraw extended the same fresh angle, finding original perspective on familiar subjects is rare and this site has clearly developed its own way of seeing rather than echoing the dominant takes from elsewhere consistently.
Now leaving a small mental note to recommend this when the topic comes up in conversation, and a look at threeoaktreasures extended that recommend ready feeling, content that arms me with shareable references for likely future conversations is content with social value and this site is providing that conversational ammunition consistently for me lately.
Just nice to read something that does not feel like it was assembled from a content brief, and a stop at imobush kept that handcrafted feel going, you can tell when a real human with real understanding is behind the words versus a templated piece churned out for an algorithm to find.
Reading this slowly because the writing rewards a slower pace, and a stop at ibeburn did the same, the pace at which I read content is something I now use as a quality signal and writing that earns a slower pace earns my attention as a reader looking for substance these days.
Reading more of the archives is now on my plan for the weekend, and a stop at triadsharp confirmed the archive worth the time, the rare archive worth a dedicated reading session rather than just casual sampling is the rare archive of serious work and this site has clearly produced enough of that work to warrant the deeper exploration.
Reading this confirmed a hunch I had been carrying about the topic without having articulated it, and a stop at sorreltavern extended the confirmation, content that gives shape to fuzzy intuitions is doing the rare work of making private thoughts public and this site is providing that articulating service consistently for me lately.
Now wondering how the writers calibrated the level of detail so well, and a stop at syncbyte continued the same calibration, the right level of detail is one of the harder editorial calls in any piece and this site has clearly developed an instinct for it through what I assume is years of careful practice publicly.
I really like how the writer keeps the tone friendly without sounding fake or overly polished, and after a stop at fylbust the same calm pace was there, no rushing to make a point and no padding either, just clean honest writing that I can respect and come back to later again.
Worth flagging that this approach to the topic is fresh without being contrarian, and a stop at tacticstaff extended the same fresh angle, finding original perspective on familiar subjects is rare and this site has clearly developed its own way of seeing rather than echoing the dominant takes from elsewhere consistently.
Glad the writer did not feel the need to argue with imaginary critics in the post itself, and a stop at zulvexa kept the same focused approach going, defensive writing wastes the reader time and confidence on positions that did not need defending and this post has clearly avoided that common failure.
This filled in a gap in my understanding that I had not even noticed was there, and a stop at pebblenovel did the same, the kind of post that gives you more than you expected when you first clicked through from somewhere else, a real find for anyone curious about the area covered here.
Now recognising the editorial wisdom of letting some questions remain open at the end, and a look at seriftackle continued that intellectual honesty, content that does not force closure on contested questions is content that respects the limits of knowledge and this site has clearly developed the maturity to know when to leave space.
One of the more thoughtful posts I have read recently on this topic, and a stop at gongjade added even more weight to that impression, this is genuinely good content that holds its own against far better known sites in the same space without trying to imitate any of them at all which I appreciate.
Came across this through a roundabout path and now it is on my regular rotation, and a stop at leveemotel sealed that decision, the open web still produces serendipitous discoveries when you let the citations and references guide you rather than relying purely on algorithmic feeds for new content recommendations always.
Skipped to a specific section because I knew that was the question I had, and the answer was clean, and a stop at byncane similarly delivered targeted answers without burying them, content engineered for readers who arrive with specific needs rather than open ended browsing is increasingly valuable in a search heavy reading environment.
Reading this between meetings turned out to be the most useful thing I did all afternoon, and a stop at steamstraw kept that productivity feeling going, content can sometimes outperform actual work in terms of what gets accomplished mentally and this site managed that today which is genuinely a high bar to clear consistently.
Liked that there was nothing performative about the writing, and a stop at exploreyourpotential continued that genuine quality, performative writing tries to be witnessed rather than read and the difference between performance and substance is huge for the careful reader and this site has clearly chosen substance every time clearly.
My friends would appreciate a few of these posts and I will be sending links accordingly, and a look at velourturban added more pages to my share queue, content that earns shares to specific people in specific contexts is content with social utility and this site is generating those targeted shares from me consistently lately.
Compared to the usual results for this kind of search this site stands well above the average, and a quick visit to jalborn kept the standard high, you can tell within seconds whether a site is going to waste your time or actually deliver and this one clearly delivers without any false starts.
Looking at the surface design and the substance together this site has both right, and a look at tritonsloop reinforced that integrated quality, sites where presentation and content reinforce each other rather than fighting are sites with full editorial coherence and this one has clearly invested in both layers in a balanced way.
Now appreciating that the post did not require external context to follow, and a look at inaarch maintained the same self contained quality, content that respects new visitors by being readable without prerequisites is content with broader accessibility and this site has clearly invested in keeping each piece reader friendly for fresh arrivals.
Glad to find a site whose links lead somewhere worth going rather than back to itself for SEO juice, and a stop at hoxfix kept that generous outbound feel, citing other peoples work with real respect rather than just for ranking signals is a sign of an honest operation worth supporting going forward.
Easy to recommend, the content speaks for itself without needing additional praise from me, and a stop at halbrook only adds more reasons to send people this way, the kind of generous resource that benefits its readers without demanding anything in return is increasingly rare and worth recognising clearly today across the broader open internet.
Working through this site has been a small antidote to the shallow content that fills most of my reading time, and a stop at swamptweed extended that antidote function, sites that quietly improve the average quality of my reading by being themselves are sites worth supporting through return visits and recommendations consistently.
Liked the balance between depth and brevity, never too shallow and never too long, and a stop at stereotarot kept the same balance going across the rest of the site, this is one of the harder skills in writing and the team here clearly has it figured out very well indeed across every page.
Liked the way the post balanced confidence and humility, and a stop at fylcalm maintained the same balance, knowing when to assert and when to acknowledge uncertainty is a sign of mature thinking and the writers here have clearly developed that calibration through what I assume is years of careful work on their craft.
Glad the writer did not feel compelled to cover every possible angle of the topic, focus is a virtue, and a stop at zunkavi reflected the same disciplined scope, knowing what to leave out is half of what makes good writing good and this post has clearly been edited with that principle in mind.
Honestly impressed, did not expect to find this level of care on the topic, and a stop at timberverge cemented the impression, you can tell within the first few paragraphs whether a site is going to be worth the time and this one delivered on that early promise nicely throughout the rest of what I read.
Felt like the post had been edited rather than just drafted and published, and a stop at vocabtoffee suggested the same care across the site, the difference between edited and unedited content is enormous for the reader and this site has clearly invested in the editing pass that most blogs skip entirely which really does show up.
Stayed longer than planned because each section earned the next, and a look at pebbleoboe kept that pulling effect going across more pages, the kind of subtle pull that good writing exerts on attention is something I find harder and harder to resist when I encounter it on the open web today.
Took a screenshot of one section to come back to later, and a stop at liegelane prompted another saved tab, the urge to capture and revisit specific pieces of content is something I rarely feel but when I do it tells me the work is worth more than the average passing read for sure.
Now organising my browser bookmarks to give this site easier access, and a look at tunicvicar earned the same organisational priority, the small acts of digital housekeeping I do for sites I expect to use often are themselves a measure of trust and this site has triggered the trust based housekeeping behaviour from me clearly.
withdraw usdt to rubles card exchange usdt to cash
Bookmark added in three places to make sure I do not lose the link, and a look at buildsomethinglasting got the same redundant treatment, sites I am afraid to lose are the rare keepers and this is clearly one of them based on what I have read so far across this and a couple of related posts.
Genuine reaction is that this site clicked with how I like to read, and a look at solotopaz kept that comfortable fit going, sometimes you find a place online whose editorial decisions just align with your preferences and when that happens it is worth recognising and supporting through repeat engagement consistently going forward.
Easy to recommend, the content speaks for itself without needing additional praise from me, and a stop at vistastencil only adds more reasons to send people this way, the kind of generous resource that benefits its readers without demanding anything in return is increasingly rare and worth recognising clearly today across the broader open internet.
Worth a quiet moment of recognition for the consistency I have noticed across multiple posts, and a stop at cadbrisk continued that consistent quality, sites that maintain quality across many pieces rather than peaking on one viral post are sites with real editorial discipline and this one has clearly developed that discipline carefully.
Now adding the homepage to my regular check rotation rather than waiting for individual links to find me, and a stop at pixiescan confirmed the rotation upgrade, the move from passive discovery to active checking is a vote of confidence in a sites ongoing quality and this site has earned that active engagement clearly.
A piece that did not lean on the writer credentials or institutional backing, and a look at ibecap maintained the same focus on substance, content that earns trust through quality rather than through name dropping is the kind I find most persuasive and this site is clearly playing on the substance side of that distinction.
Reading this in a quiet hour and finding it suited the quiet, and a stop at serifveil extended the quiet reading mood, content that matches its own optimal reading conditions rather than fighting them is content that has been thoughtfully calibrated and this site reads as having a particular reading mood in mind throughout.
Reading this site over the past week has changed how I evaluate content in this space, and a look at veilshrine extended that recalibration, the standards I bring to reading on the topic have shifted upward as a direct result of regular exposure to this kind of work and that shift will outlast any single reading session.
My time on this site has now extended past what I had budgeted, and a stop at spectrasolo keeps extending it further, content that overstays its budget in my schedule is content that has earned the extra time and this site has been earning extra time across multiple visits to the point where my schedule needs adjustment.
Just one of those reads that left me feeling slightly more capable rather than overwhelmed, and a look at inobrat kept that empowering feel going, the difference between content that builds the reader up and content that intimidates them is huge and this site clearly knows which side of that line to stand.
Reading this in segments because the day was busy, and the post survived the fragmented attention well, and a stop at zunqavo held up similarly under interrupted reading, content that can withstand modern distracted reading patterns rather than requiring a perfect block of focused time is increasingly the kind I prefer.
Felt the writer was speaking my language without trying to imitate it, and a look at gadblow continued that natural fit, when a writers default voice happens to match what you find easy to read the experience feels frictionless and that is something I notice and remember about specific sites going forward.
Reading this with a notebook open turned out to be the right move, and a stop at turtleudon added more material to the notes, content that justifies active note taking from a passive reader is content with real informational density and this site is producing notes worthy material at a high rate consistently.
Bookmarking this for later, the kind of resource I want to keep nearby, and a quick look at pebbleorbit confirmed the rest of the site is worth the same treatment, definitely going into my reference folder for the next time the topic comes up at work or in conversation with someone who asks.
Solid value for anyone willing to read carefully, and a look at savorvantage extends that value across the rest of the site, this is the kind of place that rewards return visits rather than offering everything in a single splashy post and then leaving readers nothing to come back for later which is unfortunately common.
Thanks for the clean writing, no broken sentences and no awkward translations like some other sites have, and a quick stop at siriussuperb kept that polish going nicely, it really does make a difference when a reader can move through a page without tripping on every line or going back to reread.
Felt like the post had been edited rather than just drafted and published, and a stop at discovermeaningfulideas suggested the same care across the site, the difference between edited and unedited content is enormous for the reader and this site has clearly invested in the editing pass that most blogs skip entirely which really does show up.
A clear case of writing that does not try to do too much in one post, and a look at gongketo maintained the same scoped discipline, posts that try to cover too much end up covering nothing well and this site has clearly chosen scope discipline as a core editorial principle which shows up clearly in what I read.
Now adding the homepage to my regular check rotation rather than waiting for individual links to find me, and a stop at jamcall confirmed the rotation upgrade, the move from passive discovery to active checking is a vote of confidence in a sites ongoing quality and this site has earned that active engagement clearly.
Reading this on the train into work was a better use of the commute than my usual choices, and a stop at sampleshaft extended that commute reading well, content that improves transit time rather than just filling it is content with practical benefit and this site has earned its place in my morning commute reading rotation.
Reading this prompted me to clean up some old notes related to the topic, and a stop at caroxo extended that organising urge, content that triggers personal organisation rather than just consuming attention is content with motivating energy and this site has the kind of clarity that prompts active follow up rather than passive consumption.
Жидкость для генератора тумана с минимальным конденсатом
Glad to have another data point on a question I am still thinking through, and a look at swordtunic added two more, content that acknowledges its place in a wider conversation rather than pretending to settle the question alone is intellectually honest in a way that I wish was more common across the open web.
Thanks for not padding this with the usual filler intros and outros that every other blog seems to require, and a quick visit to mercypillow continued that lean approach across more posts, content stripped of waste is content that respects you and I will always come back to that kind of approach.
Thanks for the readable length, I finished it without checking how much was left, and a stop at hoxhem kept me reading the same way, when I stop noticing the length of a piece because the content is engaging enough to sustain attention without willpower the writer has done their job well today.
If a friend asked me where to read carefully on the topic I would send them here without hesitation, and a look at hanrim confirmed the recommendation strength, the directness of my recommendation reflects how confident I am in the quality and this site has earned undiluted recommendations from me across multiple recent conversations actually.
ии презентация [url=http://www.litteraesvfu.ru]http://www.litteraesvfu.ru[/url]
Probably this is one of the better quiet successes on the open web at the moment, and a look at ibekeg reinforced that quiet success quality, sites that are doing well without making a noise about doing well are the sites I most respect and this one has clearly chosen the quiet success path consistently throughout.
Came away with a slightly better mental model of the topic than I started with, and a stop at scarabvogue sharpened that further, content that improves the reader thinking apparatus rather than just dumping facts into it is the rare kind I genuinely value and seek out when I have time to read carefully.
Honest reaction is that this is the kind of writing I would defend in a conversation about good blog content, and a look at zunvoro reinforced that, the rare site whose work I would actively recommend rather than just tolerate is the kind I want to support through return visits regularly.
Now thinking about this site as a small example of what good independent writing looks like, and a stop at sprystep continued that exemplary status, the few sites that serve as good examples are sites worth holding up in conversations about quality and this one has earned that exemplary placement through patient consistent effort over time.
The conclusions felt earned rather than tacked on at the end like an afterthought, and a look at triggersyrup kept that careful structure going, you can tell when a writer has thought about the shape of their post versus just letting it ramble out and hoping for the best at the end which most do.
Felt like I was reading something written by someone who actually thinks about the topic rather than reciting it, and a look at vortexvandal reinforced that impression, the difference between recited content and considered content is huge and this site clearly belongs to the latter category which I appreciate as a careful reader looking for substance.
Bookmarked the page and the homepage too because clearly there is more to explore here, and a quick stop at snoozestaple only made that more obvious, this is the kind of place I want to dig through over a weekend rather than rushing through during a coffee break tomorrow morning before getting back to work.
Found this through a search that was generic enough I did not expect quality results, and a look at glybrow continued the surprisingly good experience, search engines occasionally still surface excellent independent content if you scroll past the obvious paid and high authority results which is reassuring to remember sometimes.
télécharger 1xbet nouvelle version
Really appreciate that the writer did not overstate the importance of the topic to make the post feel weightier, and a quick visit to inobrisk maintained the same modest framing, content that is honest about its own scope rather than inflating itself is the kind I trust and return to repeatedly over time.
Probably the kind of site that should be more widely read than it appears to be, and a look at peltpetal reinforced that quiet wish, the gap between a sites quality and its apparent reach is sometimes large and that gap exists for this site in a way that makes me want to mention it more.
Solid quality, the kind of work that holds up to a careful read rather than a quick skim, and a quick look at stencilslick kept that standard going strong, content that rewards attention rather than punishing it is something I appreciate more and more these days online across nearly every topic I follow.
Stayed longer than planned because each section earned the next, and a look at createactionsteps kept that pulling effect going across more pages, the kind of subtle pull that good writing exerts on attention is something I find harder and harder to resist when I encounter it on the open web today.
Good clean post, no errors and no awkward phrasing that breaks the reading flow, and a stop at tasselskein kept the same standard, definitely the kind of editorial care that earns a return visit because it tells me the writer is paying attention to details that matter to readers rather than just rushing publication.
Skipped the related links section thinking I had read enough and then came back to it later when curiosity got the better of me, and a stop at snaresaffron confirmed I should have just read it first, every section of this site appears to deserve careful attention rather than skipping past lazily.
Читать расширенную версию: https://stroyteh-nsk.su
Лучшее прямо здесь: https://gazobeton163.ru
monopoly big baller live results [url=https://monopoly-live-in.com]monopoly big baller live results[/url] .
live monopoly strategy [url=monopoly-live-india.com]monopoly-live-india.com[/url] .
monopoly game live [url=http://monopoly-live-india.com]monopoly game live[/url] .
Approaching this with the usual skepticism I bring to new sites and being slowly persuaded, and a stop at gooseholm continued that gradual persuasion, the careful path from skeptical reader to genuine fan is the only one I trust and this site has walked me along that path through patient consistent quality across pieces.
monopoly live casino strategy [url=https://monopolylive-india.com]monopoly live casino strategy[/url] .
monopoly big baller live stats [url=monopoly-live-results.com]monopoly big baller live stats[/url] .
Now setting up a small reminder to revisit the site on a slow day, and a stop at starchserene confirmed the reminder was a good idea, planning return visits is a small organisational act that signals trust in ongoing quality and this site has earned that planned return through consistent performance across the pieces I have read so far.
monopoly big baller live stream [url=http://www.live-monopoly-india.com]https://live-monopoly-india.com/[/url]
On reflection this is the kind of writing that improves my taste for what is possible in the format, and a look at tasseltract continued raising that bar, content that elevates my expectations rather than lowering them is doing important work in calibrating my standards and this site is participating in that elevation reliably.
Reading this felt easy in the best way, no friction and no confusion at any point, and a stop at vocabtrifle carried that same comfort across more pages, the kind of editorial flow that lets you absorb information without fighting the format which is increasingly hard to find on the open web today across topics.
Reading this prompted me to subscribe to my first newsletter in months, and a stop at icabran confirmed the subscribe was the right call, content that earns a newsletter signup is content that has cleared a higher trust bar than a casual visit and this site has clearly earned that level of commitment from me.
A piece that earned its conclusions through the body rather than asserting them at the end, and a look at tasseltrace maintained the same earned quality, conclusions that follow from what came before are more persuasive than declarations and this site has clearly internalised that principle in how it constructs arguments throughout pieces.
Just one of those reads that left me feeling slightly more capable rather than overwhelmed, and a look at jekcar kept that empowering feel going, the difference between content that builds the reader up and content that intimidates them is huge and this site clearly knows which side of that line to stand.
Reading this with my morning coffee turned into reading the related posts with my morning coffee, and a stop at glyjay stretched the morning further, content that pulls breakfast into a reading session rather than just accompanying it is content that has earned a higher claim on my attention than the average article does.
Glad the writer did not feel the need to argue with imaginary critics in the post itself, and a stop at learncreategrow kept the same focused approach going, defensive writing wastes the reader time and confidence on positions that did not need defending and this post has clearly avoided that common failure.
Took my time with this rather than rushing because the writing rewards attention, and after vividbolt I had even more to absorb, the kind of content that pays back the patient reader rather than punishing them with empty filler is something I look for and rarely find in regular searches lately.
Looking at the surface design and the substance together this site has both right, and a look at sectorsatin reinforced that integrated quality, sites where presentation and content reinforce each other rather than fighting are sites with full editorial coherence and this one has clearly invested in both layers in a balanced way.
Honest reaction is that this is the kind of writing I would defend in a conversation about good blog content, and a look at discovernextlevelideas reinforced that, the rare site whose work I would actively recommend rather than just tolerate is the kind I want to support through return visits regularly.
Refreshing to read something where the words actually mean something instead of filling space, and a stop at turbineunion kept that going, the writing here trusts the reader to follow along without endless repetition or constant reminders of what was already said earlier in the post which I appreciate.
Liked everything about the experience, from the opening through to the closing notes, and a stop at lyxboss extended that into more pages, finding a site where the editorial vision shows through every choice rather than feeling random is an increasingly rare experience and one I am glad to have today during this particular reading session.
My time on this site has now extended past what I had budgeted, and a stop at jamkeg keeps extending it further, content that overstays its budget in my schedule is content that has earned the extra time and this site has been earning extra time across multiple visits to the point where my schedule needs adjustment.
Thanks for the simple approach, too many sites bury the actual point under layers of unnecessary words, but here every line earns its place, and a look at irotix showed the same care for the reader which is something I will remember the next time I need answers on a topic.
Granted I am giving this site more credit than I usually give new finds, and a look at thrushstoic continued earning that credit, the calibration of how much trust to extend after limited exposure is something I do carefully and this site has earned more trust on shorter exposure than most due to consistent quality across.
If I were to recommend a starting point for the topic this site would be near the top of my list, and a stop at tritile reinforced that recommendation status, the small list of starting point recommendations I keep for friends asking about topics is short and this site is now firmly on it.
Bookmark added in three places to make sure I do not lose the link, and a look at gorgefair got the same redundant treatment, sites I am afraid to lose are the rare keepers and this is clearly one of them based on what I have read so far across this and a couple of related posts.
Now adjusting my expectations upward for the topic based on this post, and a stop at hubbeat continued that bar raising effect, content that resets what I think is possible on a subject is doing real work in shaping my standards and this site is providing those bar raising experiences at a notable rate during sessions.
A piece that read as if the writer was thinking carefully rather than just typing fluently, and a look at toucanvamp continued that considered quality, the difference between fluent typing and careful thinking shows up in writing and this site reads as the product of thought rather than just the product of language fluency apparently.
Reading this between two meetings turned out to be the highlight of the morning, and a stop at siskatriton continued that highlight quality, content that outshines the structured parts of a working day is doing something well beyond ordinary and this site has produced multiple such highlights for me already this week alone.
Reading this gave me a small mental break from the heavier reading I had been doing, and a stop at udonvivid extended that lighter feel, content that provides relief without becoming trivial is harder to produce than people realise and this site has clearly figured out how to be light without being shallow at all.
Left me wanting to read more rather than feeling burned out, that is a good sign, and a look at vortextrance confirmed there is plenty more here to explore, the kind of writing that builds appetite rather than killing it which is a rare quality on the modern open internet today across most categories of content.
Halfway through reading I knew this would be one to bookmark, and a look at tractsmoke confirmed that early intuition, when bookmark intent forms before finishing a post you know the writing has cleared a quality bar that most content fails to clear and this site has cleared it on multiple visits already.
Honest take is that this was better than I expected when I clicked through, and a look at hazmug reinforced that, the bar for online content has dropped so much that finding something thoughtful and well constructed feels almost noteworthy now which says more about the average than about this site itself.
Felt the writer was being honest with the reader which is rare enough that I want to acknowledge it, and a look at idaoat continued that honest feel, content built on actual knowledge rather than aggregated summaries is something I value highly and rarely come across in regular searches on the open internet these days.
Reading this gave me confidence to make a decision I had been putting off, and a stop at explorevaluecreation reinforced that confidence, content that translates into action in my own life rather than just informing it is content with the highest practical value and this site is generating that action level utility for me lately.
Following the post through to the end without my attention drifting once, and a look at goaxio earned the same uninterrupted attention, content that holds attention without manipulating it is content with substantive pull and this site has demonstrated that substantive pull across multiple pieces in a single reading session reliably here today.
Genuine pleasure to read, and that is not something I say often after a casual click through, and a quick visit to vikingturban kept the same feeling going across the rest of the site, finding writing that actually feels good to spend time with rather than just functional is increasingly rare on the open web.
Really like that the writer trusts the reader to follow simple logic without restating every previous point, and a stop at shoretunic kept that respect going, treating an audience as capable adults rather than as people who need constant hand holding makes a noticeable difference in the reading experience for me.
A memorable post for me on a topic I had thought I was tired of, and a look at nudgelustre suggested the same site can refresh other tired topics, sites that can revive my interest in subjects I had written off as exhausted are doing rare work and this one is clearly doing that for me today.
конвертер криптовалют вывести usdt наличными
A handful of memorable phrases from this one I will probably use later, and a look at smeltstraw added a couple more, content that contributes language to my own communication rather than just facts is content with a different kind of utility and this site is providing that linguistic utility consistently across what I read.
Appreciate that you did not pad this with fluff to hit a word count, the post says what it needs to say and stops, and a look at jemido did the same, brevity here feels intentional not lazy which is a distinction many writers miss completely sometimes when they are working under deadlines.
Solid information that lines up with what I have been hearing from other reliable sources, and after my visit to kindgrooveoutlet I was even more certain of that, this site checks out which is something I value highly when so many places online play loose with the facts to chase a quick click.
Came away with a small but real shift in perspective on the topic, and a stop at buildlongtermgrowth pushed that shift a bit further, the kind of subtle reframing that good writing does to a reader without making a big deal of it is something I always appreciate when it happens which is sadly not that often.
A piece that suggested careful editing without showing the marks of the editing, and a look at lyxboss continued that invisible polish, the best editing disappears into the prose and this site reads as having been edited with skill that does not announce itself which is the highest compliment I can offer any blog content.
A genuine pleasure to find a site that publishes at a sustainable cadence rather than chasing the daily content treadmill, and a look at targetskein confirmed the careful publication rhythm, sites that prioritise quality over frequency are rare and this one has clearly chosen the slower pace which I appreciate as a reader.
Felt the writer respected the topic without being precious about it, and a look at growstrategically continued that respectful but unfussy treatment, finding the right register for serious topics is hard and this site has clearly figured out how to take the topic seriously while still being readable for casual visitors regularly.
Just what you need: https://blockchainreporter.net/net-worth/mr-beast/
Now noticing the post fit a particular gap in my reading without my having articulated the gap before, and a look at twisttailor extended that gap filling effect, content that meets needs I had not consciously formulated is content with reader insight and this site has clearly developed that anticipatory editorial sense across many pieces.
Reading this in a relaxed evening setting was a small pleasure, and a stop at stitchteal extended the pleasant evening reading, content that fits the tone of relaxed time without becoming forgettable is what I look for in evening reading and this site has the right tone for that particular slot in my daily reading routine.
Probably worth setting aside a longer block to read more carefully than I can right now, and a stop at irubelt confirmed the longer block plan, the impulse to schedule dedicated time for a sites archive is itself a measure of trust and this site has earned that scheduling impulse from me clearly today actually.
Felt like the writer was speaking directly to someone with my level of curiosity, neither talking down nor showing off, and a stop at gorgeheron kept that comfortable matching going, finding writing that meets you where you are rather than asking you to climb up or stoop down feels great every time it happens.
Now noticing the post fit a particular gap in my reading without my having articulated the gap before, and a look at learnandexecute extended that gap filling effect, content that meets needs I had not consciously formulated is content with reader insight and this site has clearly developed that anticipatory editorial sense across many pieces.
Worth flagging this site to a few specific friends who would appreciate the editorial sensibility, and a look at skeinsequoia added more pages I will mention to them, recommending sites to specific people requires understanding both the site and the person and this site is making those personalised recommendations easy and natural for me.
A piece that left me thinking I had been undercaring about the topic, and a look at odepillow reinforced that mild concern, content that raises the appropriate weight of a subject without being preachy about it is doing important work and this site is providing that gentle elevation of attention for me consistently.
Now thinking I want more sites built on this kind of editorial foundation, and a stop at idebrim extended that wish into a broader hope, sites built on substance and care rather than on metrics and growth are the kind of sites I want to see more of and this one is a small example worth supporting.
A relief to read something where I did not have to fact check every claim mentally, and a look at nudgelynx continued that reliable feeling, sites where I can lower my guard and trust the content are rare and this one is earning that trust paragraph by paragraph through consistent careful work behind the scenes.
Worth flagging that the writing rewarded a second read more than I expected, and a look at gorurn produced the same second read benefit, content with hidden depths that emerge only on careful rereading is rare in the modern blog space and this site has clearly invested in that level of compositional density throughout.
Bookmark earned and the bookmark feels like a permanent addition rather than a maybe, and a look at slateserif confirmed that permanent status, the difference between durable bookmarks and ephemeral ones is something I have learned to feel quickly and this site triggered the durable feeling almost immediately during my first read here.
Felt the writer was being honest with the reader which is rare enough that I want to acknowledge it, and a look at refinedclickpingcollective continued that honest feel, content built on actual knowledge rather than aggregated summaries is something I value highly and rarely come across in regular searches on the open internet these days.
Without comparing too aggressively to other sources this one stands out for the right reasons, and a look at salutesyrup continued that distinctive quality, content that distinguishes itself through substance rather than style tricks is content with lasting differentiation and this site has clearly chosen substance based differentiation as its core editorial strategy.
Worth saying that the quiet confidence of the writing is what landed first, and a look at taigascenic continued that quiet quality, confident writing without the loud display of confidence is a rare combination and this site has clearly developed both the knowledge and the editorial restraint to land that combination consistently.
If I were to recommend a starting point for the topic this site would be near the top of my list, and a stop at solarzip reinforced that recommendation status, the small list of starting point recommendations I keep for friends asking about topics is short and this site is now firmly on it.
Reading this with a notebook open turned out to be the right move, and a stop at discovermorevalue added more material to the notes, content that justifies active note taking from a passive reader is content with real informational density and this site is producing notes worthy material at a high rate consistently.
Skipped the social share buttons but might come back to actually use one later, and a stop at vetovarsity extended that share urge, content that triggers genuine sharing impulses rather than performative ones is content that has actually moved me and not many posts in a typical week do that for me actually.
Now wondering how the writers calibrated the level of detail so well, and a stop at jamkix continued the same calibration, the right level of detail is one of the harder editorial calls in any piece and this site has clearly developed an instinct for it through what I assume is years of careful practice publicly.
If I were to recommend a starting point for the topic this site would be near the top of my list, and a stop at nyxsip reinforced that recommendation status, the small list of starting point recommendations I keep for friends asking about topics is short and this site is now firmly on it.
Апостиль на свидетельства и справки часто требуется при переезде, заключении брака за границей или поступлении в иностранные учебные заведения. Мы помогаем организовать процесс оформления документов https://langwee-russia.com/perevod-dokumentov/
Glad to find a site whose links lead somewhere worth going rather than back to itself for SEO juice, and a stop at jencap kept that generous outbound feel, citing other peoples work with real respect rather than just for ranking signals is a sign of an honest operation worth supporting going forward.
Worth saying this site reads better than most paid newsletters I have tried, and a stop at hugbox confirmed that comparison, the bar for free content is often lower than for paid but this site clears the paid bar consistently and that says something about the editorial approach behind the work being published here regularly.
Decided this was the best thing I had read all morning, and a stop at learnandapply kept that ranking intact, ranking my reading is something I do mentally throughout the day and the top rank is competitive and not easily won but this site won it without needing to overstate its claims for that.
Reading this gave me a small jolt of recognition for an experience I thought was just mine, and a stop at solidtruffle produced more such jolts, content that universalises private experiences without flattening them is doing genuinely useful work and this site is providing that recognition function for me reliably across topics I read.
Now recognising the specific pleasure of reading writing that shows real care for sentence shapes, and a look at trophysofa extended that craft pleasure, sentence level writing quality is something most blog content ignores entirely and this site has clearly invested in the prose layer alongside the substance which is rare today.
Worth recognising the absence of the usual blog tropes here, and a look at upperspruce continued that fresh quality, sites that avoid the standard moves of the medium read as more original even when the content is on familiar topics and this one has clearly chosen its own path through the conventional terrain skilfully.
The overall feel of the post was professional without being stuffy, and a look at ohmlull kept that approachable expertise going, finding the right register for technical content is hard but this site has clearly figured out how to sound knowledgeable without slipping into that distant lecturing tone that loses readers in droves every time.
Pass this along to colleagues if the topic comes up, the framing here is sensible, and a stop at voicesash adds more useful angles to share, the kind of content that improves conversations rather than just feeding them is what makes a resource genuinely valuable in professional contexts going forward over time and across project boundaries too.
Comfortable in tone and substantive in content, that is a hard combination to land, and a look at gorgeivy kept that pairing alive across more material, this is what good editorial direction looks like in practice and the team here clearly has someone keeping a steady hand on the wheel across what they decide to publish.
Solid little post, the kind that does not need to be flashy because the substance is doing the work, and a look at connectideasworld kept that quiet confidence going across the site, this is what writing looks like when the writer trusts the content to land on its own without theatrics or unnecessary attention seeking behaviour.
Sets a higher bar than most of what shows up in search results for this topic, and a look at irubrisk did not lower that bar at all, in fact it confirmed the impression, this is the kind of consistency that earns a place in regular rotation for serious readers instead of casual scrollers passing through.
Reading this in segments because the day was busy, and the post survived the fragmented attention well, and a stop at fibdot held up similarly under interrupted reading, content that can withstand modern distracted reading patterns rather than requiring a perfect block of focused time is increasingly the kind I prefer.
Reading this prompted me to dig out an old reference book related to the topic, and a stop at idequa extended that connection to other sources, content that connects me back to my own existing knowledge rather than asking me to forget it is content with continuity and this site has that continuous quality.
Reading this gave me confidence to make a decision I had been putting off, and a stop at findnewmomentum reinforced that confidence, content that translates into action in my own life rather than just informing it is content with the highest practical value and this site is generating that action level utility for me lately.
Reading this slowly to give it the attention it deserved, and a stop at shadetassel earned the same slow read, choosing to read slowly is a small act of respect for content quality and very few sites earn that respect from me but this one did so without any explicit ask which is the cleanest way.
Considered against the flood of similar content this one stands apart in important ways, and a stop at steamsaunter extended that distinctive feel, sites that find their own corner of a crowded topic and stay there are sites worth following and this one has clearly carved out its own space and committed to defending it carefully.
Generally I do not leave comments but this post merits a small note, and a stop at gribrew extended that comment worthy quality, the urge to actively contribute to a sites community rather than passively consume from it is something specific content provokes and this site has provoked that engagement urge from me today.
Felt slightly impressed without being able to point to one specific reason, and a look at tundrastout continued that diffuse positive feeling, when content works at a level you cannot easily articulate the writer is doing something with craft rather than just delivering information and that is something I have learned to recognise.
During my morning reading slot this fit perfectly into the routine, and a look at findclaritynow extended that perfect fit into the rest of the routine, content that matches the rhythm of how I actually read rather than demanding accommodation from my schedule is content well calibrated to its likely audience and this site has it.
A genuinely unexpected highlight of my reading week, and a look at sealtoga extended that pattern, the surprise of finding excellent content rather than the predictable mediocre is one of the few real pleasures of casual web browsing and this site delivered that surprise cleanly today which I really do appreciate.
Found the rhythm of the prose particularly enjoyable on this read through, and a look at oxaboon kept that musical quality going across the related pages, sentence rhythm is something most blog writers ignore but it makes a real difference in how content lands with the careful reader who cares.
Now recognising that this site has earned a place in the small group of resources I treat as authoritative, and a stop at cepbell confirmed that placement, the difference between resources I trust and resources I just consume is real and this site has clearly moved into the trusted category through consistent quality over time.
Comfortable in tone and substantive in content, that is a hard combination to land, and a look at intentionalclickpingexperience kept that pairing alive across more material, this is what good editorial direction looks like in practice and the team here clearly has someone keeping a steady hand on the wheel across what they decide to publish.
создать презентацию ии [url=http://www.litteraesvfu.ru]http://www.litteraesvfu.ru[/url]
All the latest here: https://blockchainreporter.net/net-worth/danny-masterson/
Полная версия статьи: https://avicenna-stroy.ru
Really grateful for content like this, it does not waste my time and it does not insult my intelligence either, and a quick look at explorefreshthinking was the same, balanced respectful writing that makes a person feel welcome rather than rushed through pages of forced engagement just to keep clicking around.
Reading this confirmed a hunch I had been carrying about the topic without having articulated it, and a stop at shorevolume extended the confirmation, content that gives shape to fuzzy intuitions is doing the rare work of making private thoughts public and this site is providing that articulating service consistently for me lately.
Skimmed first and then went back to read carefully, and the careful read paid off in places I had missed, and a stop at violavenom got the same treatment, the rare site whose content rewards a second pass is content I want more of in my regular rotation rather than disposable single read articles.
Now recognising the editorial wisdom of letting some questions remain open at the end, and a look at explorecreativefreedom continued that intellectual honesty, content that does not force closure on contested questions is content that respects the limits of knowledge and this site has clearly developed the maturity to know when to leave space.
A small thank you note from me to the team behind this work, the post earned it, and a stop at stitchtwine suggested more thanks would be in order over time, recognising the people who do good writing online is something I try to remember to do because the alternative is silence and silence rewards mediocrity unfortunately.
Now considering whether the post would translate well into a different form, and a look at superbtundra suggested similar versatility, content that could move into other media without losing its substance is content that has been built around ideas rather than around format and this site reads as idea first throughout posts.
During a quiet evening reading session this provided just the right depth without being heavy, and a stop at oldenmaple maintained the same evening appropriate weight, content with depth that does not exhaust the reader is content with editorial calibration and this site has clearly figured out how to be substantial without being demanding all the time.
зимние комбинезоны для девочек [url=https://www.detskie-kombinezony-kupit.ru]зимние комбинезоны для девочек[/url]
Now noticing how rare it is to find a site that does not feel rushed, and a look at sequoiasnare extended that calm pace, content produced without time pressure has a different quality than content shipped to meet a deadline and this site reads as written without urgency which produces a different and better experience for readers.
Solid post, the structure is easy to follow and the language stays simple even when the topic gets a bit more involved, and a look at startmovingahead kept that same standard going, so I left feeling like the time spent here was actually worth something for once which is rare lately.
Found the section structure particularly thoughtful, and a stop at maplecresttradingcorner suggested the same care across the broader site, structural choices guide the reader through the material in ways most people do not consciously notice but feel the absence of when those choices are made carelessly or not at all.
Closed the tab with a small sense of finality rather than the usual rushed exit, and a stop at jeqblot produced the same considered closing, when reading ends with deliberate satisfaction rather than impatient skip you know the time was well spent and this site is producing those satisfying endings consistently across what I read.
Saving this link for the next time someone asks me about this topic, and a look at skiffvantage expanded what I will be sharing with them, this is the kind of resource that makes a real difference when you are trying to point a friend to something useful and reliable rather than generic marketing pages.
Loved the writing voice here, friendly without being fake and confident without being arrogant, and a stop at trebleupper carried the same tone forward, the kind of personality that makes a reader feel welcome rather than lectured at which is a balance plenty of writers struggle to find no matter how long they have been at it.
Came across this looking for something else entirely and ended up reading it through twice, and a look at gribump pulled me deeper into the site than I planned, the writing has a way of holding attention without resorting to manipulative cliffhangers or vague promises that never get delivered later down the page.
A piece that was confident enough to leave some questions open rather than forcing closure, and a look at goshfrost continued that intellectual honesty, content that admits the limits of its scope is more trustworthy than content that pretends to total understanding and this site has the right calibration on certainty consistently.
A small thing but the line spacing and font choices made reading this physically pleasant, and a look at flonox maintained the same careful design, technical choices about typography are part of what makes online reading actually comfortable and this site has clearly invested in the design layer alongside the content layer carefully.
Reading the writers other posts after this one suggests the quality is consistent rather than peak, and a stop at isebrook confirmed the consistent quality reading, sites that hold the same level across many pieces rather than peaking on a few are sites with sustainable editorial discipline and this one has clearly developed that.
Felt the writer was being honest with the reader which is rare enough that I want to acknowledge it, and a look at jamsyx continued that honest feel, content built on actual knowledge rather than aggregated summaries is something I value highly and rarely come across in regular searches on the open internet these days.
Just sat with this for a bit longer than I usually would because the points are worth thinking about, and after findyourinspirationnow I had even more to chew on, the kind of post that nudges your thinking forward without forcing the issue is something I have always appreciated in good writing online.
уборка квартир москва
Reading this between meetings turned out to be the most useful thing I did all afternoon, and a stop at hekarc kept that productivity feeling going, content can sometimes outperform actual work in terms of what gets accomplished mentally and this site managed that today which is genuinely a high bar to clear consistently.
Just wanted to say this was useful and leave a small note of thanks, and a quick visit to pyxedge earned a similar nod from me, the small acknowledgements add up over time and represent the real economy of trust that good content runs on across the open and increasingly fragmented modern internet.
Liked how the writer used real examples instead of theoretical ones to make the points stick, and a stop at cobqix added even more concrete examples, this is the kind of practical approach that respects readers who actually want to apply what they learn rather than just nodding along passively without doing anything useful.
Now adding the homepage to my regular check rotation rather than waiting for individual links to find me, and a stop at hugtix confirmed the rotation upgrade, the move from passive discovery to active checking is a vote of confidence in a sites ongoing quality and this site has earned that active engagement clearly.
Thanks for the breakdown, it gave me a clearer picture of something I had been confused about for a while now, and a stop at tracesinger closed the remaining gaps in my understanding nicely, no need to hunt around twenty other articles to put the pieces together which is a real time saver.
Found a small mental shift after reading this, the framing here is just a bit different from the standard takes online, and a look at vinylvessel extended that fresh perspective across more material, the rare site whose voice actually changes how you think about something rather than just confirming existing beliefs.
Glad to have another data point on a question I am still thinking through, and a look at discoverlimitlessideas added two more, content that acknowledges its place in a wider conversation rather than pretending to settle the question alone is intellectually honest in a way that I wish was more common across the open web.
капельница от запоя на дому круглосуточно [url=https://kapelnicza-ot-pokhmelya-samara-38.ru]капельница от запоя на дому круглосуточно[/url]
Felt this in a way I cannot quite explain, the topic just hit different here, and a stop at findyournextmove continued in that vein, sometimes you find a site whose perspective lines up with how you have been thinking and reading their work feels like a small relief which I appreciated more than I expected.
Came in confused about the topic and left with a much firmer grasp on it, and after trumpetsash I felt I could explain this to someone else without hesitation, that is the gold standard for any educational content and most sites simply fail to reach it ever which is unfortunate but true.
Результаты анализов и медицинские справки часто необходимы для прохождения комиссий и оформления различных документов. Мы помогаем оперативно подготовить все необходимые бумаги для ваших задач: https://baza-spravki.com/spravka-ob-otsutstvii-grazhdanstva/
Recommended to anyone working in or curious about this area, the depth and clarity combine well, and a look at learnandoptimize keeps that going across more pages, the kind of site that earns regular visits rather than chasing trends has my respect because it suggests genuine commitment to the topic itself rather than to chasing trends.
Picked up on several small touches that suggest a careful editor, and a look at oldenneon suggested the same hand at work across the broader site, editorial consistency at a granular level is one of the strongest signs that an operation is serious rather than just hobbyist and this site reads as serious throughout.
Reading this on the train into work was a better use of the commute than my usual choices, and a stop at globalqualitystore extended that commute reading well, content that improves transit time rather than just filling it is content with practical benefit and this site has earned its place in my morning commute reading rotation.
капельница от алкоголя на дому [url=https://kapelnicza-ot-pokhmelya-samara-39.ru]капельница от алкоголя на дому[/url]
Better than most of the writing I have come across on this topic recently, simpler and more direct, and a look at discoverpowerfulideas continued in that same way, a real outlier in a crowded space full of repetitive content that says little while taking up a lot of reader time today which is unfortunate.
Started believing the writer knew the topic deeply by about the second paragraph, and a look at connectgrowthrive reinforced that confidence, the speed at which a writer establishes credibility through their writing is a useful quality signal and this writer establishes it quickly and quietly without resorting to credential dropping or self promotion.
Stands out for actually being useful instead of just being long, and a look at twinetyphoon kept that going, length without value is the default mode of most blogs these days but this site has clearly chosen a different path which I respect a lot as a reader who values careful editing decisions like that.
Thanks for treating the topic with the seriousness it deserves without becoming pompous about it, and a stop at swiftvantage continued that balanced treatment, the gap between earnest and self serious is huge and writers who can stay on the right side of it earn my respect when I find them online today.
Worth marking the moment when reading this clicked into something useful for my own work, and a look at grobuff extended that practical click, content that connects to my actual life rather than just being interesting is content with the highest kind of value and this site is generating that connection at a high rate.
Bookmark moved to my permanent reference folder rather than the casual maybe later folder, and a look at tildeserene earned the same upgrade, the distinction between casual interest and lasting reference is something I track carefully and very few sites cross that threshold but this one did so without much effort apparently.
вывод из запоя капельница на дому [url=https://kapelnicza-ot-pokhmelya-samara-40.ru]вывод из запоя капельница на дому[/url]
Worth every minute of the time spent reading, and a stop at honeymeadowmarketgallery extends that value across more pages, in a media environment where most content is engineered to waste attention this site stands out by treating reader time as something valuable rather than something to be exploited and stretched as far as possible.
Felt the post handled a sensitive angle of the topic with appropriate care, and a look at unionstaff extended that careful handling across related material, sites that can navigate delicate territory without causing damage are rare and require a level of judgement that comes from experience rather than from following any clear playbook.
Reading this confirmed a small detail I had been uncertain about, and a stop at tallyvertex provided the source for further checking, content that supports verification through citations or links rather than just asserting facts is more trustworthy and this site has clearly built its credibility through that kind of verifiable approach consistently.
Glad to have another data point on a question I am still thinking through, and a look at grebeflame added two more, content that acknowledges its place in a wider conversation rather than pretending to settle the question alone is intellectually honest in a way that I wish was more common across the open web.
Felt no urge to argue with the conclusions even though I started the post slightly skeptical, and a look at jeqblue maintained that pattern, writing that earns agreement through clarity of argument rather than rhetorical pressure is the kind I find most persuasive and the kind I want to read more of these days.
Approaching this site through a casual link click and being surprised by what I found, and a look at isebulb extended the surprise, the rare experience of stumbling into excellent independent content rather than predictable mediocrity is one of the actual remaining pleasures of casual web browsing and this site provided it cleanly.
A memorable post for me on a topic I had thought I was tired of, and a look at thatchteapot suggested the same site can refresh other tired topics, sites that can revive my interest in subjects I had written off as exhausted are doing rare work and this one is clearly doing that for me today.
I came here looking for a quick answer and ended up reading the whole post because it was actually interesting, and after syxblue I had a much fuller picture, no stress and no confusion just a clear walk through the topic that made everything fall into place without much effort.
https://стартапнеделя.рф/
Really like that there are no exclamation marks or all caps shouting throughout the post, and a quick visit to corlex maintained the same calm voice, restraint in punctuation signals confidence in the content and this site clearly trusts its substance to do the persuading rather than relying on typographic emphasis.
Now realising the topic deserved better treatment than it has been getting elsewhere, and a look at learncontinuously extended that broader recognition, content that exposes the gap between actual quality and average quality elsewhere is doing the quiet work of raising standards and this site is contributing to that elevation in its own corner.
Time spent here today felt productive in the way that good reading sessions sometimes do, and a stop at discovernewpossibilities extended that productive feeling across the rest of the morning, the difference between productive reading and merely passing time is real and this site is consistently on the productive side for me lately.
However casually I came to this site I have ended up reading carefully, and a look at buildmeaningfulprogress continued earning that careful reading, the conversion from casual visitor to careful reader is something content earns rather than demands and this site has accomplished that conversion for me over the course of just a few pieces.
A modest masterpiece in its own quiet way, and a look at onionoval confirmed the same quiet quality across the rest of the site, calling something a masterpiece is usually overstating but for content this carefully crafted the word feels appropriate even if the writers themselves would probably resist the label honestly.
Found the post genuinely useful for something I was working on this week, and a look at stridertorch added more material I will reference, content that connects to my actual life and work rather than just being interesting in the abstract is the kind I will pay attention to and return to repeatedly.
Will be passing this along to a few people who would benefit from the perspective shared here, and a stop at discoverandgrow only added to what I will be sharing, this kind of generous content deserves to circulate widely rather than getting buried in some search engine algorithm tweak that pushes it down the rankings.
Solid value for anyone willing to read carefully, and a look at createprogresspath extends that value across the rest of the site, this is the kind of place that rewards return visits rather than offering everything in a single splashy post and then leaving readers nothing to come back for later which is unfortunately common.
Now planning to share the link with a small group of readers I trust, and a look at turbansample suggested more material to share with the same group, recommending content into a curated circle requires confidence in the recommendation and this site is making me confident in those personal recommendations on multiple separate occasions now.
Worth observing that the post landed without needing a flashy headline to hook attention, and a stop at shoreviper did the same, content that earns engagement through substance rather than packaging is the kind I trust more deeply and this site has clearly chosen substance as the primary lever for reader engagement throughout.
Decided not to comment because the post said what needed saying, and a stop at modernlifestyleplatform continued that complete feel, content that does not invite obvious additions or corrections from readers is content that has been carefully considered and this site appears to consistently produce pieces that satisfy rather than provoke unnecessary follow ups.
Now planning to recommend this site in a context where my recommendations are taken seriously, and a stop at grohax confirmed I should make that recommendation soon, the small but real act of recommending content into spaces where my taste matters is something I take seriously and this site is worth the recommendation.
Just dropping by to say thanks for the effort, it does not go unnoticed when a writer cares this much about the reader, and after I went through scopeviceroy I was certain this is one of the better corners of the internet for this particular kind of content which is genuinely refreshing.
Granted my mood today might be elevating my reading experience but I still think this is genuinely good, and a stop at japarrow reinforced that even discounted assessment, controlling for the mood adjustment that affects content perception this site still reads as substantively above average across multiple pieces I have read carefully today.
Stayed longer than planned because each section earned the next, and a look at hekblade kept that pulling effect going across more pages, the kind of subtle pull that good writing exerts on attention is something I find harder and harder to resist when I encounter it on the open web today.
Decided to write a short note to the author if there is contact info anywhere, and a stop at sambavarsity extended that intention, the urge to thank the writer directly is a strong signal of content quality and this site has triggered that urge in me today which is a fairly rare event for my reading.
Worth recognising the specific care that went into how this post ended, and a look at huijax maintained the same careful conclusions, endings are where most blog content falls apart and this site has clearly invested in the closing stretches of its pieces rather than letting them simply trail off when energy fades.
If I had to summarise the editorial sensibility of this site in a few words it would be careful and human, and a look at learnbyexperience extended that summary feeling, capturing the essence of a sites approach in brief is hard but this site has a clear enough identity that the summary comes naturally enough.
Now feeling slightly more optimistic about the state of independent writing online, and a stop at syxbolt extended that quiet optimism, sites like this one are the reason I have not given up on the open web entirely and finding them occasionally renews the case for paying attention to non algorithmic content sources today.
Closed three other tabs to focus on this one and never opened them again, and a stop at operalucid similarly held attention exclusively, content that crowds out other reading from working memory is content with real density and this site has demonstrated that density across multiple pages I have visited so far this morning.
Looking through other posts here the consistency is what makes the site valuable rather than any single piece, and a stop at itobout extended that consistency observation, sites whose value lies in the ongoing pattern rather than in standout posts are sites I trust more deeply and this one has clearly built that kind of trust.
Now noticing how rare it is to find a site that does not feel rushed, and a look at crearena extended that calm pace, content produced without time pressure has a different quality than content shipped to meet a deadline and this site reads as written without urgency which produces a different and better experience for readers.
Anyone curious about this topic would do well to start here, the foundation laid is solid, and a stop at swiftswallow would round out their understanding nicely, this is the kind of resource I would point a friend toward without hesitation if they asked me where to begin learning about anything in this area.
Reading this slowly in the morning before opening email, and a stop at buildsuccessmindset extended that protected attention, content that earns the prime morning reading slot before the daily distractions begin is content with elevated status and this site has earned that prime slot consistently in my recent reading habits clearly.
Started forming counter examples to test the claims and the post handled most of them implicitly, and a look at jesaria continued that anticipatory style, writers who think two steps ahead of the critical reader save themselves from a lot of follow up work and this writer has clearly internalised that habit consistently.
A piece that ended with a clean landing rather than fading out, and a look at towershimmer maintained the same crisp conclusions, endings that resolve rather than dissolve are a sign of careful structural thinking and this site has clearly invested in how its pieces conclude rather than letting them simply run out of energy.
Quietly the writers approach to the topic differs from the dominant takes I have been encountering, and a stop at startbuildingnow extended that distinctive approach, content that maintains a different perspective without explicitly arguing against the dominant ones is content with confident editorial identity and this site has that confidence throughout pieces.
Found the use of subheadings really helpful for scanning back through the post later, and a stop at findpurposequickly kept that reader friendly approach going, navigation is something many blog writers ignore but small structural choices make a noticeable difference for someone returning to find a specific point again days or weeks later.
The post made the topic feel approachable without making it feel trivial, that is a fine balance, and a stop at findmomentumnow maintained the same balance, finding the middle ground between welcoming and serious is genuinely difficult and the writers here have clearly figured out how to consistently hit it well across many different posts.
Closed the post with a small satisfied sigh, and a stop at serifsorbet produced the same gentle exhale, content that ends well is content that respects the rhythm of reading and the writers here have clearly thought about how their pieces close rather than just trailing off when they run out of things to say.
Стрийські новини https://stryi.in.ua актуальні події міста Стрий та регіону. Оперативна інформація про події, суспільне життя, культуру, економіку та важливі зміни. Слідкуйте за новинами, які відбуваються поряд із вами.
Decided to subscribe to the RSS feed if there is one, and a stop at vincatrench confirmed that decision, content that I want delivered to me proactively rather than just remembered when I have time is content that has earned a higher level of commitment from me as a reader looking for reliable sources.
A welcome reminder that thoughtful writing still happens online, and a look at gunbolt extended that reassurance, the modern web makes it easy to forget that careful writing exists and finding sites that practice it is a small antidote to the cynicism that builds up from too much exposure to algorithmic content.
This filled in a gap in my understanding that I had not even noticed was there, and a stop at sloganturban did the same, the kind of post that gives you more than you expected when you first clicked through from somewhere else, a real find for anyone curious about the area covered here.
Took me back a step or two on an assumption I had been making, and a stop at sheentrundle pushed that reconsideration further, writing that gently corrects the reader without being aggressive about it is a rare diplomatic skill and the team here clearly knows how to land critical points without turning readers off.
Found this useful, the points line up well with what I have been thinking about lately, and a stop at curatedqualityhub added some angles I had not considered yet, definitely walking away with more than I came for which is the best outcome from time spent reading online for any kind of topic.
Honestly thank you to whoever wrote this because it scratched an itch I had not quite been able to articulate, and a stop at unicorntiger kept that satisfying feeling going, the kind of writing that meets unspoken needs is special and this site clearly has writers who understand their readers more than most do today.
After several visits I am now confident this site is one to follow seriously, and a stop at explorefuturepaths reinforced that confidence, the gradual building of trust through repeated quality exposures is the only sustainable way to develop reader loyalty and this site is building that loyalty in me through patient consistent work consistently.
Блог про бижутерию https://glamglam.ru и подарки с полезными статьями о модных аксессуарах, украшениях и идеях для подарков. Обзоры трендов, советы по выбору бижутерии, рекомендации по сочетанию украшений и вдохновение для особых случаев.
Came here from another site and ended up exploring much further than I planned, and a look at orbitnomad only encouraged more exploration, the kind of place where one click leads to another not through manipulative design but through genuinely interesting content is rare and worth highlighting when found like this somewhere on the open internet.
Reading this triggered a small reorganisation of my own thinking on the topic, and a stop at plumcovegoodsroom furthered that reorganisation, content that affects the shape of my mental model rather than just decorating it with new facts is content with structural rather than informational impact and this site provides that.
I came here looking for a quick answer and ended up reading the whole post because it was actually interesting, and after crecall I had a much fuller picture, no stress and no confusion just a clear walk through the topic that made everything fall into place without much effort.
Now thinking I want more sites built on this kind of editorial foundation, and a stop at itucox extended that wish into a broader hope, sites built on substance and care rather than on metrics and growth are the kind of sites I want to see more of and this one is a small example worth supporting.
Worth marking the moment when reading this clicked into something useful for my own work, and a look at vyxarc extended that practical click, content that connects to my actual life rather than just being interesting is content with the highest kind of value and this site is generating that connection at a high rate.
Now feeling confident that this site will continue producing work I will want to read, and a look at discoverideasworthsharing extended that confidence into the future, projecting forward from current quality to expected future quality is something I do for sites I genuinely follow and this one has earned that forward looking trust clearly today.
Honestly impressed by the consistency of voice across what I have read so far, and a quick visit to explorefreshideas continued that consistent feel, when a site reads like one careful person rather than a committee the experience is more rewarding for the reader who notices these subtle editorial details over time.
Started thinking about my own writing differently after reading, and a look at hekfox continued that reflective effect, content that influences how I work rather than just informing what I know is content with the highest kind of impact and this site has triggered some of that reflective influence today on me.
Reading this gave me material for a conversation I needed to have anyway, and a stop at gunlex added even more talking points, content that connects to upcoming social or professional needs rather than just being interesting in the abstract is the kind that earns priority placement in my attention these days routinely.
Honestly enjoyed not being sold anything for the entire duration of the post, and a look at jevmox kept that pleasant absence going across more pages, content that exists for its own sake rather than as a funnel to a paid product is increasingly rare and worth supporting where I can find it.
Skipped to a specific section because I knew that was the question I had, and the answer was clean, and a stop at findyourdirectiontoday similarly delivered targeted answers without burying them, content engineered for readers who arrive with specific needs rather than open ended browsing is increasingly valuable in a search heavy reading environment.
Now thinking I want more sites built on this kind of editorial foundation, and a stop at jararch extended that wish into a broader hope, sites built on substance and care rather than on metrics and growth are the kind of sites I want to see more of and this one is a small example worth supporting.
I really like the calm tone here, it does not push anything on the reader, and after I went through sundaestudio I felt the same way, just steady useful content laid out without drama, which is exactly what someone trying to learn something quickly needs to find rather than aggressive marketing.
Came across this looking for something else entirely and ended up reading it through twice, and a look at tailorteal pulled me deeper into the site than I planned, the writing has a way of holding attention without resorting to manipulative cliffhangers or vague promises that never get delivered later down the page.
При оформлении вида на жительство часто требуется справка о несудимости. Мы оказываем помощь в подготовке и получении необходимых документов https://laws-moscow.com/kak-i-gde-poluchit-spravku-o-nesudimosti/
During a quiet evening reading session this provided just the right depth without being heavy, and a stop at stitchvamp maintained the same evening appropriate weight, content with depth that does not exhaust the reader is content with editorial calibration and this site has clearly figured out how to be substantial without being demanding all the time.
Picked this up between two other things I was doing and got drawn in completely, and after buildscalableideas my original tasks were completely forgotten for a while, content that derails a workflow in a positive way by being more interesting than what you were already doing is rare and worth recognising clearly.
комбинезон томас [url=http://www.detskie-kombinezony-kupit.ru]комбинезон томас[/url]
Adding to the bookmarks now before I forget, that is how good this is, and a look at scopevoice confirmed the rest of the site is worth saving too, this is one of those rare finds that justifies the time spent searching the web for once which is a relief in the current environment.
Reading this gave me a small jolt of recognition for an experience I thought was just mine, and a stop at snareshale produced more such jolts, content that universalises private experiences without flattening them is doing genuinely useful work and this site is providing that recognition function for me reliably across topics I read.
вызвать нарколога на дом [url=https://narkolog-na-dom-moskva-27.ru]вызвать нарколога на дом[/url]
ткань обивочная [url=https://tkan-dlya-mebeli.ru]https://tkan-dlya-mebeli.ru[/url]
Just enjoyed the experience without needing to think about why, and a look at huiyam kept that effortless feeling going, sometimes the best content is invisible in the sense that you forget you are reading until you reach the end and realise time has passed without you noticing it pass naturally.
галерея картинок
Genuine reaction is that I will probably think about this on and off for a few days, and a look at orchidlatte added fuel to that, the best content lingers in your head after you close the tab rather than evaporating immediately and this site clearly knows how to write that kind of memorable content.
подарки с корпоративной символикой [url=www.suvenirnaya-produkcziya-s-logotipom-8.ru]www.suvenirnaya-produkcziya-s-logotipom-8.ru[/url]
Polished and informative without feeling overproduced, that is the sweet spot, and a look at learnwithpurpose hit it again, you can tell when a site has been built with care versus thrown together for the sake of having something to put online and this is clearly the former approach taken by the team.
Самое важное сегодня: https://spainslov.ru
Расширенная статья здесь: https://l-parfum.ru/catalog/kosmetika/teni/
Really grateful for content like this, it does not waste my time and it does not insult my intelligence either, and a quick look at modernlifestylemarketplace was the same, balanced respectful writing that makes a person feel welcome rather than rushed through pages of forced engagement just to keep clicking around.
luxury car rental [url=https://luxury-car-rental-miami-1.com]luxury car rental[/url]
A quiet kind of confidence runs through the writing, and a look at cricap carried that same understated assurance, confidence without bragging is the most attractive register for online writing and the writers here have clearly developed it through practice rather than affecting it through stylistic tricks that would feel hollow eventually.
Worth bookmarking and sharing with anyone interested in the topic, that is my honest take, and a stop at abobrim reinforces that, the kind of generous resource that makes the open web feel worth defending against the constant pressure to retreat into walled gardens and curated feeds today everywhere I look across all my devices.
Such writing is increasingly rare and worth supporting through attention, and a stop at vyxbrisk extended that supportive attention across more pages, the conscious choice to spend time on sites that produce careful work rather than convenient consumption is itself a small form of patronage and this site is receiving that conscious patronage from me.
Worth saying that the writing carries a particular kind of authority without making any explicit claims to it, and a stop at findyourgrowthzone extended that earned authority feeling, sites that demonstrate expertise through the quality of their explanations rather than by stating credentials are sites I trust most and this site has it.
Loved the writing voice here, friendly without being fake and confident without being arrogant, and a stop at ivafix carried the same tone forward, the kind of personality that makes a reader feel welcome rather than lectured at which is a balance plenty of writers struggle to find no matter how long they have been at it.
Now feeling slightly more optimistic about the state of independent writing online, and a stop at gyrarena extended that quiet optimism, sites like this one are the reason I have not given up on the open web entirely and finding them occasionally renews the case for paying attention to non algorithmic content sources today.
Saving this link for the next time someone asks me about this topic, and a look at discoverwhatmatters expanded what I will be sharing with them, this is the kind of resource that makes a real difference when you are trying to point a friend to something useful and reliable rather than generic marketing pages.
Bookmark earned and the bookmark feels like a permanent addition rather than a maybe, and a look at startpurposefully confirmed that permanent status, the difference between durable bookmarks and ephemeral ones is something I have learned to feel quickly and this site triggered the durable feeling almost immediately during my first read here.
However casually I came to this site I have ended up reading carefully, and a look at salutevandal continued earning that careful reading, the conversion from casual visitor to careful reader is something content earns rather than demands and this site has accomplished that conversion for me over the course of just a few pieces.
Reading this fit naturally into my afternoon walk because I was reading on my phone, and a stop at siskastencil continued well in that walking format, content that survives mobile reading without becoming awkward is content with format flexibility and this site has clearly thought about how it reads across different devices today.
Quiet confidence runs through the whole post, no need to shout to make the points stick, and a stop at skeintackle carried that same restrained voice forward, content that respects the reader by trusting its own substance rather than dressing it up in theatrical language is what I look for online and rarely actually find these days.
The lack of unnecessary jargon made the post accessible without sacrificing accuracy, and a look at jewbush continued in the same accessible style, technical topics often hide behind specialised vocabulary but here the writer trusts the reader to keep up with plain language and that trust pays off nicely throughout the entire post.
Closed my email tab so I could read this without interruption, and a stop at versasandal earned the same protected attention, when content is good enough to defend against the usual digital distractions you know it deserves better than the half attention most online reading gets in a typical busy day.
Walked away in a slightly better mood than when I started reading, that says something about the writing, and a stop at siskatrance kept that going, content that leaves you feeling more capable rather than overwhelmed is the kind I keep coming back to again and again over the years and across many topics.
A piece that did not lean on the writer credentials or institutional backing, and a look at idofix maintained the same focus on substance, content that earns trust through quality rather than through name dropping is the kind I find most persuasive and this site is clearly playing on the substance side of that distinction.
Such writing is increasingly rare and worth supporting through attention, and a stop at sandaltimber extended that supportive attention across more pages, the conscious choice to spend time on sites that produce careful work rather than convenient consumption is itself a small form of patronage and this site is receiving that conscious patronage from me.
Now adding the writer to a small mental list of voices I want to follow, and a look at ospreypiano reinforced that follow intention, the few writers whose work I actively track are writers who have demonstrated sustained quality and this writer has clearly demonstrated that sustained quality across the pieces I have sampled here today.
Bookmarked the page and the homepage too because clearly there is more to explore here, and a quick stop at learnandadvance only made that more obvious, this is the kind of place I want to dig through over a weekend rather than rushing through during a coffee break tomorrow morning before getting back to work.
Compared to the usual results for this kind of search this site stands well above the average, and a quick visit to buildsolidmomentum kept the standard high, you can tell within seconds whether a site is going to waste your time or actually deliver and this one clearly delivers without any false starts.
Easy to recommend without reservations, the site delivers on every promise it implicitly makes, and a look at findyouruniqueedge kept that same standard going, the kind of consistency that earns trust over time rather than chasing it through aggressive marketing is what I see here and it is appreciated greatly by this particular reader today.
Approaching this site through a casual link click and being surprised by what I found, and a look at learnandadvance extended the surprise, the rare experience of stumbling into excellent independent content rather than predictable mediocrity is one of the actual remaining pleasures of casual web browsing and this site provided it cleanly.
Will be coming back to this for sure, too much good content to absorb in one sitting, and a stop at shadetabby only added more pages I want to dig through, this site is going onto my regular rotation list because it consistently delivers something worth the visit lately rather than empty filler.
Все подробности по ссылке: https://spainslov.ru/site/word/word/%d0%90%d0%a0%d0%a2%d0%95%d0%9b%d0%ac
Читать больше на сайте: https://home-parfum.ru/catalog/memo/
вызвать капельницу от запоя на дому [url=https://kapelnicza-ot-pokhmelya-samara-38.ru]вызвать капельницу от запоя на дому[/url]
капельница от алкоголя [url=https://kapelnicza-ot-pokhmelya-samara-39.ru]https://kapelnicza-ot-pokhmelya-samara-39.ru[/url]
Now noticing the careful balance the post struck between confidence and humility, and a stop at createactionableplans maintained the same balance, finding the line between asserting and admitting is hard and this site has clearly developed the calibration to walk that line consistently which produces a more persuasive reading experience for me.
Reading this on a phone at a coffee shop and finding it perfectly suited to that context, and a stop at buildclearobjectives continued the comfortable mobile experience, content that works across reading conditions without compromising on substance is increasingly important and this site has clearly thought about the whole reader experience here.
A piece that did exactly what it promised in the headline without overshooting or underdelivering, and a look at vincavessel continued that calibration, alignment between promise and delivery is a basic editorial virtue that many sites fail at and this site has clearly mastered the matching of expectation and substance throughout pieces.
monopoly big baller today live [url=https://monopoly-live-score.com/]monopoly big baller today live[/url] .
Reading this between meetings turned out to be the most useful thing I did all afternoon, and a stop at cyljax kept that productivity feeling going, content can sometimes outperform actual work in terms of what gets accomplished mentally and this site managed that today which is genuinely a high bar to clear consistently.
Started reading skeptically because the headline seemed overconfident, and the post earned the headline by the end, and a look at vyxbyte continued that pattern of earning its claims, sites that can back up their headlines without overpromising are rare and this one has clearly developed editorial calibration on that front consistently.
Really appreciate the absence of stock photos that have nothing to do with the content, and a quick visit to hesyam maintained the same restraint, visual filler is a tell that the writing cannot stand on its own and the lack of it here suggests the team has confidence in their content quality alone.
Genuinely useful read, the points are practical and easy to apply right away, and a quick look at createyourpathforward confirmed that this site is consistent in that approach, looking forward to digging through the rest of it when I get the chance to sit down properly later in the week or this weekend.
A piece that exhibited the kind of patience that good writing requires, and a look at jarbrag continued that patient quality, hurried writing is easy to spot and this site reads as having been written without time pressure which produces a different feel than the rushed content that dominates much of the modern blog space.
Picked a friend mentally as the audience for this and decided to send the link, and a look at discoverbetterchoices confirmed the send was the right choice, choosing whom to share content with is a small act of curation that I take more seriously than the public sharing most platforms encourage these days online.
Worth recognising that the post handled a familiar topic without reaching for any of the obvious hot takes, and a stop at haccar continued that fresh treatment, sites that find new angles on subjects others have exhausted are sites worth following carefully and this one has clearly developed that exploratory instinct through patient practice.
Felt no urge to argue with the conclusions even though I started the post slightly skeptical, and a look at tulipteacup maintained that pattern, writing that earns agreement through clarity of argument rather than rhetorical pressure is the kind I find most persuasive and the kind I want to read more of these days.
Just sat back at the end of the post and felt grateful that someone took the time to write it, and a look at aroarch extended that gratitude across more of the site, recognising effort behind quality work is part of what makes the open web a community rather than just a marketplace today.
Reading this in the morning set a good tone for the day, and a quick visit to learnandadapt kept that good tone going, content can do that sometimes when it hits the right notes and finding sites that consistently strike that tone is something I have learned to recognise and reward with regular visits.
Now organising my browser bookmarks to give this site easier access, and a look at jibion earned the same organisational priority, the small acts of digital housekeeping I do for sites I expect to use often are themselves a measure of trust and this site has triggered the trust based housekeeping behaviour from me clearly.
Now realising this site has been quietly doing good work for longer than I knew, and a look at humbust suggested an archive worth exploring, sites with deep archives of consistent quality represent a different kind of resource than sites with viral hits and this one looks like the durable kind based on what I see.
Considered against the flood of similar content this one stands apart in important ways, and a stop at ivebump extended that distinctive feel, sites that find their own corner of a crowded topic and stay there are sites worth following and this one has clearly carved out its own space and committed to defending it carefully.
рейтинг адвокатских бюро москвы
During my morning reading slot this fit perfectly into the routine, and a look at scrollswamp extended that perfect fit into the rest of the routine, content that matches the rhythm of how I actually read rather than demanding accommodation from my schedule is content well calibrated to its likely audience and this site has it.
Beats most of the alternatives on the topic by a noticeable margin, and a look at sorbettower did not change that at all, this is one of the better corners of the open internet for this kind of content and I am glad I clicked through rather than skipping past quickly like I usually do.
Reading this prompted a small note in my reference file, and a stop at idozix prompted another, the rare site that contributes useful nuggets to my own working knowledge rather than just consuming my attention is worth the time investment many times over compared to the usual pile of forgettable scroll content.
A genuine pleasure to find a site that publishes at a sustainable cadence rather than chasing the daily content treadmill, and a look at outerpastry confirmed the careful publication rhythm, sites that prioritise quality over frequency are rare and this one has clearly chosen the slower pace which I appreciate as a reader.
Good post, the kind that respects the reader by getting to the point quickly without skipping the details that matter, and a short look at exploreyourstrengths confirmed that approach is consistent across the site which is rare to find online these days, definitely a place I will return to soon.
Аттестаты и свидетельства могут потребоваться для оформления гражданства, трудоустройства и обучения за границей. Мы помогаем подготовить документы для решения подобных задач – https://diplomasters.com/specialty/prodavecz/
Bookmark folder reorganised slightly to make this site easier to find, and a look at growwithconfidenceclearly earned the same accessibility upgrade, the small organisational moves I make for sites I expect to return to often are themselves a signal of how much I trust them and this site triggered those moves naturally.
Came across this and immediately thought of a friend who would enjoy it, and a stop at findgrowthopportunities also reminded me of someone, content that triggers the urge to share is content that has earned my recommendation and this site has earned multiple from me already across different conversations during the week.
Worth flagging that the writing rewarded a second read more than I expected, and a look at explorefreshperspectives produced the same second read benefit, content with hidden depths that emerge only on careful rereading is rare in the modern blog space and this site has clearly invested in that level of compositional density throughout.
Now noticing that the post benefited from being neither too short nor too long for its content, and a look at findgrowthopportunities continued that calibration of length, sites that match length to content rather than padding to hit some target are sites that respect both their material and their readers and this site does both.
Looking at the surface design and the substance together this site has both right, and a look at createconsistentmomentum reinforced that integrated quality, sites where presentation and content reinforce each other rather than fighting are sites with full editorial coherence and this one has clearly invested in both layers in a balanced way.
Well crafted post, the structure flows naturally from one point to the next without forcing transitions, and a stop at buildclearobjectives kept the same flow going, you can tell when a writer has thought about how their content reads rather than just what it contains and this is one of those examples.
Now adjusting my mental list of reliable sites for this topic, and a stop at vyxcar reinforced the adjustment, the small ongoing curation work of maintaining trusted sources is one of the actual practical activities of careful reading and this site has earned a permanent place on my list for this particular subject.
Quietly impressive in a way that does not announce itself, and a stop at cynbeo extended that quiet impressiveness, the kind of quality that emerges through sustained attention rather than first impressions is the kind I trust more deeply and this site has been earning that deeper trust across multiple sessions over time consistently.
Solid recommendation from me to anyone working in the area, the perspective here is grounded, and a look at haclex adds even more useful angles, the kind of site that becomes a reference rather than just a one time read which is a higher bar than most blogs ever reach today on the modern web.
Started forming counter examples to test the claims and the post handled most of them implicitly, and a look at explorebetteroptions continued that anticipatory style, writers who think two steps ahead of the critical reader save themselves from a lot of follow up work and this writer has clearly internalised that habit consistently.
Reading this on a long flight and finding it the best thing I read across hours of trying, and a stop at solacesteam kept the streak going, when content beats long flight reading you know it has substance because flight reading is a hard test of a piece given the alternatives available everywhere.
A piece that handled multiple complications without becoming confused, and a look at tracetroop continued that organisational clarity, holding multiple threads in a single piece without losing any of them is a sign of skilled writing and this site has clearly developed the editorial discipline to manage complexity without sacrificing readability throughout.
Worth saying that the writing carries a particular kind of authority without making any explicit claims to it, and a stop at sherpaslick extended that earned authority feeling, sites that demonstrate expertise through the quality of their explanations rather than by stating credentials are sites I trust most and this site has it.
Whitecrest Resort https://whitecrestonline.com.au offers excellent conditions for relaxation and rejuvenation. Modern infrastructure, comfortable accommodations, active recreation, and a tranquil atmosphere create the perfect vacation setting.
Нуждаете се спешно от пари в брой? Заложна къща Галерия 65 Варна предлага бързи заеми, обезпечени със злато, електроника, часовници и други ценности. Предлагаме конкурентни оценки на имоти, бърза обработка и професионално обслужване.
Decided to read more before commenting and the more I read the more I wanted to say something, and a stop at jibtix pushed that impulse further, when content provokes the urge to participate rather than just consume it is doing something quite specific and worth recognising clearly when it happens during reading.
Bookmark folder created specifically for this site, and a look at findyournextstep confirmed the dedicated folder was the right call, dedicated folders for individual sites are a level of organisation I rarely deploy and this site has earned that level of dedicated tracking based on the consistency I have seen so far across sessions.
Now thinking about how to apply some of this to a project I have been planning, and a look at steamsurge added more material for the planning, content that connects to my actual creative work rather than just being interesting in the abstract is the kind that earns priority placement in my reading rotation consistently going forward.
Beyond the topic at hand this site reads as a small ongoing project of taking writing seriously, and a look at thrashurge reinforced that project quality, sites that treat publishing as an ongoing serious practice rather than as content production for traffic are sites worth supporting and this one has clearly chosen the serious approach.
Honestly the simplicity is what makes this work, the topic is not buried under filler words or overly complex examples, and a quick look at ozoneosprey showed the same sensible style, I left with what I came for and no headache from over reading which is a real win these days.
Came away with a slightly better mental model of the topic than I started with, and a stop at startclearthinking sharpened that further, content that improves the reader thinking apparatus rather than just dumping facts into it is the rare kind I genuinely value and seek out when I have time to read carefully.
The lack of unnecessary jargon made the post accessible without sacrificing accuracy, and a look at discovernewdirectionsnow continued in the same accessible style, technical topics often hide behind specialised vocabulary but here the writer trusts the reader to keep up with plain language and that trust pays off nicely throughout the entire post.
Without comparing too aggressively to other sources this one stands out for the right reasons, and a look at connectideasandpeople continued that distinctive quality, content that distinguishes itself through substance rather than style tricks is content with lasting differentiation and this site has clearly chosen substance based differentiation as its core editorial strategy.
Came in for one specific question and got answers to three I had not even thought to ask, and a look at arobell extended that bonus value pattern, the kind of resource that anticipates reader needs rather than just answering the literal question asked is the gold standard and this site reaches it.
Got pulled in by the headline and stayed because the content actually delivered on the promise, and a stop at findyourwinningedge kept that trust intact, when a site lives up to its own framing it earns the right to keep showing up in my browser tabs going forward indefinitely from here on out really.
mercedes benz rental near me [url=http://www.luxury-car-rental-miami-1.com]http://www.luxury-car-rental-miami-1.com[/url]
Solid value for anyone willing to read carefully, and a look at igoblob extends that value across the rest of the site, this is the kind of place that rewards return visits rather than offering everything in a single splashy post and then leaving readers nothing to come back for later which is unfortunately common.
Ended up here on a wandering afternoon and was glad I stayed for the read, and a stop at ixaqua extended the wandering into a proper exploration of the site, the kind of place that rewards aimless clicking with something genuinely interesting rather than the shallow content that mostly populates the modern open web.
Learned something from this without having to dig through layers of fluff, and a stop at learnbypracticenow added a bit more context that helped tie things together for me, definitely a useful corner of the internet for anyone who wants real information without the usual marketing nonsense around it that often ruins similar pages.
Now adding this to a list of sites I want to see flourish, and a stop at topaztower reinforced that wish, the few sites I actively root for are sites that produce the kind of work I want more of in the world and this one has joined that small list based on what I have read so far.
Honest opinion is that this is the kind of post that builds long term trust with readers, and a look at voicevinyl reinforced that perception, the slow accumulation of trust through consistent quality is the only sustainable way to build a real audience and this site is clearly playing that long game.
вывод из запоя круглосуточно самара [url=https://kapelnicza-ot-pokhmelya-samara-40.ru]вывод из запоя круглосуточно самара[/url]
Skipped the related links section thinking I had read enough and then came back to it later when curiosity got the better of me, and a stop at javcab confirmed I should have just read it first, every section of this site appears to deserve careful attention rather than skipping past lazily.
Now planning to write about the topic myself eventually using this post as a reference, and a look at wyxburn would also serve in that future piece, content that becomes raw material for my own writing rather than just informing my reading is content with multiplicative value and this site is generating that multiplicative effect.
Grateful for posts like this one, they remind me there are still places online run by people who care about quality, and a look at hagaro reflected the same standards, you can tell the difference between content made for readers and content made just for search engines today and this is the former.
Easy to recommend without reservations, the site delivers on every promise it implicitly makes, and a look at growintentiondriven kept that same standard going, the kind of consistency that earns trust over time rather than chasing it through aggressive marketing is what I see here and it is appreciated greatly by this particular reader today.
Beyond the immediate post itself the editorial sensibility behind the site is what struck me, and a stop at dahbrood continued displaying that sensibility, content that reveals editorial choices through accumulated reading is content with structural quality and this site has clearly developed an underlying approach worth identifying through multiple sessions of reading.
Купить iPhone http://kupit-iphone43.ru в Нижнем Новгороде по выгодной цене с гарантией качества. В наличии популярные модели Apple, различные цвета и объемы памяти. Удобная оплата, доставка по городу, возможность покупки в кредит или рассрочку.
Picked this site to mention to a colleague who would benefit, and a look at createforwardmovement added more material I will pass along, recommending sites to colleagues is a higher bar than recommending to friends because the professional context demands more careful curation and this site cleared the professional bar without me having to think.
свежие цветы магазин цветов с доставкой
Decided after reading this that I would check this site weekly going forward, and a stop at buildmomentumfast reinforced that commitment, deciding to add a site to a regular rotation requires meeting a quality bar that very few places clear and this one cleared it cleanly without any noticeable effort or marketing push behind it.
вывод из запоя в стационаре в спб [url=https://vyvod-iz-zapoya-v-staczionare-sankt-peterburg-27.ru]вывод из запоя в стационаре в спб[/url]
презентация ии [url=litteraesvfu.ru]litteraesvfu.ru[/url]
During the time spent here I noticed the absence of the usual distractions, and a stop at hewblob extended that distraction free experience, content that does not fight my attention with pop ups and modals and aggressive prompts is content that respects me and this site has clearly chosen the respectful approach throughout.
A piece that did not lecture even when it had clear positions, and a look at humcamp maintained the same teaching without preaching tone, finding the line between informing and lecturing is hard and most sites land on the wrong side of it but this one has clearly figured out how to inform without becoming preachy.
During a reading session that included several other sources this one stood out, and a look at sorbetsolo continued the standout quality, the side by side comparison of sources during research is a useful exercise and this site has been winning those comparisons for me consistently across multiple research sessions during the last week.
A clean piece that knew exactly what it wanted to say and said it, and a look at creategrowthframeworks maintained the same clarity of intention, knowing the goal of a piece before writing is something most blog content lacks and the clarity of purpose here shows up in every paragraph for any careful reader to notice.
Recommended to anyone working in or curious about this area, the depth and clarity combine well, and a look at ozonepalette keeps that going across more pages, the kind of site that earns regular visits rather than chasing trends has my respect because it suggests genuine commitment to the topic itself rather than to chasing trends.
A piece that handled a controversial angle without becoming heated, and a look at createforwardenergy continued that calm engagement, content that can address contested topics without inflaming them is doing rare diplomatic work and this site has clearly developed the editorial maturity to handle sensitive material with the appropriate temperature of writing throughout.
Picked this for my morning read because the topic seemed worth the time, and a look at discovergrowthideas confirmed the choice was right, my morning reading slot is precious and giving it to this site felt like a good investment rather than a waste which is a higher endorsement than I usually offer for content.
Now adjusting my mental list of reliable sites for this topic, and a stop at explorefuturethinking reinforced the adjustment, the small ongoing curation work of maintaining trusted sources is one of the actual practical activities of careful reading and this site has earned a permanent place on my list for this particular subject.
Now adding the homepage to my regular check rotation rather than waiting for individual links to find me, and a stop at jifaero confirmed the rotation upgrade, the move from passive discovery to active checking is a vote of confidence in a sites ongoing quality and this site has earned that active engagement clearly.
Came away with a small but real shift in perspective on the topic, and a stop at tangovillage pushed that shift a bit further, the kind of subtle reframing that good writing does to a reader without making a big deal of it is something I always appreciate when it happens which is sadly not that often.
Really like the way the post resists reaching for cliches that would have made it feel generic, and a quick visit to igogoa kept that fresh feel going, original phrasing and unexpected metaphors are signs that the writer is actually thinking rather than just stitching together familiar phrases into the appearance of content.
Reading this gave me a small mental break from the heavier reading I had been doing, and a stop at thinkcreativelyalways extended that lighter feel, content that provides relief without becoming trivial is harder to produce than people realise and this site has clearly figured out how to be light without being shallow at all.
Top tier post, the kind that makes you want to share the link with friends working in the same area, and a stop at startyourgrowthjourney only made me more confident in doing that, this site is one of the better resources I have seen on the topic recently across both new and older posts.
Reading this gave me confidence to make a decision I had been putting off, and a stop at findnextopportunity reinforced that confidence, content that translates into action in my own life rather than just informing it is content with the highest practical value and this site is generating that action level utility for me lately.
Now placing this in the same category as a few other sites I have come to trust, and a look at izoblade continued the placement decision, the small category of fully trusted sites is one I extend rarely and only after multiple positive reading sessions and this site has earned the category placement methodically over time.
Decided I would read the archives over the weekend, and a stop at saltvinca confirmed that the archives would be worth the time, very few sites have archives I would actively read through but this one has earned that level of interest based on the consistent quality across what I have sampled so far.
Reading the writers other posts after this one suggests the quality is consistent rather than peak, and a stop at buildyourdirection confirmed the consistent quality reading, sites that hold the same level across many pieces rather than peaking on a few are sites with sustainable editorial discipline and this one has clearly developed that.
Felt the writer did the homework before publishing, the references hold up, and a look at sketchsherpa continued that documented care, content with traceable claims rather than vague assertions is the kind I trust and the lack of bald assertion in this post is one of its quietly impressive qualities for me.
Picked up something useful for a side project, and a look at halarch added another piece I will incorporate, content that connects to specific projects I am working on is content with practical utility and the practical utility of this site is showing up across multiple posts I have read in the last hour or so.
Coming back to this one, definitely, and a quick visit to mindfullifestylemarket only made me more sure of that, the kind of writing that makes you want to set aside time later rather than rushing through it now while distracted by everything else competing for attention on the screen today across so many tabs.
Really appreciate that the writer did not assume I would read every other related post first, and a look at daheko kept that self contained feel going where each piece can stand alone, accessibility for new readers is a sign of generous editorial thinking and this site has clearly invested in that approach.
Following a few of the internal links revealed more posts of similar quality, and a stop at growwithpurposefully added more to that growing pile, sites where internal links lead to more good content rather than to more of the same recycled material are sites with depth and this one has clearly built that depth carefully.
Worth pointing out that the writer made the topic feel more interesting than I had been expecting, and a look at learnsomethinguseful continued that elevation effect, content that improves the apparent quality of its subject through skilled treatment is doing something real and this site has clearly developed that kind of editorial alchemy throughout.
Closed the laptop and walked away thinking about the post for a good twenty minutes, and a stop at straitsalt produced similar lingering thoughts, content that survives the closing of the browser tab is content that has actually entered the mind rather than just decorating the screen for the duration of the reading.
нарколог дом [url=https://narkolog-na-dom-moskva-27.ru]нарколог дом[/url]
обивочная ткань для мебели [url=https://tkan-dlya-mebeli.ru]https://tkan-dlya-mebeli.ru[/url]
Now noticing that the post did not mention the writer at all, focus stayed on the topic, and a look at trenchvinca continued that author absent quality, content that disappears the writer to focus on the substance is a particular kind of generosity and this site has clearly chosen the substance over the personality consistently.
Came across this through a roundabout path and now it is on my regular rotation, and a stop at createimpactefficiently sealed that decision, the open web still produces serendipitous discoveries when you let the citations and references guide you rather than relying purely on algorithmic feeds for new content recommendations always.
Once you start reading carefully here it is hard to go back to lower quality alternatives, and a stop at findyournextchallenge reinforced that ratchet effect, the way good content raises standards is real over time and this site has clearly contributed to raising my expectations for what is possible in writing on the topic generally.
Reading this in the morning set a good tone for the day, and a quick visit to learnandaccelerate kept that good tone going, content can do that sometimes when it hits the right notes and finding sites that consistently strike that tone is something I have learned to recognise and reward with regular visits.
Весь процесс был максимально прозрачным и комфортным для меня как для клиента. Компания выдает справки об инвалидности 1, 2 и 3 группы, оформляет детские документы и делает бессрочные заключения, https://spravki-invalidnost.com/kakoy-srok-deystviya-spravki-ob-invalidnosti-mse/
Closed the post with a small satisfied sigh, and a stop at buildyourmomentum produced the same gentle exhale, content that ends well is content that respects the rhythm of reading and the writers here have clearly thought about how their pieces close rather than just trailing off when they run out of things to say.
мелбет [url=https://tcso-begovoy.ru]мелбет[/url]
Skipped the TLDR thinking I would read everything anyway, and ended up enjoying the path through the full post, and a stop at createimpactfulchange similarly rewarded the patient read, summaries are useful but the journey through good writing is part of what makes the destination feel earned rather than just delivered cleanly.
Decided to write a short note to the author if there is contact info anywhere, and a stop at growwithconfidencepath extended that intention, the urge to thank the writer directly is a strong signal of content quality and this site has triggered that urge in me today which is a fairly rare event for my reading.
Now thinking about this site as a small example of what good independent writing looks like, and a stop at explorefreshdirections continued that exemplary status, the few sites that serve as good examples are sites worth holding up in conversations about quality and this one has earned that exemplary placement through patient consistent effort over time.
Closed the tab with a small sense of finality rather than the usual rushed exit, and a stop at jadburst produced the same considered closing, when reading ends with deliberate satisfaction rather than impatient skip you know the time was well spent and this site is producing those satisfying endings consistently across what I read.
Reading this as part of my evening winding down routine fit perfectly, and a stop at javyam extended the wind down nicely, content that calms rather than agitates is what I want at the end of the day and this site provides that calming reading experience reliably which is increasingly rare across the modern web.
Reading this prompted me to dig out an old reference book related to the topic, and a stop at growstrategicclarity extended that connection to other sources, content that connects me back to my own existing knowledge rather than asking me to forget it is content with continuity and this site has that continuous quality.
Honestly this was a good read, no jargon and no padding, and a short look at jifarena kept that same feel going which I really appreciated, the writer clearly knows the topic well enough to explain it without hiding behind big words or filler that often gets used to seem clever.
Thanks for the practical examples scattered through the post rather than abstract theory only, and a look at buildyourvisionnow continued that grounded style, abstract points are easier to remember when paired with concrete situations and the writers here clearly understand how readers actually retain information from blog content reading sessions.
Reading this gave me a small refresher on something I had partially forgotten, and a stop at vaultscript extended the refresher, content that strengthens existing knowledge rather than just adding new is content with a particular kind of consolidating value and this site is providing that consolidating function across multiple visits.
Looking through the archives suggests this site has been doing this for a while at this level, and a look at subletviper confirmed the long term consistency, sites that have maintained quality across years rather than just a recent stretch are sites with serious editorial discipline and this one has clearly been at it for a while.
Огонь войны разгорается с новой силой! Танец драконов в самом разгаре — Таргариены сходятся в кровавой битве за Железный трон. Новые альянсы, предательства и эпические сражения в небе Вестероса. Смотри онлайн – https://dom-drakona-3-sezon.top/. Ставки выше, драконы яростнее, исход – непредсказуем.
Reading this slowly to absorb the structure, and the structure is doing real work alongside the words, and a look at hewzap maintained the same architectural quality, when sentence shapes and paragraph rhythms reinforce the meaning rather than just transporting words you know you are reading skilled work today.
Decided I would read the archives over the weekend, and a stop at bexedge confirmed that the archives would be worth the time, very few sites have archives I would actively read through but this one has earned that level of interest based on the consistent quality across what I have sampled so far.
Just nice to read something that does not feel like it was assembled from a content brief, and a stop at deoblob kept that handcrafted feel going, you can tell when a real human with real understanding is behind the words versus a templated piece churned out for an algorithm to find.
A piece that read as the work of someone who reads carefully themselves, and a look at humvat continued that informed feel, writers who are also serious readers produce work with a different quality and this site reads as the product of someone steeped in good writing rather than just generating content for an audience.
Took the time to read every paragraph rather than skimming for the punchline, and a quick visit to startbuildingclarity earned the same careful attention from me, that is the highest signal I can give about content quality because my default mode is rapid scanning rather than deliberate reading on most pages.
Will be sharing this with a couple of people who care about the topic, and a stop at premiumlivingmarketplace added more material worth passing along, the kind of site that is generous with quality content and does not make you jump through hoops to access it which is appreciated more than the team probably realises.
Thanks for a post that does not try to be funny when it is not the moment for it, and a stop at teapotshrine maintained the same appropriate seriousness, knowing when humour helps and when it just signals desperation for engagement is a sign of editorial maturity that many blogs have not developed yet.
Reading this back to back with a similar piece elsewhere made the quality difference obvious, and a stop at learnandscaleeffectively only widened the gap, comparing content side by side is a useful exercise and the gap between this site and average competitors in the space is large enough to be noticeable from the first paragraph.
The post made the topic feel approachable without making it feel trivial, that is a fine balance, and a stop at explorefreshconcepts maintained the same balance, finding the middle ground between welcoming and serious is genuinely difficult and the writers here have clearly figured out how to consistently hit it well across many different posts.
Comfortable in tone and substantive in content, that is a hard combination to land, and a look at growwithclearintent kept that pairing alive across more material, this is what good editorial direction looks like in practice and the team here clearly has someone keeping a steady hand on the wheel across what they decide to publish.
Honestly enjoyed not being sold anything for the entire duration of the post, and a look at startfreshthinking kept that pleasant absence going across more pages, content that exists for its own sake rather than as a funnel to a paid product is increasingly rare and worth supporting where I can find it.
Stayed longer than planned because each section earned the next, and a look at buildsmarthabits kept that pulling effect going across more pages, the kind of subtle pull that good writing exerts on attention is something I find harder and harder to resist when I encounter it on the open web today.
Speaking as someone who reads a lot on this topic this site has earned a high position in my source rankings, and a stop at ilanub reinforced that ranking, the informal ranking of sources for a topic is something I maintain mentally and this site has moved into the upper portion of those rankings clearly.
Once you start reading carefully here it is hard to go back to lower quality alternatives, and a stop at learnstepbystep reinforced that ratchet effect, the way good content raises standards is real over time and this site has clearly contributed to raising my expectations for what is possible in writing on the topic generally.
Thanks for keeping the writing direct without losing the warmth that makes content feel human, and a stop at tokensaffron carried both qualities forward, balancing professionalism and personality is a rare skill and the writers here have clearly figured out how to consistently land it across many posts which I notice.
A piece that did not require external context to follow, and a look at findgrowthchannels maintained the same self contained quality, content that stands alone without forcing readers to chase prerequisites is more accessible and this site has clearly thought about how each piece can serve a fresh visitor rather than only existing members.
Approaching this with the usual skepticism I bring to new sites and being slowly persuaded, and a stop at createvaluefast continued that gradual persuasion, the careful path from skeptical reader to genuine fan is the only one I trust and this site has walked me along that path through patient consistent quality across pieces.
Quietly enjoying that I have found a new site to follow for the topic, and a look at findyourperfectpath reinforced the small pleasure of the find, the discovery of new high quality sources is one of the more durable pleasures of careful internet reading and this site has been generating that discovery pleasure at multiple points already today.
Reading this prompted a brief but useful conversation with a colleague who happened to walk by, and a stop at buildpositiveprogress extended that conversational seed, content that becomes a starting point for in person discussion rather than ending in solitary reading is content with social generative energy and this site has plenty of it apparently.
Time spent here today felt productive in the way that good reading sessions sometimes do, and a stop at startpurposefulgrowth extended that productive feeling across the rest of the morning, the difference between productive reading and merely passing time is real and this site is consistently on the productive side for me lately.
Now adding the homepage to my regular check rotation rather than waiting for individual links to find me, and a stop at jadkix confirmed the rotation upgrade, the move from passive discovery to active checking is a vote of confidence in a sites ongoing quality and this site has earned that active engagement clearly.
Useful read, especially because the writer did not assume too much background from the reader, and a quick look at exploreuntappedpaths continued in the same way, a thoughtful site that meets people where they are which is something the modern web could use a lot more of for both casual and serious readers.
Started reading skeptically because the headline seemed overconfident, and the post earned the headline by the end, and a look at discovernewpossibility continued that pattern of earning its claims, sites that can back up their headlines without overpromising are rare and this one has clearly developed editorial calibration on that front consistently.
Easy to recommend, the content speaks for itself without needing additional praise from me, and a stop at shoresyrup only adds more reasons to send people this way, the kind of generous resource that benefits its readers without demanding anything in return is increasingly rare and worth recognising clearly today across the broader open internet.
Worth saying that the quiet confidence of the writing is what landed first, and a look at growwithfocusedaction continued that quiet quality, confident writing without the loud display of confidence is a rare combination and this site has clearly developed both the knowledge and the editorial restraint to land that combination consistently.
Honestly slowed down to read this carefully which is not my default, and a look at tidaltunic kept me in that careful reading mode, the kind of writing that demands attention by being worth attention is rare in a media environment full of content engineered to be skimmed not read with any real focus today.
During the time spent here I noticed the absence of the usual distractions, and a stop at derbunch extended that distraction free experience, content that does not fight my attention with pop ups and modals and aggressive prompts is content that respects me and this site has clearly chosen the respectful approach throughout.
A nicely understated post that does not shout for attention, and a look at growwithclarity maintained the same quiet quality, understatement is a stylistic choice that distinguishes serious writing from attention seeking writing and this site has clearly committed to the understated approach as a core editorial value rather than just a phase.
Honestly this hits the sweet spot between detail and brevity, no rambling and no shortcuts, and a quick visit to learnandadvanceforward kept that going across the related pages, the kind of place that respects your attention without trying to grab it through cheap tactics or attention seeking design choices that get tired fast.
Generally I do not leave comments but this post merits a small note, and a stop at createclarityfast extended that comment worthy quality, the urge to actively contribute to a sites community rather than passively consume from it is something specific content provokes and this site has provoked that engagement urge from me today.
A piece that handled multiple complications without becoming confused, and a look at swampstaple continued that organisational clarity, holding multiple threads in a single piece without losing any of them is a sign of skilled writing and this site has clearly developed the editorial discipline to manage complexity without sacrificing readability throughout.
Speaking from the perspective of having read widely on the topic this site offers something distinct, and a look at designfocusedcommerce reinforced that distinctness, the rare site that contributes something genuinely original to a saturated topic is the rare site worth following carefully and this one has demonstrated that original contribution capability today.
Reading this in the morning set a good tone for the day, and a quick visit to findbettergrowthmodels kept that good tone going, content can do that sometimes when it hits the right notes and finding sites that consistently strike that tone is something I have learned to recognise and reward with regular visits.
Really thankful for posts that respect a reader’s time, this one does, and a quick look at ilavex was the same, no need to scroll through endless intros just to get to the actual content, that approach alone is enough reason to come back here regularly for the kind of writing offered.
A piece that did not lean on the writer credentials or institutional backing, and a look at jifedge maintained the same focus on substance, content that earns trust through quality rather than through name dropping is the kind I find most persuasive and this site is clearly playing on the substance side of that distinction.
Now recognising the editorial wisdom of letting some questions remain open at the end, and a look at biablur continued that intellectual honesty, content that does not force closure on contested questions is content that respects the limits of knowledge and this site has clearly developed the maturity to know when to leave space.
Reading this slowly to give it the attention it deserved, and a stop at exploreideasfreely earned the same slow read, choosing to read slowly is a small act of respect for content quality and very few sites earn that respect from me but this one did so without any explicit ask which is the cleanest way.
A relief to read something where I did not have to fact check every claim mentally, and a look at senatetrench continued that reliable feeling, sites where I can lower my guard and trust the content are rare and this one is earning that trust paragraph by paragraph through consistent careful work behind the scenes.
Liked the careful word choice throughout, every term seemed picked for a reason rather than thrown in casually, and a stop at heyaro continued that precise style, this kind of attention to small details is what separates careful writing from the usual rushed content that dominates blog spaces today across pretty much every topic I follow.
Started smiling at one paragraph because the writing was just nice, and a look at findyournextidea produced a couple more such moments, prose that produces small spontaneous reactions in the reader is doing more than just transferring information and the writers here are clearly hitting that level fairly consistently throughout pieces.
Halfway through I knew I would finish the post, and a stop at discovernewperspectives also held me through to the end, content that signals its quality early and then sustains it is content with real internal consistency and this site has clearly figured out how to maintain quality from opening sentence through to closing thought.
Now adding the writer to a small mental list of voices I want to follow, and a look at learnandexpand reinforced that follow intention, the few writers whose work I actively track are writers who have demonstrated sustained quality and this writer has clearly demonstrated that sustained quality across the pieces I have sampled here today.
Now thinking about how to apply some of this to a project I have been planning, and a look at jaycap added more material for the planning, content that connects to my actual creative work rather than just being interesting in the abstract is the kind that earns priority placement in my reading rotation consistently going forward.
Felt like the post had been edited rather than just drafted and published, and a stop at startbuildingpurpose suggested the same care across the site, the difference between edited and unedited content is enormous for the reader and this site has clearly invested in the editing pass that most blogs skip entirely which really does show up.
скачать мелбет [url=https://tcso-begovoy.ru]скачать мелбет[/url]
Reading this gave me confidence to make a decision I had been putting off, and a stop at scopeskylark reinforced that confidence, content that translates into action in my own life rather than just informing it is content with the highest practical value and this site is generating that action level utility for me lately.
Just enjoyed the experience without needing to think about why, and a look at learnandgrowfaster kept that effortless feeling going, sometimes the best content is invisible in the sense that you forget you are reading until you reach the end and realise time has passed without you noticing it pass naturally.
During a quiet evening reading session this provided just the right depth without being heavy, and a stop at taffetaswan maintained the same evening appropriate weight, content with depth that does not exhaust the reader is content with editorial calibration and this site has clearly figured out how to be substantial without being demanding all the time.
Glad to find a site whose links lead somewhere worth going rather than back to itself for SEO juice, and a stop at startstrongprogress kept that generous outbound feel, citing other peoples work with real respect rather than just for ranking signals is a sign of an honest operation worth supporting going forward.
Decided to set aside time later to read more carefully, and a stop at derburn reinforced that decision, content that earns a calendar entry rather than just a passing read is in a different tier altogether and this site is clearly working at that elevated level which I really do appreciate as a reader today.
Found this through a search that was generic enough I did not expect quality results, and a look at growstepbystep continued the surprisingly good experience, search engines occasionally still surface excellent independent content if you scroll past the obvious paid and high authority results which is reassuring to remember sometimes.
Halfway through I knew I would finish the post, and a stop at humzap also held me through to the end, content that signals its quality early and then sustains it is content with real internal consistency and this site has clearly figured out how to maintain quality from opening sentence through to closing thought.
A piece that handled the topic with appropriate weight without becoming portentous, and a look at growwithconfidencenow continued that calibrated seriousness, content that takes itself seriously without becoming pompous is something this site has clearly figured out and the balance shows up in every piece I have read across multiple sessions now.
Most attempts at writing on this topic feel like they are missing something and this post finally identified what was missing, and a look at explorepossibilitiestoday extended that diagnostic clarity, content that names what is wrong with adjacent treatments while doing better itself is content with both critical and constructive value and this site has both.
Займы под залог https://црс.рф ПТС автомобиля, спецтехники и недвижимости на выгодных условиях. Быстрое рассмотрение заявки, минимальный пакет документов и возможность получить необходимую сумму без длительных проверок. Финансовые решения для частных лиц и бизнеса.
Speaking as someone who reads a lot on this topic this site has earned a high position in my source rankings, and a stop at buildstrategicfocus reinforced that ranking, the informal ranking of sources for a topic is something I maintain mentally and this site has moved into the upper portion of those rankings clearly.
Appreciated that the writer trusted the reader to follow along without constant restating of earlier points, and a look at silverumber continued that respect for the reader, treating an audience as capable adults rather than as people to be hand held through every paragraph is something I notice and value highly across the open internet today.
Recommended without reservation for anyone interested in the topic at any level of expertise, and a look at heritageinspiredgoods only strengthens that recommendation, this site clearly knows how to serve readers across a range of backgrounds without watering down the content or talking past anyone in the audience which is genuinely impressive to see.
My usual response to new bookmarks is to forget them but this one I have already returned to twice, and a look at ilefix pulled me back a third time, the actual return rate to bookmarked sites is the real measure of value and this one is clearing that measure at a notable rate already.
Really appreciate that the writer did not overstate the importance of the topic to make the post feel weightier, and a quick visit to discovergrowthstrategies maintained the same modest framing, content that is honest about its own scope rather than inflating itself is the kind I trust and return to repeatedly over time.
During a quiet evening reading session this provided just the right depth without being heavy, and a stop at findbettersolutions maintained the same evening appropriate weight, content with depth that does not exhaust the reader is content with editorial calibration and this site has clearly figured out how to be substantial without being demanding all the time.
Most blog writing on this subject reaches for the same handful of arguments and this post avoided them, and a look at explorenewdirections continued the original treatment, content that finds its own path through territory other writers have flattened is content with real authorial energy and this site has plenty of that distinctive energy.
красный комбинезон для девочки [url=https://detskie-kombinezony-kupit.ru]https://detskie-kombinezony-kupit.ru[/url]
сделать презентацию нейросеть [url=https://www.litteraesvfu.ru]https://www.litteraesvfu.ru[/url]
откапаться на дому от алкоголизма [url=https://kapelnicza-ot-pokhmelya-samara-38.ru]https://kapelnicza-ot-pokhmelya-samara-38.ru[/url]
клиника вывода из запоя со стационаром [url=https://vyvod-iz-zapoya-v-staczionare-sankt-peterburg-27.ru]клиника вывода из запоя со стационаром[/url]
Solid value packed into a relatively short post, that takes skill, and a look at unlockcreativeideas continues the dense useful content across more pages, this site clearly understands that respecting reader time is itself a form of generosity which is something most blog operations seem to have forgotten lately across the wider open web.
капельница от запоя на дому круглосуточно [url=https://kapelnicza-ot-pokhmelya-samara-39.ru]капельница от запоя на дому круглосуточно[/url]
mercedes benz rental near me [url=luxury-car-rental-miami-1.com]luxury-car-rental-miami-1.com[/url]
производство корпоративных подарков [url=https://www.suvenirnaya-produkcziya-s-logotipom-8.ru]https://www.suvenirnaya-produkcziya-s-logotipom-8.ru[/url]
Just want to acknowledge that the writing here is doing something right, and a quick visit to jikbond confirmed the same standards run across the broader site, recognising good work is something I try to do when I find it because the alternative is silence and silence rewards mediocrity.
Genuine reaction is that this site clicked with how I like to read, and a look at buildbetterhabits kept that comfortable fit going, sometimes you find a place online whose editorial decisions just align with your preferences and when that happens it is worth recognising and supporting through repeat engagement consistently going forward.
Really like the way the post resists reaching for cliches that would have made it feel generic, and a quick visit to learnandtransformideas kept that fresh feel going, original phrasing and unexpected metaphors are signs that the writer is actually thinking rather than just stitching together familiar phrases into the appearance of content.
Came in skeptical and left mostly convinced, that is the highest praise I can offer, and a look at learnandprogress pushed me further in the same direction, content that survives a critical first read is rare and worth recognising because most blog posts crumble under any real scrutiny these days when you actually pay attention closely.
A piece that reads as if the writer trusted readers to fill in obvious gaps, and a look at createimpactframework continued that respectful approach, content that does not over explain what the reader can infer is content that respects intelligence and this site has clearly chosen to write to capable readers rather than to the lowest common denominator.
Recommended to anyone working in or curious about this area, the depth and clarity combine well, and a look at syruptunic keeps that going across more pages, the kind of site that earns regular visits rather than chasing trends has my respect because it suggests genuine commitment to the topic itself rather than to chasing trends.
Now sitting back and recognising that this was a small but real win in my reading day, and a stop at buildyournextstep extended that quiet win, the cumulative effect of small reading wins versus the cumulative effect of small reading losses is real over time and this site is contributing to the wins side of that ledger.
Хочешь сладкую клубнику? https://berrygo.ru/ свежая, сладкая и ароматная ягода для всей семьи. В наличии сезонная клубника высокого качества, выращенная с соблюдением стандартов свежести. Удобный заказ, выгодные цены и быстрая доставка
Reading this back to back with a similar piece elsewhere made the quality difference obvious, and a stop at exploreinnovativegrowth only widened the gap, comparing content side by side is a useful exercise and the gap between this site and average competitors in the space is large enough to be noticeable from the first paragraph.
Now adding this to a list of sites I want to see flourish, and a stop at createvisionforward reinforced that wish, the few sites I actively root for are sites that produce the kind of work I want more of in the world and this one has joined that small list based on what I have read so far.
Took something from this I did not expect to find, and a stop at doxfix added another unexpected useful piece, content that exceeds expectations rather than just meeting them is the kind that builds enthusiasm and earns repeat visits without any explicit ask from the writer or platform behind the work being read.
Glad I stumbled across this post, the explanations actually make sense without needing background knowledge to follow along, and after a stop at shamrockveil the same was true there, no assumptions about the reader just clear writing that anyone can understand from the first line right through to the end.
Honest opinion is that this is the kind of post that builds long term trust with readers, and a look at hirpod reinforced that perception, the slow accumulation of trust through consistent quality is the only sustainable way to build a real audience and this site is clearly playing that long game.
A piece that handled multiple complications without becoming confused, and a look at learnandapplyfast continued that organisational clarity, holding multiple threads in a single piece without losing any of them is a sign of skilled writing and this site has clearly developed the editorial discipline to manage complexity without sacrificing readability throughout.
Reading this gave me a small mental break from the heavier reading I had been doing, and a stop at globalpremiumfinds extended that lighter feel, content that provides relief without becoming trivial is harder to produce than people realise and this site has clearly figured out how to be light without being shallow at all.
Now adding this to a short list of sites I would defend in a conversation about the modern web, and a look at siriustender reinforced that defence list, the few sites that serve as evidence the web can still produce good things are precious and this one has clearly joined that small list of exemplary sites.
Picked up two new ideas that I expect will come up in conversations this week, and a look at discoverforwardpaths added another, content that arms me with talking points rather than just filling time is the kind that provides ongoing value beyond the moment of reading and this site is generating that kind of ongoing value.
A slim post with substantial content per word, and a look at createfuturevision maintained the same density, the content per word ratio is something I track informally and this site scores high on that ratio compared to most sources I read regularly which is a quiet indicator of careful editorial work behind the scenes.
вывод из запоя доктор на дом [url=https://narkolog-na-dom-moskva-27.ru]вывод из запоя доктор на дом[/url]
Most of the time I bounce off similar pages within seconds, and a stop at ilenub held me longer than I would have predicted, the ability to convert a likely bouncing visitor into an engaged reader is a quality signal and this site has demonstrated that conversion ability across multiple visits where I expected to bounce.
Thanks for putting in the work to make this approachable, plenty of sites cover the same ground but most do it badly, and a quick visit to uplandharborvendorparlor confirmed this one stands apart, simple language and useful examples without anyone trying to sell me anything along the way which I really appreciated.
Halfway through I knew I would finish the post, and a stop at buildconfidencefast also held me through to the end, content that signals its quality early and then sustains it is content with real internal consistency and this site has clearly figured out how to maintain quality from opening sentence through to closing thought.
The whole experience of reading this was pleasant from start to finish, no pop ups and no annoying interruptions, and a look at createimpactroadmap continued that clean experience, technical choices about page design matter for the reader and this site clearly cares about the small details that add up to comfort across multiple visits.
Now noticing that the post benefited from being neither too short nor too long for its content, and a look at createclaritysteps continued that calibration of length, sites that match length to content rather than padding to hit some target are sites that respect both their material and their readers and this site does both.
Thanks for the moderate length, neither so short it skips substance nor so long it bloats, and a stop at jazbox hit the same balance, the right length is one of the hardest things to calibrate in blog writing and I appreciate when a team has clearly thought about it rather than defaulting.
Took the time to read every paragraph rather than skimming for the punchline, and a quick visit to explorefreshapproaches earned the same careful attention from me, that is the highest signal I can give about content quality because my default mode is rapid scanning rather than deliberate reading on most pages.
Thanks for laying this out in a way that someone newer to the topic can follow, and a stop at buildbetterdecisions kept that accessibility going, writing that meets readers at different experience levels without condescending is hard to do well and the writers here have clearly thought about who they are writing for.
A piece that read smoothly because the writer understood how readers actually move through prose, and a look at discoverfuturepaths maintained the same reader awareness, writers who think about the reading experience as much as the writing experience produce better work and this site has clearly made that shift in editorial approach.
Все про життя Полтави https://36000.com.ua новини, події, культура, дозвілля та міська інфраструктура. Корисний портал для тих, хто хоче бути в курсі актуальних подій та змін у місті.
A small thing but the line spacing and font choices made reading this physically pleasant, and a look at buildlastingimpact maintained the same careful design, technical choices about typography are part of what makes online reading actually comfortable and this site has clearly invested in the design layer alongside the content layer carefully.
Just sat with this for a bit longer than I usually would because the points are worth thinking about, and after exploreuntappedideas I had even more to chew on, the kind of post that nudges your thinking forward without forcing the issue is something I have always appreciated in good writing online.
Liked the careful word choice throughout, every term seemed picked for a reason rather than thrown in casually, and a stop at explorefreshthinkingnow continued that precise style, this kind of attention to small details is what separates careful writing from the usual rushed content that dominates blog spaces today across pretty much every topic I follow.
Definitely returning here, that is decided, and a look at hunhax only made the case stronger, this is one of those rare websites that rewards regular visits rather than feeling stale after the first read which is something I cannot say about most of the places I bookmark today across all my topics.
Now thinking about this site as a small example of what good independent writing looks like, and a stop at drubeat continued that exemplary status, the few sites that serve as good examples are sites worth holding up in conversations about quality and this one has earned that exemplary placement through patient consistent effort over time.
Liked the post enough to read it twice and the second read found new things, and a stop at jilbrew similarly rewarded the second look, content with hidden depths that only reveal themselves on careful rereading is the rare kind that earns lasting respect rather than fleeting first impressions only briefly held.
мелбет скачать [url=https://tcso-begovoy.ru]мелбет скачать[/url]
прокапаться от алкоголя [url=https://kapelnicza-ot-pokhmelya-samara-40.ru]прокапаться от алкоголя[/url]
мелбет скачать приложение на андроид [url=https://elenagatilova.ru]мелбет скачать приложение на андроид[/url]
Really appreciate that the writer did not overstate the importance of the topic to make the post feel weightier, and a quick visit to slacktally maintained the same modest framing, content that is honest about its own scope rather than inflating itself is the kind I trust and return to repeatedly over time.
Came away with a small but real shift in perspective on the topic, and a stop at premiumdesignmarket pushed that shift a bit further, the kind of subtle reframing that good writing does to a reader without making a big deal of it is something I always appreciate when it happens which is sadly not that often.
мел бет [url=https://limon-ads.ru]мел бет[/url]
Solid little post, the kind that does not need to be flashy because the substance is doing the work, and a look at fastbuycorner kept that quiet confidence going across the site, this is what writing looks like when the writer trusts the content to land on its own without theatrics or unnecessary attention seeking behaviour.
Thank you for being clear and direct, that simple approach saves so much frustration on the reader’s end, and a stop at findyourcorevision only made me more sure of it, the rest of the content seems to follow the same pattern which is a great sign of consistent editorial care behind the scenes.
Honestly informative, the writer covers the ground without showing off, and a look at learnbydoing reflected the same humility, content that respects the reader rather than trying to dazzle them is something I always appreciate and rarely come across in this corner of the internet today across the topics I usually read.
Picked something concrete from the post that I will use immediately, and a look at buildactionablemomentum added another concrete piece, content that produces immediately useful output rather than just abstract appreciation is content that earns its place in my regular rotation without needing any further evaluation from me at this point honestly.
Probably this is one of the better quiet successes on the open web at the moment, and a look at ileqix reinforced that quiet success quality, sites that are doing well without making a noise about doing well are the sites I most respect and this one has clearly chosen the quiet success path consistently throughout.
If I am being honest this is the kind of site I quietly hope my own work will someday resemble, and a stop at startwithclearpurpose extended that aspirational feeling, finding work that models what I want to produce is part of why I read carefully and this site has been performing that modelling function for me lately consistently.
Reading this prompted me to dig into a related topic later, and a stop at explorelimitlessthinking provided some of the starting points for that follow up reading, content that triggers further exploration rather than satisfying curiosity completely is content with real generative energy and this site has plenty of that energy throughout it.
Reading this on a phone at a coffee shop and finding it perfectly suited to that context, and a stop at growwithintentiondaily continued the comfortable mobile experience, content that works across reading conditions without compromising on substance is increasingly important and this site has clearly thought about the whole reader experience here.
Started thinking about my own writing differently after reading, and a look at hislex continued that reflective effect, content that influences how I work rather than just informing what I know is content with the highest kind of impact and this site has triggered some of that reflective influence today on me.
Reading this with a fresh mind in the morning brought out details I might have missed in the afternoon, and a stop at growwithsmartchoices earned the same fresh attention, content that rewards being read at full attention rather than at energy lows is content with real density and this site has that density consistently.
Once I trust a site this much I tend to read everything they publish and that is the trajectory I am on with this one, and a stop at growfocusedresults confirmed the trajectory, the rare progression from interested reader to comprehensive reader is something only certain sites earn and this one is earning that progression rapidly.
Glad I gave this a chance instead of bouncing on the headline, and after exploregrowthmindset I was certain I had made the right call, snap judgements based on titles miss a lot of good content and this is a reminder to slow down and check things out before scrolling past in a hurry.
Going to come back when I have more time to read carefully, the post deserves more than a quick scan, and a stop at discoveropportunitypaths reinforced that, this is the kind of site that rewards a slower read which is hard to find in this fast paced corner of the internet but really worthwhile.
Honestly impressed by how much useful content sits in such a small post, and a stop at buildclarityforward confirmed the rest of the site packs a similar punch, density without confusion is a hard balance to strike and this site has clearly cracked the code on it across many different topic areas covered.
Quality writing that respects the reader’s intelligence without overloading them, and a quick look at tailortarget reflected that approach, a balanced thoughtful site that earns trust by being consistent rather than by shouting about how trustworthy it is which is the usual approach online sadly across most content categories.
капітальний ремонт квартири ремонт квартир під ключ ціна
мебельные ткани купить в москве в розницу [url=https://tkan-dlya-mebeli.ru]мебельные ткани купить в москве в розницу[/url]
Strong recommendation from me, anyone curious about the topic should make time for this, and a look at brightfuturedeals only sharpens that recommendation further, the kind of resource that holds up against careful scrutiny rather than crumbling at the first critical question is rare and worth pointing other people toward when the topic comes up.
Closed the tab with a small sense of finality rather than the usual rushed exit, and a stop at learnandtransformfast produced the same considered closing, when reading ends with deliberate satisfaction rather than impatient skip you know the time was well spent and this site is producing those satisfying endings consistently across what I read.
Adding to the bookmarks now before I forget, that is how good this is, and a look at authenticlivinggoods confirmed the rest of the site is worth saving too, this is one of those rare finds that justifies the time spent searching the web for once which is a relief in the current environment.
Worth saying that the quiet confidence of the writing is what landed first, and a look at jinblob continued that quiet quality, confident writing without the loud display of confidence is a rare combination and this site has clearly developed both the knowledge and the editorial restraint to land that combination consistently.
Thanks for sharing this with the open internet rather than locking it behind a paywall like so many sites do now, and a stop at ilobyte kept the same vibe going, generous helpful and clearly written by someone who actually wants people to learn from it rather than just charge them.
Bookmark earned and the bookmark feels like a permanent addition rather than a maybe, and a look at discoverwhatworksbest confirmed that permanent status, the difference between durable bookmarks and ephemeral ones is something I have learned to feel quickly and this site triggered the durable feeling almost immediately during my first read here.
Comfortable read, finished it without realising how much time had passed, and a look at learnandadjustquickly pulled me into more pages the same way, the absence of friction in good content lets time disappear and that is one of the highest compliments I can pay any piece of writing I find online during a regular search session.
More substantial than most of what I find searching for this topic online, and a stop at discovergrowthpaths kept that quality consistent, this is one of those sites where the writing actually rewards careful reading rather than punishing the patient reader with empty filler stretched out across long paragraphs that say very little.
Reading this in a relaxed evening setting was a small pleasure, and a stop at createprogresssystems extended the pleasant evening reading, content that fits the tone of relaxed time without becoming forgettable is what I look for in evening reading and this site has the right tone for that particular slot in my daily reading routine.
Reading this gave me a small refresher on something I had partially forgotten, and a stop at jazbrood extended the refresher, content that strengthens existing knowledge rather than just adding new is content with a particular kind of consolidating value and this site is providing that consolidating function across multiple visits.
Felt like the post had been edited rather than just drafted and published, and a stop at findyourwinningpath suggested the same care across the site, the difference between edited and unedited content is enormous for the reader and this site has clearly invested in the editing pass that most blogs skip entirely which really does show up.
My time on this site has now extended past what I had budgeted, and a stop at createvalueconsistently keeps extending it further, content that overstays its budget in my schedule is content that has earned the extra time and this site has been earning extra time across multiple visits to the point where my schedule needs adjustment.
Really nice to see things explained without overcomplicating the topic, the words flow naturally and stay easy to follow, and a short visit to growintentionally only added to that experience because the same simple approach is used across the rest of the page too without any change in tone.
Generally I bookmark sparingly to avoid building up a bookmark graveyard but this one earned a permanent slot, and a stop at findgrowthsolutions extended that permanence designation, the few sites I keep permanent bookmarks for are sites I expect to use repeatedly and this one has clearly cleared that expectation bar today.
A nicely understated post that does not shout for attention, and a look at hupblob maintained the same quiet quality, understatement is a stylistic choice that distinguishes serious writing from attention seeking writing and this site has clearly committed to the understated approach as a core editorial value rather than just a phase.
Got pulled in by the headline and stayed because the content actually delivered on the promise, and a stop at exploreinnovativepaths kept that trust intact, when a site lives up to its own framing it earns the right to keep showing up in my browser tabs going forward indefinitely from here on out really.
Took a few notes from this post, the points are easy to remember without needing to come back and check, and a look at jalaxis added a couple more, the kind of place that sticks in the memory long after the browser tab has been closed for the day which says a lot really.
Recommended to anyone working in or curious about this area, the depth and clarity combine well, and a look at discoverwhatworks keeps that going across more pages, the kind of site that earns regular visits rather than chasing trends has my respect because it suggests genuine commitment to the topic itself rather than to chasing trends.
мелбет [url=https://tcso-begovoy.ru]мелбет[/url]
пробить человека по номеру бесплатно [url=kak-najti-cheloveka-po-nomeru-telefona-2.ru]kak-najti-cheloveka-po-nomeru-telefona-2.ru[/url]
Closed my email tab so I could read this without interruption, and a stop at bomboard earned the same protected attention, when content is good enough to defend against the usual digital distractions you know it deserves better than the half attention most online reading gets in a typical busy day.
A small thank you note from me to the team behind this work, the post earned it, and a stop at hobcar suggested more thanks would be in order over time, recognising the people who do good writing online is something I try to remember to do because the alternative is silence and silence rewards mediocrity unfortunately.
Reading this gave me a small sense of progress on a topic I have been slowly working through, and a stop at unlocknewideas added another step forward, learning happens in small increments across many sources and finding sources that consistently contribute is the actual practical value of careful curation in an information rich world.
Considered as a whole this site has developed a coherent point of view that comes through in individual pieces, and a look at jaspermeadowtradegallery continued displaying that coherence, sites with a unified perspective rather than a grab bag of takes are sites with editorial maturity and this one has clearly developed that maturity through years of work.
After several visits I am now confident this site is one to follow seriously, and a stop at discovernewmomentum reinforced that confidence, the gradual building of trust through repeated quality exposures is the only sustainable way to develop reader loyalty and this site is building that loyalty in me through patient consistent work consistently.
Skipped the comments to avoid spoilers and came back later to find them genuinely worth reading, and a stop at solarorchardmarketparlor extended that surprised respect, when the discussion below a post matches the quality of the post itself you have found something special and this site appears to attract that kind of audience.
My usual pattern is to skim and bounce but this site has reset that pattern temporarily, and a stop at exploreuntappedopportunities maintained the slower reading mode, content that changes how I read is content with structural influence and this site has clearly nudged my reading behaviour toward something better at least for the duration of these visits.
Just want to flag that this was useful and not bury the appreciation in caveats, and a look at learnandaccelerategrowth earned the same direct praise, recognising good work without hedging it with criticism is something I try to practice because over qualified compliments tend to read as backhanded and miss the point sometimes.
Generally I am cautious about recommending sites on first encounter but this one warrants the exception, and a look at findnewgrowthpaths reinforced the exception making, the rare site that justifies breaking my normal cautious approach is the rare site worth flagging early and this one has prompted exactly that early flagging response from me.
Appreciated the way each section connected smoothly to the next without abrupt jumps, and a stop at intentionaldesignstore kept that flow going nicely, transitions are something most blog writers ignore but the difference is huge for the reader who is trying to follow a sustained line of thought today across many different topics.
Reading this between two meetings turned out to be the highlight of the morning, and a stop at discoverdailyinspiration continued that highlight quality, content that outshines the structured parts of a working day is doing something well beyond ordinary and this site has produced multiple such highlights for me already this week alone.
Honest opinion is that this is the kind of post that builds long term trust with readers, and a look at findyourgrowthpath reinforced that perception, the slow accumulation of trust through consistent quality is the only sustainable way to build a real audience and this site is clearly playing that long game.
Felt the post handled a sensitive angle of the topic with appropriate care, and a look at findclearopportunities extended that careful handling across related material, sites that can navigate delicate territory without causing damage are rare and require a level of judgement that comes from experience rather than from following any clear playbook.
мелбет казино скачать на андроид [url=https://elenagatilova.ru]мелбет казино скачать на андроид[/url]
Found this through a friend who recommended it and now I see why, and a look at learnandgrowfaster only strengthened that recommendation in my own mind, word of mouth still works for content that actually delivers and this site is clearly earning recommendations the old fashioned way through quality rather than marketing.
If quality blog writing is dying as people sometimes claim then this site is one piece of evidence that it has not died yet, and a look at createimpactstructure extended that evidence, the broader cultural question about online writing has empirical answers in specific sites and this one is contributing to a more optimistic answer overall.
Worth flagging this site to a few specific friends who would appreciate the editorial sensibility, and a look at buildstrongmomentum added more pages I will mention to them, recommending sites to specific people requires understanding both the site and the person and this site is making those personalised recommendations easy and natural for me.
A piece that left me thinking I had been undercaring about the topic, and a look at growresultsdrivenpath reinforced that mild concern, content that raises the appropriate weight of a subject without being preachy about it is doing important work and this site is providing that gentle elevation of attention for me consistently.
Now adding this to a short list of sites I would defend in a conversation about the modern web, and a look at jinvex reinforced that defence list, the few sites that serve as evidence the web can still produce good things are precious and this one has clearly joined that small list of exemplary sites.
Following the post through to the end without my attention drifting once, and a look at tidalslick earned the same uninterrupted attention, content that holds attention without manipulating it is content with substantive pull and this site has demonstrated that substantive pull across multiple pieces in a single reading session reliably here today.
презентация нейросеть [url=https://litteraesvfu.ru]https://litteraesvfu.ru[/url]
Reading this prompted me to clean up some old notes related to the topic, and a stop at ilonox extended that organising urge, content that triggers personal organisation rather than just consuming attention is content with motivating energy and this site has the kind of clarity that prompts active follow up rather than passive consumption.
Over the course of reading several posts here a pattern of quality has emerged, and a stop at startwithclarity confirmed the pattern, the difference between sites that hit quality occasionally and sites that hit it consistently is huge and this site has clearly demonstrated the consistent kind through what I have read this morning.
стационарное выведение из запоя [url=https://vyvod-iz-zapoya-v-staczionare-sankt-peterburg-27.ru]стационарное выведение из запоя[/url]
Generally my comment to other readers about new sites is to wait and see but for this one I would jump to recommend now, and a look at seoscope reinforced that early recommendation, the speed at which a site earns my recommendation is itself a quality signal and this one has earned mine quickly clearly.
Taking the time to read carefully here has been worthwhile for the past hour, and a look at createactionstepsnow extended the worthwhile reading, the calculation of return on reading time spent is something I do informally and this site has been producing positive returns across multiple sessions during the last week of regular visits and reads.
Found the use of subheadings really helpful for scanning back through the post later, and a stop at quickcartcorner kept that reader friendly approach going, navigation is something many blog writers ignore but small structural choices make a noticeable difference for someone returning to find a specific point again days or weeks later.
Once you find a site like this the search for similar voices begins, and a look at ravenharbortradehouse extended the search energy, finding a high quality reference point makes the gap between it and adjacent sources visible in a way it was not before and this site has provided that high reference point across multiple recent visits.
Approaching this with the usual skepticism I bring to new sites and being slowly persuaded, and a stop at growyourpotential continued that gradual persuasion, the careful path from skeptical reader to genuine fan is the only one I trust and this site has walked me along that path through patient consistent quality across pieces.
My usual response to new bookmarks is to forget them but this one I have already returned to twice, and a look at learnandbuildmomentum pulled me back a third time, the actual return rate to bookmarked sites is the real measure of value and this one is clearing that measure at a notable rate already.
Recommended without hesitation if you care about careful coverage of this topic, and a stop at bomkix reinforced the recommendation, the bar I set for unhesitating recommendations is fairly high and this site has cleared it through the cumulative weight of multiple consistently good pieces rather than through any single standout post which is meaningful.
Even on a quick first read the substance of the post comes through, and a look at growwithfocusedsteps reinforced that immediate quality, content that does not require a slow careful read to demonstrate value but rewards one anyway is content with real depth and this site has produced work of that demanding depth class.
Reading this in the gap between work projects was a small but meaningful break, and a stop at startnextleveljourney extended that gentle reset, content that provides genuine refreshment rather than just distraction during work breaks is content with a particular kind of utility and this site fits that role for me reliably during work days.
Started thinking about my own writing differently after reading, and a look at discoverhiddeninsights continued that reflective effect, content that influences how I work rather than just informing what I know is content with the highest kind of impact and this site has triggered some of that reflective influence today on me.
Even on a quick first read the substance of the post comes through, and a look at buildintentionalgrowth reinforced that immediate quality, content that does not require a slow careful read to demonstrate value but rewards one anyway is content with real depth and this site has produced work of that demanding depth class.
Beats most of the alternatives on the topic by a noticeable margin, and a look at jazfix did not change that at all, this is one of the better corners of the open internet for this kind of content and I am glad I clicked through rather than skipping past quickly like I usually do.
Picked up something useful for a side project, and a look at createprogressnow added another piece I will incorporate, content that connects to specific projects I am working on is content with practical utility and the practical utility of this site is showing up across multiple posts I have read in the last hour or so.
Купить павильон для киоска Москва
Pleasant surprise, the post delivered more than the headline promised, and a stop at discoverhiddenvaluehub continued that pattern of under promising and over delivering, the rarest combination on the modern web where most content does the opposite by promising the world and delivering thin recycled summaries instead each time you click on something interesting.
мелбет скачать приложение [url=https://limon-ads.ru]мелбет скачать приложение[/url]
Thanks for keeping the writing direct without losing the warmth that makes content feel human, and a stop at createimpactframework carried both qualities forward, balancing professionalism and personality is a rare skill and the writers here have clearly figured out how to consistently land it across many posts which I notice.
Удобный каталог https://weblabo.ru онлайн-калькуляторов, конвертеров и полезных сервисов для быстрых расчетов. Здесь собраны инструменты для математики, финансов, строительства, IT и повседневных задач.
Reading this prompted me to send the link to two different people for two different reasons, and a stop at learnandinnovate provided ammunition for a third share, content that suits multiple audiences without being generic enough to be useless to any of them is genuinely valuable and this site has that multi audience quality clearly.
Worth pointing out the careful word choice in this post, no buzzwords and no jargon, and a look at discoverinnovativeideas continued that disciplined vocabulary, sites that resist the pull of trendy language are sites that will read well in five years and this one is clearly built for that kind of long durability.
Picked this post to share in a Slack channel where I knew it would be appreciated, and a look at createbetterresults suggested I will share more from here later, content worth sharing into a professional context is content that has earned a higher kind of trust than mere personal interest and this site has it.
Now noticing the careful balance the post struck between confidence and humility, and a stop at hupbolt maintained the same balance, finding the line between asserting and admitting is hard and this site has clearly developed the calibration to walk that line consistently which produces a more persuasive reading experience for me.
Once you start reading carefully here it is hard to go back to lower quality alternatives, and a stop at holbook reinforced that ratchet effect, the way good content raises standards is real over time and this site has clearly contributed to raising my expectations for what is possible in writing on the topic generally.
помощь при запое на дому [url=https://narkolog-na-dom-moskva-27.ru]помощь при запое на дому[/url]
комбинезон для мальчика новорожденного [url=www.detskie-kombinezony-kupit.ru]www.detskie-kombinezony-kupit.ru[/url]
мелбет скачать казино [url=https://tcso-begovoy.ru]https://tcso-begovoy.ru[/url]
Now feeling the small relief of finding writing that does not condescend, and a stop at learnandprogressdaily extended that respect for readers, content that treats its audience as capable adults rather than as people to be managed produces a different reading experience and this site has clearly chosen the respectful approach across all pieces.
Probably the best thing I have read on this topic in the past month, and a stop at imobush extended that ranking, the casual ranking of recent reading is informal but real and this site has been winning those rankings for me on this topic specifically over the last several weeks of regular reading sessions.
Felt the post had been written without using a single buzzword, and a look at explorecreativeoptions continued that clean vocabulary, content free of jargon and trendy phrases reads better and ages better and this site has clearly committed to a vocabulary that will not feel dated in three years which is impressive editorially.
Reading this felt easy in the best way, no friction and no confusion at any point, and a stop at buildfocusedmomentum carried that same comfort across more pages, the kind of editorial flow that lets you absorb information without fighting the format which is increasingly hard to find on the open web today across topics.
Now thinking about this site as a small example of what good independent writing looks like, and a stop at everydayvaluecorner continued that exemplary status, the few sites that serve as good examples are sites worth holding up in conversations about quality and this one has earned that exemplary placement through patient consistent effort over time.
Reading this brought back an idea I had set aside months ago, and a stop at linencovevendorparlor added more substance to that idea, content that revives dormant projects in my own thinking is content with serious creative value and this site is contributing to my own work in ways I had not expected when first clicking through.
Bookmark earned, calendar reminder set, share queued, all from one good post, and a look at startfreshtoday did the same, when a single reading session triggers multiple downstream actions you know the content has actually moved me beyond the page and this site is moving me at that higher level reliably.
One of the more thoughtful posts I have read recently on this topic, and a stop at discovernewpotential added even more weight to that impression, this is genuinely good content that holds its own against far better known sites in the same space without trying to imitate any of them at all which I appreciate.
Reading this brought back an idea I had set aside months ago, and a stop at buildsmartmomentum added more substance to that idea, content that revives dormant projects in my own thinking is content with serious creative value and this site is contributing to my own work in ways I had not expected when first clicking through.
Skipped the social share buttons but might come back to actually use one later, and a stop at growwithsteadyfocus extended that share urge, content that triggers genuine sharing impulses rather than performative ones is content that has actually moved me and not many posts in a typical week do that for me actually.
Honestly this was a good read, no jargon and no padding, and a short look at discoverwinningpaths kept that same feel going which I really appreciated, the writer clearly knows the topic well enough to explain it without hiding behind big words or filler that often gets used to seem clever.
The headings made navigating the post simple even when I needed to find a specific section quickly, and a look at buildstrategicdirection continued the same thoughtful structure, small details like clear headings show that someone is actually thinking about how the reader uses the page rather than just filling it for length alone.
Reading this gave me the rare experience of fully agreeing with all the conclusions, and a stop at learnanddevelopquickly continued that agreement pattern, content that aligns with my existing views without seeming designed to do so is just content that happens to be reasonable and this site reads as reasonable rather than ideological mostly.
Started imagining how I would explain the topic to someone else after reading, and a look at createfocusedmomentum gave me more material for that imagined explanation, content that improves my own ability to discuss a topic is content that has actually transferred knowledge rather than just decorating my screen for a few minutes.
Picked this site to mention to a colleague who would benefit, and a look at startthinkingstrategically added more material I will pass along, recommending sites to colleagues is a higher bar than recommending to friends because the professional context demands more careful curation and this site cleared the professional bar without me having to think.
https://buyankina.ru/
Really appreciate that the writer did not stretch the post to hit some target word count, the points end when they are made, and a stop at scrolltower reflected the same discipline, brevity is generosity in disguise and this site has clearly figured that out far better than most blog operations have.
Felt the writer respected the topic without being precious about it, and a look at learnandoptimizeprocesses continued that respectful but unfussy treatment, finding the right register for serious topics is hard and this site has clearly figured out how to take the topic seriously while still being readable for casual visitors regularly.
найти по номеру [url=www.kak-najti-cheloveka-po-nomeru-telefona-2.ru]найти по номеру[/url]
скачать мелбет на андроид [url=https://elenagatilova.ru]скачать мелбет на андроид[/url]
Now feeling confident enough in this site to use it as a reference point for evaluating others on the same topic, and a look at buildsmartprogress continued the comparison friendly quality, sites that serve as quality benchmarks for their topic are precious and this one has clearly become a benchmark for me on this particular subject area.
After several visits I am now confident this site is one to follow seriously, and a stop at oliveorchard reinforced that confidence, the gradual building of trust through repeated quality exposures is the only sustainable way to develop reader loyalty and this site is building that loyalty in me through patient consistent work consistently.
изделия с логотипом [url=http://www.suvenirnaya-produkcziya-s-logotipom-8.ru]http://www.suvenirnaya-produkcziya-s-logotipom-8.ru[/url]
Took a few notes from this post, the points are easy to remember without needing to come back and check, and a look at createimpacttogether added a couple more, the kind of place that sticks in the memory long after the browser tab has been closed for the day which says a lot really.
Appreciate that you did not pad this with fluff to hit a word count, the post says what it needs to say and stops, and a look at startwithclearvision did the same, brevity here feels intentional not lazy which is a distinction many writers miss completely sometimes when they are working under deadlines.
Speaking as someone who used to recommend blogs frequently and got out of the habit this site is rekindling that impulse, and a look at learnandexpandfast extended the rekindling, the recovery of an old habit triggered by encountering work that justifies it is itself a small kind of pleasure and this site is providing that recovery experience.
A piece that demonstrated competence without performing it, and a look at createfocusedaction maintained the same self assured but unshowy register, the gap between competence and performance of competence is one I track and this site has clearly chosen to demonstrate rather than perform which I find much more persuasive as a reader.
Closed the laptop and walked away thinking about the post for a good twenty minutes, and a stop at learnandoptimizefast produced similar lingering thoughts, content that survives the closing of the browser tab is content that has actually entered the mind rather than just decorating the screen for the duration of the reading.
If patience for careful reading is rare these days finding sites that reward it is rarer still, and a stop at createimpactquickly extended that rare reward, the diminishing returns on shallow content reading have made me more selective about where to spend reading time and this site is meeting the higher selectivity bar consistently.
Now thinking about how this post will age over the coming years, and a stop at inaarch suggested the same durability, content built to age well rather than to capture the attention of the moment is content with a different kind of value and this site has clearly chosen the long horizon over the short one.
A piece that reads like it was written for me without claiming to be written for me, and a look at buildsmartfoundations produced the same fit, when the writer audience match clicks naturally without being engineered through demographic targeting you know the writing is solid and this site has that natural fit consistently for me.
Clean writing, easy to read, and never tries too hard to impress, that combination is harder to find than people think, and after my time on discovermeaningfulgrowth I am sure this site treats its readers well, no flashy tricks just useful content done right which is honestly all I want online.
Picked a single sentence from this post to remember, and a look at growwithconfidencenow gave me another to keep, content that produces memorable lines is doing more than just transferring information and the small selection of sentences I keep from each reading session is one of the actual returns I get from reading carefully.
Honestly enjoyed reading this more than I expected to when I first clicked through, and a stop at buildactionableprogress kept that pleasant surprise going, sometimes you stumble onto a site that just clicks with how you like to read and this is one of those for me right now today which is great.
Glad I gave this fifteen minutes rather than the usual three minute skim, and a look at buildyournextmove earned the same investment, time spent on quality content is rarely wasted but the reverse is also true and learning which sites deserve which kind of attention is part of being a careful online reader.
Thanks for keeping things clear and to the point, that is honestly hard to find online these days, and after reading through jebbeo the message stayed consistent which makes me trust the information being shared more than I usually do on similar pages that cover this same kind of topic.
A piece that built up gradually rather than front loading its main points, and a look at holcap maintained the same gradual structure, content that trusts the reader to reach conclusions through accumulating reasoning is more persuasive than content that announces conclusions and then defends them and this site uses the persuasive approach.
The whole experience of reading this was pleasant from start to finish, no pop ups and no annoying interruptions, and a look at findnewopportunityflows continued that clean experience, technical choices about page design matter for the reader and this site clearly cares about the small details that add up to comfort across multiple visits.
Excellent post, balanced and well organised without showing off, and a stop at createprogressmapping continued in that same vein, this site has clearly figured out the formula for content that works for readers rather than for search engine ranking signals which is harder than it sounds today and worth real recognition from anyone.
Found something new in here that I had not seen explained this way before, and a quick stop at buildstrategicdirection expanded the idea even further, the kind of writing that nudges your thinking forward a bit without forcing the issue is exactly what I look for online today and rarely actually find anywhere.
A well calibrated piece that knew its scope and stayed inside it, and a look at seosprout maintained the same scope discipline, scope creep is one of the failure modes of long blog posts and this site has clearly invested in the editorial discipline to prevent it which shows up in tightly contained pieces.
Выбор памятника: материалы и формы
Now feeling the quiet pleasure of finding writing that takes itself seriously without being self serious, and a stop at createprogressframework extended that subtle pleasure, the gap between earnest and pretentious is fine and this site has clearly chosen to land on the earnest side without slipping over into pretentious which is impressive.
Reading this gave me a quiet moment of intellectual pleasure that I had not been expecting, and a stop at hupido extended that pleasure across more pages, the unexpected reward of stumbling into careful writing is one of the small ongoing pleasures of reading the open web and this site is delivering it reliably.
Picked up several practical tips that I plan to try out this week, and a look at buildactionableprogress added a few more I will be testing alongside, content with practical hooks that connect to my actual life is the kind that earns my repeat attention rather than the merely interesting that I forget within a day.
More substantial than most of what I find searching for this topic online, and a stop at explorefreshgrowth kept that quality consistent, this is one of those sites where the writing actually rewards careful reading rather than punishing the patient reader with empty filler stretched out across long paragraphs that say very little.
Reading this brought back an idea I had set aside months ago, and a stop at startmovingforward added more substance to that idea, content that revives dormant projects in my own thinking is content with serious creative value and this site is contributing to my own work in ways I had not expected when first clicking through.
Now realising the topic deserved better treatment than it has been getting elsewhere, and a look at findyourgrowthlane extended that broader recognition, content that exposes the gap between actual quality and average quality elsewhere is doing the quiet work of raising standards and this site is contributing to that elevation in its own corner.
Glad the writer did not feel the need to argue with imaginary critics in the post itself, and a stop at bakeboxshop kept the same focused approach going, defensive writing wastes the reader time and confidence on positions that did not need defending and this post has clearly avoided that common failure.
Just want to say thank you for putting this together, posts like these make searching online actually worth it sometimes, and a quick look at discoveropportunityzones kept that going, useful and easy to read without any of the tricks that ruin most blog comment sections lately on the wider open web.
Worth marking the moment when reading this clicked into something useful for my own work, and a look at createyourstorytoday extended that practical click, content that connects to my actual life rather than just being interesting is content with the highest kind of value and this site is generating that connection at a high rate.
Took a chance on the headline and was rewarded, and a stop at findbetterapproaches kept the rewards coming as I clicked through, the kind of place where every link leads somewhere worth the click is a small luxury on the modern web where so many sites are mostly empty calories disguised as content.
Took me back a step or two on an assumption I had been making, and a stop at findgrowthopportunitiesnow pushed that reconsideration further, writing that gently corrects the reader without being aggressive about it is a rare diplomatic skill and the team here clearly knows how to land critical points without turning readers off.
A small editorial detail caught my attention, the way headings related to body text, and a look at startnextphase maintained that careful relationship, structural details like that show up to readers who notice them and the writers here have clearly thought about every level of the piece rather than just the words.
Coming back to this one, definitely, and a quick visit to startwithpurpose only made me more sure of that, the kind of writing that makes you want to set aside time later rather than rushing through it now while distracted by everything else competing for attention on the screen today across so many tabs.
Comfortable reading experience throughout, no jarring tone shifts and no awkward formatting, and a look at startwithpurposefulsteps kept that smooth feel going, the kind of editorial polish that goes unnoticed when present but glaring when absent is something this site has clearly invested in across the broader content as well which deserves recognition.
Reading this with my morning coffee turned into reading the related posts with my morning coffee, and a stop at learnandrefine stretched the morning further, content that pulls breakfast into a reading session rather than just accompanying it is content that has earned a higher claim on my attention than the average article does.
Really grateful for content like this, it does not waste my time and it does not insult my intelligence either, and a quick look at learnandadvancefaster was the same, balanced respectful writing that makes a person feel welcome rather than rushed through pages of forced engagement just to keep clicking around.
Took a screenshot of one section to come back to later, and a stop at createvisionforward prompted another saved tab, the urge to capture and revisit specific pieces of content is something I rarely feel but when I do it tells me the work is worth more than the average passing read for sure.
скачать мелбет казино [url=https://limon-ads.ru]https://limon-ads.ru[/url]
Now placing this in the small category of sites whose updates I would actually want to know about, and a stop at buildactionableprogress confirmed that placement, the difference between sites I want to follow and sites I just consume from is real and this one has crossed into the active follow category from the casual consumption side.
Обратился в эту компанию за оформлением документов и остался крайне доволен качеством работы. Здесь делают отличные дипломы, быстро готовят любые справки, оформляют свидетельства и предоставляют надежные нотариальные услуги. Весь процесс прошел гладко и без лишних вопросов https://spravka-diplom.com/notarialnye-i-yur-uslugi/apostil-na-lyuboy-dokument-vydannyy-gosudarstvennym-organom-belarusii/
Reading this prompted me to dig out an old reference book related to the topic, and a stop at siloteapot extended that connection to other sources, content that connects me back to my own existing knowledge rather than asking me to forget it is content with continuity and this site has that continuous quality.
Beyond the immediate post itself the editorial sensibility behind the site is what struck me, and a stop at inobrat continued displaying that sensibility, content that reveals editorial choices through accumulated reading is content with structural quality and this site has clearly developed an underlying approach worth identifying through multiple sessions of reading.
Thanks for keeping the writing direct without losing the warmth that makes content feel human, and a stop at discovercreativegrowth carried both qualities forward, balancing professionalism and personality is a rare skill and the writers here have clearly figured out how to consistently land it across many posts which I notice.
Decided to subscribe to the RSS feed if there is one, and a stop at buildyournextmove confirmed that decision, content that I want delivered to me proactively rather than just remembered when I have time is content that has earned a higher level of commitment from me as a reader looking for reliable sources.
The lack of unnecessary jargon made the post accessible without sacrificing accuracy, and a look at surgesorrel continued in the same accessible style, technical topics often hide behind specialised vocabulary but here the writer trusts the reader to keep up with plain language and that trust pays off nicely throughout the entire post.
Skipped a meeting reminder to finish the post, and a stop at createimpactsteps held me past another reminder, when content beats meetings the writer is doing something extraordinary because meetings have institutional support behind them and yet good writing can still occasionally win that competition for attention which I find heartening today.
Picked this post to share in a Slack channel where I knew it would be appreciated, and a look at buildsustainableprogress suggested I will share more from here later, content worth sharing into a professional context is content that has earned a higher kind of trust than mere personal interest and this site has it.
Now sitting with the thoughts the post triggered rather than rushing on to the next thing, and a stop at bulkingbayou extended that reflective pause, content that earns time for thought after closing the tab is content of higher value than the merely interesting and this site has clearly produced that lasting effect today.
A clean piece that knew exactly what it wanted to say and said it, and a look at seolift maintained the same clarity of intention, knowing the goal of a piece before writing is something most blog content lacks and the clarity of purpose here shows up in every paragraph for any careful reader to notice.
Compared to the usual results for this kind of search this site stands well above the average, and a quick visit to learnandscale kept the standard high, you can tell within seconds whether a site is going to waste your time or actually deliver and this one clearly delivers without any false starts.
Closed the laptop and walked away thinking about the post for a good twenty minutes, and a stop at holdax produced similar lingering thoughts, content that survives the closing of the browser tab is content that has actually entered the mind rather than just decorating the screen for the duration of the reading.
Appreciated how the writer anticipated the questions a reader might have along the way, and a stop at buildsustainablemomentum continued that thoughtful approach, you can tell when content has been edited with the reader in mind versus just published as a first draft and this is clearly the former approach across what I read.
Probably worth setting aside a longer block to read more carefully than I can right now, and a stop at buildforwardthinking confirmed the longer block plan, the impulse to schedule dedicated time for a sites archive is itself a measure of trust and this site has earned that scheduling impulse from me clearly today actually.
Better than most of the writing I have come across on this topic recently, simpler and more direct, and a look at buildsmartdirection continued in that same way, a real outlier in a crowded space full of repetitive content that says little while taking up a lot of reader time today which is unfortunate.
Once you start reading carefully here it is hard to go back to lower quality alternatives, and a stop at discoverpowerfulpaths reinforced that ratchet effect, the way good content raises standards is real over time and this site has clearly contributed to raising my expectations for what is possible in writing on the topic generally.
melbet [url=https://elenagatilova.ru]melbet[/url]
During a reading session that included several other sources this one stood out, and a look at exploreideaswithpurpose continued the standout quality, the side by side comparison of sources during research is a useful exercise and this site has been winning those comparisons for me consistently across multiple research sessions during the last week.
Refreshing tone compared to the dry corporate posts on similar topics, and a stop at explorefreshgrowthideas carried that personality through nicely, you can tell when a real person is behind the writing versus a content team chasing metrics and this site definitely falls into the former category clearly across what I have seen.
Reading this in the time it took to drink half a cup of coffee, and a stop at startthinkingclearly fit naturally into the second half, content that respects the rhythms of a typical morning is content with practical fit and this site has the kind of length and pacing that works for the way I actually read.
Reading this gave me a small mental break from the heavier reading I had been doing, and a stop at jebbird extended that lighter feel, content that provides relief without becoming trivial is harder to produce than people realise and this site has clearly figured out how to be light without being shallow at all.
Started believing the writer knew the topic deeply by about the second paragraph, and a look at explorefreshthinkingnow reinforced that confidence, the speed at which a writer establishes credibility through their writing is a useful quality signal and this writer establishes it quickly and quietly without resorting to credential dropping or self promotion.
Really nice to see things explained without overcomplicating the topic, the words flow naturally and stay easy to follow, and a short visit to startnextlevelgrowth only added to that experience because the same simple approach is used across the rest of the page too without any change in tone.
Halfway through reading I knew this would be one to bookmark, and a look at learnandoptimizepath confirmed that early intuition, when bookmark intent forms before finishing a post you know the writing has cleared a quality bar that most content fails to clear and this site has cleared it on multiple visits already.
Probably worth setting aside a longer block to read more carefully than I can right now, and a stop at exploreideaswithpurpose confirmed the longer block plan, the impulse to schedule dedicated time for a sites archive is itself a measure of trust and this site has earned that scheduling impulse from me clearly today actually.
Will be back, that is the simplest way to say it, and a quick visit to findgrowthopportunitiespath reinforced the decision, this site has earned a spot in my regular rotation alongside a few other reliable places I check when I want something genuinely informative without all the usual modern web noise getting in the way.
Genuine pleasure to read, and that is not something I say often after a casual click through, and a quick visit to hurbug kept the same feeling going across the rest of the site, finding writing that actually feels good to spend time with rather than just functional is increasingly rare on the open web.
A piece that did exactly what it promised in the headline without overshooting or underdelivering, and a look at inobrisk continued that calibration, alignment between promise and delivery is a basic editorial virtue that many sites fail at and this site has clearly mastered the matching of expectation and substance throughout pieces.
Now considering the post as evidence that careful blog writing is still possible, and a look at createimpactjourney extended that evidence, the broader question of whether the modern web can sustain quality writing has obvious empirical answers in sites like this one and seeing them is reassuring even when they remain a minority overall today.
как найти геолокацию по номеру телефона [url=http://kak-najti-cheloveka-po-nomeru-telefona-2.ru]http://kak-najti-cheloveka-po-nomeru-telefona-2.ru[/url]
Came away with a small but real shift in perspective on the topic, and a stop at startwithpurposefulsteps pushed that shift a bit further, the kind of subtle reframing that good writing does to a reader without making a big deal of it is something I always appreciate when it happens which is sadly not that often.
Decided not to skim despite my usual habit and was rewarded for the discipline, and a stop at growyourcapabilities earned the same patient approach, training myself to recognise sites that warrant slower reading is part of being a careful online reader and this site is the kind that helps me practice that skill regularly.
Genuinely useful read, the points are practical and easy to apply right away, and a quick look at parcelparadise confirmed that this site is consistent in that approach, looking forward to digging through the rest of it when I get the chance to sit down properly later in the week or this weekend.
Started reading expecting to disagree and ended mostly nodding along, and a look at startnextchapter continued the pattern, content that wins agreement through evidence and reasoning rather than rhetorical force is the kind that actually shifts minds and this site clearly knows how to do that across what I have read so far.
Liked how the post handled an objection I was forming as I read, and a stop at startyournextphase similarly anticipated where my thinking was going next, the rare writer who can predict reader concerns and address them in advance is doing something most online content fails to do despite that being basic editorial work.
Closed several other tabs to focus on this one as I read, and a stop at learnandprogresssteadily held my undivided attention the same way, content that earns full focus in an attention environment full of competing pulls is content doing something genuinely well and the team behind it deserves recognition for that achievement consistently.
В случае если вам нужны сериалы турецкий на русском языке хорошем качестве без траты времени и непроверенных площадок, обратите внимание на нашу коллекцию востребованных турецких проектов. Здесь собраны как популярные новые проекты, а также известные хиты, которые любят миллионы зрителей. Зрители часто выбирают турецкие сериалы за интересные сюжеты, ярким персонажам, живописным местам съемок и насыщенной драматургии, которая удерживает интерес от первой до последней серии. Все проекты можно смотреть в хорошем качестве, без сложной регистрации и дополнительных сложностей.
как называется детский комбинезон с ножками [url=www.detskie-kombinezony-kupit.ru]www.detskie-kombinezony-kupit.ru[/url]
Güvenli bahis deneyimi için [url=https://1xbet-giris-78.com]1xbet güncel adres[/url] adresini kullanabilirsiniz.
1xbet giriş yapmak. Giriş yaparken dikkat edilmesi gereken bazı noktalar vardır. İlk olarak doğru adresin kullanılması önemlidir. Site güvenliğine verilen önem yüksektir.
Giriş sayfasına yönlendirme için ana sayfadan ilgili buton seçilmeli. Kullanıcı adı ve şifre alanları özenle doldurulmalıdır. Kişisel bilgilerinizi girmeden önce sayfanın orijinalliği onaylanmalıdır.
Eğer henüz üye değilseniz, basit bir formla kayıt olunabilir. Kayıt formunda doğru ve güncel bilgilerin girilmesi tavsiye edilir. Bazı durumlarda hesabınızı onaylemek için ek adımlar uygulanabilir.
Hesabınız aktif olduktan sonra çeşitli avantajlarınız olur. Bahisler, canlı casino ve diğer oyunlar gibi aktiviteler erişilebilir hale gelir. Bonuslar ve özel tekliflerle kazancınızı artırabilirsiniz.
Reading this gave me something to think about for the rest of the afternoon, and after createpositiveoutcomes I had even more to mull over, the kind of post that lingers in the background of your day rather than evaporating immediately is genuinely valuable in an attention economy that punishes depth rather than rewarding it.
Started taking notes about halfway through because the points were stacking up, and a look at buildlongtermstrength added enough material that my notes file grew further, content that demands note taking from a passive reader is content with substance and the writers here are clearly producing that kind of work consistently across topics.
Народ, если кто искал, свежая инфа. Нашел чистый вариант, в итоге скачал отсюда: [url=https://teobit.ru]скачать мелбет на айфон[/url].
Вообще проект предлагает отличные условия для игроков, выбор спортивных дисциплин впечатляет. Плюс ко всему трансляции матчей идут без задержек.
И еще, при регистрации активируется стартовый фрибет, так что можно затестить. Что думаете?
Liked the balance between depth and brevity, never too shallow and never too long, and a stop at syrupserif kept the same balance going across the rest of the site, this is one of the harder skills in writing and the team here clearly has it figured out very well indeed across every page.
A piece that demonstrated competence without performing it, and a look at growfocusedexecution maintained the same self assured but unshowy register, the gap between competence and performance of competence is one I track and this site has clearly chosen to demonstrate rather than perform which I find much more persuasive as a reader.
My time on this site has now extended past what I had budgeted, and a stop at seomagnet keeps extending it further, content that overstays its budget in my schedule is content that has earned the extra time and this site has been earning extra time across multiple visits to the point where my schedule needs adjustment.
A clear case of writing that does not try to do too much in one post, and a look at startwithclearfocus maintained the same scoped discipline, posts that try to cover too much end up covering nothing well and this site has clearly chosen scope discipline as a core editorial principle which shows up clearly in what I read.
Now feeling the small relief of finding writing that does not condescend, and a stop at buildclarityforward extended that respect for readers, content that treats its audience as capable adults rather than as people to be managed produces a different reading experience and this site has clearly chosen the respectful approach across all pieces.
Came across this through a roundabout path and now it is on my regular rotation, and a stop at holpod sealed that decision, the open web still produces serendipitous discoveries when you let the citations and references guide you rather than relying purely on algorithmic feeds for new content recommendations always.
Solid little post, the kind that does not need to be flashy because the substance is doing the work, and a look at startpurposefuljourney kept that quiet confidence going across the site, this is what writing looks like when the writer trusts the content to land on its own without theatrics or unnecessary attention seeking behaviour.
Liked that the post left some questions open rather than pretending to settle everything, and a stop at explorefreshthinkingpaths continued that intellectual honesty, content that respects the limits of its own claims is more trustworthy than content that overreaches and this site has clearly figured out which positions it can defend confidently.
Found a couple of useful angles in here I had not considered before reading carefully, and a quick stop at buildgrowthmomentum added more, this is one of those sites where the value compounds the more you read rather than peaking at one viral post and then offering nothing else of substance afterwards which is common.
Reading the writers other posts after this one suggests the quality is consistent rather than peak, and a stop at startpurposefuljourney confirmed the consistent quality reading, sites that hold the same level across many pieces rather than peaking on a few are sites with sustainable editorial discipline and this one has clearly developed that.
Liked the careful word choice throughout, every term seemed picked for a reason rather than thrown in casually, and a stop at findyournextstage continued that precise style, this kind of attention to small details is what separates careful writing from the usual rushed content that dominates blog spaces today across pretty much every topic I follow.
Honestly thank you to whoever wrote this because it scratched an itch I had not quite been able to articulate, and a stop at startsmartprogress kept that satisfying feeling going, the kind of writing that meets unspoken needs is special and this site clearly has writers who understand their readers more than most do today.
Reading this in a quiet coffee shop matched the calm energy of the writing, and a stop at nutmegnetwork extended that environmental match, content that has its own ambient quality which can match or clash with surroundings is content with a personality and this site has the kind of personality that suits calm reading.
Beyond the topic at hand this site reads as a small ongoing project of taking writing seriously, and a look at exploreideasdeeply reinforced that project quality, sites that treat publishing as an ongoing serious practice rather than as content production for traffic are sites worth supporting and this one has clearly chosen the serious approach.
Good post, the kind that respects the reader by getting to the point quickly without skipping the details that matter, and a short look at discovercreativepaths confirmed that approach is consistent across the site which is rare to find online these days, definitely a place I will return to soon.
The depth of coverage felt about right for the format, neither shallow nor overwhelming, and a look at irotix kept that calibration going, getting the depth right for blog format is genuinely difficult because too shallow loses experts and too deep loses beginners but this site nailed it nicely which I really do appreciate.
Reading this gave me the rare experience of fully agreeing with all the conclusions, and a stop at discoverforwardideas continued that agreement pattern, content that aligns with my existing views without seeming designed to do so is just content that happens to be reasonable and this site reads as reasonable rather than ideological mostly.
Solid information that lines up with what I have been hearing from other reliable sources, and after my visit to explorefreshgrowthideas I was even more certain of that, this site checks out which is something I value highly when so many places online play loose with the facts to chase a quick click.
Reading this gave me a small refresher on something I had partially forgotten, and a stop at findyournextdirection extended the refresher, content that strengthens existing knowledge rather than just adding new is content with a particular kind of consolidating value and this site is providing that consolidating function across multiple visits.
Glad I stumbled across this post, the explanations actually make sense without needing background knowledge to follow along, and after a stop at growstepwisely the same was true there, no assumptions about the reader just clear writing that anyone can understand from the first line right through to the end.
выезд на дом нарколога анонимно [url=https://narkolog-na-dom-moskva-28.ru]выезд на дом нарколога анонимно[/url]
The overall feel of the post was professional without being stuffy, and a look at jebbrood kept that approachable expertise going, finding the right register for technical content is hard but this site has clearly figured out how to sound knowledgeable without slipping into that distant lecturing tone that loses readers in droves every time.
Liked how the writer used real examples instead of theoretical ones to make the points stick, and a stop at startbuildingvision added even more concrete examples, this is the kind of practical approach that respects readers who actually want to apply what they learn rather than just nodding along passively without doing anything useful.
Worth saying that this is one of the better things I have read on the topic in months, and a stop at learnandoptimizegrowth reinforced that ranking, the topic is well covered by many sources but few do it with this level of care and the few that do deserve to be flagged so other readers can find them.
Came back to this twice now in the same week which is unusual for me, and a look at findgrowthsolutions suggested I will keep coming back, the kind of post that earns repeated visits rather than one and done reading is the gold standard for content quality and this site clearly hit that standard.
Glad I gave this fifteen minutes rather than the usual three minute skim, and a look at startnextleveldirection earned the same investment, time spent on quality content is rarely wasted but the reverse is also true and learning which sites deserve which kind of attention is part of being a careful online reader.
Took the time to read every paragraph rather than skimming for the punchline, and a quick visit to husbury earned the same careful attention from me, that is the highest signal I can give about content quality because my default mode is rapid scanning rather than deliberate reading on most pages.
Picked up two new ideas that I expect will come up in conversations this week, and a look at buildscalableprogress added another, content that arms me with talking points rather than just filling time is the kind that provides ongoing value beyond the moment of reading and this site is generating that kind of ongoing value.
A genuine compliment to the writer for keeping the post focused on what mattered, and a look at growwithstrategyfocus continued that disciplined focus, focus is a editorial choice that compounds across many small decisions and this site has clearly made those small decisions consistently across what I have read so far this week here.
мелбет казино скачать на андроид [url=https://elenagatilova.ru]мелбет казино скачать на андроид[/url]
Adding to the bookmarks now before I forget, that is how good this is, and a look at chairchampion confirmed the rest of the site is worth saving too, this is one of those rare finds that justifies the time spent searching the web for once which is a relief in the current environment.
Liked that there was nothing performative about the writing, and a stop at createactionwithpurpose continued that genuine quality, performative writing tries to be witnessed rather than read and the difference between performance and substance is huge for the careful reader and this site has clearly chosen substance every time clearly.
Generally my comment to other readers about new sites is to wait and see but for this one I would jump to recommend now, and a look at seomotion reinforced that early recommendation, the speed at which a site earns my recommendation is itself a quality signal and this one has earned mine quickly clearly.
single bet return calculator [url=https://www.singlebet-calculator.com]single bet return calculator[/url] .
Now appreciating the small but real way this post improved my afternoon, and a stop at growwithstrongintent extended that small improvement effect, content that produces measurable positive impact on the texture of a reading day is content with real value and this site is producing those small positive impacts at a sustainable rate apparently.
In conclusion, a single bet calculator saves time and reduces errors.
acca accumulator [url=https://single-betcalculator.com/bet-calculator/accumulator/]https://single-betcalculator.com/bet-calculator/accumulator/[/url]
Just one of those reads that left me feeling slightly more capable rather than overwhelmed, and a look at buildlongtermfocus kept that empowering feel going, the difference between content that builds the reader up and content that intimidates them is huge and this site clearly knows which side of that line to stand.
Coming back to this one, definitely, and a quick visit to explorefuturevisions only made me more sure of that, the kind of writing that makes you want to set aside time later rather than rushing through it now while distracted by everything else competing for attention on the screen today across so many tabs.
The odds may come in several formats, such as decimal, fraction, or American styles.
double calculator bet [url=http://www.single-bet-calculator.uk/bet-calculator/double/]https://single-bet-calculator.uk/bet-calculator/double/[/url]
odds fraction to decimal [url=singlebetcalculator.uk/odds-explained]https://singlebetcalculator.uk/odds-explained/[/url]
football accumulator calculator free [url=single-bet-calculator-free.uk/bet-calculator/accumulator]https://single-bet-calculator-free.uk/bet-calculator/accumulator/[/url]
These calculators are invaluable for those new to betting.
each way single bet calculator [url=http://www.single-bet-calculator-free.com]https://single-bet-calculator-free.com/[/url]
Honestly impressed by how much useful content sits in such a small post, and a stop at buildintentionalsteps confirmed the rest of the site packs a similar punch, density without confusion is a hard balance to strike and this site has clearly cracked the code on it across many different topic areas covered.
Picked a friend mentally as the audience for this and decided to send the link, and a look at irubelt confirmed the send was the right choice, choosing whom to share content with is a small act of curation that I take more seriously than the public sharing most platforms encourage these days online.
By knowing possible outcomes, bettors can control the amount they are willing to risk.
kalkulator single bet [url=https://www.single-betcalculator.uk]https://single-betcalculator.uk/[/url]
Now noticing how rare it is to find a site that does not feel rushed, and a look at buildlongtermstrength extended that calm pace, content produced without time pressure has a different quality than content shipped to meet a deadline and this site reads as written without urgency which produces a different and better experience for readers.
Reading this gave me confidence to make a decision I had been putting off, and a stop at createactionwithpurpose reinforced that confidence, content that translates into action in my own life rather than just informing it is content with the highest practical value and this site is generating that action level utility for me lately.
Now sitting back and recognising that this was a small but real win in my reading day, and a stop at holzix extended that quiet win, the cumulative effect of small reading wins versus the cumulative effect of small reading losses is real over time and this site is contributing to the wins side of that ledger.
Probably one of the more reliable sources I have found for this kind of careful coverage, and a look at findyourprogressroute reinforced the reliability, the small group of sources I would describe as reliable for a given topic is curated carefully and this site has earned a place in that small group through consistent performance.
Now appreciating the small but real way this post improved my afternoon, and a stop at growstepbystrategy extended that small improvement effect, content that produces measurable positive impact on the texture of a reading day is content with real value and this site is producing those small positive impacts at a sustainable rate apparently.
Reading this with a notebook open turned out to be the right move, and a stop at createclaritysteps added more material to the notes, content that justifies active note taking from a passive reader is content with real informational density and this site is producing notes worthy material at a high rate consistently.
Thank you for not assuming the reader already knows everything, the explanations meet me where I am, and a look at createconsistentdirection did the same, that consideration is what makes a site feel welcoming rather than gatekeepy which is sadly the default mood across the modern web today for most subjects covered.
Considered as a whole this site has developed a coherent point of view that comes through in individual pieces, and a look at startmovingclearly continued displaying that coherence, sites with a unified perspective rather than a grab bag of takes are sites with editorial maturity and this one has clearly developed that maturity through years of work.
Если хотите найти лучшие турецкие сериалы на русском языке без траты времени и сомнительных сайтов, загляните в нашу подборку востребованных турецких телешоу. На сайте представлены как самые обсуждаемые новинки последних сезонов, так и легендарные сериалы, которые остаются популярными среди поклонников жанра. Многие пользователи выбирают турецкие сериалы из-за захватывающих историй, запоминающимся героям, живописным местам съемок и эмоциональной подаче, которая удерживает интерес от первой до последней серии. Смотреть любимые истории можно в хорошем качестве, без длительной регистрации и лишних действий.
Для тех, кто в теме, толковый разбор. Нашел чистый вариант, в итоге скачал отсюда: [url=https://teobit.ru]скачать мелбет[/url].
Кстати, площадка предлагает отличные условия для игроков, линия на футбол и теннис огромная. Порадовало, что есть нормальные live-ставки.
Если только заводите аккаунт капает бонус на баланс, так что можно затестить. Кто уже ставил там?
Different feel from the algorithmically optimised posts that dominate the topic, and a stop at createimpactstructure reinforced that human touch, you can tell when a site is being run by someone who reads what they publish versus someone just hitting submit and moving on quickly to the next assignment without checking the result.
Looking at this objectively the editorial quality is hard to deny even setting aside personal taste, and a stop at brightbanyan maintained the same objective quality, the gap between what I personally enjoy and what is objectively well crafted exists and this site clears both bars simultaneously which is rarer than it sounds.
Really grateful for content like this, it does not waste my time and it does not insult my intelligence either, and a quick look at findbetterwaysforward was the same, balanced respectful writing that makes a person feel welcome rather than rushed through pages of forced engagement just to keep clicking around.
отследить по номеру телефона [url=http://kak-najti-cheloveka-po-nomeru-telefona-2.ru]отследить по номеру телефона[/url]
Once I trust a site this much I tend to read everything they publish and that is the trajectory I am on with this one, and a stop at buildfocusedprogress confirmed the trajectory, the rare progression from interested reader to comprehensive reader is something only certain sites earn and this one is earning that progression rapidly.
Reading this felt easy in the best way, no friction and no confusion at any point, and a stop at buildideasforward carried that same comfort across more pages, the kind of editorial flow that lets you absorb information without fighting the format which is increasingly hard to find on the open web today across topics.
Güvenli bahis deneyimi için [url=https://1xbet-giris-78.com]1xbet güncel giriş[/url] adresini kullanabilirsiniz.
1xbet giriş yapmak. Giriş yaparken dikkat edilmesi gereken bazı noktalar vardır. İlk olarak doğru adresin kullanılması önemlidir. Site güvenliğine verilen önem yüksektir.
Kullanıcılar giriş yapmak için ana sayfadaki giriş linkini kullanmalıdır. Doğru kullanıcı adı ve şifre girilmesi çok önemlidir. Kişisel bilgilerinizi girmeden önce sayfanın orijinalliği onaylanmalıdır.
Üyeliğiniz yoksa, kayıt işlemi birkaç dakika içinde tamamlanabilir. Bilgilerin eksiksiz ve doğru doldurulması önem taşır. Hesap güvenliği için doğrulama zorunlu olabilir.
Siteye giriş sonrası birçok seçenek sizleri bekler. Spor bahisleri ve canlı oyunlar kolaylıkla oynanabilir. Kampanyalar hakkında bilgi alabilir ve fırsatları yakalayabilirsiniz.
Going to share this with a friend who has been asking the same questions for a while now, and a stop at findyournextfocus added a few more pages I will pass along too, this is the kind of generous information that earns a small thank you from me right now and again later this week.
выведение из запоя стационар санкт петербург [url=https://vyvod-iz-zapoya-v-staczionare-sankt-peterburg-27.ru]выведение из запоя стационар санкт петербург[/url]
A welcome contrast to the loud takes that have dominated my feed lately, and a look at findmomentumquickly extended that calm voice, content that arrives without yelling has become unusual in the modern attention economy and this site is one of the few places I have found that consistently delivers without raising its voice.
Picked this for a morning recommendation in our company chat, and a look at createclearoutcomes suggested I will mention this site again later, recommending content into a workplace context is a small editorial act that requires confidence in the recommendation and this site is making me confident in those recommendations consistently here too.
Halfway through reading I knew this would be one to bookmark, and a look at buildfocusedgrowth confirmed that early intuition, when bookmark intent forms before finishing a post you know the writing has cleared a quality bar that most content fails to clear and this site has cleared it on multiple visits already.
Thank you for being clear and direct, that simple approach saves so much frustration on the reader’s end, and a stop at startwithpurposefuldirection only made me more sure of it, the rest of the content seems to follow the same pattern which is a great sign of consistent editorial care behind the scenes.
Solid endorsement from me, the writing earns it, and a look at createforwardmotion continues to earn it across the broader site too, the kind of operation that maintains quality across many pages rather than just one viral post is a sign of serious commitment and that is what I see here clearly across what I read.
Now adding the homepage to my regular check rotation rather than waiting for individual links to find me, and a stop at jebmug confirmed the rotation upgrade, the move from passive discovery to active checking is a vote of confidence in a sites ongoing quality and this site has earned that active engagement clearly.
A quiet piece that did not try to compete on volume, and a look at startgrowingtoday maintained that selective approach, sites that publish less but better are increasingly rare in an environment that rewards volume and this one has clearly chosen quality cadence over quantity which is a brave editorial decision in current conditions.
Worth marking the moment when reading this clicked into something useful for my own work, and a look at discoverforwardmomentum extended that practical click, content that connects to my actual life rather than just being interesting is content with the highest kind of value and this site is generating that connection at a high rate.
Всем доброго времени суток. Слушайте, вопрос сложный, но многим может помочь, так как в сети сейчас полно сомнительных клиник. Когда нужен проверенный и опытный врач для капельницы, лучше сразу обращаться к сертифицированным медикам.
Знакомые вызывали бригаду в похожей ситуации в итоге вся ценная информация была собрана по крупицам. Если вам актуально или ситуация экстренная, можете ознакомиться по ссылке: вывести из запоя в наркологическом стационаре [url=https://vyvod-iz-zapoya-v-staczionare-sankt-peterburg-28.ru]вывести из запоя в наркологическом стационаре[/url].
Врачи дежурят круглосуточно во всех районах, и помощь окажут полностью конфиденциально. Главное — не затягивать в такие моменты, кому-то тоже пригодится и спасет здоровье. Всем удачи и берегите близких!
Decided to set aside time later to read more carefully, and a stop at createprogressjourney reinforced that decision, content that earns a calendar entry rather than just a passing read is in a different tier altogether and this site is clearly working at that elevated level which I really do appreciate as a reader today.
Found this via a link from another piece I was reading and the click was worth it, and a stop at seomotive extended the value across more material, the open web still rewards clicking through citations when the underlying writers care about each other work and this site clearly belongs to that network.
Bookmark folder created specifically for this site, and a look at startyourgrowthpath confirmed the dedicated folder was the right call, dedicated folders for individual sites are a level of organisation I rarely deploy and this site has earned that level of dedicated tracking based on the consistency I have seen so far across sessions.
A welcome reminder that thoughtful writing still happens online, and a look at learnandtransformdirection extended that reassurance, the modern web makes it easy to forget that careful writing exists and finding sites that practice it is a small antidote to the cynicism that builds up from too much exposure to algorithmic content.
One of the more honest takes on the topic I have seen lately, no spin and no oversell, and a stop at createclaritysystems kept that going, the kind of voice the open web could use a lot more of rather than the endless echo chamber of recycled opinions floating around every social platform these days.
Strong recommendation, anyone interested in this topic owes themselves a visit, and a stop at hyxarch extends that recommendation across more of the site, this is the kind of resource that makes me more optimistic about the state of the open web than I usually am these days actually for once which is genuinely refreshing.
Well crafted post, the structure flows naturally from one point to the next without forcing transitions, and a stop at startwithclearpurpose kept the same flow going, you can tell when a writer has thought about how their content reads rather than just what it contains and this is one of those examples.
The structure of the post made it easy to follow without losing track of where I was, and a look at mochamarket kept the same logical flow going, this site clearly understands that organisation is half the battle in keeping readers engaged from the first line to the last across any kind of post.
Most posts I read end up forgotten within a day but this one is sticking, and a look at discoverinnovativeideas extended that lingering effect, content that survives the immediate moment of reading rather than evaporating is content with genuine retention quality and this site has been producing memorable pieces at a rate notable across my reading.
Worth observing that the post landed without needing a flashy headline to hook attention, and a stop at buildfocusedprogress did the same, content that earns engagement through substance rather than packaging is the kind I trust more deeply and this site has clearly chosen substance as the primary lever for reader engagement throughout.
A small thing but the line spacing and font choices made reading this physically pleasant, and a look at sagevogue maintained the same careful design, technical choices about typography are part of what makes online reading actually comfortable and this site has clearly invested in the design layer alongside the content layer carefully.
Reading this gave me a small mental break from the heavier reading I had been doing, and a stop at horcall extended that lighter feel, content that provides relief without becoming trivial is harder to produce than people realise and this site has clearly figured out how to be light without being shallow at all.
Vague feelings of recognition kept surfacing as I read because the writing names things I have been thinking, and a look at discoverinnovativethinking produced more of those recognition moments, content that gives shape to private intuitions is content that makes me feel less alone in my own thinking and this site has that effect.
On reflection this is the kind of writing that improves my taste for what is possible in the format, and a look at discovernewdirectionnow continued raising that bar, content that elevates my expectations rather than lowering them is doing important work in calibrating my standards and this site is participating in that elevation reliably.
A piece that brought a sense of order to a topic I had been finding chaotic, and a look at startsmartmovement continued that organising effect, content that imposes useful structure on messy subjects is doing genuine intellectual work and this site is providing that organisational function across multiple posts I have read recently here.
Bookmark folder reorganised slightly to make this site easier to find, and a look at buildgrowthdirection earned the same accessibility upgrade, the small organisational moves I make for sites I expect to return to often are themselves a signal of how much I trust them and this site triggered those moves naturally.
Worth saying that the quiet confidence of the writing is what landed first, and a look at startthinkingbigger continued that quiet quality, confident writing without the loud display of confidence is a rare combination and this site has clearly developed both the knowledge and the editorial restraint to land that combination consistently.
My reading list is short and selective and this site is now on it, and a stop at createforwardexecution confirmed the placement, the short list of sites I read deliberately rather than encounter accidentally is something I curate carefully and adding to it is a real act of trust which this site has earned today.
During the time spent here I noticed the absence of the usual distractions, and a stop at explorefutureopportunities extended that distraction free experience, content that does not fight my attention with pop ups and modals and aggressive prompts is content that respects me and this site has clearly chosen the respectful approach throughout.
Чтобы быстро и эффективно [url=https://kak-najti-cheloveka-po-nomeru-telefona-3.ru]гайд[/url], воспользуйтесь нормальными ребята реально помогают.
Слушай, тут главное — без глупостей.
Иногда обычного запроса достаточно, чтобы получить имя или ссылку на профиль.
Надеюсь, понятно объяснил.
If I had to defend the time I spend reading independent blogs this site would feature in the defence, and a look at growwithclaritynow reinforced that defensive utility, the ongoing case for non algorithmic reading is one I make to myself periodically and sites like this one provide the actual evidence that supports the case clearly.
Skimmed first and then went back to read carefully, and the careful read paid off in places I had missed, and a stop at buildsustainablemovement got the same treatment, the rare site whose content rewards a second pass is content I want more of in my regular rotation rather than disposable single read articles.
Liked that the post acknowledged complications rather than pretending they did not exist, and a stop at learnandmoveahead continued that honest framing, sites that handle complexity with care rather than papering it over with simplifying claims are doing real intellectual work and this one is clearly in that category based on what I have read.
Glad I gave this a chance instead of bouncing on the headline, and after discovernewfocusareas I was certain I had made the right call, snap judgements based on titles miss a lot of good content and this is a reminder to slow down and check things out before scrolling past in a hurry.
Now feeling slightly more committed to my own careful reading practices having read this, and a stop at explorefutureclarity reinforced that commitment, content that models the kind of attention it deserves is content that calibrates the reader and this site has clearly raised my own bar for what to bring to good writing today.
Worth a quiet moment of recognition for the consistency I have noticed across multiple posts, and a stop at discovergrowthmindset continued that consistent quality, sites that maintain quality across many pieces rather than peaking on one viral post are sites with real editorial discipline and this one has clearly developed that discipline carefully.
Thanks for the breakdown, it gave me a clearer picture of something I had been confused about for a while now, and a stop at createvisionexecution closed the remaining gaps in my understanding nicely, no need to hunt around twenty other articles to put the pieces together which is a real time saver.
Народ, приветствую. Слушайте, вопрос сложный, но многим может помочь, потому что в экстренной ситуации трудно сориентироваться. Если ищете анонимного специалиста с быстрым выездом по городу, то не рискуйте и не доверяйте случайным объявлениям.
Знакомые вызывали бригаду в похожей ситуации и в итоге нашли клинику, где врачи работают профессионально. Чтобы узнать точные цены и вызвать специалиста, можете ознакомиться по ссылке: [url=https://narkolog-na-dom-moskva-27.ru/]подробнее тут[/url].
Там расписаны все аспекты, которые стоит учитывать, так что найдете ответы на свои вопросы. Не теряйте время, поможет вовремя принять правильные меры. Пусть все будет хорошо!
Closed it feeling I had taken something away rather than just consumed something, and a stop at coppercrown extended that taking away feeling, the difference between content I extract value from and content I just pass through is something I track informally and this site is consistently in the value extraction column for me.
Народ, если кто искал, свежая инфа. Сам долго ковырялся, делюсь полезной ссылкой: [url=https://teobit.ru]мелбет скачать[/url].
Сам сервис предлагает отличные условия для игроков, все интуитивно понятно даже новичку. Порадовало, что трансляции матчей идут без задержек.
Там сейчас дают неплохой приветственный бонус, что очень даже кстати. Кто уже ставил там?
Reading this triggered a small change in how I think about the topic going forward, and a stop at findyourtruefocus reinforced that subtle shift, the rare content that actually moves my thinking rather than just confirming or filling it is the kind I most value and this site is providing that kind of impact today.
Excellent execution from start to finish, the post never loses its rhythm and the points stay sharp, and a quick stop at exploreinnovativepathwaysnow kept the same level going, consistency like this across a site is the marker of a serious operation rather than a casual side project running on autopilot somewhere else.
If a friend asked me where to read carefully on the topic I would send them here without hesitation, and a look at learnandtransformfast confirmed the recommendation strength, the directness of my recommendation reflects how confident I am in the quality and this site has earned undiluted recommendations from me across multiple recent conversations actually.
Now feeling the rare pleasure of trusting a source completely on first encounter, and a look at startthinkingstrategically extended that initial trust into something more durable, the calibration of trust to evidence is something I do informally and this site has earned high trust through the cumulative weight of multiple consistently good posts already.
Came in for one specific question and got answers to three I had not even thought to ask, and a look at irubrisk extended that bonus value pattern, the kind of resource that anticipates reader needs rather than just answering the literal question asked is the gold standard and this site reaches it.
Genuine pleasure to read, and that is not something I say often after a casual click through, and a quick visit to seoorbit kept the same feeling going across the rest of the site, finding writing that actually feels good to spend time with rather than just functional is increasingly rare on the open web.
This actually answered the question I had been searching for, and after I checked learnandoptimizegrowthpath I had a few more pieces I had not realised I needed, that is the sign of a site that knows what its readers want before they even know how to ask it which is impressive.
Looking at the surface design and the substance together this site has both right, and a look at learnandexecuteclearly reinforced that integrated quality, sites where presentation and content reinforce each other rather than fighting are sites with full editorial coherence and this one has clearly invested in both layers in a balanced way.
A piece that handled the topic with appropriate weight without becoming portentous, and a look at unlocknewopportunities continued that calibrated seriousness, content that takes itself seriously without becoming pompous is something this site has clearly figured out and the balance shows up in every piece I have read across multiple sessions now.
Quality writing that respects the reader’s intelligence without overloading them, and a quick look at explorefreshstrategicpaths reflected that approach, a balanced thoughtful site that earns trust by being consistent rather than by shouting about how trustworthy it is which is the usual approach online sadly across most content categories.
автовоз москва доставка автовоз москва сколько стоит
капельница от запоя в стационаре [url=https://vyvod-iz-zapoya-v-staczionare-sankt-peterburg-27.ru]капельница от запоя в стационаре[/url]
Worth saying that the quiet confidence of the writing is what landed first, and a look at jebyam continued that quiet quality, confident writing without the loud display of confidence is a rare combination and this site has clearly developed both the knowledge and the editorial restraint to land that combination consistently.
Я изначально скептически относился ко всей этой дистанционке. Думал, сын просто будет играть в танчики. Но жена настояла, нашли один портал с живыми учителями: [url=https://shkola-onlajn-53.ru]онлайн школа 8 класс[/url] . Честно? Зашли просто на пробный урок, а в итоге остались на весь год. Преподаватели не просто читают по бумажке, а реально вовлекают. Ребенок сам ноутбук включает к началу пары. Так что если кому актуально – очень рекомендую хотя бы тест-драйв пройти.
Just dropping by to say thanks for the effort, it does not go unnoticed when a writer cares this much about the reader, and after I went through discovernewdirectionnow I was certain this is one of the better corners of the internet for this particular kind of content which is genuinely refreshing.
Genuine reaction is that I will probably think about this on and off for a few days, and a look at startprogressnow added fuel to that, the best content lingers in your head after you close the tab rather than evaporating immediately and this site clearly knows how to write that kind of memorable content.
During a quiet evening reading session this provided just the right depth without being heavy, and a stop at explorefutureopportunity maintained the same evening appropriate weight, content with depth that does not exhaust the reader is content with editorial calibration and this site has clearly figured out how to be substantial without being demanding all the time.
The overall feel of the post was professional without being stuffy, and a look at growwithstrategyintent kept that approachable expertise going, finding the right register for technical content is hard but this site has clearly figured out how to sound knowledgeable without slipping into that distant lecturing tone that loses readers in droves every time.
Quality writing that respects the reader’s intelligence without overloading them, and a quick look at growintentionallyforward reflected that approach, a balanced thoughtful site that earns trust by being consistent rather than by shouting about how trustworthy it is which is the usual approach online sadly across most content categories.
вызов на дом частного нарколога [url=https://narkolog-na-dom-moskva-28.ru]вызов на дом частного нарколога[/url]
Found something quietly useful here that I expect to return to, and a stop at growresultsoriented added more of the same, content with quiet utility ages well in a way that flashy hot takes do not and I have learned to weight quiet utility much higher when deciding what to bookmark for later use.
Picked up on several small touches that suggest a careful editor, and a look at growresultsfocused suggested the same hand at work across the broader site, editorial consistency at a granular level is one of the strongest signs that an operation is serious rather than just hobbyist and this site reads as serious throughout.
Now realising the post solved a small problem I had been carrying for weeks, and a look at startpurposefullynow extended that problem solving function, content that connects to specific unresolved questions in my own life rather than just providing general interest is content with real practical impact and this site is providing that practical value.
как найти местоположение телефона по номеру [url=www.kak-najti-cheloveka-po-nomeru-telefona-2.ru]www.kak-najti-cheloveka-po-nomeru-telefona-2.ru[/url]
Took some notes for a project I am working on, and a stop at hyxbrook added more raw material to those notes, content that contributes to my own creative work rather than just being interesting in the moment is the kind I value most and the kind I will keep coming back to repeatedly.
If I am being honest this is the kind of site I quietly hope my own work will someday resemble, and a stop at findgrowthpotential extended that aspirational feeling, finding work that models what I want to produce is part of why I read carefully and this site has been performing that modelling function for me lately consistently.
Reading this gave me something to think about for the rest of the afternoon, and after seogrove I had even more to mull over, the kind of post that lingers in the background of your day rather than evaporating immediately is genuinely valuable in an attention economy that punishes depth rather than rewarding it.
Felt the post was written for someone like me without explicitly addressing me, and a look at createprogressmappingnow produced the same fit, when content lands on its target without pandering you know the writer has done careful audience thinking rather than relying on demographic targeting or interest signals to do the work of editorial decisions.
Now planning to share the link with a small group of readers I trust, and a look at createprogressframework suggested more material to share with the same group, recommending content into a curated circle requires confidence in the recommendation and this site is making me confident in those personal recommendations on multiple separate occasions now.
Closed several other tabs to focus on this one as I read, and a stop at growwithsteadyintent held my undivided attention the same way, content that earns full focus in an attention environment full of competing pulls is content doing something genuinely well and the team behind it deserves recognition for that achievement consistently.
Glad to have another reliable bookmark for this topic, and a look at isebrook suggested several more pages I will be marking too, building a personal library of trustworthy resources is one of the actual rewards of careful browsing and this site is earning a place on my permanent shortlist for the topic.
Started imagining how I would explain the topic to someone else after reading, and a look at learnandadvancepath gave me more material for that imagined explanation, content that improves my own ability to discuss a topic is content that has actually transferred knowledge rather than just decorating my screen for a few minutes.
Now I want to find more sites like this but I suspect they are rare, and a look at learnandadvancegrowth extended that thought, the few sites that meet this quality bar are precious specifically because they are rare and finding others like them is one of the ongoing projects of careful internet curation across the years.
Glad I gave this a chance rather than scrolling past, and a stop at buildclaritymovement confirmed I made the right call, sometimes the best content is hidden behind unassuming headlines that do not scream for attention and learning to slow down and check those out has paid off many times now across years of reading.
Closed it feeling slightly more competent in the topic than I started, and a stop at findyourstrongdirection reinforced that competence boost, real learning is rare in casual online reading but it does happen sometimes and this site managed to make it happen for me today which is genuinely worth pausing to acknowledge.
Thanks for sharing this with the open internet rather than locking it behind a paywall like so many sites do now, and a stop at startmovingstrategicallynow kept the same vibe going, generous helpful and clearly written by someone who actually wants people to learn from it rather than just charge them.
Speaking carefully because I do not want to overstate things this site is genuinely above average across multiple measurements, and a stop at seoripple continued the above average performance, the calibration of judgement against potential overstatement is something I take seriously and this site clears the higher bar even after that calibration applies.
I learned more from this short post than from longer articles I read earlier today, and a stop at growwithintentionalsteps added even more useful detail without going off topic, this site clearly knows how to keep things focused without sacrificing depth which is a hard balance to strike for any writer.
Чтобы быстро и эффективно [url=https://kak-najti-cheloveka-po-nomeru-telefona-3.ru]найти человека по номеру[/url], воспользуйтесь специализированными сервисами.
Слушай, тут главное — без глупостей.
Юридические процедуры гарантируют законность и защиту приватности всех сторон.
Да, и ещё момент — без фанатизма.
I usually skim posts like these but this one held my attention all the way through, and a stop at exploreuntappedpotential did the same, that is a strong endorsement coming from me because I am usually quick to bounce when content gets repetitive or fails to deliver on its initial promise made in the headline.
Thanks for a post that does not try to be funny when it is not the moment for it, and a stop at createprogressplanning maintained the same appropriate seriousness, knowing when humour helps and when it just signals desperation for engagement is a sign of editorial maturity that many blogs have not developed yet.
A piece that did exactly what it promised in the headline without overshooting or underdelivering, and a look at findnewopportunityroutes continued that calibration, alignment between promise and delivery is a basic editorial virtue that many sites fail at and this site has clearly mastered the matching of expectation and substance throughout pieces.
Now thinking about this site as a small example of what good independent writing looks like, and a stop at startyourjourneynow continued that exemplary status, the few sites that serve as good examples are sites worth holding up in conversations about quality and this one has earned that exemplary placement through patient consistent effort over time.
A welcome contrast to the loud takes that have dominated my feed lately, and a look at seohive extended that calm voice, content that arrives without yelling has become unusual in the modern attention economy and this site is one of the few places I have found that consistently delivers without raising its voice.
Reading this in pieces during a long afternoon and finding it consistently rewarding, and a stop at discoverforwardmomentumnow fit naturally into the same fragmented reading pattern, sites whose posts can be read in segments without losing the thread are well suited to how I actually read these days and this one is built well.
Now adding this site to a small mental group of recommendations I keep ready for specific kinds of inquiries, and a stop at unlockcreativepaths extended the recommendation readiness, content that I can confidently point friends and colleagues toward in specific contexts is content with real social utility and this site has that utility clearly.
Слушайте, кому актуально, свежая инфа. Нашел чистый вариант, в итоге скачал отсюда: [url=https://teobit.ru]melbet[/url].
Вообще проект радует удобным интерфейсом, коэффициенты вполне адекватные. Плюс ко всему есть нормальные live-ставки.
И еще, при регистрации дают неплохой приветственный бонус, лишним точно не будет. Что думаете?
Speaking as someone who used to recommend blogs frequently and got out of the habit this site is rekindling that impulse, and a look at createbetterpaths extended the rekindling, the recovery of an old habit triggered by encountering work that justifies it is itself a small kind of pleasure and this site is providing that recovery experience.
Thank you for not assuming the reader already knows everything, the explanations meet me where I am, and a look at jedbroom did the same, that consideration is what makes a site feel welcoming rather than gatekeepy which is sadly the default mood across the modern web today for most subjects covered.
Quality writing that respects the reader’s intelligence without overloading them, and a quick look at learnandaccelerategrowthpath reflected that approach, a balanced thoughtful site that earns trust by being consistent rather than by shouting about how trustworthy it is which is the usual approach online sadly across most content categories.
Güvenli bahis deneyimi için [url=https://1xbet-giris-78.com]1xbet güncel[/url] adresini kullanabilirsiniz.
günümüzde oldukça basit. Üyelik ve giriş süreci hızlıca tamamlanabilir. Öncelikle resmi web sitesi ziyaret edilmelidir. Güvenli bağlantı sayesinde bilgileriniz korunur.
Kullanıcılar giriş yapmak için ana sayfadaki giriş linkini kullanmalıdır. Kullanıcı adı ve şifre alanları özenle doldurulmalıdır. Kişisel bilgilerinizi girmeden önce sayfanın orijinalliği onaylanmalıdır.
Üyeliğiniz yoksa, kayıt işlemi birkaç dakika içinde tamamlanabilir. Bilgilerin eksiksiz ve doğru doldurulması önem taşır. Bazı durumlarda hesabınızı onaylemek için ek adımlar uygulanabilir.
1xbet girişi yaptıktan sonra pek çok fırsattan yararlanabilirsiniz. Spor bahisleri ve canlı oyunlar kolaylıkla oynanabilir. Bonuslar ve özel tekliflerle kazancınızı artırabilirsiniz.
Now noticing that the post never raised its voice even when making a strong point, and a look at createimpactplanningframework continued that calm volume, content that can make important points without resorting to typographic emphasis or emotional appeal is content that trusts its substance to do the work and this site has that confidence consistently.
Found this through a friend who recommended it and now I see why, and a look at learnandexecuteclearly only strengthened that recommendation in my own mind, word of mouth still works for content that actually delivers and this site is clearly earning recommendations the old fashioned way through quality rather than marketing.
The structure of the post made it easy to follow without losing track of where I was, and a look at portguilds kept the same logical flow going, this site clearly understands that organisation is half the battle in keeping readers engaged from the first line to the last across any kind of post.
High quality writing, no marketing speak and no buzzwords that mean nothing, and a stop at buildyournextstrategy kept that going, simple direct content that actually communicates something is harder to find than it should be and this is one of the rare places that gets it right consistently across many different posts.
Worth flagging this post as worth a careful read rather than a casual skim, and a stop at discovercreativegrowth earned the same careful approach, the few sites that warrant slower reading are sites I now treat differently from the daily content stream and this one has clearly moved into that elevated treatment category.
Thanks for the practical examples scattered through the post rather than abstract theory only, and a look at topazstrict continued that grounded style, abstract points are easier to remember when paired with concrete situations and the writers here clearly understand how readers actually retain information from blog content reading sessions.
Reading this prompted me to dig out an old reference book related to the topic, and a stop at isebulb extended that connection to other sources, content that connects me back to my own existing knowledge rather than asking me to forget it is content with continuity and this site has that continuous quality.
Honestly thank you to whoever wrote this because it scratched an itch I had not quite been able to articulate, and a stop at explorefuturepathideas kept that satisfying feeling going, the kind of writing that meets unspoken needs is special and this site clearly has writers who understand their readers more than most do today.
Closed three other tabs to focus on this one and never opened them again, and a stop at startbuildingclearvision similarly held attention exclusively, content that crowds out other reading from working memory is content with real density and this site has demonstrated that density across multiple pages I have visited so far this morning.
Really like that there are no exclamation marks or all caps shouting throughout the post, and a quick visit to learnandapplywisely maintained the same calm voice, restraint in punctuation signals confidence in the content and this site clearly trusts its substance to do the persuading rather than relying on typographic emphasis.
Glad to have another reliable bookmark for this topic, and a look at discovernewdirections suggested several more pages I will be marking too, building a personal library of trustworthy resources is one of the actual rewards of careful browsing and this site is earning a place on my permanent shortlist for the topic.
Now appreciating that the post did not require external context to follow, and a look at discoverinnovativepaths maintained the same self contained quality, content that respects new visitors by being readable without prerequisites is content with broader accessibility and this site has clearly invested in keeping each piece reader friendly for fresh arrivals.
Reading this as part of my evening winding down routine fit perfectly, and a stop at growwithclearstrategy extended the wind down nicely, content that calms rather than agitates is what I want at the end of the day and this site provides that calming reading experience reliably which is increasingly rare across the modern web.
Solid information that lines up with what I have been hearing from other reliable sources, and after my visit to seometric I was even more certain of that, this site checks out which is something I value highly when so many places online play loose with the facts to chase a quick click.
Picked up something useful for a side project, and a look at learnandoptimizepathwaynow added another piece I will incorporate, content that connects to specific projects I am working on is content with practical utility and the practical utility of this site is showing up across multiple posts I have read in the last hour or so.
Всем доброго времени суток. Тема здоровья всегда на первом месте, так как в сети сейчас полно сомнительных клиник. Если ищете анонимного специалиста с быстрым выездом, важно, чтобы доктора отреагировали оперативно.
Знакомые вызывали бригаду в похожей ситуации в итоге вся ценная информация была собрана по крупицам. Если вам актуально или ситуация экстренная, можете ознакомиться по ссылке: выведение из запоя диспансер [url=https://vyvod-iz-zapoya-v-staczionare-sankt-peterburg-28.ru]выведение из запоя диспансер[/url].
На этом ресурсе действительно дана полная информация, реагируют очень быстро, буквально за час. Надеюсь, эта рекомендация кому-то тоже пригодится и спасет здоровье. Всем душевного спокойствия!
Found the writing surprisingly fresh for what is by now a well covered topic, and a stop at findgrowthsolutionspath kept that freshness going across the related pages, original perspective on familiar ground is hard to come by and this site has clearly earned its place in the conversation rather than just rehashing old ideas.
Approaching this site through a casual link click and being surprised by what I found, and a look at createclaritydrivengrowth extended the surprise, the rare experience of stumbling into excellent independent content rather than predictable mediocrity is one of the actual remaining pleasures of casual web browsing and this site provided it cleanly.
Now planning to come back when I have the right kind of attention to read carefully, and a stop at learnandacceleratesuccess reinforced that plan, choosing the right moment to read certain content is a quiet form of respect for the work and this site is generating those careful planning behaviours from me consistently as a reader.
Genuinely good work, the kind that holds up over multiple readings without losing its appeal, and a stop at discovernewfocuspoints kept that going, definitely a site I will be returning to and probably mentioning to others who work in or care about this particular area of interest today and in coming weeks.
Speaking as someone who reads a lot on this topic this site has earned a high position in my source rankings, and a stop at discovernewdirectionpaths reinforced that ranking, the informal ranking of sources for a topic is something I maintain mentally and this site has moved into the upper portion of those rankings clearly.
Beyond the immediate post itself the editorial sensibility behind the site is what struck me, and a stop at growintentionallynow continued displaying that sensibility, content that reveals editorial choices through accumulated reading is content with structural quality and this site has clearly developed an underlying approach worth identifying through multiple sessions of reading.
Took the time to read every paragraph rather than skimming for the punchline, and a quick visit to seospark earned the same careful attention from me, that is the highest signal I can give about content quality because my default mode is rapid scanning rather than deliberate reading on most pages.
Reading this on the train into work was a better use of the commute than my usual choices, and a stop at learnandoptimizepath extended that commute reading well, content that improves transit time rather than just filling it is content with practical benefit and this site has earned its place in my morning commute reading rotation.
Now feeling confident that this site will continue producing work I will want to read, and a look at createconsistentdirectionalgrowth extended that confidence into the future, projecting forward from current quality to expected future quality is something I do for sites I genuinely follow and this one has earned that forward looking trust clearly today.
Reading this slowly because the writing rewards a slower pace, and a stop at buildsustainablegrowth did the same, the pace at which I read content is something I now use as a quality signal and writing that earns a slower pace earns my attention as a reader looking for substance these days.
Generally I bookmark sparingly to avoid building up a bookmark graveyard but this one earned a permanent slot, and a stop at findgrowthsolutionsnow extended that permanence designation, the few sites I keep permanent bookmarks for are sites I expect to use repeatedly and this one has clearly cleared that expectation bar today.
Solid value for anyone willing to read carefully, and a look at findyournextbreakpoint extends that value across the rest of the site, this is the kind of place that rewards return visits rather than offering everything in a single splashy post and then leaving readers nothing to come back for later which is unfortunately common.
Genuine reaction is that I will probably think about this on and off for a few days, and a look at draftports added fuel to that, the best content lingers in your head after you close the tab rather than evaporating immediately and this site clearly knows how to write that kind of memorable content.
Decided not to comment because the post said what needed saying, and a stop at itobout continued that complete feel, content that does not invite obvious additions or corrections from readers is content that has been carefully considered and this site appears to consistently produce pieces that satisfy rather than provoke unnecessary follow ups.
Reading this gave me a small jolt of recognition for an experience I thought was just mine, and a stop at findgrowthpotentialnow produced more such jolts, content that universalises private experiences without flattening them is doing genuinely useful work and this site is providing that recognition function for me reliably across topics I read.
A piece that read as if the writer was thinking carefully rather than just typing fluently, and a look at buildsustainabledirection continued that considered quality, the difference between fluent typing and careful thinking shows up in writing and this site reads as the product of thought rather than just the product of language fluency apparently.
The lack of unnecessary jargon made the post accessible without sacrificing accuracy, and a look at learnandadvancegrowth continued in the same accessible style, technical topics often hide behind specialised vocabulary but here the writer trusts the reader to keep up with plain language and that trust pays off nicely throughout the entire post.
Beyond the topic at hand this site reads as a small ongoing project of taking writing seriously, and a look at discovernewangles reinforced that project quality, sites that treat publishing as an ongoing serious practice rather than as content production for traffic are sites worth supporting and this one has clearly chosen the serious approach.
Ended up here on a wandering afternoon and was glad I stayed for the read, and a stop at buildsustainablegrowthdirection extended the wandering into a proper exploration of the site, the kind of place that rewards aimless clicking with something genuinely interesting rather than the shallow content that mostly populates the modern open web.
Picked this up between two other things I was doing and got drawn in completely, and after discovermeaningfulpaths my original tasks were completely forgotten for a while, content that derails a workflow in a positive way by being more interesting than what you were already doing is rare and worth recognising clearly.
Памятники с индивидуальной гравировкой как заказать
Reading this prompted me to dig out an old reference book related to the topic, and a stop at seotrail extended that connection to other sources, content that connects me back to my own existing knowledge rather than asking me to forget it is content with continuity and this site has that continuous quality.
Held my interest from the opening line through to the closing thought, and a stop at startmovingwithpurpose did the same, content that earns sustained attention in an environment full of distractions is doing something right and this site is clearly doing several things right rather than just one or two which I really appreciate.
Чтобы быстро и эффективно [url=https://kak-najti-cheloveka-po-nomeru-telefona-3.ru]вычислить по номеру телефона[/url], воспользуйтесь нормальными ребята реально помогают.
В общем, тема такая, не для паники.
Применяйте полученные данные обдуманно и исключительно в рамках закона.
Короче, не нарывайтесь.
Worth flagging that the post handled an angle of the topic I had not seen elsewhere, and a look at growintentionallyahead extended that fresh treatment, content that finds underexplored corners of well covered subjects is genuinely valuable and this site has demonstrated that exploratory editorial approach across multiple pieces in my reading sessions today.
Народ, если кто искал, свежая инфа. Нашел чистый вариант, делюсь полезной ссылкой: [url=https://teobit.ru]melbet скачать ios[/url].
Кстати, площадка реально топовый — коэффициенты вполне адекватные. Там еще трансляции матчей идут без задержек.
Для новых пользователей активируется стартовый фрибет, лишним точно не будет. Кто уже ставил там?
Thanks for not padding this with the usual filler intros and outros that every other blog seems to require, and a quick visit to growresultsdrivenstrategy continued that lean approach across more posts, content stripped of waste is content that respects you and I will always come back to that kind of approach.
Thanks for a post that does not try to be funny when it is not the moment for it, and a stop at learnandprogressfurther maintained the same appropriate seriousness, knowing when humour helps and when it just signals desperation for engagement is a sign of editorial maturity that many blogs have not developed yet.
Glad I gave this fifteen minutes rather than the usual three minute skim, and a look at createbetterdecisions earned the same investment, time spent on quality content is rarely wasted but the reverse is also true and learning which sites deserve which kind of attention is part of being a careful online reader.
A piece that did not lecture even when it had clear positions, and a look at tennisvortex maintained the same teaching without preaching tone, finding the line between informing and lecturing is hard and most sites land on the wrong side of it but this one has clearly figured out how to inform without becoming preachy.
Looking through other posts here the consistency is what makes the site valuable rather than any single piece, and a stop at learnandapplystrategies extended that consistency observation, sites whose value lies in the ongoing pattern rather than in standout posts are sites I trust more deeply and this one has clearly built that kind of trust.
Now realising the topic deserved better treatment than it has been getting elsewhere, and a look at discoverinnovativegrowthpaths extended that broader recognition, content that exposes the gap between actual quality and average quality elsewhere is doing the quiet work of raising standards and this site is contributing to that elevation in its own corner.
Thanks for laying this out in a way that someone newer to the topic can follow, and a stop at learnandbuild kept that accessibility going, writing that meets readers at different experience levels without condescending is hard to do well and the writers here have clearly thought about who they are writing for.
Давно хотел найти толковое место, где реально дают живые знания. Особенно когда речь про онлайн-школу для детей — тут ведь важен подход. У меня дочка как раз начал учиться дистанционно, так что намучились мы знатно. В общем, вся подробная информация вот тут: школа онлайн 11 класс [url=https://shkola-onlajn-55.ru]https://shkola-onlajn-55.ru[/url] Я если кому интересно ещё раньше вообще относился скептически к таким форматам. Оказалось — зря сомневался. У них и программа грамотная. В общем, рекомендую присмотреться. Надеюсь, поможет в выборе.
Мы помогаем оформить широкий перечень справок, включая медицинские документы, результаты анализов и документы для официальных инстанций – https://baza-spravki.com/spravka-ot-vracha-svobodnoy-formy/
Уже отчаялся был найти хоть что-то стоящее. Знакомая многим фигня, нужно срочно проверить один подозрительный номер. Решил докопаться до истины и разобраться,. И знаете что? Оказывается, сейчас есть реальные способы.
Короче, если вас сейчас волнует тот же самый вопрос — пробить странный входящий звонок, то есть один нормальный рабочий метод. Конкретно про то, где найти по телефонному номеру актуальные данные — вот здесь всё максимально норм расписано: как найти телефон по номеру [url=https://kak-najti-cheloveka-po-nomeru-telefona-4.ru]как найти телефон по номеру[/url].
Друзьям ссылку скинул в телегу, им тоже помогло. Потому что в открытых пабликах обычно полная тишина. В общем, обязательно сохраните себе на будущее. Век живи — век учись, как говорится.
Я в шоке от количества программ в интернете в последнее время, но после кучи долгих обсуждений наткнулся на один нормальный человеческий вариант. Короче, вот что я понял: современная школа онлайн — это серьёзный и комплексный подход. Там и домашние задания с подробной индивидуальной проверкой, что очень радует на практике.
В общем, кому реально нужно нормальное обучение в теме онлайн образование школа — посмотрите условия, вот здесь все разжевано до мелочей: lbs [url=https://shkola-onlajn-54.ru]lbs[/url].
А я пока пойду дальше разбираться с расписанием. Потому что обычная школа часто проигрывает по всем фронтам, а тут организована именно частная школа онлайн. Пригодится точно, потом еще спасибо скажете.
Skipped past the first paragraph thinking it was setup and had to come back when the rest referenced it, and a stop at startyournextdirection similarly rewarded careful reading from the start, content where every paragraph carries weight is content I now know to read from the beginning rather than skipping ahead.
Honest assessment after reading this twice is that it holds up under careful attention, and a look at startwithclearfocus extended that durability across more pages, content that survives a second read without revealing weak spots is rarer than the average reader probably realises and this site clearly cleared that bar.
Appreciated how the writer anticipated the questions a reader might have along the way, and a stop at createforwardsteps continued that thoughtful approach, you can tell when content has been edited with the reader in mind versus just published as a first draft and this is clearly the former approach across what I read.
Useful enough to recommend to several people I know who would appreciate it, and a stop at createprogressdirection added more material I will pass along too, the kind of writing that earns word of mouth is the kind that actually delivers on its promises which is what this site does without any drama or fanfare attached.
Now placing this in the small category of sites whose updates I would actually want to know about, and a stop at seotactic confirmed that placement, the difference between sites I want to follow and sites I just consume from is real and this one has crossed into the active follow category from the casual consumption side.
Liked the way the post balanced confidence and humility, and a stop at seovista maintained the same balance, knowing when to assert and when to acknowledge uncertainty is a sign of mature thinking and the writers here have clearly developed that calibration through what I assume is years of careful work on their craft.
Found something quietly useful here that I expect to return to, and a stop at explorefutureoptionsnow added more of the same, content with quiet utility ages well in a way that flashy hot takes do not and I have learned to weight quiet utility much higher when deciding what to bookmark for later use.
Thank you for keeping the writing honest and the points easy to verify against your own experience, and a stop at edgedial reflected the same approach, no exaggeration just steady useful content that I can take with me into my own work without second guessing every sentence I happen to read here.
Reading this prompted a small note in my reference file, and a stop at learnandprogressnow prompted another, the rare site that contributes useful nuggets to my own working knowledge rather than just consuming my attention is worth the time investment many times over compared to the usual pile of forgettable scroll content.
Just sat back at the end of the post and felt grateful that someone took the time to write it, and a look at learnandprogresssteadilynow extended that gratitude across more of the site, recognising effort behind quality work is part of what makes the open web a community rather than just a marketplace today.
Started taking notes about halfway through because the points were stacking up, and a look at growwithconfidenceandclarity added enough material that my notes file grew further, content that demands note taking from a passive reader is content with substance and the writers here are clearly producing that kind of work consistently across topics.
If patience for careful reading is rare these days finding sites that reward it is rarer still, and a stop at itucox extended that rare reward, the diminishing returns on shallow content reading have made me more selective about where to spend reading time and this site is meeting the higher selectivity bar consistently.
I learned more from this short post than from longer articles I read earlier today, and a stop at findmomentumnextstep added even more useful detail without going off topic, this site clearly knows how to keep things focused without sacrificing depth which is a hard balance to strike for any writer.
анонимный вывод из запоя на дому недорого [url=https://narkolog-na-dom-moskva-28.ru]анонимный вывод из запоя на дому недорого[/url]
Reading this felt easy in the best way, no friction and no confusion at any point, and a stop at discovermeaningfuldirection carried that same comfort across more pages, the kind of editorial flow that lets you absorb information without fighting the format which is increasingly hard to find on the open web today across topics.
Güvenli bahis deneyimi için [url=https://1xbet-giris-78.com]1xbet türkiye[/url] adresini kullanabilirsiniz.
1xbet hesabınıza erişim sağlamak. Giriş yaparken dikkat edilmesi gereken bazı noktalar vardır. Kullanıcılar giriş yapmak için doğru siteyi seçmelidir. SSL sertifikası ile güvenliğiniz sağlanır.
Kullanıcılar giriş yapmak için ana sayfadaki giriş linkini kullanmalıdır. Kullanıcı adı ve şifre alanları özenle doldurulmalıdır. Kişisel bilgilerinizi girmeden önce sayfanın orijinalliği onaylanmalıdır.
Eğer henüz üye değilseniz, basit bir formla kayıt olunabilir. Bilgilerin eksiksiz ve doğru doldurulması önem taşır. Bazı durumlarda hesabınızı onaylemek için ek adımlar uygulanabilir.
Siteye giriş sonrası birçok seçenek sizleri bekler. Spor bahisleri ve canlı oyunlar kolaylıkla oynanabilir. Ayrıca güncel promosyonlar ve bonuslar takip edilebilir.
Кстати, в соседней ветке кто-то спрашивал про адекватную альтернативу обычным школам. Сам недавно наткнулся на одну площадку. Там как раз упор на индивидуальный темп, нет этой дикой уравниловки: [url=https://shkola-onlajn-53.ru]онлайн-школа для детей[/url] . Фишка в том, что можно спокойно закрыть программу без нервов и репетиторов по вечерам. Техподдержка отвечает быстро. Платформа не виснет на вебинарах, что для меня было критично. Короче, кому надоело возить чадо через весь город под дождем – заглядывайте.
I usually skim posts like these but this one held my attention all the way through, and a stop at buildstrategicmovement did the same, that is a strong endorsement coming from me because I am usually quick to bounce when content gets repetitive or fails to deliver on its initial promise made in the headline.
Now adding this site to a small mental group of recommendations I keep ready for specific kinds of inquiries, and a stop at learnandmoveforward extended the recommendation readiness, content that I can confidently point friends and colleagues toward in specific contexts is content with real social utility and this site has that utility clearly.
A piece that left me thinking I had been undercaring about the topic, and a look at learnandgrowstrong reinforced that mild concern, content that raises the appropriate weight of a subject without being preachy about it is doing important work and this site is providing that gentle elevation of attention for me consistently.
Honestly enjoyed every minute spent here, that is not something I say lightly, and a look at discovernewanglesnow confirmed I will be back, the bar for spending time online is high for me these days but this site clears it without effort which is high praise indeed from this reader who is usually rather demanding.
Probably the kind of site that should be more widely read than it appears to be, and a look at learnandapplywisely reinforced that quiet wish, the gap between a sites quality and its apparent reach is sometimes large and that gap exists for this site in a way that makes me want to mention it more.
A small editorial detail caught my attention, the way headings related to body text, and a look at growwithfocusedexecution maintained that careful relationship, structural details like that show up to readers who notice them and the writers here have clearly thought about every level of the piece rather than just the words.
перевозка машин перевозка авто по россии
Closed the tab feeling I had spent the time well, and a stop at learnandoptimizepathway extended that feeling across more pages, the test of whether time on a site was well spent is one I apply silently after closing tabs and very few sites pass it but this one passed it cleanly today afternoon clearly.
A piece that handled multiple complications without becoming confused, and a look at learnandoptimizegrowth continued that organisational clarity, holding multiple threads in a single piece without losing any of them is a sign of skilled writing and this site has clearly developed the editorial discipline to manage complexity without sacrificing readability throughout.
Big thanks to whoever wrote this, you saved me a lot of time hunting for the same info on other sites, and a stop at findyourcompetitiveedge only added more useful detail without going off topic, that kind of focus is honestly hard to come across these days when most posts wander everywhere.
A clean read with no irritations, and a look at explorefuturegrowthlanes continued that frictionless quality, the absence of small irritations is something I notice only when present elsewhere and this site is one of the rare places where everything just works and lets me focus on the substance rather than fighting the format.
The whole experience of reading this was pleasant from start to finish, no pop ups and no annoying interruptions, and a look at shopmint continued that clean experience, technical choices about page design matter for the reader and this site clearly cares about the small details that add up to comfort across multiple visits.
Skipped the related products section because there was none, and a stop at findnewopportunitypaths also lacked any aggressive monetisation, content that is not constantly trying to convert me into a customer or subscriber is content that has confidence in its own value and that confidence shows up as a different reading experience.
The lack of unnecessary jargon made the post accessible without sacrificing accuracy, and a look at buildsmartplanning continued in the same accessible style, technical topics often hide behind specialised vocabulary but here the writer trusts the reader to keep up with plain language and that trust pays off nicely throughout the entire post.
Now adding the writer to a small mental list of voices I want to follow, and a look at exploreuntappeddirectionpaths reinforced that follow intention, the few writers whose work I actively track are writers who have demonstrated sustained quality and this writer has clearly demonstrated that sustained quality across the pieces I have sampled here today.
Now setting aside time on my next free afternoon to read more from the archives, and a stop at explorefreshstrategicgrowth confirmed that time will be well spent, the rare site whose archive deserves a dedicated reading session rather than just casual sampling is the kind of resource worth scheduling around and this one qualifies clearly.
Thanks for treating the topic with the seriousness it deserves without becoming pompous about it, and a stop at learnandrefineapproach continued that balanced treatment, the gap between earnest and self serious is huge and writers who can stay on the right side of it earn my respect when I find them online today.
Reading this gave me a small framework I expect to use going forward, and a stop at startbuildingstrategically extended that framework, content that produces transferable mental models rather than just specific facts is content with multiplicative value and this site is providing those models at a rate that justifies extra attention from me regularly.
ссылка
Following a few of the internal links revealed more posts of similar quality, and a stop at findnewperspective added more to that growing pile, sites where internal links lead to more good content rather than to more of the same recycled material are sites with depth and this one has clearly built that depth carefully.
Found this via a link from another piece I was reading and the click was worth it, and a stop at finchfiber extended the value across more material, the open web still rewards clicking through citations when the underlying writers care about each other work and this site clearly belongs to that network.
Now recognising that the post handled the topic with appropriate technical precision without becoming dry, and a stop at unicorntempo continued that balance, technical precision and readability are often in tension and this site has clearly figured out how to maintain both at once which is one of the harder editorial achievements in the form.
Now adjusting my mental model of how the topic fits into the broader landscape, and a look at ivafix extended that adjustment, content that affects my structural understanding rather than just my factual knowledge is content with deeper impact and this site is providing those structural updates at a meaningful rate consistently across topics.
Came in tired from a long day and the writing held my attention anyway, and a stop at startmovingstrategically kept that going, content that can engage a fatigued reader is doing something right because most online reading happens in suboptimal conditions like that one and quality content adapts to it without complaint.
Анализ рыночной конъюнктуры и конкурентоспособности
Decided not to skim despite my usual habit and was rewarded for the discipline, and a stop at discovercreativepathsnow earned the same patient approach, training myself to recognise sites that warrant slower reading is part of being a careful online reader and this site is the kind that helps me practice that skill regularly.
Bookmark earned and shared the link with one specific person who would care, and a look at findyourwinningdirection got the same targeted share, sharing carefully rather than broadcasting is a discipline I try to maintain and this site is generating shares from me at a sustainable rate rather than the spam rate of viral content.
Decided to read this site for a while before forming a verdict, and the verdict after several pages is positive, and a stop at seostreet continued that pattern, judging a site requires more than one post and giving sites a fair sample is something I try to do for promising candidates rather than rushing to dismiss.
Left me wanting to read more rather than feeling burned out, that is a good sign, and a look at growfocusedprogressnow confirmed there is plenty more here to explore, the kind of writing that builds appetite rather than killing it which is a rare quality on the modern open internet today across most categories of content.
Чтобы быстро и эффективно [url=https://kak-najti-cheloveka-po-nomeru-telefona-3.ru]отследить телефон по номеру[/url], воспользуйтесь платформами которые не врут.
В общем, тема такая, не для паники.
Порой простой поиск позволяет обнаружить имя человека или его профиль.
Да, и ещё момент — без фанатизма.
Now recognising that this site has earned a place in the small group of resources I treat as authoritative, and a stop at buildsmartforwarddirection confirmed that placement, the difference between resources I trust and resources I just consume is real and this site has clearly moved into the trusted category through consistent quality over time.
This filled in a gap in my understanding that I had not even noticed was there, and a stop at findmomentumnextstage did the same, the kind of post that gives you more than you expected when you first clicked through from somewhere else, a real find for anyone curious about the area covered here.
Ребят, наконец-то наткнулся на реальный опыт. Там всё разложено по полочкам, без лишней воды и тупых SEO-текстов. Многие на форумах спорят, а ответ лежал на поверхности. Вот melbet скачать на андроид [url=https://howtoairbrush.com]melbet скачать на андроид[/url] — переходите, там вся суть. Мне лично это сэкономило кучу времени и нервов, так что делюсь от души.
Beats most of the alternatives on the topic by a noticeable margin, and a look at growstepbystrategy did not change that at all, this is one of the better corners of the open internet for this kind of content and I am glad I clicked through rather than skipping past quickly like I usually do.
Reading this confirmed a small detail I had been uncertain about, and a stop at learnandprogressintentionally provided the source for further checking, content that supports verification through citations or links rather than just asserting facts is more trustworthy and this site has clearly built its credibility through that kind of verifiable approach consistently.
Now considering carefully how to share this site with the right audience rather than broadcasting widely, and a look at seoharbor extended that careful sharing impulse, content worth sharing carefully rather than spamming is content that has earned a higher kind of recommendation and this site has earned that careful shareability throughout pieces.
A piece that read as the work of someone who reads carefully themselves, and a look at growwithstrategyintentnow continued that informed feel, writers who are also serious readers produce work with a different quality and this site reads as the product of someone steeped in good writing rather than just generating content for an audience.
Reading the writers other posts after this one suggests the quality is consistent rather than peak, and a stop at buildsustainabledirection confirmed the consistent quality reading, sites that hold the same level across many pieces rather than peaking on a few are sites with sustainable editorial discipline and this one has clearly developed that.
Reading this confirmed that the topic deserves more careful attention than it usually gets, and a stop at discovernewanglestoday extended that elevated framing, content that raises the appropriate weight of a subject without being preachy about it is serving a quiet but important editorial function for the broader cultural conversation about it.
Now appreciating that I did not feel exhausted after reading, and a stop at buildpositiveoutcomes extended that energising quality, content that leaves me with more attention than it consumed is rare and the gap between draining and energising content is real over the course of a typical day spent reading widely online.
Now leaving a small mental note to recommend this when the topic comes up in conversation, and a look at growfocusedprogress extended that recommend ready feeling, content that arms me with shareable references for likely future conversations is content with social value and this site is providing that conversational ammunition consistently for me lately.
Now feeling the rare pleasure of trusting a source completely on first encounter, and a look at growresultsdriven extended that initial trust into something more durable, the calibration of trust to evidence is something I do informally and this site has earned high trust through the cumulative weight of multiple consistently good posts already.
I usually skim posts like these but this one held my attention all the way through, and a stop at createprogressfocusedstrategy did the same, that is a strong endorsement coming from me because I am usually quick to bounce when content gets repetitive or fails to deliver on its initial promise made in the headline.
Working through this site has been a small antidote to the shallow content that fills most of my reading time, and a stop at startbuildingfuture extended that antidote function, sites that quietly improve the average quality of my reading by being themselves are sites worth supporting through return visits and recommendations consistently.
Just dropping by to say thanks for the effort, it does not go unnoticed when a writer cares this much about the reader, and after I went through createimpactfocuseddirection I was certain this is one of the better corners of the internet for this particular kind of content which is genuinely refreshing.
Closed the tab with a small sense of finality rather than the usual rushed exit, and a stop at startyournextmove produced the same considered closing, when reading ends with deliberate satisfaction rather than impatient skip you know the time was well spent and this site is producing those satisfying endings consistently across what I read.
Felt energised after reading rather than drained, which is unusual for online content these days, and a look at findyournextphase continued that good feeling, content that leaves you better than it found you is rare and worth bookmarking when you stumble across it for the first time today or any other day really.
Приветствую всех участников. Слушайте, вопрос сложный, но многим может помочь, так как в сети сейчас полно сомнительных клиник. Когда нужен проверенный и опытный врач для капельницы, то не рискуйте и не доверяйте случайным объявлениям.
Сам долго изучал отзывы и искал надежный вариант, в итоге вся ценная информация была собрана по крупицам. Чтобы узнать точные цены и вызвать специалиста, советую посмотреть официальный источник: нарколог вывод из запоя в стационаре [url=https://vyvod-iz-zapoya-v-staczionare-sankt-peterburg-28.ru]нарколог вывод из запоя в стационаре[/url].
На этом ресурсе действительно дана полная информация, и помощь окажут полностью конфиденциально. Главное — не затягивать в такие моменты, и обращайтесь к настоящим профессионалам. Пусть все будет хорошо!
Reading this gave me material for a conversation I needed to have anyway, and a stop at discovernewdirectionpathsnow added even more talking points, content that connects to upcoming social or professional needs rather than just being interesting in the abstract is the kind that earns priority placement in my attention these days routinely.
monopoly game live [url=www.monopoly-casino-in.com/]monopoly game live[/url] .
Yesterday I was complaining about the state of online writing and today this site has temporarily fixed that complaint, and a look at explorefuturepathways extended that mood reversal, the short term mood improvement that comes from finding good content is real and this site has produced that improvement for me at a useful moment.
Давно присматривался к разным предложениям, где реально учат делу. Особенно когда речь про частную школу онлайн — тут ведь нужна нормальная подача. У меня дочка как раз перешел на удаленку, так что пришлось перебрать кучу вариантов. В общем, можете глянуть сами: онлайн школа для детей [url=https://shkola-onlajn-55.ru]https://shkola-onlajn-55.ru[/url] Я если честно ещё до этого вообще не верил в онлайн образование школа. Оказалось — реально работает. У них и обратная связь отличная. Сам теперь советую знакомым. Надеюсь, поможет в выборе.
Considered against the flood of similar content this one stands apart in important ways, and a stop at ivebump extended that distinctive feel, sites that find their own corner of a crowded topic and stay there are sites worth following and this one has clearly carved out its own space and committed to defending it carefully.
подбор кадрового персонала подбор кадрового персонала
If a friend asked me where to read carefully on the topic I would send them here without hesitation, and a look at createimpactforward confirmed the recommendation strength, the directness of my recommendation reflects how confident I am in the quality and this site has earned undiluted recommendations from me across multiple recent conversations actually.
Я в шоке от количества программ в интернете в последнее время, но после кучи долгих обсуждений наткнулся на один нормальный человеческий вариант. К слову, вот что я понял: современная школа онлайн — это не просто унылые вебинарчики. Там и программа насыщенная, без лишней воды, что очень радует на практике.
В общем, кому понимает толк в теме онлайн образование школа — убедитесь во всём сами, вот здесь все разжевано до мелочей: lbs [url=https://shkola-onlajn-54.ru]lbs[/url].
Думаю, это как раз то, что сейчас нужно многим родителям. Потому что обычная школа часто проигрывает по всем фронтам, а тут организована именно частная школа онлайн. Советую не тянуть и сразу изучить тему.
What we recommend now: סוכנות ליווי
Felt the post handled a sensitive angle of the topic with appropriate care, and a look at claritydrivenexecution extended that careful handling across related material, sites that can navigate delicate territory without causing damage are rare and require a level of judgement that comes from experience rather than from following any clear playbook.
Reading this felt easy in the best way, no friction and no confusion at any point, and a stop at startyourgrowthpath carried that same comfort across more pages, the kind of editorial flow that lets you absorb information without fighting the format which is increasingly hard to find on the open web today across topics.
Liked everything about the experience, from the opening through to the closing notes, and a stop at discovernextdirection extended that into more pages, finding a site where the editorial vision shows through every choice rather than feeling random is an increasingly rare experience and one I am glad to have today during this particular reading session.
Probably this is one of the better quiet successes on the open web at the moment, and a look at forwardthinkingengine reinforced that quiet success quality, sites that are doing well without making a noise about doing well are the sites I most respect and this one has clearly chosen the quiet success path consistently throughout.
Liked the way the post balanced confidence and humility, and a stop at findgrowthopportunitiesnow maintained the same balance, knowing when to assert and when to acknowledge uncertainty is a sign of mature thinking and the writers here have clearly developed that calibration through what I assume is years of careful work on their craft.
A piece that ended with a clean landing rather than fading out, and a look at learnandgrowforward maintained the same crisp conclusions, endings that resolve rather than dissolve are a sign of careful structural thinking and this site has clearly invested in how its pieces conclude rather than letting them simply run out of energy.
Halfway through I knew I would finish the post, and a stop at explorefuturepathwaysfast also held me through to the end, content that signals its quality early and then sustains it is content with real internal consistency and this site has clearly figured out how to maintain quality from opening sentence through to closing thought.
Reading this with a fresh mind in the morning brought out details I might have missed in the afternoon, and a stop at buildstrongfoundations earned the same fresh attention, content that rewards being read at full attention rather than at energy lows is content with real density and this site has that density consistently.
Loved the writing voice here, friendly without being fake and confident without being arrogant, and a stop at findyournextgrowthstage carried the same tone forward, the kind of personality that makes a reader feel welcome rather than lectured at which is a balance plenty of writers struggle to find no matter how long they have been at it.
Felt the writer respected the topic without being precious about it, and a look at buildlongtermdirection continued that respectful but unfussy treatment, finding the right register for serious topics is hard and this site has clearly figured out how to take the topic seriously while still being readable for casual visitors regularly.
Even just sampling a few posts the consistency is what stands out, and a look at clearpathcreation confirmed the broader pattern, sites where every piece I sample lives up to the standard set by the others are sites with serious quality control and this one has clearly invested in whatever editorial process produces that consistency reliably.
Güvenli bahis deneyimi için [url=https://1xbet-giris-78.com]1xbet güncel giriş[/url] adresini kullanabilirsiniz.
1xbet giriş yapmak. Giriş yaparken dikkat edilmesi gereken bazı noktalar vardır. İlk olarak doğru adresin kullanılması önemlidir. Site güvenliğine verilen önem yüksektir.
Giriş sayfasına yönlendirme için ana sayfadan ilgili buton seçilmeli. Doğru kullanıcı adı ve şifre girilmesi çok önemlidir. Her zaman resmi site olduğundan emin olunması gerekir.
Üyeliğiniz yoksa, kayıt işlemi birkaç dakika içinde tamamlanabilir. Doğru bilgilerin girilmesi kayıt sonrası işlemleri kolaylaştırır. Bazı durumlarda hesabınızı onaylemek için ek adımlar uygulanabilir.
Hesabınız aktif olduktan sonra çeşitli avantajlarınız olur. Bahisler, canlı casino ve diğer oyunlar gibi aktiviteler erişilebilir hale gelir. Bonuslar ve özel tekliflerle kazancınızı artırabilirsiniz.
Now thinking about whether the writer might publish a longer form work I would buy, and a look at learnandprogressconsistently suggested the same depth would translate, content that makes me want to pay for related work in other formats is content that has earned commercial trust as well as attention trust and this site has both clearly.
Reading this slowly to give it the attention it deserved, and a stop at buildpositiveforwardmotion earned the same slow read, choosing to read slowly is a small act of respect for content quality and very few sites earn that respect from me but this one did so without any explicit ask which is the cleanest way.
Honestly informative, the writer covers the ground without showing off, and a look at shoreskipper reflected the same humility, content that respects the reader rather than trying to dazzle them is something I always appreciate and rarely come across in this corner of the internet today across the topics I usually read.
Reading this gave me a small refresher on something I had partially forgotten, and a stop at findgrowthchannelsnow extended the refresher, content that strengthens existing knowledge rather than just adding new is content with a particular kind of consolidating value and this site is providing that consolidating function across multiple visits.
Reading this between two meetings turned out to be the highlight of the morning, and a stop at growfocusedexecutionnow continued that highlight quality, content that outshines the structured parts of a working day is doing something well beyond ordinary and this site has produced multiple such highlights for me already this week alone.
Honestly enjoyed not being sold anything for the entire duration of the post, and a look at learnandrefineprogressnow kept that pleasant absence going across more pages, content that exists for its own sake rather than as a funnel to a paid product is increasingly rare and worth supporting where I can find it.
источник информации
Now noticing that the post benefited from being neither too short nor too long for its content, and a look at discovergrowthdirectionpaths continued that calibration of length, sites that match length to content rather than padding to hit some target are sites that respect both their material and their readers and this site does both.
I really like the calm tone here, it does not push anything on the reader, and after I went through createclarityframework I felt the same way, just steady useful content laid out without drama, which is exactly what someone trying to learn something quickly needs to find rather than aggressive marketing.
Now I want to find more sites like this but I suspect they are rare, and a look at createforwardsteps extended that thought, the few sites that meet this quality bar are precious specifically because they are rare and finding others like them is one of the ongoing projects of careful internet curation across the years.
Deneyip de begenen cok oldu. Surekli adres degisiyor. En sonunda her seyi cozdum.
Bu isin puf noktalar? var. Su an en sorunsuz cal?san 1xbet yeni giris adresi tam olarak soyle: 1xbet spor bahislerinin adresi [url=https://1xbet-giris-79.com]1xbet spor bahislerinin adresi[/url]. Ne demisler — 1xbet turkiye icin tek adres buras?.
Denemek isteyen kac?rmas?n. Kim ne derse desin — canl? destekleri bile h?zl?. Baska yerde aramay?n art?k…
Found the post genuinely useful for something I was working on this week, and a look at pebbletrailvendorstudio added more material I will reference, content that connects to my actual life and work rather than just being interesting in the abstract is the kind I will pay attention to and return to repeatedly.
Found this through a search that was generic enough I did not expect quality results, and a look at executewithfocus continued the surprisingly good experience, search engines occasionally still surface excellent independent content if you scroll past the obvious paid and high authority results which is reassuring to remember sometimes.
Изготовление торговых павильонов позволяет создавать современные объекты с высоким уровнем комфорта для персонала и посетителей:
Павильон для туалета на дачу Коломна (Московская область)
Good clean post, no errors and no awkward phrasing that breaks the reading flow, and a stop at buildsmartdirectionalplans kept the same standard, definitely the kind of editorial care that earns a return visit because it tells me the writer is paying attention to details that matter to readers rather than just rushing publication.
Чтобы быстро и эффективно [url=https://kak-najti-cheloveka-po-nomeru-telefona-3.ru]официальный сайт[/url], воспользуйтесь такими штуками которые дают инфу.
Слушай, тут главное — без глупостей.
Доступны официальные и коммерческие справочники, которые позволяют делать обратный поиск.
Короче, не нарывайтесь.
Bookmark added with a small note about why, and a look at discovernewfocusareas prompted another bookmark with another note, the bookmarks I annotate are the ones I expect to return to deliberately rather than stumble into and this site is generating annotated bookmarks at a higher rate than my usual content sources by some margin.
Solid endorsement from me, the writing earns it, and a look at ixaqua continues to earn it across the broader site too, the kind of operation that maintains quality across many pages rather than just one viral post is a sign of serious commitment and that is what I see here clearly across what I read.
More original than the recycled takes I keep finding on the topic elsewhere, and a quick look at findyourcorestrength confirmed it, the kind of site that has its own voice rather than echoing whatever is trending which makes it stand out as a refreshing change from the usual rotation of generic content I see daily.
A clean piece that knew exactly what it wanted to say and said it, and a look at buildsustainableforwardmomentum maintained the same clarity of intention, knowing the goal of a piece before writing is something most blog content lacks and the clarity of purpose here shows up in every paragraph for any careful reader to notice.
Now noticing how rare it is to find a site that does not feel rushed, and a look at buildactionabledirectionsteps extended that calm pace, content produced without time pressure has a different quality than content shipped to meet a deadline and this site reads as written without urgency which produces a different and better experience for readers.
A piece that handled multiple complications without becoming confused, and a look at startbuildingvision continued that organisational clarity, holding multiple threads in a single piece without losing any of them is a sign of skilled writing and this site has clearly developed the editorial discipline to manage complexity without sacrificing readability throughout.
Quiet confidence runs through the whole post, no need to shout to make the points stick, and a stop at oakarenas carried that same restrained voice forward, content that respects the reader by trusting its own substance rather than dressing it up in theatrical language is what I look for online and rarely actually find these days.
Looking for similar voices elsewhere has come up empty in my recent searches, and a stop at discoverpowerfuldirections extended the search frustration, the rare site that does what no other does in quite the same way is precious and this one has clearly developed a particular approach that I have not been able to find duplicates of.
A memorable post for me on a topic I had thought I was tired of, and a look at buildwithdirection suggested the same site can refresh other tired topics, sites that can revive my interest in subjects I had written off as exhausted are doing rare work and this one is clearly doing that for me today.
Now recognising that this site has earned a place in the small group of resources I treat as authoritative, and a stop at explorefreshpossibilities confirmed that placement, the difference between resources I trust and resources I just consume is real and this site has clearly moved into the trusted category through consistent quality over time.
A piece that handled multiple complications without becoming confused, and a look at startmovingupward continued that organisational clarity, holding multiple threads in a single piece without losing any of them is a sign of skilled writing and this site has clearly developed the editorial discipline to manage complexity without sacrificing readability throughout.
Will share this on a forum I am part of where it will be appreciated by others working in the same area, and a look at growwithconfidencepathway suggests there is more here worth passing along too, definitely a generous resource that deserves a wider audience than it probably has today across the open internet.
Adding to the bookmarks now before I forget, that is how good this is, and a look at buildyournextvision confirmed the rest of the site is worth saving too, this is one of those rare finds that justifies the time spent searching the web for once which is a relief in the current environment.
Ребят, наконец-то нашел нормальный разбор темы. Всё расписано до мелочей, даже новичок поймет что к чему. Рекомендую заглянуть, чтобы не совершать глупых ошибок, как я в прошлый раз. Вот скачать мелбет казино на андроид [url=https://howtoairbrush.com]скачать мелбет казино на андроид[/url] — переходите, там вся суть. Там внутри и примеры, и пошаговые инструкции, короче полный фарш.
Solid little post, the kind that does not need to be flashy because the substance is doing the work, and a look at buildsustainablemomentum kept that quiet confidence going across the site, this is what writing looks like when the writer trusts the content to land on its own without theatrics or unnecessary attention seeking behaviour.
Closed it feeling slightly more competent in the topic than I started, and a stop at createvisionfocusedexecution reinforced that competence boost, real learning is rare in casual online reading but it does happen sometimes and this site managed to make it happen for me today which is genuinely worth pausing to acknowledge.
Liked how the post handled an objection I was forming as I read, and a stop at exploreuntappeddirections similarly anticipated where my thinking was going next, the rare writer who can predict reader concerns and address them in advance is doing something most online content fails to do despite that being basic editorial work.
Will share this on a forum I am part of where it will be appreciated by others working in the same area, and a look at findyournextsignal suggests there is more here worth passing along too, definitely a generous resource that deserves a wider audience than it probably has today across the open internet.
A handful of memorable phrases from this one I will probably use later, and a look at claritydrivenactions added a couple more, content that contributes language to my own communication rather than just facts is content with a different kind of utility and this site is providing that linguistic utility consistently across what I read.
Reading this on a long flight and finding it the best thing I read across hours of trying, and a stop at coralharborretailgallery kept the streak going, when content beats long flight reading you know it has substance because flight reading is a hard test of a piece given the alternatives available everywhere.
Closed the post with a small satisfied sigh, and a stop at discovernextgrowthchapter produced the same gentle exhale, content that ends well is content that respects the rhythm of reading and the writers here have clearly thought about how their pieces close rather than just trailing off when they run out of things to say.
Started forming counter examples to test the claims and the post handled most of them implicitly, and a look at createimpactstrategies continued that anticipatory style, writers who think two steps ahead of the critical reader save themselves from a lot of follow up work and this writer has clearly internalised that habit consistently.
Worth pointing out that the post avoided the temptation to summarise everything at the end, and a look at discovermeaningfulgrowthpaths continued that confident closing approach, content that trusts readers to retain the substance without being reminded of it at the end is content that respects the reader and this site practices that respect.
Reading this gave me a small sense of progress on a topic I have been slowly working through, and a stop at growintentionallyforward added another step forward, learning happens in small increments across many sources and finding sources that consistently contribute is the actual practical value of careful curation in an information rich world.
Now setting up a small reminder to revisit the site on a slow day, and a stop at growwithstrategyfocusnow confirmed the reminder was a good idea, planning return visits is a small organisational act that signals trust in ongoing quality and this site has earned that planned return through consistent performance across the pieces I have read so far.
Now feeling confident that this site will continue producing work I will want to read, and a look at learnandscaleprogressnow extended that confidence into the future, projecting forward from current quality to expected future quality is something I do for sites I genuinely follow and this one has earned that forward looking trust clearly today.
Will be coming back to this for sure, too much good content to absorb in one sitting, and a stop at growwithclearfocus only added more pages I want to dig through, this site is going onto my regular rotation list because it consistently delivers something worth the visit lately rather than empty filler.
Now thinking the topic is more interesting than I had given it credit for, and a stop at growthwithdiscipline continued that elevated interest, content that revives my curiosity about subjects I had set aside is doing genuine work in the structure of my interests and this site is providing that revivifying effect today actually.
Reading the writers other posts after this one suggests the quality is consistent rather than peak, and a stop at findnewopportunitypaths confirmed the consistent quality reading, sites that hold the same level across many pieces rather than peaking on a few are sites with sustainable editorial discipline and this one has clearly developed that.
A piece that earned its conclusions through the body rather than asserting them at the end, and a look at sofatavern maintained the same earned quality, conclusions that follow from what came before are more persuasive than declarations and this site has clearly internalised that principle in how it constructs arguments throughout pieces.
Reading this prompted a brief but useful conversation with a colleague who happened to walk by, and a stop at izoblade extended that conversational seed, content that becomes a starting point for in person discussion rather than ending in solitary reading is content with social generative energy and this site has plenty of it apparently.
Worth flagging this site to a few specific friends who would appreciate the editorial sensibility, and a look at seoloom added more pages I will mention to them, recommending sites to specific people requires understanding both the site and the person and this site is making those personalised recommendations easy and natural for me.
The headings made navigating the post simple even when I needed to find a specific section quickly, and a look at findyourprogressroute continued the same thoughtful structure, small details like clear headings show that someone is actually thinking about how the reader uses the page rather than just filling it for length alone.
Easily one of the better explanations I have read on the topic, and a stop at buildfocusedgrowthpath pushed it even higher in my mental ranking of useful resources, the kind of site that beats the average not by trying harder but by simply caring more about what it puts out daily which always shows.
A piece that did not try to be timeless and ended up reading as durable anyway, and a look at unlocknewdirections extended that durable feel, content that stays useful past its publication date without straining for permanence is content that ages well and this site has the kind of evergreen quality that I value highly today.
Got something practical out of this that I can apply later this week, and a stop at foxarbor added more details to think about, this is exactly the kind of content I bookmark for future reference rather than the throwaway listicles that dominate most search results these days for almost any common topic.
Probably worth setting aside a longer block to read more carefully than I can right now, and a stop at buildsmartmovementplans confirmed the longer block plan, the impulse to schedule dedicated time for a sites archive is itself a measure of trust and this site has earned that scheduling impulse from me clearly today actually.
Glad I gave this fifteen minutes rather than the usual three minute skim, and a look at discovernewleverage earned the same investment, time spent on quality content is rarely wasted but the reverse is also true and learning which sites deserve which kind of attention is part of being a careful online reader.
If quality blog writing is dying as people sometimes claim then this site is one piece of evidence that it has not died yet, and a look at learnandscaleideas extended that evidence, the broader cultural question about online writing has empirical answers in specific sites and this one is contributing to a more optimistic answer overall.
вызвать врача нарколога на дом анонимно [url=https://narkolog-na-dom-moskva-28.ru]вызвать врача нарколога на дом анонимно[/url]
Worth recommending broadly to anyone who reads on the topic, and a look at findyournextfocusarea only confirms that, the rare combination of accessibility and depth in this site makes it suitable for both newcomers and people who already know the area which is hard to pull off in any blog format today and rarely managed.
A quiet kind of confidence runs through the writing, and a look at discoveropportunitypathways carried that same understated assurance, confidence without bragging is the most attractive register for online writing and the writers here have clearly developed it through practice rather than affecting it through stylistic tricks that would feel hollow eventually.
Speaking as someone who reads a lot on this topic this site has earned a high position in my source rankings, and a stop at explorefreshopportunity reinforced that ranking, the informal ranking of sources for a topic is something I maintain mentally and this site has moved into the upper portion of those rankings clearly.
Reading this confirmed something I had been suspecting about the topic, and a look at createbetteroutcomes pushed that confirmation toward greater confidence, content that lines up with independently held intuitions earns a special kind of trust and I will return to writers who consistently land that way for me without overselling positions.
Coming to this with low expectations and being pleasantly surprised by the substance, and a stop at buildgrowthdirectionnow continued exceeding expectations, the recalibration of expectations upward across multiple positive readings is one of the actual rewards of careful browsing and this site is providing that recalibration at a steady rate apparently.
Closed it feeling I had taken something away rather than just consumed something, and a stop at simplifythenexecute extended that taking away feeling, the difference between content I extract value from and content I just pass through is something I track informally and this site is consistently in the value extraction column for me.
Found a couple of useful angles in here I had not considered before reading carefully, and a quick stop at discovernewdirectionflows added more, this is one of those sites where the value compounds the more you read rather than peaking at one viral post and then offering nothing else of substance afterwards which is common.
Arkadaslar uzun suredir ar?yordum. Girdim c?kt?m derken zaman kaybettim. En sonunda her seyi cozdum.
Ozellikle bahis ve casino sevenler icin. Su an en h?zl? cal?san 1xbet yeni giris adresi tam olarak soyle: 1xbet güncel giriş [url=https://1xbet-giris-79.com]1xbet güncel giriş[/url]. Herkesin bildigi gibi — 1xbet turkiye icin tek adres buras?.
Denemek isteyen kac?rmas?n. Kim ne derse desin — cekim konusunda s?k?nt? yasamad?m. Baska yerde aramay?n art?k…
Давно хотел найти толковое место, где реально учат делу. Особенно когда речь про онлайн-школу для детей — тут ведь без фанатизма и воды. У меня дочка как раз перешел на удаленку, так что пришлось перебрать кучу вариантов. В общем, вся подробная информация вот тут: онлайн школа обучение [url=https://shkola-onlajn-55.ru]онлайн школа обучение[/url] Я если кому интересно ещё пару месяцев назад вообще относился скептически к таким форматам. Оказалось — зря сомневался. У них и программа грамотная. В общем, рекомендую присмотреться. Удачи!
Честно говоря, долго выбирал, варианты для учёбы, но после советов хороших знакомых наткнулся на один рабочий и проверенный вариант. Короче, вот что я понял: современная онлайн-школа для детей — это уровень на порядок выше обычного. Там и преподаватели живые и вовлеченные, так что прогресс виден сразу.
В общем, кому реально нужно нормальное обучение в теме онлайн образование школа — почитайте подробности, вот здесь все разжевано до мелочей: школа онлайн 11 класс [url=https://shkola-onlajn-54.ru]https://shkola-onlajn-54.ru[/url].
Если честно, даже не ожидал такого крутого качества. Потому что стандартный дистант бывает дико скучным для ребенка, а тут организована именно частная школа онлайн. Держите этот вариант у себя в закладках.
A welcome reminder that thoughtful writing still happens online, and a look at createforwardplanningsteps extended that reassurance, the modern web makes it easy to forget that careful writing exists and finding sites that practice it is a small antidote to the cynicism that builds up from too much exposure to algorithmic content.
Skimmed first and then went back to read carefully, and the careful read paid off in places I had missed, and a stop at senatetoucan got the same treatment, the rare site whose content rewards a second pass is content I want more of in my regular rotation rather than disposable single read articles.
Траурные сборы и их значение (1)
Reading this in pieces over a coffee break and finding it consistently rewarding, and a stop at findyournextgrowthphase extended that into related material I will return to later, the kind of site that fits naturally into small reading windows without requiring a long uninterrupted block is genuinely useful for how I actually browse.
Reading this gave me a small framework I expect to use going forward, and a stop at startyournextphase extended that framework, content that produces transferable mental models rather than just specific facts is content with multiplicative value and this site is providing those models at a rate that justifies extra attention from me regularly.
Useful reading material, the kind I can hand off to someone newer to the topic without worrying about confusing them, and a quick look at growwithintentionalsteps confirmed the same beginner friendly tone runs throughout the site which is great for sharing with people just starting their learning journey on this particular topic.
More substantial than most of what I find searching for this topic online, and a stop at findyourstrongpath kept that quality consistent, this is one of those sites where the writing actually rewards careful reading rather than punishing the patient reader with empty filler stretched out across long paragraphs that say very little.
Held my interest from the opening line through to the closing thought, and a stop at solarorchardmarketparlor did the same, content that earns sustained attention in an environment full of distractions is doing something right and this site is clearly doing several things right rather than just one or two which I really appreciate.
Useful reading material, the kind I can hand off to someone newer to the topic without worrying about confusing them, and a quick look at progresswithprecision confirmed the same beginner friendly tone runs throughout the site which is great for sharing with people just starting their learning journey on this particular topic.
Felt the post was written for someone like me without explicitly addressing me, and a look at jadburst produced the same fit, when content lands on its target without pandering you know the writer has done careful audience thinking rather than relying on demographic targeting or interest signals to do the work of editorial decisions.
Honestly enjoyed reading this more than I expected to when I first clicked through, and a stop at explorefutureopportunityideas kept that pleasant surprise going, sometimes you stumble onto a site that just clicks with how you like to read and this is one of those for me right now today which is great.
Reading this in a quiet coffee shop matched the calm energy of the writing, and a stop at startwithclearstrategy extended that environmental match, content that has its own ambient quality which can match or clash with surroundings is content with a personality and this site has the kind of personality that suits calm reading.
Bookmarked the page and the homepage too because clearly there is more to explore here, and a quick stop at startthinkingstrategicallyfast only made that more obvious, this is the kind of place I want to dig through over a weekend rather than rushing through during a coffee break tomorrow morning before getting back to work.
Узнать больше здесь: https://zaiushka.ru/%D0%B7%D0%B0%D0%B4%D0%B0%D0%BD%D0%B8%D1%8F-%D1%81-%D0%B1%D1%83%D0%BA%D0%B2%D0%BE%D0%B9-%D0%B8/
Лучший выбор дня: https://detivmodnom.ru
Yesterday I was complaining about the state of online writing and today this site has temporarily fixed that complaint, and a look at createprogressjourney extended that mood reversal, the short term mood improvement that comes from finding good content is real and this site has produced that improvement for me at a useful moment.
Even just sampling a few posts the consistency is what stands out, and a look at findyourcorepath confirmed the broader pattern, sites where every piece I sample lives up to the standard set by the others are sites with serious quality control and this one has clearly invested in whatever editorial process produces that consistency reliably.
сайт мероприятия
Выбор ритуального агента: сравнение цен и услуг
Слушайте, реально замучилась искать нормальную платформу для дочки. Везде одна вода или заоблачные ценники. Соседка по площадке посоветовала глянуть вот этот проект: [url=https://shkola-onlajn-53.ru]онлайн школа обучение[/url] . Честно? Зашли просто на пробный урок, а в итоге остались на весь год. Преподаватели не просто читают по бумажке, а реально вовлекают. Ребенок сам ноутбук включает к началу пары. Так что если кому актуально – очень рекомендую хотя бы тест-драйв пройти.
Felt this in a way I cannot quite explain, the topic just hit different here, and a stop at domemarinas continued in that vein, sometimes you find a site whose perspective lines up with how you have been thinking and reading their work feels like a small relief which I appreciated more than I expected.
Worth marking the moment when reading this clicked into something useful for my own work, and a look at findyournextbreakthrough extended that practical click, content that connects to my actual life rather than just being interesting is content with the highest kind of value and this site is generating that connection at a high rate.
A thoughtful read in a week that has been mostly noisy, and a look at createalignedactions carried that thoughtful quality across more pages, finding pockets of considered writing in a week of distractions is one of the small wins of careful curation and this site is providing those pockets at a sustainable rate.
Most posts I read end up forgotten within a day but this one is sticking, and a look at learnandoptimizeexecution extended that lingering effect, content that survives the immediate moment of reading rather than evaporating is content with genuine retention quality and this site has been producing memorable pieces at a rate notable across my reading.
Useful information presented in a way that does not feel like a sales pitch, that is what I appreciated most, and a stop at designbetteroutcomes was the same, no upsell and no fake urgency just steady content laid out properly for someone trying to actually learn from it rather than just be sold to.
Decent post that improved my afternoon a small amount, and a look at buildpositiveoutcomes added a bit more to that, sometimes the small wins online add up over time and a useful site like this one is the kind of place that contributes consistently to those small wins for me lately across many different topics I follow.
Looking through other posts here the consistency is what makes the site valuable rather than any single piece, and a stop at exploreideaswithclarity extended that consistency observation, sites whose value lies in the ongoing pattern rather than in standout posts are sites I trust more deeply and this one has clearly built that kind of trust.
Reading this confirmed that my time researching the topic in other places had not been wasted, and a stop at buildpositivegrowth extended the confirmation, when independent sources agree that is a useful signal and this site is one of the more reliable sources I have found for cross checking what I read elsewhere on similar subjects.
wowholst.ru
Just dropping by to say thanks for the effort, it does not go unnoticed when a writer cares this much about the reader, and after I went through learnandadvanceconfidently I was certain this is one of the better corners of the internet for this particular kind of content which is genuinely refreshing.
Ребята, привет! Я вообще в шоке, если честно. Поменяли газовую плиту, сдвинули раковину, а стены вообще вынесли — думал, пронесёт. В общем, инспекция пришла и выписала предписание. И тут встал вопрос: узаконить перепланировку стоимость [url=https://skolko-stoit-uzakonit-pereplanirovku-10.ru]https://skolko-stoit-uzakonit-pereplanirovku-10.ru[/url] просто интересно, стоимость согласования перепланировки квартиры сейчас вообще реальная или грабёж. Или взносы в жилинспекцию за выдачу акта. А то риелторы называют цифры от балды. Без этого всё равно потом квартиру не продать. Короче, нужна стоимость согласования перепланировки, реальная по рынку.
If patience for careful reading is rare these days finding sites that reward it is rarer still, and a stop at joxaxis extended that rare reward, the diminishing returns on shallow content reading have made me more selective about where to spend reading time and this site is meeting the higher selectivity bar consistently.
Top tier post, the kind that makes you want to share the link with friends working in the same area, and a stop at buildfocusedmomentumnow only made me more confident in doing that, this site is one of the better resources I have seen on the topic recently across both new and older posts.
Bookmark earned, calendar reminder set, share queued, all from one good post, and a look at ravenharbortradehouse did the same, when a single reading session triggers multiple downstream actions you know the content has actually moved me beyond the page and this site is moving me at that higher level reliably.
Excellent post, balanced and well organised without showing off, and a stop at growresultsdrivenpath continued in that same vein, this site has clearly figured out the formula for content that works for readers rather than for search engine ranking signals which is harder than it sounds today and worth real recognition from anyone.
A piece that respected the reader by not over explaining the obvious, and a look at intentiondrivenprogress continued that calibrated approach, finding the right level of explanation is one of the harder editorial calls and this site has clearly thought carefully about what readers will already know versus what they need help with consistently.
Приветствую всех участников. Слушайте, вопрос сложный, но многим может помочь, потому что в экстренной ситуации трудно сориентироваться. Если срочно требуется квалифицированная медицинская помощь, важно, чтобы доктора отреагировали оперативно.
Сам долго изучал отзывы и искал надежный вариант, чтобы помощь оказали без лишних хлопот и в спокойной атмосфере. Кому тоже нужны подробности и условия, советую посмотреть официальный источник: лечение от запоя в стационаре [url=https://vyvod-iz-zapoya-v-staczionare-sankt-peterburg-28.ru]лечение от запоя в стационаре[/url].
На этом ресурсе действительно дана полная информация, реагируют очень быстро, буквально за час. Надеюсь, эта рекомендация поможет вовремя принять правильные меры. Всем душевного спокойствия!
Decent post that improved my afternoon a small amount, and a look at startbuildingmomentumpath added a bit more to that, sometimes the small wins online add up over time and a useful site like this one is the kind of place that contributes consistently to those small wins for me lately across many different topics I follow.
Time spent here today felt productive in the way that good reading sessions sometimes do, and a stop at jadkix extended that productive feeling across the rest of the morning, the difference between productive reading and merely passing time is real and this site is consistently on the productive side for me lately.
Reading this confirmed that my time researching the topic in other places had not been wasted, and a stop at thinkforwardact extended the confirmation, when independent sources agree that is a useful signal and this site is one of the more reliable sources I have found for cross checking what I read elsewhere on similar subjects.
Genuine reaction is that this site clicked with how I like to read, and a look at findnewopportunitydirections kept that comfortable fit going, sometimes you find a place online whose editorial decisions just align with your preferences and when that happens it is worth recognising and supporting through repeat engagement consistently going forward.
уборка после ремонта спб
Worth recognising the absence of the usual blog tropes here, and a look at creategrowthsystems continued that fresh quality, sites that avoid the standard moves of the medium read as more original even when the content is on familiar topics and this one has clearly chosen its own path through the conventional terrain skilfully.
Now appreciating that the post did not require me to agree with the writer to find it valuable, and a look at learnandtransformdirectionnow maintained the same useful regardless of agreement quality, content that informs even when it does not convince is content with broader utility and this site reads as useful even when I disagree.
Now recognising the editorial wisdom of letting some questions remain open at the end, and a look at growwithintentionalmovement continued that intellectual honesty, content that does not force closure on contested questions is content that respects the limits of knowledge and this site has clearly developed the maturity to know when to leave space.
Reading this triggered a small change in how I think about the topic going forward, and a stop at discoveropportunitydirectionnow reinforced that subtle shift, the rare content that actually moves my thinking rather than just confirming or filling it is the kind I most value and this site is providing that kind of impact today.
Will share this on a forum I am part of where it will be appreciated by others working in the same area, and a look at discoverforwardideas suggests there is more here worth passing along too, definitely a generous resource that deserves a wider audience than it probably has today across the open internet.
уборка в москве
A welcome contrast to the loud takes that have dominated my feed lately, and a look at findmomentumnext extended that calm voice, content that arrives without yelling has become unusual in the modern attention economy and this site is one of the few places I have found that consistently delivers without raising its voice.
Now feeling that this site is the kind I want to make sure does not disappear, and a look at findyourcoremomentum reinforced that quiet protective feeling, the rare sites whose disappearance would actually matter to me are the sites I want to support through return visits and recommendations and this one has joined that small protected list.
Now feeling the post has earned a proper recommendation rather than a casual mention, and a stop at directioncreatesenergy reinforced the recommendation strength, the difference between mentioning and recommending is a small editorial distinction I observe in my own conversations and this site has earned the upgraded recommendation level from me confidently today.
A relief to read something where I did not have to fact check every claim mentally, and a look at suburbvesper continued that reliable feeling, sites where I can lower my guard and trust the content are rare and this one is earning that trust paragraph by paragraph through consistent careful work behind the scenes.
Top tier post, the kind that makes you want to share the link with friends working in the same area, and a stop at startnextleveldirectionfast only made me more confident in doing that, this site is one of the better resources I have seen on the topic recently across both new and older posts.
Reading this post made me realise I had been settling for lower quality elsewhere, and a look at discovergrowthmindset extended that recalibration, content that exposes how much I had been accepting in adjacent sources is content with calibrating effect on my standards and this site is performing that calibration function across topics for me reliably.
Этап 1: Консультация и сбор информации
Торговые павильоны могут оснащаться витринами, инженерными коммуникациями и дополнительным оборудованием для комфортной работы персонала и обслуживания клиентов:
Павильон для шаурмы под ключ иваново
Reading this slowly to absorb the structure, and the structure is doing real work alongside the words, and a look at explorefreshroutes maintained the same architectural quality, when sentence shapes and paragraph rhythms reinforce the meaning rather than just transporting words you know you are reading skilled work today.
Ac?kcas? sas?rd?m kalitesine. Girdim c?kt?m derken zaman kaybettim. En sonunda guvenilir bir kaynak buldum.
Spor bahisleriyle ilgilenenler bilir. Su an en guncel cal?san 1xbet giris adresi tam olarak soyle: 1xbet türkiye [url=https://1xbet-giris-79.com]1xbet türkiye[/url]. Ne demisler — 1xbet spor bahislerinin adresi degisti.
Sorunsuz baglant? icin bu link yeterli. Kendi deneyimim buysa da — arayuz zaten al?s?k oldugunuz gibi. Baska yerde aramay?n art?k…
A nicely understated post that does not shout for attention, and a look at startwithclearstrategyfocus maintained the same quiet quality, understatement is a stylistic choice that distinguishes serious writing from attention seeking writing and this site has clearly committed to the understated approach as a core editorial value rather than just a phase.
Now realising the post solved a small problem I had been carrying for weeks, and a look at directionalclarityhub extended that problem solving function, content that connects to specific unresolved questions in my own life rather than just providing general interest is content with real practical impact and this site is providing that practical value.
одежда для собак
Skipped the comments section but might come back to read it, and a stop at linencovevendorparlor hinted at a quality reader community, sites where the comments are worth reading separately from the post are increasingly rare and signal a particular kind of audience that has grown around the editorial vision over time gradually.
Thank you for being clear and direct, that simple approach saves so much frustration on the reader’s end, and a stop at kyarax only made me more sure of it, the rest of the content seems to follow the same pattern which is a great sign of consistent editorial care behind the scenes.
уборка после ремонта спб
The overall feel of the post was professional without being stuffy, and a look at jadyam kept that approachable expertise going, finding the right register for technical content is hard but this site has clearly figured out how to sound knowledgeable without slipping into that distant lecturing tone that loses readers in droves every time.
Glad the writer did not feel the need to argue with imaginary critics in the post itself, and a stop at growwithsteadyfocus kept the same focused approach going, defensive writing wastes the reader time and confidence on positions that did not need defending and this post has clearly avoided that common failure.
This stands out compared to similar posts I have read recently, less noise and more substance, and a look at createclearprogresspath kept that gap going, you can really feel the difference between content made by someone who cares versus content made to fill a publishing schedule for an algorithm trying to keep growing somehow.
Definitely returning here, that is decided, and a look at learnandprogressconsistently only made the case stronger, this is one of those rare websites that rewards regular visits rather than feeling stale after the first read which is something I cannot say about most of the places I bookmark today across all my topics.
Decent post that improved my afternoon a small amount, and a look at actionwithalignment added a bit more to that, sometimes the small wins online add up over time and a useful site like this one is the kind of place that contributes consistently to those small wins for me lately across many different topics I follow.
A satisfying piece in the way that good meals are satisfying rather than just filling, and a look at buildlongtermvision extended that satisfaction, the metaphor between content and meals is one I find useful and this site reads as a satisfying meal rather than the empty calories that most content provides for casual readers.
Came in for one specific question and got answers to three I had not even thought to ask, and a look at learnandadvanceclearly extended that bonus value pattern, the kind of resource that anticipates reader needs rather than just answering the literal question asked is the gold standard and this site reaches it.
Производство торговых павильонов включает возможность выбора различных вариантов отделки, остекления и внутренней планировки:
Автономный гараж сэндвич панели Тула
Felt the post was written for someone like me without explicitly addressing me, and a look at startpurposefuldirection produced the same fit, when content lands on its target without pandering you know the writer has done careful audience thinking rather than relying on demographic targeting or interest signals to do the work of editorial decisions.
Felt mildly happier after reading, which sounds silly but is true, and a look at exploreuntappedopportunities extended that small mood lift, content that improves rather than degrades my mental state is content I want more of and the cumulative effect of reading sites that lift versus sites that drag is real over time.
Now considering the post as evidence that careful blog writing is still possible, and a look at exploreideaswithfocus extended that evidence, the broader question of whether the modern web can sustain quality writing has obvious empirical answers in sites like this one and seeing them is reassuring even when they remain a minority overall today.
Now feeling mildly impressed in a way I do not quite remember feeling about a blog in a while, and a stop at discovernewfocusareasnow extended that mild impression, content that produces specific positive emotional responses rather than just neutral information transfer is content with extra dimensions and this site has those extra dimensions clearly.
Felt like I was reading something written by someone who actually thinks about the topic rather than reciting it, and a look at progressbystrategy reinforced that impression, the difference between recited content and considered content is huge and this site clearly belongs to the latter category which I appreciate as a careful reader looking for substance.
Now wishing I had found this site sooner, and a look at createimpactplanning extended that mild regret, the calculation of how many years of good content I missed by not finding the right sources earlier is one I try not to make too often but it does come up sometimes when I find sites this good.
Давно присматривался к разным предложениям, где реально дают живые знания. Особенно когда речь про образовательные онлайн школы — тут ведь нужна нормальная подача. У меня племянник как раз искал гибкий график, так что намучились мы знатно. В общем, вся подробная информация вот тут: школа онлайн дистанционное обучение [url=https://shkola-onlajn-55.ru]школа онлайн дистанционное обучение[/url] Я если кому интересно ещё до этого вообще относился скептически к таким форматам. Оказалось — всё гораздо лучше. У них и домашка без перегруза. В общем, рекомендую присмотреться. Удачи!
Worth saying that the quiet confidence of the writing is what landed first, and a look at discoverhiddenroutes continued that quiet quality, confident writing without the loud display of confidence is a rare combination and this site has clearly developed both the knowledge and the editorial restraint to land that combination consistently.
Picked this up while looking for something else and ended up reading every paragraph because it was actually informative, and after findgrowthpotential I was sure I would come back, that does not happen often when most sites bury the useful parts under endless ads and pop ups today and across most categories online.
If I were grading sites on this topic this one would receive high marks, and a stop at startsmartmovementnow continued earning those high marks, the informal grading I do mentally for content sources is something I take seriously even though it is informal and this site has been receiving consistent high marks across multiple sessions today.
Quality you can feel from the first paragraph, the writer clearly knows the topic and how to share it, and a quick look at oliveorchard confirmed the same depth runs throughout the rest of the site as well which is rare and worth pointing out when it happens online for any reader passing through.
Обзор кейтеринга для спортивных мероприятий
Worth saying that the quiet confidence of the writing is what landed first, and a look at jalaxis continued that quiet quality, confident writing without the loud display of confidence is a rare combination and this site has clearly developed both the knowledge and the editorial restraint to land that combination consistently.
Reading this gave me a small jolt of recognition for an experience I thought was just mine, and a stop at buildlongtermfocus produced more such jolts, content that universalises private experiences without flattening them is doing genuinely useful work and this site is providing that recognition function for me reliably across topics I read.
Better than most of the writing I have come across on this topic recently, simpler and more direct, and a look at lyxbark continued in that same way, a real outlier in a crowded space full of repetitive content that says little while taking up a lot of reader time today which is unfortunate.
A clean piece that knew exactly what it wanted to say and said it, and a look at buildwithpurposefulsteps maintained the same clarity of intention, knowing the goal of a piece before writing is something most blog content lacks and the clarity of purpose here shows up in every paragraph for any careful reader to notice.
Worth bookmarking and sharing with anyone interested in the topic, that is my honest take, and a stop at actioncreatesresults reinforces that, the kind of generous resource that makes the open web feel worth defending against the constant pressure to retreat into walled gardens and curated feeds today everywhere I look across all my devices.
Solid value packed into a relatively short post, that takes skill, and a look at learnandtransformthinking continues the dense useful content across more pages, this site clearly understands that respecting reader time is itself a form of generosity which is something most blog operations seem to have forgotten lately across the wider open web.
Worth pointing out that the writer made the topic feel more interesting than I had been expecting, and a look at exploreinnovativepathsnow continued that elevation effect, content that improves the apparent quality of its subject through skilled treatment is doing something real and this site has clearly developed that kind of editorial alchemy throughout.
More original than the recycled takes I keep finding on the topic elsewhere, and a quick look at forwardmovementworks confirmed it, the kind of site that has its own voice rather than echoing whatever is trending which makes it stand out as a refreshing change from the usual rotation of generic content I see daily.
Picked up a couple of new ideas here that I can actually try out, and after my visit to soontornado I have even more notes saved, this is the kind of resource that pays you back for the time you spend on it which is rare to come across in this corner of the web.
Reading this between meetings turned out to be the most useful thing I did all afternoon, and a stop at unlocknewpotentialnow kept that productivity feeling going, content can sometimes outperform actual work in terms of what gets accomplished mentally and this site managed that today which is genuinely a high bar to clear consistently.
Came across this looking for something else entirely and ended up reading it through twice, and a look at createimpactdirectionplan pulled me deeper into the site than I planned, the writing has a way of holding attention without resorting to manipulative cliffhangers or vague promises that never get delivered later down the page.
вызов нарколога на дом анонимно [url=https://narkolog-na-dom-moskva-28.ru]вызов нарколога на дом анонимно[/url]
Looking at this objectively the editorial quality is hard to deny even setting aside personal taste, and a stop at buildlongtermmomentum maintained the same objective quality, the gap between what I personally enjoy and what is objectively well crafted exists and this site clears both bars simultaneously which is rarer than it sounds.
Most blog writing on this subject reaches for the same handful of arguments and this post avoided them, and a look at discoverinnovativethinkingnow continued the original treatment, content that finds its own path through territory other writers have flattened is content with real authorial energy and this site has plenty of that distinctive energy.
Just wanted to say this was useful and leave a small note of thanks, and a quick visit to startnextleveljourney earned a similar nod from me, the small acknowledgements add up over time and represent the real economy of trust that good content runs on across the open and increasingly fragmented modern internet.
Started forming counter examples to test the claims and the post handled most of them implicitly, and a look at intelligentprogress continued that anticipatory style, writers who think two steps ahead of the critical reader save themselves from a lot of follow up work and this writer has clearly internalised that habit consistently.
Worth recognising the absence of the usual blog tropes here, and a look at startmovingupward continued that fresh quality, sites that avoid the standard moves of the medium read as more original even when the content is on familiar topics and this one has clearly chosen its own path through the conventional terrain skilfully.
Good quality through and through, no rough edges and no signs of being rushed, and a quick look at explorefuturethinkingnow kept the same polish going, the kind of site that respects its own brand by maintaining consistency across pages which is something I always appreciate as a reader looking for trustworthy information online today.
Genuinely well crafted writing, the kind that makes the topic look easier than it actually is, and a look at bakeboxshop added even more depth, you can feel the experience behind every line which is something only writers who have been at this for a while can pull off with this level of grace.
Arkadaslar uzun suredir ar?yordum. Baz? siteler cal?sm?yor. En sonunda dogru adrese ulast?m.
Bu isin puf noktalar? var. Su an en h?zl? cal?san 1xbet yeni giris adresi tam olarak soyle: 1xbet spor bahislerinin adresi [url=https://1xbet-giris-79.com]1xbet spor bahislerinin adresi[/url]. Herkesin bildigi gibi — 1xbet spor bahislerinin adresi degisti.
Denemek isteyen kac?rmas?n. Kim ne derse desin — canl? destekleri bile h?zl?. Baska yerde aramay?n art?k…
Will recommend this to a couple of friends who have been asking about this exact topic, and after createbetterdirection I have even more reason to do so, the kind of site that earns word of mouth rather than chasing it through aggressive marketing or paid placements is always a treat to find online.
Reading this fit naturally into my afternoon walk because I was reading on my phone, and a stop at unlockcreativepaths continued well in that walking format, content that survives mobile reading without becoming awkward is content with format flexibility and this site has clearly thought about how it reads across different devices today.
Decided this was the best thing I had read all morning, and a stop at growwithfocusedintent kept that ranking intact, ranking my reading is something I do mentally throughout the day and the top rank is competitive and not easily won but this site won it without needing to overstate its claims for that.
Народ, привет! Такая ситуация — на планерке сказали срочно найти подарки для клиентов. Может, кто шарит где лучше брать сувенирную продукцию с логотипом. брендированная продукция [url=https://suvenirnaya-produkcziya-s-logotipom-10.ru]брендированная продукция[/url] Говорят, сейчас модно заказывать корпоративные подарки сувениры из экокожи — но кто делает качественно. Просили ещё брендированные кружки и толстовки. Заранее респект тем, кто откликнется с контактами проверенными.
Stands apart from similar pages by actually being useful, that is high praise these days, and a look at learnandexecuteeffectively kept that standard going, you can tell when a site is built around the reader versus around metrics and this one clearly belongs to the first category for sure based on what I read.
Коллеги, всем привет! Организуем встречу с дилерами, хочется сделать им приятные и полезные презенты. Посоветуйте нормальное изготовление корпоративных сувениров — чтобы и кружки не облазили, и ручки писали. изготовление сувенирной продукции с логотипом [url=https://suvenirnaya-produkcziya-s-logotipom-11.ru]изготовление сувенирной продукции с логотипом[/url] Кто недавно брал подарки с логотипом под новогодние корпоративы, поделитесь контактами. Может, есть проверенные фабрики, которые работают напрямую, без посредников. Киньте ссылки или названия компаний, буду очень благодарен.
Ребята, выручайте! Кот старый диван в клочья разодрал, надо перетягивать. Теперь мучаюсь — какую взять ткань для мебели, чтобы и выглядело достойно, и кошачьи когти выдержало. материал для обивки мебели [url=https://tkan-dlya-mebeli-1.ru]https://tkan-dlya-mebeli-1.ru[/url] Интересно про ткань для обивки мебели — какой вариант самый практичный для дивана, где постоянно лежат с чипсами. Буду благодарен за любые советы, особенно от тех, кто сам перетягивал.
Thanks for the practical examples scattered through the post rather than abstract theory only, and a look at growthbydesign continued that grounded style, abstract points are easier to remember when paired with concrete situations and the writers here clearly understand how readers actually retain information from blog content reading sessions.
Started forming counter examples to test the claims and the post handled most of them implicitly, and a look at buildalignedprogress continued that anticipatory style, writers who think two steps ahead of the critical reader save themselves from a lot of follow up work and this writer has clearly internalised that habit consistently.
Какие блюда лучше всего заказывать с доставкой в холодное время года
Without comparing too aggressively to other sources this one stands out for the right reasons, and a look at buildgrowthdirectionplan continued that distinctive quality, content that distinguishes itself through substance rather than style tricks is content with lasting differentiation and this site has clearly chosen substance based differentiation as its core editorial strategy.
A piece that prompted a small mental rearrangement of how I order related ideas, and a look at explorefreshopportunityzones extended that rearranging effect, content that affects the structure of my thinking rather than just adding to it is content with the deepest kind of impact and this site is reaching that depth for me today.
Honest reaction is that I want to send this to a friend who would benefit from it, and a look at findyournextfocus added more material I will pass along too, the impulse to share is the strongest signal I have for content quality and this site is generating that impulse cleanly across multiple posts.
Most of the time I feel the open web is in decline and then I find a site like this, and a stop at ignitefreshthinking reinforced that mood lift, the cumulative effect of finding occasional excellent independent content versus the cumulative effect of finding mostly mediocre content is real for the long term reader maintaining web habits today.
Found this through a search that was generic enough I did not expect quality results, and a look at discovergrowthdirection continued the surprisingly good experience, search engines occasionally still surface excellent independent content if you scroll past the obvious paid and high authority results which is reassuring to remember sometimes.
Срочно нужен совет тем, кто занимается брендингом. Хотим обновить мерч для сотрудников. Везде говорят про индивидуальный подход, но реально где заказать корпоративные подарки с логотипом компании — чтоб не за границей, но и не откровенный шлак. продукция с логотипом на заказ [url=https://suvenirnaya-produkcziya-s-logotipom-9.ru]https://suvenirnaya-produkcziya-s-logotipom-9.ru[/url] Говорят, что корпоративные подарки сувениры сейчас заказывают в основном в Китае, но боюсь за качество. Пока просто собираем инфу. А то бюджет уже вчера утвердили, а поставщика нет.
Thanks for not padding this with the usual filler intros and outros that every other blog seems to require, and a quick visit to bulkingbayou continued that lean approach across more posts, content stripped of waste is content that respects you and I will always come back to that kind of approach.
Worth marking the moment when reading this clicked into something useful for my own work, and a look at buildsmartdirectionplan extended that practical click, content that connects to my actual life rather than just being interesting is content with the highest kind of value and this site is generating that connection at a high rate.
автомобильный форум
Как организовать корпоратив в условиях офиса
Quiet confidence runs through the whole post, no need to shout to make the points stick, and a stop at fromthinkingtodoing carried that same restrained voice forward, content that respects the reader by trusting its own substance rather than dressing it up in theatrical language is what I look for online and rarely actually find these days.
I came here looking for a quick answer and ended up reading the whole post because it was actually interesting, and after explorefuturepathwaysnow I had a much fuller picture, no stress and no confusion just a clear walk through the topic that made everything fall into place without much effort.
Bookmark folder reorganised slightly to make this site easier to find, and a look at suntansage earned the same accessibility upgrade, the small organisational moves I make for sites I expect to return to often are themselves a signal of how much I trust them and this site triggered those moves naturally.
Народ, приветствую. Тема здоровья всегда на первом месте, потому что в экстренной ситуации трудно сориентироваться. Если ищете анонимного специалиста с быстрым выездом, то не рискуйте и не доверяйте случайным объявлениям.
Сам долго изучал отзывы и искал надежный вариант, и в итоге нашли клинику, где врачи работают профессионально. Кому тоже нужны подробности и условия, можете ознакомиться по ссылке: выведение из запоя санкт петербург стационар [url=https://vyvod-iz-zapoya-v-staczionare-sankt-peterburg-28.ru]выведение из запоя санкт петербург стационар[/url].
На этом ресурсе действительно дана полная информация, и помощь окажут полностью конфиденциально. Главное — не затягивать в такие моменты, и обращайтесь к настоящим профессионалам. Всем удачи и берегите близких!
Really appreciate the confidence to make a clear point rather than hedging everything, and a quick visit to startthinkingstrategicallynow maintained the same direct stance, writing that takes positions rather than equivocating is more useful even when the positions are debatable because at least the reader has something to react to clearly.
Per vivere l’adrenalina del Crazy Time nei casino italiani, visita [url=https://crazy-timedemo.com/]roulette crazy time[/url] e scopri demo, statistiche e partite in diretta.
Il casino online Crazy Time si e affermato come una delle piattaforme di gioco piu conosciute in Italia.
Ребят, наконец-то нашел нормальный разбор темы. Всё расписано до мелочей, даже новичок поймет что к чему. Рекомендую заглянуть, чтобы не совершать глупых ошибок, как я в прошлый раз. Вот melbet скачать на андроид [url=https://howtoairbrush.com]melbet скачать на андроид[/url] — обязательно гляньте. Если останутся вопросы, пишите прямо там в комментариях, админ отвечает быстро.
Честно говоря, долго выбирал, направления для детей, но после изучения реальных отзывов наткнулся на один нормальный человеческий вариант. Короче, вот что я понял: современная онлайн-школа для детей — это серьёзный и комплексный подход. Там и преподаватели живые и вовлеченные, и дети занимаются с реальным интересом.
В общем, кому реально нужно нормальное обучение в теме онлайн образование школа — убедитесь во всём сами, вот здесь все расписано в деталях: lbs что это [url=https://shkola-onlajn-54.ru]lbs что это[/url].
Если честно, даже не ожидал такого крутого качества. Потому что без четкой системы в обучении сейчас вообще никуда, а тут организована именно частная школа онлайн. Пригодится точно, потом еще спасибо скажете.
каталог цветов
Se vuoi vivere l’emozione unica del gioco d’azzardo, non perdere l’occasione di provare [url=https://crazy-timeitaly.com/]strategie crazy time[/url] per scoprire il miglior intrattenimento casino in Italia!
Il Crazy Time Slot Casino Italy si e affermato come uno dei casino online maggiormente apprezzati. Gli appassionati di slot machine scelgono questo casino per la sua vasta offerta di giochi e per l’interfaccia intuitiva. La sicurezza e l’affidabilita sono elementi chiave che rendono questo casino una scelta ideale per chi desidera divertirsi senza preoccupazioni.
L’interfaccia utente e stata progettata per essere accessibile a tutti, anche ai principianti. Elementi visivi dinamici e suoni di alta qualita aumentano il coinvolgimento durante il gioco. Inoltre, il casino offre ottimizzazioni per dispositivi mobili, permettendo di giocare ovunque.
Probably the kind of site that should be more widely read than it appears to be, and a look at learnandscaleideas reinforced that quiet wish, the gap between a sites quality and its apparent reach is sometimes large and that gap exists for this site in a way that makes me want to mention it more.
Worth pointing out that the post avoided the temptation to summarise everything at the end, and a look at createforwardthinkingsteps continued that confident closing approach, content that trusts readers to retain the substance without being reminded of it at the end is content that respects the reader and this site practices that respect.
Will share this on a forum I am part of where it will be appreciated by others working in the same area, and a look at learnandacceleratesuccess suggests there is more here worth passing along too, definitely a generous resource that deserves a wider audience than it probably has today across the open internet.
Honestly enjoyed reading this more than I expected to when I first clicked through, and a stop at findgrowthchannelsfast kept that pleasant surprise going, sometimes you stumble onto a site that just clicks with how you like to read and this is one of those for me right now today which is great.
Generally I do not leave comments but this post merits a small note, and a stop at focusdrivesresults extended that comment worthy quality, the urge to actively contribute to a sites community rather than passively consume from it is something specific content provokes and this site has provoked that engagement urge from me today.
Easily one of the better explanations I have read on the topic, and a stop at explorefreshdirectionalideas pushed it even higher in my mental ranking of useful resources, the kind of site that beats the average not by trying harder but by simply caring more about what it puts out daily which always shows.
A particular kind of restraint shows up in the writing, and a look at growththroughclarity maintained the same restraint across pages, knowing what not to say is just as important as knowing what to say and this site has clearly developed strong instincts on both sides of that editorial line throughout pieces I have read.
Уже отчаялся был найти хоть что-то стоящее. Знакомая многим фигня, потерял контакт со старым хорошим другом. Стало дико интересно,. И знаете что? Тут главное знать, куда именно смотреть и какие базы юзать.
Короче, если вас сейчас волнует тот же самый вопрос — пробить странный входящий звонок, то есть один нормальный рабочий метод. Конкретно про то, как узнать по мобильному кто именно звонил — вот здесь всё максимально норм расписано: отследить человека по номеру бесплатно [url=https://kak-najti-cheloveka-po-nomeru-telefona-4.ru]отследить человека по номеру бесплатно[/url].
Друзьям ссылку скинул в телегу, им тоже помогло. Потому что в открытых пабликах обычно полная тишина. В общем, кому надо — тот точно воспользуется. Надеюсь, кому-то тоже упростит жизнь.
The clarity here is something I really appreciate, especially compared to sites that pile on jargon for no reason, and a look at learnandadvancepathnow was the same, simple direct sentences that actually deliver information instead of dancing around the point for paragraphs at a time which wastes reader patience.
Appreciate the practical examples, they made the abstract points easier to grasp, and a stop at designyourdirection added more of the same, this site clearly understands that real examples beat empty theory every single time which is the mark of a writer who knows their audience well and respects their time.
Just want to say thank you for putting this together, posts like these make searching online actually worth it sometimes, and a quick look at unlocknewideas kept that going, useful and easy to read without any of the tricks that ruin most blog comment sections lately on the wider open web.
Давно присматривался к разным предложениям, где реально не грузят лишней теорией. Особенно когда речь про онлайн-школу для детей — тут ведь нужна нормальная подача. У меня племянник как раз начал учиться дистанционно, так что пришлось перебрать кучу вариантов. В общем, вся подробная информация вот тут: онлайн образование школа [url=https://shkola-onlajn-55.ru]онлайн образование школа[/url] Я кстати ещё раньше вообще не верил в онлайн образование школа. Оказалось — зря сомневался. У них и программа грамотная. Сам теперь советую знакомым. Удачи!
Strong recommendation, anyone interested in this topic owes themselves a visit, and a stop at parcelparadise extends that recommendation across more of the site, this is the kind of resource that makes me more optimistic about the state of the open web than I usually am these days actually for once which is genuinely refreshing.
tattica crazy time [url=https://www.crazytimeitalia-it.com]https://crazytimeitalia-it.com/[/url]
Grateful for posts like this one, they remind me there are still places online run by people who care about quality, and a look at unlocksmartideas reflected the same standards, you can tell the difference between content made for readers and content made just for search engines today and this is the former.
crazy time sito ufficiale [url=http://crazytimeit-italia.com/]https://crazytimeit-italia.com/[/url]
Deneyip de begenen cok oldu. Baz? siteler cal?sm?yor. En sonunda her seyi cozdum.
Ozellikle bahis ve casino sevenler icin. Su an en h?zl? cal?san 1xbet yeni giris adresi tam olarak soyle: 1xbet yeni giriş [url=https://1xbet-giris-79.com]1xbet yeni giriş[/url]. Ne demisler — 1xbet spor bahislerinin adresi degisti.
Sorunsuz baglant? icin bu link yeterli. Kim ne derse desin — arayuz zaten al?s?k oldugunuz gibi. Baska yerde aramay?n art?k…
Looking through other posts here the consistency is what makes the site valuable rather than any single piece, and a stop at discovernewroutes extended that consistency observation, sites whose value lies in the ongoing pattern rather than in standout posts are sites I trust more deeply and this one has clearly built that kind of trust.
A clean piece that knew exactly what it wanted to say and said it, and a look at discoverinnovativethinking maintained the same clarity of intention, knowing the goal of a piece before writing is something most blog content lacks and the clarity of purpose here shows up in every paragraph for any careful reader to notice.
A piece that did not require external context to follow, and a look at buildsmartmovement maintained the same self contained quality, content that stands alone without forcing readers to chase prerequisites is more accessible and this site has clearly thought about how each piece can serve a fresh visitor rather than only existing members.
Found the section structure particularly thoughtful, and a stop at startbuildinglongtermvision suggested the same care across the broader site, structural choices guide the reader through the material in ways most people do not consciously notice but feel the absence of when those choices are made carelessly or not at all.
Will be coming back to this for sure, too much good content to absorb in one sitting, and a stop at buildcleanmomentum only added more pages I want to dig through, this site is going onto my regular rotation list because it consistently delivers something worth the visit lately rather than empty filler.
Коллеги, всем привет! Срочно нужна консультация тех, кто уже заказывал мерч для бизнеса. Интересует надежный поставщик корпоративных подарков с логотипом компании, который не подведет со сроками. сувениры с логотипом на заказ [url=https://suvenirnaya-produkcziya-s-logotipom-11.ru]сувениры с логотипом на заказ[/url] Реально ли найти недорогую сувенирную продукцию с логотипом с печатью от 100 штук. Бюджет пока не утвержден, поэтому хочу понять рыночные цены. Киньте ссылки или названия компаний, буду очень благодарен.
Speaking carefully because I do not want to overstate things this site is genuinely above average across multiple measurements, and a stop at createbetterdecisions continued the above average performance, the calibration of judgement against potential overstatement is something I take seriously and this site clears the higher bar even after that calibration applies.
уборка после ремонта
Reading this felt productive in a way most internet reading does not, and a look at learnandexecutenow continued that productive feeling, sometimes the open web feels like a waste of time but sites like this remind me why I still bother to look around rather than retreating to old reliable sources for everything I need.
Nice to see a post that does not try to overcomplicate the basics for the sake of looking smart, and once I looked at pathwaytoprogress the same direct tone was there too, which honestly makes a difference when you are short on time and want answers without long pointless intros.
Liked that the post left some questions open rather than pretending to settle everything, and a stop at trancetidal continued that intellectual honesty, content that respects the limits of its own claims is more trustworthy than content that overreaches and this site has clearly figured out which positions it can defend confidently.
Recommended without reservation for anyone interested in the topic at any level of expertise, and a look at nutmegnetwork only strengthens that recommendation, this site clearly knows how to serve readers across a range of backgrounds without watering down the content or talking past anyone in the audience which is genuinely impressive to see.
Ребята, привет! Долго думал, стоит ли начинать эту волокиту. Акт скрытых работ потерял, да и проект сам переделывал. В общем, теперь легализовывать этот бардак придётся официально. И тут встал вопрос: узаконить перепланировку цена [url=https://skolko-stoit-uzakonit-pereplanirovku-10.ru]https://skolko-stoit-uzakonit-pereplanirovku-10.ru[/url] говорят, согласование перепланировки квартиры цена сильно выросла после ужесточения норм. Или взносы в жилинспекцию за выдачу акта. А то риелторы называют цифры от балды. Без этого всё равно потом квартиру не продать. Короче, нужна стоимость согласования перепланировки, реальная по рынку.
Most blog writing on this subject reaches for the same handful of arguments and this post avoided them, and a look at growwithintentionalmovementnow continued the original treatment, content that finds its own path through territory other writers have flattened is content with real authorial energy and this site has plenty of that distinctive energy.
Reading this gave me a small sense of progress on a topic I have been slowly working through, and a stop at findyourcorepath added another step forward, learning happens in small increments across many sources and finding sources that consistently contribute is the actual practical value of careful curation in an information rich world.
Уборка после ремонта спб
Easy to recommend without reservations, the site delivers on every promise it implicitly makes, and a look at discoveruntappedangles kept that same standard going, the kind of consistency that earns trust over time rather than chasing it through aggressive marketing is what I see here and it is appreciated greatly by this particular reader today.
Bookmarked the page and the homepage too because clearly there is more to explore here, and a quick stop at createactionstepsnow only made that more obvious, this is the kind of place I want to dig through over a weekend rather than rushing through during a coffee break tomorrow morning before getting back to work.
Народ, привет! Такая ситуация — на планерке сказали срочно найти подарки для клиентов. Ищу нормальное изготовление корпоративных сувениров с доставкой по Москве. сувенирная продукция под заказ [url=https://suvenirnaya-produkcziya-s-logotipom-10.ru]https://suvenirnaya-produkcziya-s-logotipom-10.ru[/url] Кто уже заказывал корпоративные подарки с логотипом компании, поделитесь опытом. Просили ещё брендированные кружки и толстовки. Заранее респект тем, кто откликнется с контактами проверенными.
During my morning reading slot this fit perfectly into the routine, and a look at buildprogressintelligently extended that perfect fit into the rest of the routine, content that matches the rhythm of how I actually read rather than demanding accommodation from my schedule is content well calibrated to its likely audience and this site has it.
Came away with some new perspectives I had not considered before, and after explorefreshgrowthroutes those ideas felt more complete, the kind of content that stays with you a little while after reading rather than slipping out the moment you switch tabs and move on with your day to whatever comes next.
Заказать суши с доставкой
Glad to have another reliable bookmark for this topic, and a look at discovernewstrategicangles suggested several more pages I will be marking too, building a personal library of trustworthy resources is one of the actual rewards of careful browsing and this site is earning a place on my permanent shortlist for the topic.
генеральная уборка квартиры
Now feeling the quiet pleasure of finding writing that takes itself seriously without being self serious, and a stop at startnextlevelprogress extended that subtle pleasure, the gap between earnest and pretentious is fine and this site has clearly chosen to land on the earnest side without slipping over into pretentious which is impressive.
Уборка после ремонта спб
Reading this gave me confidence to make a decision I had been putting off, and a stop at discoveropportunityflows reinforced that confidence, content that translates into action in my own life rather than just informing it is content with the highest practical value and this site is generating that action level utility for me lately.
Что входит в среднюю цену заказа суши с доставкой
A clean read with no irritations, and a look at growthwithalignment continued that frictionless quality, the absence of small irritations is something I notice only when present elsewhere and this site is one of the rare places where everything just works and lets me focus on the substance rather than fighting the format.
Давно искал инфу и наконец-то наткнулся на реальный опыт. Там всё разложено по полочкам, без лишней воды и тупых SEO-текстов. Сам долго мучился, пока не нашел этот гайд. Вот скачать melbet на андроид [url=https://howtoairbrush.com]скачать melbet на андроид[/url] — сохраняйте себе в закладки, пригодится. Там внутри и примеры, и пошаговые инструкции, короче полный фарш.
Экономия на корпоративе без потери качества
Felt no urge to argue with the conclusions even though I started the post slightly skeptical, and a look at learnandgrowstrong maintained that pattern, writing that earns agreement through clarity of argument rather than rhetorical pressure is the kind I find most persuasive and the kind I want to read more of these days.
A quiet kind of confidence runs through the writing, and a look at chairchampion carried that same understated assurance, confidence without bragging is the most attractive register for online writing and the writers here have clearly developed it through practice rather than affecting it through stylistic tricks that would feel hollow eventually.
Now considering whether the post would translate well into a different form, and a look at discovergrowthdirectionnow suggested similar versatility, content that could move into other media without losing its substance is content that has been built around ideas rather than around format and this site reads as idea first throughout posts.
Уже отчаялся был найти хоть что-то стоящее. Знакомая многим фигня, постоянно звонят с незнакомого телефона, а кто — вообще непонятно. Стало дико интересно,. И знаете что? Оказывается, сейчас есть реальные способы.
Короче, если вас сейчас волнует тот же самый вопрос — пробить странный входящий звонок, то есть один реально работающий и живой сервис. Конкретно про то, как найти человека по номеру телефона — вот здесь всё максимально норм расписано: поиск по номеру телефона геолокация [url=https://kak-najti-cheloveka-po-nomeru-telefona-4.ru]поиск по номеру телефона геолокация[/url].
Я сам сначала вообще не верил во всё это. Потому что в открытых пабликах обычно полная тишина. В общем, не теряйте свое время зря на разводняк. Надеюсь, кому-то тоже упростит жизнь.
Coming to this with low expectations and being pleasantly surprised by the substance, and a stop at forwardactionframework continued exceeding expectations, the recalibration of expectations upward across multiple positive readings is one of the actual rewards of careful browsing and this site is providing that recalibration at a steady rate apparently.
услуги уборки
Reading this felt productive in a way most internet reading does not, and a look at learnandscaleprogress continued that productive feeling, sometimes the open web feels like a waste of time but sites like this remind me why I still bother to look around rather than retreating to old reliable sources for everything I need.
Uzun zamandır takipteyim. Bazı adresler çalışmıyor. En sonunda sağlam bir link buldum.
Bahisle ilgilenen arkadaşlara duyurulur. Uyarıları dikkate alarak sistemi kurun. Giriş adresi aynen şu şekilde: 1xbet spor bahislerinin adresi [url=https://1xbet-giris-80.com]1xbet spor bahislerinin adresi[/url]. Özetle — 1xbet güncel adres arayanlar buraya baksın.
Para çekme işlemleri sorunsuz. Dost meclisinde öğrendim — başka yerde aramaya gerek yok. İyi eğlenceler…
Appreciated how the post felt complete without overstaying its welcome, and a stop at fernbureau confirmed that economical approach runs across the site, knowing when to stop is a skill many writers never develop but here the discipline is obvious and welcome from the perspective of a busy reader trying to learn things efficiently.
Quality you can feel from the first paragraph, the writer clearly knows the topic and how to share it, and a quick look at buildfocusedmomentum confirmed the same depth runs throughout the rest of the site as well which is rare and worth pointing out when it happens online for any reader passing through.
Честно говоря, долго выбирал, куда поступать, но после кучи долгих обсуждений наткнулся на один нормальный человеческий вариант. Если кратко, вот что я понял: современная школа онлайн — это серьёзный и комплексный подход. Там и программа насыщенная, без лишней воды, так что прогресс виден сразу.
В общем, кому понимает толк в теме онлайн образование школа — почитайте подробности, вот здесь все разжевано до мелочей: школы дистанционного обучения [url=https://shkola-onlajn-54.ru]школы дистанционного обучения[/url].
Если честно, даже не ожидал такого крутого качества. Потому что обычная школа часто проигрывает по всем фронтам, а тут организована именно грамотно выстроенный учебный процесс. Держите этот вариант у себя в закладках.
Quietly building a case in my head for why this site deserves more attention than it currently seems to receive, and a look at buildforwardclarity reinforced the case, the gap between quality and recognition is a recurring frustration in independent online content and this site is one of the cases that seems particularly egregious to me today.
Планируете выездное мероприятие? кофе брейк профессиональная организация выездного питания для свадеб, корпоративов, конференций и частных мероприятий. Разработка меню, приготовление блюд, доставка, сервировка и обслуживание гостей. Полный комплекс услуг для событий любого масштаба.
Looking through other posts here the consistency is what makes the site valuable rather than any single piece, and a stop at findmomentumnext extended that consistency observation, sites whose value lies in the ongoing pattern rather than in standout posts are sites I trust more deeply and this one has clearly built that kind of trust.
служба дезинфекции стоимость уничтожения клопов в москве
Highly recommend to anyone looking for a sensible take on this topic without the usual marketing nonsense, and a look at createbetteroutcomesnow kept that grounded approach going, sites that stay focused on serving readers rather than monetising every click are rare and this is clearly one of those rare ones I really appreciate finding.
One of the more honest takes on the topic I have seen lately, no spin and no oversell, and a stop at tomatotactic kept that going, the kind of voice the open web could use a lot more of rather than the endless echo chamber of recycled opinions floating around every social platform these days.
Если честно, сам перерыл кучу форумов в поисках нормальной обивки. Оказалось, что выбрать подходящий вариант совсем непросто. Итак, смотрите, вот здесь реально толково расписано про плотность, ворс и износостойкость для диванов и кресел, а главное — показаны варианты, которые не линяют. Вся полезная информация доступна здесь: ткань для обивки мебели купить [url=https://tkan-dlya-mebeli-2.ru]ткань для обивки мебели купить[/url] Дальше сами гляньте фактические отзывы. Да, и не берите первое, что попалось — я уже обжёгся, когда брал мебельную ткань купить с рук. Эта тема реально вывозит по соотношению цена-качество. Кстати: ткань для обивки мебели купить лучше уже с нормальной пропиткой от грязи. Да и рвётся такое полотно гораздо меньше. В общем, советую глянуть источник.
Коллеги, всем привет! Организуем встречу с дилерами, хочется сделать им приятные и полезные презенты. Подскажите, где заказать качественную сувенирную продукцию с логотипом. сувенирная продукция с логотипом москва [url=https://suvenirnaya-produkcziya-s-logotipom-11.ru]сувенирная продукция с логотипом москва[/url] Кто недавно брал подарки с логотипом под новогодние корпоративы, поделитесь контактами. Может, есть проверенные фабрики, которые работают напрямую, без посредников. А то маркетинговые агентства такой ценник лупят — закачаешься.
Will recommend this to a couple of friends who have been asking about this exact topic, and after palmmills I have even more reason to do so, the kind of site that earns word of mouth rather than chasing it through aggressive marketing or paid placements is always a treat to find online.
Refreshing tone compared to the dry corporate posts on similar topics, and a stop at brightbanyan carried that personality through nicely, you can tell when a real person is behind the writing versus a content team chasing metrics and this site definitely falls into the former category clearly across what I have seen.
Now thinking the topic is more interesting than I had given it credit for, and a stop at opaldunes continued that elevated interest, content that revives my curiosity about subjects I had set aside is doing genuine work in the structure of my interests and this site is providing that revivifying effect today actually.
Recommended without reservation for anyone interested in the topic at any level of expertise, and a look at curiopacts only strengthens that recommendation, this site clearly knows how to serve readers across a range of backgrounds without watering down the content or talking past anyone in the audience which is genuinely impressive to see.
Now adjusting my mental model of how the topic fits into the broader landscape, and a look at graingrove extended that adjustment, content that affects my structural understanding rather than just my factual knowledge is content with deeper impact and this site is providing those structural updates at a meaningful rate consistently across topics.
Now appreciating that the post did not require external context to follow, and a look at explorefutureopportunitypaths maintained the same self contained quality, content that respects new visitors by being readable without prerequisites is content with broader accessibility and this site has clearly invested in keeping each piece reader friendly for fresh arrivals.
Speaking from the perspective of a fairly demanding reader the writing here clears the bar consistently, and a look at portguild continued clearing that bar, the calibration of demanding reader is something I apply to all sources and this site has been one of the few that handles the demanding reading well across pieces sampled.
A piece that took its time without dragging, and a look at lobbydawn kept the same patient pace, the difference between unhurried and slow is a fine editorial distinction and this site has clearly found the unhurried side without slipping into the slow side which would have lost me as a reader quickly otherwise.
Reading this in the morning set a good tone for the day, and a quick visit to focuscreatesprogress kept that good tone going, content can do that sometimes when it hits the right notes and finding sites that consistently strike that tone is something I have learned to recognise and reward with regular visits.
Now organising my browser bookmarks to give this site easier access, and a look at zingtorch earned the same organisational priority, the small acts of digital housekeeping I do for sites I expect to use often are themselves a measure of trust and this site has triggered the trust based housekeeping behaviour from me clearly.
Ребята, выручайте! Кот старый диван в клочья разодрал, надо перетягивать. Теперь мучаюсь — какую взять ткань для мебели, чтобы и выглядело достойно, и кошачьи когти выдержало. ткань обивочная купить [url=https://tkan-dlya-mebeli-1.ru]https://tkan-dlya-mebeli-1.ru[/url] Кто разбирается в тканях для мебели, подскажите, что сейчас берут. Буду благодарен за любые советы, особенно от тех, кто сам перетягивал.
A quiet kind of confidence runs through the writing, and a look at micapacts carried that same understated assurance, confidence without bragging is the most attractive register for online writing and the writers here have clearly developed it through practice rather than affecting it through stylistic tricks that would feel hollow eventually.
Solid endorsement from me, the writing earns it, and a look at createwithintention continues to earn it across the broader site too, the kind of operation that maintains quality across many pages rather than just one viral post is a sign of serious commitment and that is what I see here clearly across what I read.
Denemek isteyen arkadaşlara hep aynısını söylüyorum. Herkes farklı bir şey anlatıyor kafam allak bullak oldu. Adımları doğru sırayla uyguladıktan sonra bağlantı hatasız açıldı. Güvenilir bir kaynak bulmanın ne kadar zor olduğunu hepimiz biliyoruz işte size o adres: 1xbet giriş [url=https://1xbet-giris-87.com]1xbet giriş[/url]. Valla bak net konuşayım — canlı bahis kısmı bile yeterli aslında.
para çekme işlemleri de sorunsuz yani rahat olun. İşin aslını söylemek gerekirse — en güvendiğim liman burası oldu artık. Umarım siz de memnun kalırsınız…
Reading this in pieces over a coffee break and finding it consistently rewarding, and a stop at draftport extended that into related material I will return to later, the kind of site that fits naturally into small reading windows without requiring a long uninterrupted block is genuinely useful for how I actually browse.
Generally I am cautious about recommending sites on first encounter but this one warrants the exception, and a look at findyourwinningdirection reinforced the exception making, the rare site that justifies breaking my normal cautious approach is the rare site worth flagging early and this one has prompted exactly that early flagging response from me.
Bir arkadaş tavsiyesiyle başladım. Kapanan siteler yüzünden güvenim sarsılmıştı. Ama sonunda doğru adresi buldum işte.
Bu işe yeni başlayanlar dinlesin. Sistem ayarlarını doğru yaptıktan sonra süreç çok basit. Giriş adresi tam olarak şurada: 1xbet güncel adres [url=https://1xbet-giris-81.com]1xbet güncel adres[/url]. Yani demem o ki — 1xbet güncel adres arayanlar işte karşınızda.
Arayüzü anlaşılır, takılmazsınız. Çok araştırdım emin olun — şikayet edecek bir şey bulamadım. Gözünüz arkada kalmasın…
Reading this prompted a small note in my reference file, and a stop at findgrowthdirections prompted another, the rare site that contributes useful nuggets to my own working knowledge rather than just consuming my attention is worth the time investment many times over compared to the usual pile of forgettable scroll content.
Just sat with this for a bit longer than I usually would because the points are worth thinking about, and after ideaswithtraction I had even more to chew on, the kind of post that nudges your thinking forward without forcing the issue is something I have always appreciated in good writing online.
I really like the calm tone here, it does not push anything on the reader, and after I went through buildforwardthinkingmomentum I felt the same way, just steady useful content laid out without drama, which is exactly what someone trying to learn something quickly needs to find rather than aggressive marketing.
A piece that did not require external context to follow, and a look at fernpier maintained the same self contained quality, content that stands alone without forcing readers to chase prerequisites is more accessible and this site has clearly thought about how each piece can serve a fresh visitor rather than only existing members.
Uzun süredir oynuyorum diyebilirim. Her gün yeni bir engelleme haberi alınca insan bıkıyor. Ama sonunda her derde deva bir adrese ulaştım.
Bahis severler bilir burayı kesinlikle tavsiye ederim. Güncel sistem ayarlarını kontrol ettikten sonra erişim sağlamak en mantıklısı. Giriş adresi tam olarak şu şekilde: 1xbet spor bahislerinin adresi [url=https://1xbet-giris-82.com]1xbet spor bahislerinin adresi[/url]. Ne diyeyim yani — 1xbet güncel adres arayanlar buraya baksın.
Çekimler konusunda hiç sıkıntı yaşamadım. Daha önce birçok site denedim — en memnun kaldığım yer burası oldu. Herkese iyi şanslar…
Мечтаешь о незабываемом отпуске? https://karta-abhazii.ru где величественные горы встречаются с бескрайним морем, а история оживает на каждом шагу, добро пожаловать в Абхазию!
Quietly enthusiastic about this site after the past few hours of reading, and a stop at createforwardexecutionsteps extended that enthusiasm, the calibration of enthusiasm to evidence is something I try to maintain and this site has earned a calibrated quiet enthusiasm rather than the loud excitement that usually fades within a day or two of finding something.
A thoughtful piece that did not strain to be thoughtful, and a look at momentumbymindset continued that effortless quality, when thinking shows up in writing without the writer drawing attention to it you know you are reading something genuinely considered rather than something performing the appearance of consideration which is also common online.
Bookmark earned and shared the link with one specific person who would care, and a look at edendomes got the same targeted share, sharing carefully rather than broadcasting is a discipline I try to maintain and this site is generating shares from me at a sustainable rate rather than the spam rate of viral content.
The structure of the post made it easy to follow without losing track of where I was, and a look at mochamarket kept the same logical flow going, this site clearly understands that organisation is half the battle in keeping readers engaged from the first line to the last across any kind of post.
A small thank you note from me to the team behind this work, the post earned it, and a stop at frostcoasts suggested more thanks would be in order over time, recognising the people who do good writing online is something I try to remember to do because the alternative is silence and silence rewards mediocrity unfortunately.
Reading this gave me a small mental break from the heavier reading I had been doing, and a stop at buildsmartprogress extended that lighter feel, content that provides relief without becoming trivial is harder to produce than people realise and this site has clearly figured out how to be light without being shallow at all.
Even from a single post the editorial care is clear, and a stop at portguild extended that care across more pages, the kind of attention to quality that shows up in every paragraph is what separates serious sites from the rest and this one has clearly invested in that paragraph level attention across what I have read.
I learned more from this short post than from longer articles I read earlier today, and a stop at lobbydawn added even more useful detail without going off topic, this site clearly knows how to keep things focused without sacrificing depth which is a hard balance to strike for any writer.
Refreshing to read something where the words actually mean something instead of filling space, and a stop at grippalace kept that going, the writing here trusts the reader to follow along without endless repetition or constant reminders of what was already said earlier in the post which I appreciate.
Уже отчаялся был найти хоть что-то стоящее. Прям беда реальная: потерял контакт со старым хорошим другом. Полез в глубокий поиск по веткам. И знаете что? Тут главное знать, куда именно смотреть и какие базы юзать.
Короче, если вас сейчас волнует тот же самый вопрос — пробить странный входящий звонок, то есть один реально работающий и живой сервис. Конкретно про то, как узнать по мобильному кто именно звонил — вот здесь всё максимально норм расписано: найти по телефону [url=https://kak-najti-cheloveka-po-nomeru-telefona-4.ru]найти по телефону[/url].
Я сам сначала вообще не верил во всё это. Потому что а тут выложена конкретная и структурированная информация. В общем, кому надо — тот точно воспользуется. Тема вроде избитая, но толковое решение всё же нашлось.
Народ, привет! Такая ситуация — на планерке сказали срочно найти подарки для клиентов. Ищу нормальное изготовление корпоративных сувениров с доставкой по Москве. брендированная продукция с логотипом [url=https://suvenirnaya-produkcziya-s-logotipom-10.ru]брендированная продукция с логотипом[/url] Посоветуйте нормального поставщика сувенирной продукции с логотипом, чтобы не обдиралово было. Просили ещё брендированные кружки и толстовки. А то я уже второй день в интернете сижу и ничего адекватного не нашёл.
Liked everything about the experience, from the opening through to the closing notes, and a stop at ideasintoexecution extended that into more pages, finding a site where the editorial vision shows through every choice rather than feeling random is an increasingly rare experience and one I am glad to have today during this particular reading session.
Better than the average post on this subject by some distance, and a look at fernbureaus reinforced that, you can tell within the first paragraph that the writer here actually cares about the topic rather than just covering it for the sake of having something to publish that week or that day.
Picked this up between two other things I was doing and got drawn in completely, and after zingtorch my original tasks were completely forgotten for a while, content that derails a workflow in a positive way by being more interesting than what you were already doing is rare and worth recognising clearly.
Honest assessment after reading this twice is that it holds up under careful attention, and a look at driftfair extended that durability across more pages, content that survives a second read without revealing weak spots is rarer than the average reader probably realises and this site clearly cleared that bar.
I really like how the writer keeps the tone friendly without sounding fake or overly polished, and after a stop at salemsolid the same calm pace was there, no rushing to make a point and no padding either, just clean honest writing that I can respect and come back to later again.
Давно искал инфу и наконец-то разобрался с этой проблемой. Авторы реально шарят в вопросе, никаких банальных советов из интернета. Рекомендую заглянуть, чтобы не совершать глупых ошибок, как я в прошлый раз. Вот мелбет скачать приложение на андроид [url=https://howtoairbrush.com]мелбет скачать приложение на андроид[/url] — сохраняйте себе в закладки, пригодится. Если останутся вопросы, пишите прямо там в комментариях, админ отвечает быстро.
Felt the post had been written without looking over its shoulder, and a look at firminlet continued that confident posture, content written for its own sake rather than against imagined critics has a different quality and this site reads as written from a place of confidence rather than defensive justification of every claim.
Ended up here on a wandering afternoon and was glad I stayed for the read, and a stop at explorefuturepathways extended the wandering into a proper exploration of the site, the kind of place that rewards aimless clicking with something genuinely interesting rather than the shallow content that mostly populates the modern open web.
генеральная уборка квартиры
Got something practical out of this that I can apply later this week, and a stop at ideasworthmoving added more details to think about, this is exactly the kind of content I bookmark for future reference rather than the throwaway listicles that dominate most search results these days for almost any common topic.
Just want to record that this site is entering my regular reading list, and a look at fairfinch confirmed it deserves the spot, my regular reading list is short and well curated and adding to it requires meeting a fairly high quality bar that this site has clearly cleared without much effort apparently.
Коллеги, всем привет! Встала задача обновить ассортимент брендированной атрибуки для отдела продаж. Посоветуйте нормальное изготовление корпоративных сувениров — чтобы и кружки не облазили, и ручки писали. подарочная продукция с логотипом [url=https://suvenirnaya-produkcziya-s-logotipom-11.ru]подарочная продукция с логотипом[/url] Реально ли найти недорогую сувенирную продукцию с логотипом с печатью от 100 штук. Бюджет пока не утвержден, поэтому хочу понять рыночные цены. Киньте ссылки или названия компаний, буду очень благодарен.
Знаете, ситуация бывает — близкий совсем плох, а везти в больницу нет сил. Моя семья такое пережила недавно. Руки опускаются, время идёт. Начинаешь обзванивать знакомых , а вокруг бабло тянут. Пока кто-то не подсказал один реально работающий вариант. Требуется срочная помощь — а ехать куда-то просто нереально, то нужно вызывать врача на дом. Речь конкретно про наркологическую помощь на дому . В Самаре , если честно, тоже полно левых контор без лицензии. Вся проверенная информация вот тут : частный нарколог [url=https://narkolog-na-dom-samara-13.ru]https://narkolog-na-dom-samara-13.ru[/url] Откровенно говоря, после того как вник в детали, понял, как правильно действовать. И про снятие запоя на дому, и про последующее кодирование. И цены адекватные, без разводов. Советую не откладывать.
Павильон для туалета с умывальником Ярославль
Клининговые услуги москва
A piece that exhibited the kind of patience that good writing requires, and a look at jetdomes continued that patient quality, hurried writing is easy to spot and this site reads as having been written without time pressure which produces a different feel than the rushed content that dominates much of the modern blog space.
Great work on keeping things readable, the post never drags or repeats itself which I really appreciate, and a stop at fernpiers added a bit more context that fit naturally with what was already said here, no need to read everything twice to get the point being made today.
Felt the post handled a sensitive angle of the topic with appropriate care, and a look at coppercrown extended that careful handling across related material, sites that can navigate delicate territory without causing damage are rare and require a level of judgement that comes from experience rather than from following any clear playbook.
Just one of those reads that left me feeling slightly more capable rather than overwhelmed, and a look at portmill kept that empowering feel going, the difference between content that builds the reader up and content that intimidates them is huge and this site clearly knows which side of that line to stand.
Glad the writer kept this short rather than padding it out, the points stand on their own without needing extra context, and a look at loopbough kept the same approach going, brevity is a sign of confidence in the substance and the team here clearly trusts their content to land without filler.
Now adding the writer to a small mental list of voices I want to follow, and a look at createactionforward reinforced that follow intention, the few writers whose work I actively track are writers who have demonstrated sustained quality and this writer has clearly demonstrated that sustained quality across the pieces I have sampled here today.
Once you start reading carefully here it is hard to go back to lower quality alternatives, and a stop at grovefarm reinforced that ratchet effect, the way good content raises standards is real over time and this site has clearly contributed to raising my expectations for what is possible in writing on the topic generally.
Will be passing this along to a few people who would benefit from the perspective shared here, and a stop at focusdrivenmomentum only added to what I will be sharing, this kind of generous content deserves to circulate widely rather than getting buried in some search engine algorithm tweak that pushes it down the rankings.
Bookmark added without hesitation after finishing, and a look at knackgrove confirmed I should bookmark the homepage too rather than just this page, the rare site that earns category level trust rather than just single article approval is the kind I want to rely on across many different topics over time.
Found this useful, the points line up well with what I have been thinking about lately, and a stop at ideasintoresults added some angles I had not considered yet, definitely walking away with more than I came for which is the best outcome from time spent reading online for any kind of topic.
Picked up on several small touches that suggest a careful editor, and a look at executeideasclean suggested the same hand at work across the broader site, editorial consistency at a granular level is one of the strongest signs that an operation is serious rather than just hobbyist and this site reads as serious throughout.
Worth marking this site as one to come back to deliberately rather than by accident, and a stop at duetparishs reinforced that intention, the difference between sites I find again by chance and sites I return to on purpose is meaningful and this one has clearly moved into the deliberate return category for me.
Picked this up while looking for something else and ended up reading every paragraph because it was actually informative, and after startmovingforward I was sure I would come back, that does not happen often when most sites bury the useful parts under endless ads and pop ups today and across most categories online.
Как взыскать недостачу через суд (спокойный алгоритм)
Came away feeling slightly smarter than I was when I started, that is a real win, and a stop at zingtrace added a bit more to that, the rare site that actually transfers some of its knowledge to the reader in a way that sticks rather than just creating an illusion of learning briefly.
Came in tired from a long day and the writing held my attention anyway, and a stop at buildclaritydrivenmomentum kept that going, content that can engage a fatigued reader is doing something right because most online reading happens in suboptimal conditions like that one and quality content adapts to it without complaint.
The post made the topic feel approachable without making it feel trivial, that is a fine balance, and a stop at findyourclearpath maintained the same balance, finding the middle ground between welcoming and serious is genuinely difficult and the writers here have clearly figured out how to consistently hit it well across many different posts.
Reading this prompted me to dig into a related topic later, and a stop at flareaisle provided some of the starting points for that follow up reading, content that triggers further exploration rather than satisfying curiosity completely is content with real generative energy and this site has plenty of that energy throughout it.
Really like that there are no exclamation marks or all caps shouting throughout the post, and a quick visit to createimpactplanningnow maintained the same calm voice, restraint in punctuation signals confidence in the content and this site clearly trusts its substance to do the persuading rather than relying on typographic emphasis.
Deneyen çok kişi duydum çevremde. Herkes farklı bir adres söylüyordu. Ama sonunda işe yarar bir link keşfettim.
Bu işe yeni başlayanlar dinlesin. Sistem ayarlarını doğru yaptıktan sonra süreç çok basit. Giriş adresi tam olarak şurada: 1xbet türkiye [url=https://1xbet-giris-81.com]1xbet türkiye[/url]. Yani demem o ki — 1xbet türkiye için tek geçerli adres bu.
İşlemler hızlı mı derseniz evet. Kendi adıma konuşmam gerekirse — her şey düşünülmüş. Hayırlı olsun…
Excellent post, balanced and well organised without showing off, and a stop at duetcoast continued in that same vein, this site has clearly figured out the formula for content that works for readers rather than for search engine ranking signals which is harder than it sounds today and worth real recognition from anyone.
After several visits I am now confident this site is one to follow seriously, and a stop at falconfern reinforced that confidence, the gradual building of trust through repeated quality exposures is the only sustainable way to develop reader loyalty and this site is building that loyalty in me through patient consistent work consistently.
Decided to write a short note to the author if there is contact info anywhere, and a stop at knackdomes extended that intention, the urge to thank the writer directly is a strong signal of content quality and this site has triggered that urge in me today which is a fairly rare event for my reading.
Thanks for keeping the writing direct without losing the warmth that makes content feel human, and a stop at simplifyyourprogress carried both qualities forward, balancing professionalism and personality is a rare skill and the writers here have clearly figured out how to consistently land it across many posts which I notice.
Honestly impressed by how much useful content sits in such a small post, and a stop at seogrove confirmed the rest of the site packs a similar punch, density without confusion is a hard balance to strike and this site has clearly cracked the code on it across many different topic areas covered.
Açıkçası ben de önceden çok zorlanıyordum. Doğru düzgün bir site bulmak işkenceydi resmen. Ama sonunda her derde deva bir adrese ulaştım.
Casino oyunlarına meraklıysanız burayı bir şans verin derim. Güncel sistem ayarlarını kontrol ettikten sonra erişim sağlamak en mantıklısı. Giriş adresi tam olarak şu şekilde: 1xbet spor bahislerinin adresi [url=https://1xbet-giris-82.com]1xbet spor bahislerinin adresi[/url]. Ne diyeyim yani — 1xbet türkiye için doğru adres burası.
Bonus kampanyaları fena değil. Çevremdekilere de söyledim — başka yerde aramaya gerek yok. Umarım işinize yarar…
Долго рылся в интернете на разных форумах, Прям беда реальная: потерял контакт со старым хорошим другом. Полез в глубокий поиск по веткам. И знаете что? Не всё так сложно в этом плане, как кажется.
Короче, если вас сейчас волнует тот же самый вопрос — пробить странный входящий звонок, то есть один нормальный рабочий метод. Конкретно про то, как узнать по мобильному кто именно звонил — вот здесь всё максимально норм расписано: как отследить по номеру телефона местонахождение бесплатно [url=https://kak-najti-cheloveka-po-nomeru-telefona-4.ru]как отследить по номеру телефона местонахождение бесплатно[/url].
Друзьям ссылку скинул в телегу, им тоже помогло. Потому что в открытых пабликах обычно полная тишина. В общем, обязательно сохраните себе на будущее. Тема вроде избитая, но толковое решение всё же нашлось.
If you scroll past this site without looking carefully you will miss something, and a stop at explorefreshopportunities extended that mild warning, the surface of the site does not advertise its quality loudly which means careful attention is required to recognise what is being offered here which is itself a kind of editorial signal.
Probably this is one of the better quiet successes on the open web at the moment, and a look at portolive reinforced that quiet success quality, sites that are doing well without making a noise about doing well are the sites I most respect and this one has clearly chosen the quiet success path consistently throughout.
A relief to read something where I did not have to fact check every claim mentally, and a look at lunacourt continued that reliable feeling, sites where I can lower my guard and trust the content are rare and this one is earning that trust paragraph by paragraph through consistent careful work behind the scenes.
A piece that did not require external context to follow, and a look at grovequay maintained the same self contained quality, content that stands alone without forcing readers to chase prerequisites is more accessible and this site has clearly thought about how each piece can serve a fresh visitor rather than only existing members.
Just want to record that this site is entering my regular reading list, and a look at progressbuiltcarefully confirmed it deserves the spot, my regular reading list is short and well curated and adding to it requires meeting a fairly high quality bar that this site has clearly cleared without much effort apparently.
This one is staying open in a tab for the rest of the day so I can come back and re read certain parts, and a look at bravopiers suggests I will be doing the same with a few more pages here too, this is going to be a deep dive over the coming hours.
1xbet com mobile
Now planning to share the link with a small group of readers I trust, and a look at clarityfuelsgrowth suggested more material to share with the same group, recommending content into a curated circle requires confidence in the recommendation and this site is making me confident in those personal recommendations on multiple separate occasions now.
Picked this up between two other things I was doing and got drawn in completely, and after vitalsummit my original tasks were completely forgotten for a while, content that derails a workflow in a positive way by being more interesting than what you were already doing is rare and worth recognising clearly.
Клининговые услуги в москве
Worth saying that the post fit naturally into a rhythm of careful reading, and a stop at createimpactsteps extended the same rhythm, content that pairs well with how I actually read rather than demanding a different mode is content well calibrated to its likely audience and this site has clearly thought about that consistently.
Коллеги, всем привет! Срочно нужна консультация тех, кто уже заказывал мерч для бизнеса. Интересует надежный поставщик корпоративных подарков с логотипом компании, который не подведет со сроками. корпоративные сувениры москва [url=https://suvenirnaya-produkcziya-s-logotipom-11.ru]корпоративные сувениры москва[/url] Реально ли найти недорогую сувенирную продукцию с логотипом с печатью от 100 штук. Бюджет пока не утвержден, поэтому хочу понять рыночные цены. А то маркетинговые агентства такой ценник лупят — закачаешься.
Производство киосков и торговых павильонов в раменском: инновации и качество на рынке
Now considering carefully how to share this site with the right audience rather than broadcasting widely, and a look at quillglade extended that careful sharing impulse, content worth sharing carefully rather than spamming is content that has earned a higher kind of recommendation and this site has earned that careful shareability throughout pieces.
Thanks for the simple approach, too many sites bury the actual point under layers of unnecessary words, but here every line earns its place, and a look at flarefest showed the same care for the reader which is something I will remember the next time I need answers on a topic.
Glad I gave this a chance rather than scrolling past, and a stop at grippalaces confirmed I made the right call, sometimes the best content is hidden behind unassuming headlines that do not scream for attention and learning to slow down and check those out has paid off many times now across years of reading.
Closed several other tabs to focus on this one as I read, and a stop at meritquays held my undivided attention the same way, content that earns full focus in an attention environment full of competing pulls is content doing something genuinely well and the team behind it deserves recognition for that achievement consistently.
Услуги клининга в спб
Срочно нужен совет для отдела маркетинга. Хотим обновить мерч для сотрудников. Везде говорят про индивидуальный подход, но реально найти нормальную сувенирную продукцию с логотипом. бизнес подарки интернет магазин [url=https://suvenirnaya-produkcziya-s-logotipom-9.ru]https://suvenirnaya-produkcziya-s-logotipom-9.ru[/url] Интересует именно изготовление под ключ — от кружек до брендированных блокнотов. Пока просто собираем инфу. Заранее спасибо, кто откликнется.
The structure of the post made it easy to follow without losing track of where I was, and a look at seohive kept the same logical flow going, this site clearly understands that organisation is half the battle in keeping readers engaged from the first line to the last across any kind of post.
Если честно, сам перерыл кучу форумов в поисках нормальной ткани для мебели. Оказалось, что выбрать подходящий вариант тот ещё квест. Итак, смотрите, вот здесь реально толково расписано про плотность, ворс и износостойкость для диванов и кресел, а главное — показаны варианты, которые не линяют. Вся полезная информация доступна здесь: мебельная обивка [url=https://tkan-dlya-mebeli-2.ru]https://tkan-dlya-mebeli-2.ru[/url] Дальше сами гляньте каталог с ценами. Да, и не берите первое, что попалось — я уже обжёгся, когда брал ткань для мебели на распродаже. Эта тема реально вывозит по соотношению цена-качество. Кстати: ткань мебельная купить лучше уже с нормальной пропиткой от грязи. Да и трётся такое полотно гораздо меньше. Здесь реально дельные советы.
Брал перфоратор https://vse-instrumenti.ru перед оформлением поискал промокод все инструменты — нашёл на этом сайте. Код сработал, скинули 10%.
Reading more of the archives is now on my plan for the weekend, and a stop at falconflame confirmed the archive worth the time, the rare archive worth a dedicated reading session rather than just casual sampling is the rare archive of serious work and this site has clearly produced enough of that work to warrant the deeper exploration.
бальные танцы для детей стрит данс для детей
Bir arkadaşım ısrarla tavsiye etti. Denemekle denememek arasında gidip geldim. Sonra şu linki görünce karar verdim.
Bahis dünyasına ilgi duyanlar bilir. Detaylı incelemeleri tamamlayıp adımları takip ettikten sonra her şey netleşti. Giriş adresi işte karşınızda: 1xbet güncel adres [url=https://1xbet-giris-83.com]1xbet güncel adres[/url]. Demem o ki — 1xbet türkiye için tek doğru adres burası.
Arayüzü bile kullanışlı. Kendi adıma konuşuyorum — pişman eden bir yer değil kesinlikle. Şimdiden iyi eğlenceler…
Народ, привет! Такая ситуация — на планерке сказали срочно найти подарки для клиентов. Может, кто шарит где лучше брать сувенирную продукцию с логотипом. сувениры на заказ [url=https://suvenirnaya-produkcziya-s-logotipom-10.ru]сувениры на заказ[/url] А то эти менеджеры по рекламе такие цены выкатывают — волосы дыбом. Просили ещё брендированные кружки и толстовки. Заранее респект тем, кто откликнется с контактами проверенными.
A piece that left me thinking I had been undercaring about the topic, and a look at portpoise reinforced that mild concern, content that raises the appropriate weight of a subject without being preachy about it is doing important work and this site is providing that gentle elevation of attention for me consistently.
Reading this in a quiet coffee shop matched the calm energy of the writing, and a stop at duetdrive extended that environmental match, content that has its own ambient quality which can match or clash with surroundings is content with a personality and this site has the kind of personality that suits calm reading.
услуги уборки
Ребята, привет! Долго думал, стоит ли начинать эту волокиту. Акт скрытых работ потерял, да и проект сам переделывал. В общем, теперь легализовывать этот бардак придётся официально. И тут встал вопрос: стоимость согласования перепланировки квартиры [url=https://skolko-stoit-uzakonit-pereplanirovku-10.ru]стоимость согласования перепланировки квартиры[/url] Кто сталкивался недавно — сколько стоит узаконить перепланировку в многоэтажке. Или взносы в жилинспекцию за выдачу акта. А то риелторы называют цифры от балды. Без этого а если решите ипотеку рефинансировать, БТИ зарубит. Короче, просто сколько отдать, чтобы спать спокойно с новой планировкой.
Now appreciating the way the post avoided the temptation to be longer than necessary, and a look at moveideasforward continued that lean approach, content with the discipline to stop when finished rather than padding for length is content that respects both itself and its readers and this site has that disciplined editorial culture clearly throughout.
I really like how the writer keeps the tone friendly without sounding fake or overly polished, and after a stop at meritquay the same calm pace was there, no rushing to make a point and no padding either, just clean honest writing that I can respect and come back to later again.
A thoughtful piece that did not strain to be thoughtful, and a look at startbuildingdirection continued that effortless quality, when thinking shows up in writing without the writer drawing attention to it you know you are reading something genuinely considered rather than something performing the appearance of consideration which is also common online.
Found the post genuinely useful for something I was working on this week, and a look at unlockclaritytoday added more material I will reference, content that connects to my actual life and work rather than just being interesting in the abstract is the kind I will pay attention to and return to repeatedly.
Liked the natural conversational tone throughout, never stiff and never overly casual either, and a stop at hazemill kept that comfortable middle ground going, finding a tone that respects the reader without becoming distant or overly familiar is harder than it sounds and this site nails that balance consistently across many different pieces.
Thanks for the honest framing without exaggerated claims that the topic will change my life, and a stop at portpoises kept the same modest tone, restraint in marketing language signals trustworthiness and the writers here are clearly playing the long game by building credibility rather than chasing immediate clicks through hyperbole.
клининговые услуги
Looking for similar voices elsewhere has come up empty in my recent searches, and a stop at learnandrefineprogress extended the search frustration, the rare site that does what no other does in quite the same way is precious and this one has clearly developed a particular approach that I have not been able to find duplicates of.
After several visits I am now confident this site is one to follow seriously, and a stop at actionwithpurposefulsteps reinforced that confidence, the gradual building of trust through repeated quality exposures is the only sustainable way to develop reader loyalty and this site is building that loyalty in me through patient consistent work consistently.
Reading this on a long flight and finding it the best thing I read across hours of trying, and a stop at startvisiondrivenprogress kept the streak going, when content beats long flight reading you know it has substance because flight reading is a hard test of a piece given the alternatives available everywhere.
Reading this in pieces over a coffee break and finding it consistently rewarding, and a stop at explorefreshgrowththinking extended that into related material I will return to later, the kind of site that fits naturally into small reading windows without requiring a long uninterrupted block is genuinely useful for how I actually browse.
Клининговые услуги мск
Reading this with my morning coffee turned into reading the related posts with my morning coffee, and a stop at thinkbeyondboundaries stretched the morning further, content that pulls breakfast into a reading session rather than just accompanying it is content that has earned a higher claim on my attention than the average article does.
A piece that demonstrated competence without performing it, and a look at flarefoil maintained the same self assured but unshowy register, the gap between competence and performance of competence is one I track and this site has clearly chosen to demonstrate rather than perform which I find much more persuasive as a reader.
Thank you for being clear and direct, that simple approach saves so much frustration on the reader’s end, and a stop at epicestates only made me more sure of it, the rest of the content seems to follow the same pattern which is a great sign of consistent editorial care behind the scenes.
Took the time to read every paragraph rather than skimming for the punchline, and a quick visit to createimpactjourney earned the same careful attention from me, that is the highest signal I can give about content quality because my default mode is rapid scanning rather than deliberate reading on most pages.
Just want to flag that this was useful and not bury the appreciation in caveats, and a look at seometric earned the same direct praise, recognising good work without hedging it with criticism is something I try to practice because over qualified compliments tend to read as backhanded and miss the point sometimes.
Started taking notes about halfway through because the points were stacking up, and a look at quirkbazaar added enough material that my notes file grew further, content that demands note taking from a passive reader is content with substance and the writers here are clearly producing that kind of work consistently across topics.
Печи для дачной бани https://stoves-fireplaces.ru
Now recognising the editorial wisdom of letting some questions remain open at the end, and a look at falconkite continued that intellectual honesty, content that does not force closure on contested questions is content that respects the limits of knowledge and this site has clearly developed the maturity to know when to leave space.
Skimmed first and then went back to read carefully, and the careful read paid off in places I had missed, and a stop at ivypiers got the same treatment, the rare site whose content rewards a second pass is content I want more of in my regular rotation rather than disposable single read articles.
Got pulled in by the headline and stayed because the content actually delivered on the promise, and a stop at duetparish kept that trust intact, when a site lives up to its own framing it earns the right to keep showing up in my browser tabs going forward indefinitely from here on out really.
Felt no urge to argue with the conclusions even though I started the post slightly skeptical, and a look at micapact maintained that pattern, writing that earns agreement through clarity of argument rather than rhetorical pressure is the kind I find most persuasive and the kind I want to read more of these days.
A particular kind of restraint shows up in the writing, and a look at vesselthrift maintained the same restraint across pages, knowing what not to say is just as important as knowing what to say and this site has clearly developed strong instincts on both sides of that editorial line throughout pieces I have read.
Now thinking about how to apply some of this to a project I have been planning, and a look at createimpactdriven added more material for the planning, content that connects to my actual creative work rather than just being interesting in the abstract is the kind that earns priority placement in my reading rotation consistently going forward.
The post made the topic feel approachable without making it feel trivial, that is a fine balance, and a stop at flareinlets maintained the same balance, finding the middle ground between welcoming and serious is genuinely difficult and the writers here have clearly figured out how to consistently hit it well across many different posts.
Started this morning and finished at lunch with a small sense of having spent the time well, and a look at irisarbor extended that satisfaction into the afternoon, content that fits naturally into the rhythm of a working day rather than demanding a dedicated reading block is increasingly the kind I prefer.
Quietly building a case in my head for why this site deserves more attention than it currently seems to receive, and a look at neatmills reinforced the case, the gap between quality and recognition is a recurring frustration in independent online content and this site is one of the cases that seems particularly egregious to me today.
Just nice to read something that does not feel like it was assembled from a content brief, and a stop at movefromvision kept that handcrafted feel going, you can tell when a real human with real understanding is behind the words versus a templated piece churned out for an algorithm to find.
Liked the careful word choice throughout, every term seemed picked for a reason rather than thrown in casually, and a stop at buildfocusedoutcomes continued that precise style, this kind of attention to small details is what separates careful writing from the usual rushed content that dominates blog spaces today across pretty much every topic I follow.
Worth flagging that this approach to the topic is fresh without being contrarian, and a stop at loopboughs extended the same fresh angle, finding original perspective on familiar subjects is rare and this site has clearly developed its own way of seeing rather than echoing the dominant takes from elsewhere consistently.
Genuinely changed how I think about a small piece of the topic, which does not happen often online, and a look at flareinlet added another nudge in the same direction, the kind of writing that earns a small mental shift rather than just confirming what you already thought before reading is a sign of careful thought.
Now adding this site to a small mental group of recommendations I keep ready for specific kinds of inquiries, and a stop at seotrail extended the recommendation readiness, content that I can confidently point friends and colleagues toward in specific contexts is content with real social utility and this site has that utility clearly.
Вот такой момент: подбор качественного стационара — это реально отдельная и очень сложная история. Многие лично сталкивались с такой ситуацией,, когда родным или близким людям срочно понадобилась грамотная помощь врачей. И тут сразу возникает главный вопрос: куда именно везти человека?
Я сам недавно детально изучал этот вопрос, искал действительно надежный медицинский вариант. Очень сложно с ходу отличить реальные отзывы пациентов от банальной рекламы. Если коротко, лучше сразу перейти на официальный сайт, где нет вранья, там подробно расписаны все важные условия и нюансы про анонимное снятие запоя в условиях клиники. В общем, не тяните время и долго не раздумывайте,, чтобы четко во всем разобраться.
Вся актуальная информация и контакты доступны прямо здесь: наркологический стационар санкт петербург [url=narkologicheskij-staczionar-sankt-peterburg-12.ru]narkologicheskij-staczionar-sankt-peterburg-12.ru[/url]. Честно говоря, после изучения всех условий, насколько там много полезных нюансов и скрытых факторов, включая комфортные условия содержания, современные палаты и полную анонимность. Для Санкт-Петербурга это точно один из самых лучших вариантов, который стабильно работает и имеет хорошие отзывы.
Now wishing I had found this site sooner, and a look at learnandexpandcapabilities extended that mild regret, the calculation of how many years of good content I missed by not finding the right sources earlier is one I try not to make too often but it does come up sometimes when I find sites this good.
Glad to have another data point on a question I am still thinking through, and a look at focuscreatesmovement added two more, content that acknowledges its place in a wider conversation rather than pretending to settle the question alone is intellectually honest in a way that I wish was more common across the open web.
Worth flagging that the writing rewarded a second read more than I expected, and a look at flareaisles produced the same second read benefit, content with hidden depths that emerge only on careful rereading is rare in the modern blog space and this site has clearly invested in that level of compositional density throughout.
A piece that suggested careful editing without showing the marks of the editing, and a look at buildgrowthmomentum continued that invisible polish, the best editing disappears into the prose and this site reads as having been edited with skill that does not announce itself which is the highest compliment I can offer any blog content.
Now realising the topic deserved better treatment than it has been getting elsewhere, and a look at dustorchid extended that broader recognition, content that exposes the gap between actual quality and average quality elsewhere is doing the quiet work of raising standards and this site is contributing to that elevation in its own corner.
Worth pointing out that the writing reads as confident without being defensive about it, and a look at fancyfinal extended that secure tone, content that does not pre emptively argue against imagined critics has a different quality from defensive writing and this site reads as written from a place of real ease.
I came here looking for a quick answer and ended up reading the whole post because it was actually interesting, and after growstepbydirection I had a much fuller picture, no stress and no confusion just a clear walk through the topic that made everything fall into place without much effort.
Useful read, especially because the writer did not assume too much background from the reader, and a quick look at mintdawn continued in the same way, a thoughtful site that meets people where they are which is something the modern web could use a lot more of for both casual and serious readers.
Если требуется восстановить свидетельство и поставить апостиль, важно правильно подготовить документы. Мы оказываем помощь на всех этапах процесса https://langwee-russia.com/apostil-na-spravku-o-nesudimosti/
Genuinely useful read, the points are practical and easy to apply right away, and a quick look at irisbureau confirmed that this site is consistent in that approach, looking forward to digging through the rest of it when I get the chance to sit down properly later in the week or this weekend.
Reading this felt easy in the best way, no friction and no confusion at any point, and a stop at dewdawns carried that same comfort across more pages, the kind of editorial flow that lets you absorb information without fighting the format which is increasingly hard to find on the open web today across topics.
Denemek isteyenler çok soruyor. Bazı adresler çalışmıyor. En sonunda güvenilir adrese ulaştım.
Casino sevenler bilir. Uyarıları dikkate alarak sistemi kurun. Giriş adresi aynen şu şekilde: 1xbet güncel giriş [url=https://1xbet-giris-80.com]1xbet güncel giriş[/url]. Kısacası — 1xbet türkiye için tek doğru adres bu.
Bonusları gayet iyi. Kimseye zararım dokunmaz — başka yerde aramaya gerek yok. Selametle…
Now leaving a small mental note to recommend this when the topic comes up in conversation, and a look at structureyourgrowth extended that recommend ready feeling, content that arms me with shareable references for likely future conversations is content with social value and this site is providing that conversational ammunition consistently for me lately.
minecraft apk download
A piece that did not lean on the writer credentials or institutional backing, and a look at navigateyournextmove maintained the same focus on substance, content that earns trust through quality rather than through name dropping is the kind I find most persuasive and this site is clearly playing on the substance side of that distinction.
Thanks for putting this online without locking it behind email signups or paywalls, and a quick visit to grovequays kept that open feel going, content that trusts the reader to come back rather than gating access is the kind of approach I will reward with regular return visits over time happily.
Genuinely useful read, the points are practical and easy to apply right away, and a quick look at ideasintoimpact confirmed that this site is consistent in that approach, looking forward to digging through the rest of it when I get the chance to sit down properly later in the week or this weekend.
Appreciated how the post felt complete without overstaying its welcome, and a stop at cadetarenas confirmed that economical approach runs across the site, knowing when to stop is a skill many writers never develop but here the discipline is obvious and welcome from the perspective of a busy reader trying to learn things efficiently.
1xbe
Working through this site has been a small antidote to the shallow content that fills most of my reading time, and a stop at seovista extended that antidote function, sites that quietly improve the average quality of my reading by being themselves are sites worth supporting through return visits and recommendations consistently.
A small thank you note from me to the team behind this work, the post earned it, and a stop at sauntersonar suggested more thanks would be in order over time, recognising the people who do good writing online is something I try to remember to do because the alternative is silence and silence rewards mediocrity unfortunately.
Случается, когда уже не до раздумий — близкий совсем плох, а тащить в клинику просто нереально . Я сам через это прошёл недавно. Сидишь, не знаешь что делать . Начинаешь обзванивать знакомых , а вокруг сплошной развод . Пока случайно не наткнулся на один реально работающий вариант. Требуется срочная помощь — а везти самому просто нереально, то выход один . Речь конкретно про нарколога на дом . У нас в Самаре, к слову , тоже полно левых контор без лицензии. Вся проверенная информация ниже по ссылке: наркология на дому вызов [url=https://narkolog-na-dom-samara-13.ru]https://narkolog-na-dom-samara-13.ru[/url] Честно скажу , после того как прочитал , понял, как правильно действовать. Там и про капельницы подробно , и про последующее кодирование. Плюс анонимность — это важно . Советую не откладывать.
Народ, привет! Такая ситуация — на планерке сказали срочно найти подарки для клиентов. Может, кто шарит где лучше брать сувенирную продукцию с логотипом. корпоративные сувениры с логотипом компании [url=https://suvenirnaya-produkcziya-s-logotipom-10.ru]https://suvenirnaya-produkcziya-s-logotipom-10.ru[/url] Посоветуйте нормального поставщика сувенирной продукции с логотипом, чтобы не обдиралово было. Просили ещё брендированные кружки и толстовки. Заранее респект тем, кто откликнется с контактами проверенными.
Picked a single sentence from this post to remember, and a look at edendome gave me another to keep, content that produces memorable lines is doing more than just transferring information and the small selection of sentences I keep from each reading session is one of the actual returns I get from reading carefully.
Жидкость для генератора снега: crm
Reading this triggered a small but real correction in something I had assumed, and a stop at flarequill extended that corrective effect, content that updates my beliefs through evidence rather than rhetoric is content with intellectual integrity and this site has earned that label consistently across the pieces I have read so far today.
Really appreciate the confidence to make a clear point rather than hedging everything, and a quick visit to createforwardexecutionplan maintained the same direct stance, writing that takes positions rather than equivocating is more useful even when the positions are debatable because at least the reader has something to react to clearly.
Reading this slowly to give it the attention it deserved, and a stop at fancyhale earned the same slow read, choosing to read slowly is a small act of respect for content quality and very few sites earn that respect from me but this one did so without any explicit ask which is the cleanest way.
Reading this gave me a small sense of progress on a topic I have been slowly working through, and a stop at clarityinexecution added another step forward, learning happens in small increments across many sources and finding sources that consistently contribute is the actual practical value of careful curation in an information rich world.
Felt energised after reading rather than drained, which is unusual for online content these days, and a look at musebeat continued that good feeling, content that leaves you better than it found you is rare and worth bookmarking when you stumble across it for the first time today or any other day really.
Reading this in three sittings because the day was fragmented, and the piece survived the fragmentation, and a stop at growwithstrategyfocus held up under similar reading conditions, content engineered for continuous attention is fragile in modern conditions and this site reads as durable across the realistic ways people consume content today.
Açıkçası ben de bu konuda epey araştırma yaptım. Herkes bir şey diyor ama kimse net konuşmuyor. Gerekli teknik incelemeleri tek tek tamamlayıp sistemi test ettim. En sonunda güvenilir bir kaynak buldum ve size de aktarayım dedim: 1xbet güncel adres [url=https://1xbet-giris-85.com]1xbet güncel adres[/url]. Kusura bakmayın da durum şu — spor bahislerinde iddialı olanlar burayı çok iyi bilir.
bonusları bile tatmin edici gerçekten inanın. Araştırmayı seven biriyimdir bu konuda — en memnun kaldığım yer burası oldu kesinlikle. Umarım işinize yarar bu bilgiler…
After reading several posts back to back the consistent voice across them is impressive, and a stop at islemeadow continued that voice consistency, sites that maintain a single coherent voice across many pieces by potentially many writers represent serious editorial discipline and this one has clearly developed the institutional consistency needed for that.
Liked the balance between depth and brevity, never too shallow and never too long, and a stop at foxarbors kept the same balance going across the rest of the site, this is one of the harder skills in writing and the team here clearly has it figured out very well indeed across every page.
During my morning reading slot this fit perfectly into the routine, and a look at driftfairs extended that perfect fit into the rest of the routine, content that matches the rhythm of how I actually read rather than demanding accommodation from my schedule is content well calibrated to its likely audience and this site has it.
Welcome to Azimutbet https://21noticias.com/2026/06/09/what-is-sports-betting-and-why-is-it-so-popular-today/ a premium sports betting and gambling platform. Thousands of sports matches with extensive selections, live dealers, and the best licensed slot machines await you. Activate the bonus program, participate in VIP tournaments, and enjoy instant payouts with no hidden fees.
Рынок жидкости для генераторов дыма: современное состояние и перспективы развития
Now planning a longer reading session for the archives, and a stop at progresswithstructure confirmed the archives are worth that longer commitment, sites with archives I want to read deliberately rather than just sample are rare and this one has clearly earned that level of interest based on the consistency of what I have already read.
Closed the laptop and walked away thinking about the post for a good twenty minutes, and a stop at apexhelm produced similar lingering thoughts, content that survives the closing of the browser tab is content that has actually entered the mind rather than just decorating the screen for the duration of the reading.
Worth marking the moment when reading this clicked into something useful for my own work, and a look at executeideascleanly extended that practical click, content that connects to my actual life rather than just being interesting is content with the highest kind of value and this site is generating that connection at a high rate.
Looking forward to seeing what gets published next month, and a look at shopmint extended that anticipation across the broader site, finding myself looking forward to a sites future content rather than just consuming its existing content is a stronger commitment level than I usually reach with new finds and this site triggered that.
High quality writing, no marketing speak and no buzzwords that mean nothing, and a stop at momentumthroughstrategy kept that going, simple direct content that actually communicates something is harder to find than it should be and this is one of the rare places that gets it right consistently across many different posts.
Felt mildly happier after reading, which sounds silly but is true, and a look at discovercreativegrowthpaths extended that small mood lift, content that improves rather than degrades my mental state is content I want more of and the cumulative effect of reading sites that lift versus sites that drag is real over time.
télécharger 1xbet android
If you asked me to point to a recent positive sign for the open web this site would be near the top, and a stop at buildactionabledirection reinforced that designation, the few sites that serve as evidence the web can still produce quality independent content are precious and this one has clearly become one for me.
Liked everything about the experience, from the opening through to the closing notes, and a stop at lobbydawn extended that into more pages, finding a site where the editorial vision shows through every choice rather than feeling random is an increasingly rare experience and one I am glad to have today during this particular reading session.
Вот реально ситуация — человек в ступоре , а везти в клинику страшно . Моя семья такое пережила пару лет назад . Сидишь, не знаешь за что хвататься . Начинаешь обзванивать знакомых , а вокруг только деньги тянут. Пока случайно не нашел один реально работающий вариант. Если нужна срочная помощь — а ехать куда-то нет физической возможности , то нужно вызывать врача на дом. Я про выезд нарколога на дом. У нас в Самаре, если честно, тоже полно шарлатанов . Нормальные контакты, кто реально приезжает вот тут : врач нарколог [url=https://narkolog-na-dom-samara-14.ru]https://narkolog-na-dom-samara-14.ru[/url] Честно скажу , после того как прочитал , понял, как правильно действовать. И про снятие запоя на дому, и про последующее кодирование. И цены адекватные, без разводов. Рекомендую не откладывать.
Closed the tab feeling I had spent the time well, and a stop at eliteledges extended that feeling across more pages, the test of whether time on a site was well spent is one I apply silently after closing tabs and very few sites pass it but this one passed it cleanly today afternoon clearly.
Skipped the social share buttons but might come back to actually use one later, and a stop at fawnetch extended that share urge, content that triggers genuine sharing impulses rather than performative ones is content that has actually moved me and not many posts in a typical week do that for me actually.
Found this useful, the points line up well with what I have been thinking about lately, and a stop at etherledge added some angles I had not considered yet, definitely walking away with more than I came for which is the best outcome from time spent reading online for any kind of topic.
Thanks for the simple approach, too many sites bury the actual point under layers of unnecessary words, but here every line earns its place, and a look at mythmanor showed the same care for the reader which is something I will remember the next time I need answers on a topic.
Vague feelings of recognition kept surfacing as I read because the writing names things I have been thinking, and a look at eagerkilt produced more of those recognition moments, content that gives shape to private intuitions is content that makes me feel less alone in my own thinking and this site has that effect.
Liked the balance between depth and brevity, never too shallow and never too long, and a stop at growintentionallyaheadnow kept the same balance going across the rest of the site, this is one of the harder skills in writing and the team here clearly has it figured out very well indeed across every page.
Reading this confirmed that my time researching the topic in other places had not been wasted, and a stop at isleparish extended the confirmation, when independent sources agree that is a useful signal and this site is one of the more reliable sources I have found for cross checking what I read elsewhere on similar subjects.
This one is staying open in a tab for the rest of the day so I can come back and re read certain parts, and a look at directionoverdistraction suggests I will be doing the same with a few more pages here too, this is going to be a deep dive over the coming hours.
Quietly the post solved something I had been turning over without quite knowing how to phrase the question, and a look at progresswithoutlimits extended that quiet solving, content that addresses unformulated needs is content with reader insight and this site has demonstrated that insight at a high rate across the pieces I have read recently.
Closed three other tabs to focus on this one and never opened them again, and a stop at flickaltar similarly held attention exclusively, content that crowds out other reading from working memory is content with real density and this site has demonstrated that density across multiple pages I have visited so far this morning.
Came in skeptical of the angle and left mostly persuaded, and a stop at startmovingclearly pushed me a bit further in the same direction, content that can move a critical reader by argument rather than rhetoric is rare and worth pointing out because it indicates real substance underneath the surface presentation here.
A handful of memorable phrases from this one I will probably use later, and a look at learnandadvancewisely added a couple more, content that contributes language to my own communication rather than just facts is content with a different kind of utility and this site is providing that linguistic utility consistently across what I read.
Если честно, сам перерыл кучу форумов в поисках нормальной обивки. Оказалось, что выбрать подходящий вариант тот ещё квест. В общем, смотрите, вот здесь реально толково расписано про плотность, ворс и износостойкость для диванов и кресел, а главное — показаны варианты, которые не выцветают. Вся полезная информация доступна здесь: ткань для обивки дивана купить [url=https://tkan-dlya-mebeli-2.ru]ткань для обивки дивана купить[/url] Дальше сами гляньте каталог с ценами. Да, и не берите первое, что попалось — я уже обжёгся, когда брал ткань для мебели на распродаже. Эта тема реально вывозит по износу. Кстати: ткань мебельная купить лучше уже с нормальной пропиткой от грязи. Да и рвётся такое полотно гораздо меньше. Не поленитесь, откройте.
Came away feeling slightly smarter than I was when I started, that is a real win, and a stop at mintdawns added a bit more to that, the rare site that actually transfers some of its knowledge to the reader in a way that sticks rather than just creating an illusion of learning briefly.
Solid value packed into a relatively short post, that takes skill, and a look at vectorswift continues the dense useful content across more pages, this site clearly understands that respecting reader time is itself a form of generosity which is something most blog operations seem to have forgotten lately across the wider open web.
Thanks for keeping things clear and to the point, that is honestly hard to find online these days, and after reading through findyourprogresslane the message stayed consistent which makes me trust the information being shared more than I usually do on similar pages that cover this same kind of topic.
Thanks for a post that does not try to be funny when it is not the moment for it, and a stop at edendune maintained the same appropriate seriousness, knowing when humour helps and when it just signals desperation for engagement is a sign of editorial maturity that many blogs have not developed yet.
Thank you for not assuming the reader already knows everything, the explanations meet me where I am, and a look at buildtowardresults did the same, that consideration is what makes a site feel welcoming rather than gatekeepy which is sadly the default mood across the modern web today for most subjects covered.
Honestly this was a good read, no jargon and no padding, and a short look at bravofarm kept that same feel going which I really appreciated, the writer clearly knows the topic well enough to explain it without hiding behind big words or filler that often gets used to seem clever.
Skimmed first and then went back to read carefully, and the careful read paid off in places I had missed, and a stop at forwardmotionlabs got the same treatment, the rare site whose content rewards a second pass is content I want more of in my regular rotation rather than disposable single read articles.
Как выбрать жидкость для генератора дыма: советы по правильному выбору и использованию
Genuinely good work, the kind that holds up over multiple readings without losing its appeal, and a stop at seoharbor kept that going, definitely a site I will be returning to and probably mentioning to others who work in or care about this particular area of interest today and in coming weeks.
Took longer than expected to finish because I kept stopping to think, and a stop at zingtrace did the same to me, content that provokes thought rather than just delivering information is in a different category and the team here is clearly working at that higher level rather than just cranking out posts.
Ne zamandır böyle bir adres arıyordum. Herkes bir şey diyor ama doğru düzgün çalışan yok. En sonunda şu linkte karar kıldım.
Bahisle aranız nasıl bilmem burayı bir şans verin derim. Gerekli tüm teknik kontrolleri yapıp adımları uyguladıktan sonra erişim açıldı. Giriş adresi tam olarak şurada: 1xbet güncel [url=https://1xbet-giris-84.com]1xbet güncel[/url]. Özetle söylemek gerekirse — 1xbet güncel adres arayanlara müjde.
Hiçbir sorun yaşatmadı bugüne kadar. Kendi deneyimim buysa da — pişman olacağınızı sanmıyorum. Şimdiden iyi oyunlar…
Знаете, поиск действительно проверенного медицинского центра — это всегда целая проблема и головная боль. Нередко в жизни бывает так, когда родным или близким людям срочно понадобилась грамотная помощь врачей. И в этот момент обычно начинается паника просто из-за банальной нехватки информации.
Мой коллега по работе долго искал по-настоящему работающий и безопасный выход. Очень сложно с ходу отличить реальные отзывы пациентов от банальной рекламы. Короче говоря, советую присмотреться к одному источнику, там действительно раскладывают по полочкам всю подноготную про круглосуточную наркологическую поддержку и условия проживания. В общем, не тяните время и долго не раздумывайте,, чтобы четко во всем разобраться.
Вся актуальная информация и контакты доступны прямо здесь: наркология вывод из запоя в стационаре [url=www.narkologicheskij-staczionar-sankt-peterburg-12.ru]наркология вывод из запоя в стационаре[/url]. Сам сначала даже не думал, насколько там много подводных камней, на которые стоит обращать внимание, включая комфортные условия содержания, современные палаты и полную анонимность. Для Санкт-Петербурга это точно один из самых лучших вариантов, который стабильно работает и имеет хорошие отзывы.
Most attempts at writing on this topic feel like they are missing something and this post finally identified what was missing, and a look at duetdrives extended that diagnostic clarity, content that names what is wrong with adjacent treatments while doing better itself is content with both critical and constructive value and this site has both.
Now saved this in a way that I will actually find again rather than the casual bookmark approach, and a stop at loopbough earned the same careful saving, organising my reading bookmarks so that high quality sources rise to the top is something I should do more of and this site triggered that organisation today.
Let’s be real, finding a decent rental company down here is a nightmare. Or worse — they freeze your credit card for an extra two grand and smile like it’s totally normal. Fool me once, shame on you, right. When you are trying to find a reliable premium fleet down here, make sure to check the actual fleet reviews before signing anything. Miami without a decent whip is pretty rough, whether you are heading to Brickell, Coconut Grove, or just driving down to Key Biscayne.
Most of these local agencies are just fancy websites hiding a garbage fleet, until I finally stumbled across one that actually delivers what it promises. If you are looking for an honest source for premium rentals across Florida, check the details here: premium car hire [url=https://luxury-car-rental-miami-2.com]premium car hire[/url]. Yeah, finding parking in downtown is still its own separate nightmare, but that’s on you. Anyway, at least there’s one trustworthy service left in this town, hope this helps someone save a few bucks.
Picked this up between two other things I was doing and got drawn in completely, and after ivypier my original tasks were completely forgotten for a while, content that derails a workflow in a positive way by being more interesting than what you were already doing is rare and worth recognising clearly.
A thoughtful read in a week that has been mostly noisy, and a look at neatdawn carried that thoughtful quality across more pages, finding pockets of considered writing in a week of distractions is one of the small wins of careful curation and this site is providing those pockets at a sustainable rate.
Looking through other posts here the consistency is what makes the site valuable rather than any single piece, and a stop at everattic extended that consistency observation, sites whose value lies in the ongoing pattern rather than in standout posts are sites I trust more deeply and this one has clearly built that kind of trust.
Excellent post, balanced and well organised without showing off, and a stop at fawngate continued in that same vein, this site has clearly figured out the formula for content that works for readers rather than for search engine ranking signals which is harder than it sounds today and worth real recognition from anyone.
A piece that handled the topic with appropriate weight without becoming portentous, and a look at neatdawns continued that calibrated seriousness, content that takes itself seriously without becoming pompous is something this site has clearly figured out and the balance shows up in every piece I have read across multiple sessions now.
Now feeling that this site is the kind I want to make sure does not disappear, and a look at discoverhiddenopportunitiesnow reinforced that quiet protective feeling, the rare sites whose disappearance would actually matter to me are the sites I want to support through return visits and recommendations and this one has joined that small protected list.
A piece that built up gradually rather than front loading its main points, and a look at ideastointent maintained the same gradual structure, content that trusts the reader to reach conclusions through accumulating reasoning is more persuasive than content that announces conclusions and then defends them and this site uses the persuasive approach.
Really thankful for posts that respect a reader’s time, this one does, and a quick look at clarityoverchaos was the same, no need to scroll through endless intros just to get to the actual content, that approach alone is enough reason to come back here regularly for the kind of writing offered.
Over the course of reading several posts here a pattern of quality has emerged, and a stop at createclaritysystems confirmed the pattern, the difference between sites that hit quality occasionally and sites that hit it consistently is huge and this site has clearly demonstrated the consistent kind through what I have read this morning.
Знаете, ситуация бывает — человек в ступоре , а тащить в клинику просто нереально . Моя семья такое пережила недавно. Руки опускаются, время идёт. Лезешь в интернет, а вокруг сплошной развод . Пока случайно не наткнулся на один реально работающий вариант. Требуется немедленная консультация — а ехать куда-то просто нереально, то выход один . Речь конкретно про наркологическую помощь на дому . В Самаре , к слову , тоже полно левых контор без лицензии. Вся проверенная информация вот тут : вызов нарколога на дом запой [url=https://narkolog-na-dom-samara-13.ru]вызов нарколога на дом запой[/url] Откровенно говоря, после того как прочитал , понял, как правильно действовать. И про снятие запоя на дому, и про последующее кодирование. Плюс анонимность — это важно . Рекомендую не тянуть .
Felt the writer respected the topic without being precious about it, and a look at flowlegend continued that respectful but unfussy treatment, finding the right register for serious topics is hard and this site has clearly figured out how to take the topic seriously while still being readable for casual visitors regularly.
Bir arkadaşım ısrarla tavsiye etti. Açıkçası önyargılıydım biraz. Sonra biraz araştırayım dedim.
Spor bahislerinde iddialı olanlar buraya. Detaylı incelemeleri tamamlayıp adımları takip ettikten sonra her şey netleşti. Giriş adresi işte karşınızda: 1xbet spor bahislerinin adresi [url=https://1xbet-giris-83.com]1xbet spor bahislerinin adresi[/url]. Demem o ki — 1xbet spor bahislerinin adresi burada.
Hem hızlı hem güvenilir. Kimseye zararı dokunmaz — pişman eden bir yer değil kesinlikle. Şimdiden iyi eğlenceler…
Bookmark moved to my permanent reference folder rather than the casual maybe later folder, and a look at findyourgrowthdirection earned the same upgrade, the distinction between casual interest and lasting reference is something I track carefully and very few sites cross that threshold but this one did so without much effort apparently.
Справки для работы и учебы требуют соблюдения определенных требований к оформлению. Мы оказываем помощь в подготовке необходимых документов https://baza-spravki.com/spravka-nd-narkologicheskiy-dispanser/
Thanks for laying this out in a way that someone newer to the topic can follow, and a stop at eastglaze kept that accessibility going, writing that meets readers at different experience levels without condescending is hard to do well and the writers here have clearly thought about who they are writing for.
Now noticing that the post avoided the temptation to be funny in places where humour would have undermined the substance, and a stop at ideasdrivenforward maintained the same restraint, knowing when to be serious is a rare editorial virtue and this site has clearly developed it through what I assume is careful editorial practice over years.
Слушайте, какая история — человек в ступоре , а везти в клинику нет никаких сил. Я сам через это прошел недавно совсем. Сидишь, не знаешь за что хвататься . Начинаешь обзванивать знакомых , а вокруг сплошной развод . Пока случайно не нашел один реально работающий вариант. Если нужна немедленная консультация — а ехать куда-то нет физической возможности , то выход один . Я про круглосуточный вызов нарколога . У нас в Самаре, к слову , тоже полно левых контор без лицензии. Нормальные контакты, кто реально приезжает вот тут : нарколог на дом круглосуточно [url=https://narkolog-na-dom-samara-14.ru]нарколог на дом круглосуточно[/url] Откровенно говоря, после того как вник в детали, понял, как правильно действовать. И про снятие запоя на дому, и про последующее кодирование. Плюс анонимность — это важно . Советую не тянуть .
A handful of memorable phrases from this one I will probably use later, and a look at discoverfreshopportunities added a couple more, content that contributes language to my own communication rather than just facts is content with a different kind of utility and this site is providing that linguistic utility consistently across what I read.
The pacing of the post was just right, never rushed and never dragged out unnecessarily, and a look at quillglade maintained the same rhythm, you can tell the writer has experience because the difficult skill of pacing is something only practiced writers manage to handle well in long form content over time and across formats.
A piece that handled a controversial angle without becoming heated, and a look at findgrowthopportunityspace continued that calm engagement, content that can address contested topics without inflaming them is doing rare diplomatic work and this site has clearly developed the editorial maturity to handle sensitive material with the appropriate temperature of writing throughout.
Daha önce hiç bu kadar kararlı bir site görmedim. Kapanan siteler yüzünden çok mağdur oldum. Gerekli tüm teknik kontrolleri sırasıyla tamamlayıp süreci başlattım. En doğru adrese ulaştığımı düşünüyorum ve size de buradan bahsetmek istiyorum: 1xbet giriş [url=https://1xbet-giris-86.com]1xbet giriş[/url]. Şöyle düşünün yani — canlı bahis seçenekleri bile yeterli aslında.
Hiçbir aksilik yaşamadım bugüne kadar. Kendi tecrübelerimi aktarıyorum size — başka yerde kaybolmanıza gerek yok yani. Şimdiden bol şans yardımı ve iyi eğlenceler…
Now leaving a small mental note to recommend this when the topic comes up in conversation, and a look at lunacourt extended that recommend ready feeling, content that arms me with shareable references for likely future conversations is content with social value and this site is providing that conversational ammunition consistently for me lately.
Took a screenshot of one section to come back to later, and a stop at seoloom prompted another saved tab, the urge to capture and revisit specific pieces of content is something I rarely feel but when I do it tells me the work is worth more than the average passing read for sure.
Now considering the post as evidence that careful blog writing is still possible, and a look at buildideasintomotion extended that evidence, the broader question of whether the modern web can sustain quality writing has obvious empirical answers in sites like this one and seeing them is reassuring even when they remain a minority overall today.
Honest reaction is that I want to send this to a friend who would benefit from it, and a look at bravopier added more material I will pass along too, the impulse to share is the strongest signal I have for content quality and this site is generating that impulse cleanly across multiple posts.
Справки различного назначения могут потребоваться для государственных учреждений, работодателей и учебных заведений. Мы предлагаем удобный сервис оформления документов – https://baza-spravki.com/soglasie-na-vyezd-rebenka-za-granitcu/
Genuinely good work, the kind that holds up over multiple readings without losing its appeal, and a stop at startmovingdecisively kept that going, definitely a site I will be returning to and probably mentioning to others who work in or care about this particular area of interest today and in coming weeks.
Thank you for being clear and direct, that simple approach saves so much frustration on the reader’s end, and a stop at growthbyfocus only made me more sure of it, the rest of the content seems to follow the same pattern which is a great sign of consistent editorial care behind the scenes.
My reading list is short and selective and this site is now on it, and a stop at learnandscaleprogressively confirmed the placement, the short list of sites I read deliberately rather than encounter accidentally is something I curate carefully and adding to it is a real act of trust which this site has earned today.
Such writing is increasingly rare and worth supporting through attention, and a stop at jetdome extended that supportive attention across more pages, the conscious choice to spend time on sites that produce careful work rather than convenient consumption is itself a small form of patronage and this site is receiving that conscious patronage from me.
Found this through a search that was generic enough I did not expect quality results, and a look at neatglyph continued the surprisingly good experience, search engines occasionally still surface excellent independent content if you scroll past the obvious paid and high authority results which is reassuring to remember sometimes.
Beyond the immediate post itself the editorial sensibility behind the site is what struck me, and a stop at vitalsnippet continued displaying that sensibility, content that reveals editorial choices through accumulated reading is content with structural quality and this site has clearly developed an underlying approach worth identifying through multiple sessions of reading.