Kefir Grains Growth Time
My kitchen usually smells like fresh bread and simmering soup, but lately, a new scent has taken over. A slight tang fills the air as I stand over my countertop, peering into a glass jar. My kids often gather around, asking if the “magic bubbles” are ready yet.
They are talking about my milk kefir grains, those tiny, rubbery cauliflower-looking clusters that turn plain milk into a probiotic powerhouse. As a mom of three, I focus on nourishing my family with real food, and kefir is a staple in our home. However, I quickly learned that the kefir grains growth time isn’t just a set number on a clock.
It is a living process that changes with the seasons and the rhythm of our busy house. Understanding the kefir grains growth time helped me stop worrying about whether I was “doing it right” and started letting nature take the lead. Consequently, my kitchen has become a small laboratory of health where we track the kefir grains growth time together.
When I first started, I felt frustrated because my grains didn’t seem to double overnight. I wondered if I was failing them. I soon realized that various environmental factors influence the kefir grains growth time significantly.
Specifically, the temperature of my kitchen and the quality of the milk I choose play huge roles. If the house is chilly, the kefir grains growth time slows down to a crawl. Conversely, during a humid summer afternoon, the kefir grains growth time accelerates, sometimes catching me off guard.
Mastering the kefir grains growth time allows me to provide my children with the best gut-healing nutrients without the stress of guesswork. Today, I want to share my secrets for managing the kefir grains growth time so you can enjoy this beautiful, simple process too.
Why You’ll Love Tracking Your Kefir Grains Growth Time
You will absolutely love diving into the world of home fermentation once you understand how the kefir grains growth time works. First, it saves you an incredible amount of money. Store-bought kefir often contains added sugars and thickeners that our bodies just don’t need.
When you manage your own kefir grains growth time, you produce a superior product for the cost of a half-gallon of milk. Furthermore, the satisfaction of seeing those grains multiply is unmatched. It feels like a small win every time you strain your kefir and realize your grains have grown. This physical growth is a sign of a healthy, thriving culture.
Another reason to love this process is the educational value for your children. My kids have learned so much about biology just by watching the kefir grains growth time vary week by week. We talk about how the bacteria and yeast eat the lactose in the milk.
We observe how the kefir grains growth time changes when we move the jar to a warmer spot. Additionally, homemade kefir is incredibly versatile. Once you master the kefir grains growth time, you will always have a base for smoothies, salad dressings, and even healthy pancakes. It simplifies your healthy living journey by providing a consistent source of probiotics right on your counter.
Ingredients You’ll Need
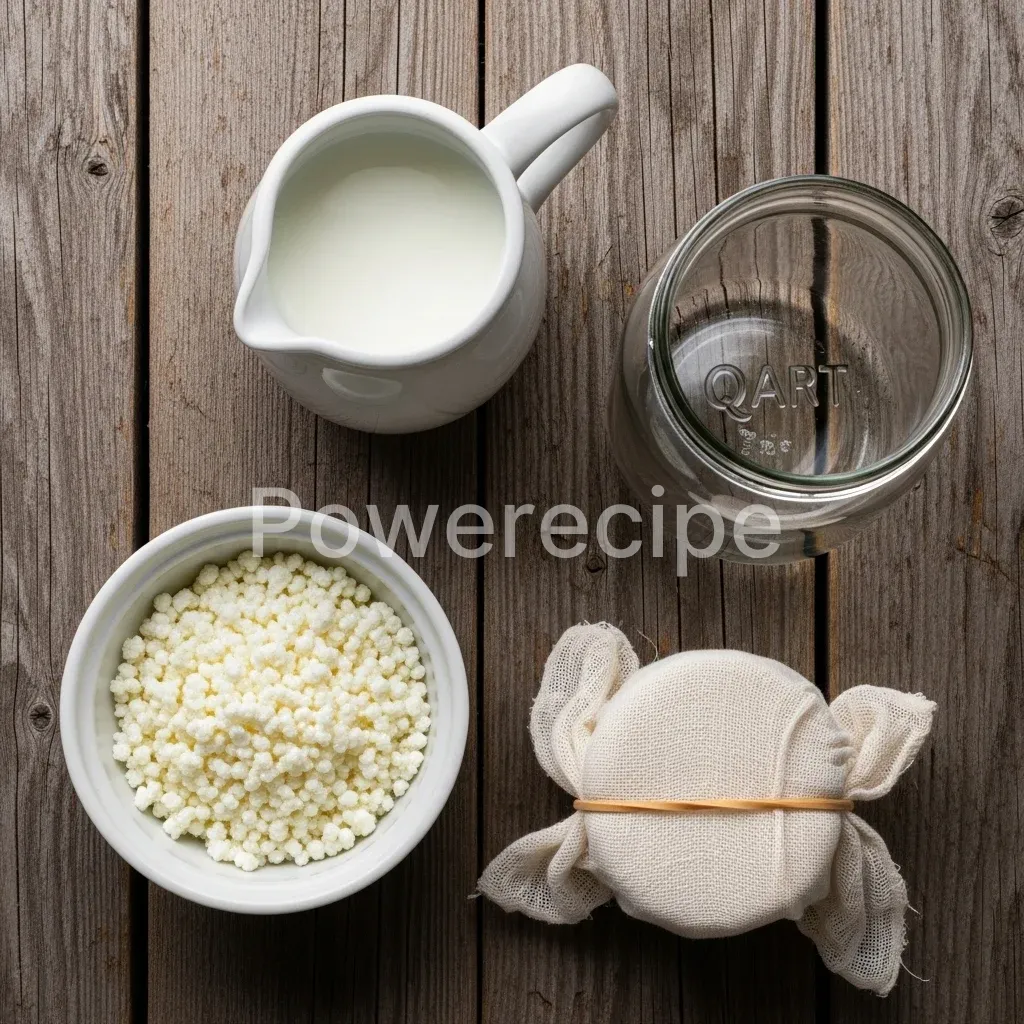
To begin your journey and observe your own kefir grains growth time, you only need a few simple items. High-quality ingredients lead to better growth and a more delicious flavor. I always recommend using the best milk you can find, as the grains thrive on the minerals and fats found in natural dairy.
| Ingredient | Quantity | Purpose |
|---|---|---|
| Active Milk Kefir Grains | 1-2 Tablespoons | The living culture that ferments the milk and grows over time. |
| Fresh Whole Milk | 2-4 Cups | Provides the lactose and nutrients for the kefir grains growth time to peak. |
| Glass Jar | 1 Quart size | The vessel where the fermentation happens safely. |
| Breathable Cover | 1 Piece | Coffee filter or cloth to keep dust out while letting gases escape. |
kefir grains growth time
A comprehensive guide to culturing homemade milk kefir using active grains to create a probiotic-rich beverage that supports gut health.
- Prep Time: 10 mins
- Cook Time: 24 hours
- Total Time: 24 hours 10 mins
- Yield: 4 servings
- Category: Beverage
- Method: Fermentation
- Cuisine: American
- Diet: Gluten Free
Ingredients
1.5 Tablespoons Active Milk Kefir Grains
3 Cups Fresh Whole Milk
1 Quart size Glass Jar
1 Piece Breathable Cover
Instructions
- Place your active milk kefir grains into a clean glass jar, ensuring it is free from soap residue
- Pour the fresh milk over the grains, leaving about an inch of headspace at the top for gas expansio
- Place the breathable cover (coffee filter or cloth) over the jar and secure it tightly with a rubber band
- Find a spot away from direct sunlight, such as a warm pantry, maintaining a temperature of 70-75°F (21-24°C)
- Let the jar sit for 12 to 24 hours while observing for a thickened texture and yeasty aroma
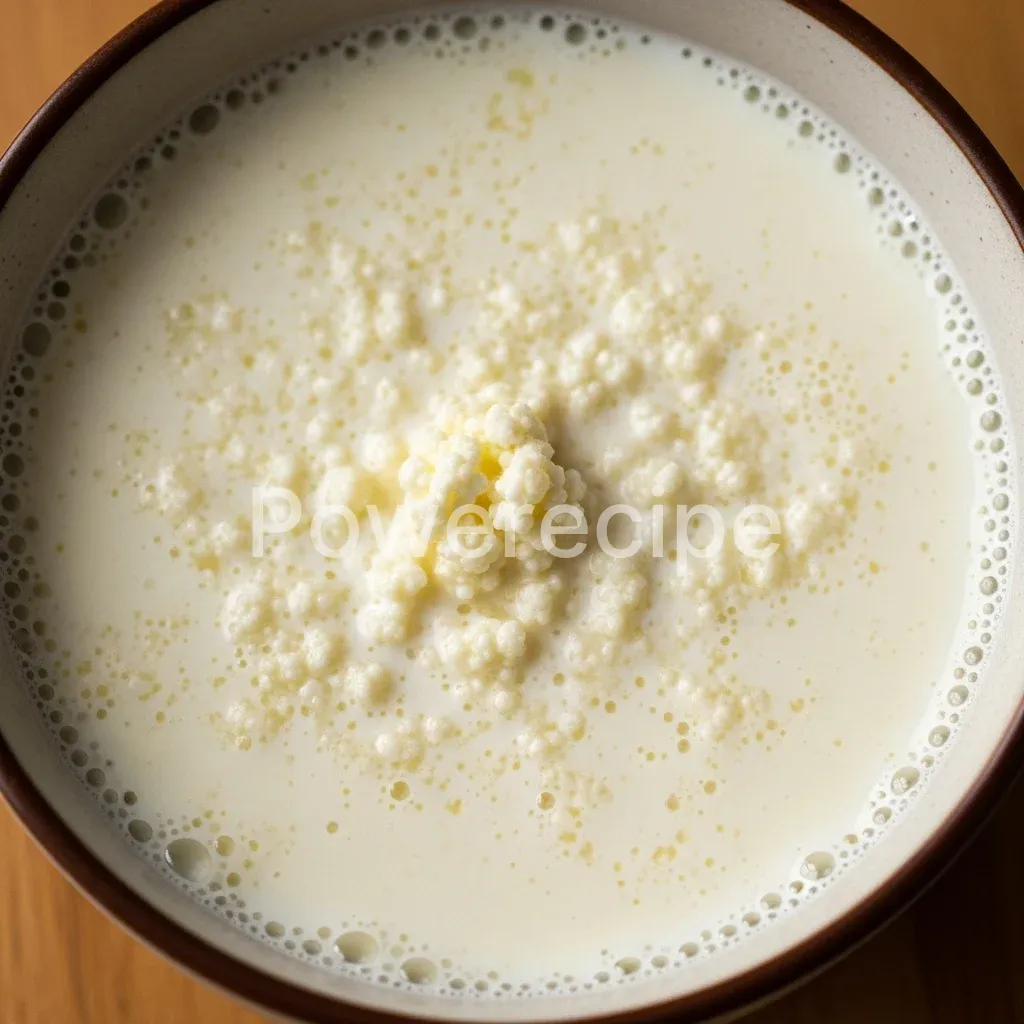
- Check for completion by looking for small pockets of whey (clear liquid) forming at the bottom of the jar
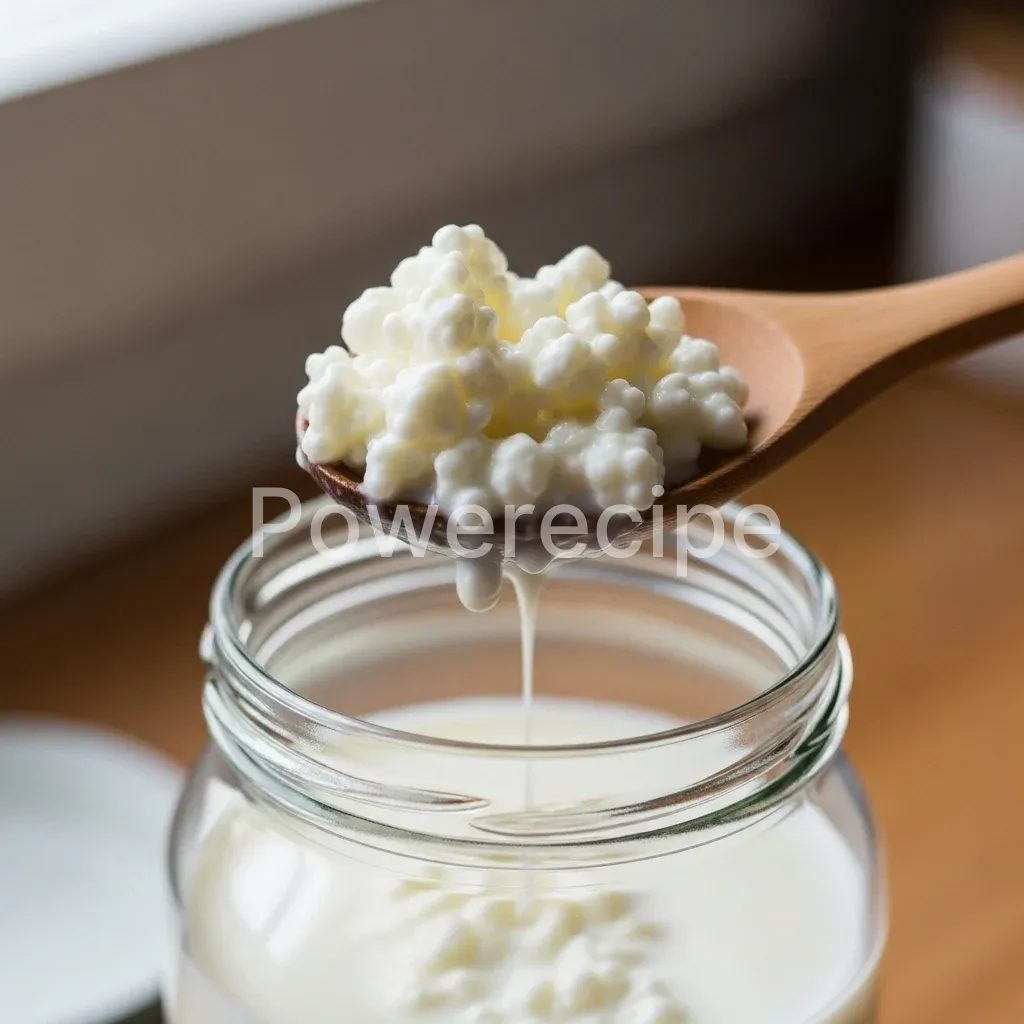
- Gently separate the grains from the finished kefir using a plastic or stainless steel mesh strainer
- Immediately return the grains to a clean jar with fresh milk to restart the fermentation cycle
Notes
Ideal grain-to-milk ratio is one tablespoon of grains per two cups of milk.
Avoid reactive metals like aluminum or copper which can harm the living culture.
If using raw milk, the grains may grow faster due to natural enzymes.
To take a break, store grains in fresh milk in the refrigerator for up to one week to slow growth.
Never reheat finished kefir as high heat kills the beneficial probiotic bacteria.
Substitutions & Variations
While traditional cow’s milk is the gold standard for the best kefir grains growth time, you can experiment with variations. Many people successfully use goat’s milk. Goat milk often results in a thinner consistency, but the kefir grains growth time usually remains steady because the lactose content is similar to cow’s milk.
If you prefer raw milk, your grains will likely be very happy. Raw milk contains enzymes that can actually support a faster kefir grains growth time compared to highly processed milk. However, avoid ultra-pasteurized (UHT) milk if possible. The high heat used in that process alters the proteins, which can sometimes hinder the kefir grains growth time or make the grains sluggish.
For those looking for dairy-free options, you can use coconut milk occasionally. However, you must be careful. Milk kefir grains need lactose to survive long-term.
If you ferment coconut milk, your kefir grains growth time will stop, and the grains may eventually starve. To prevent this, I always suggest rotating them back into cow’s milk every couple of batches. This “refresh” period ensures that the kefir grains growth time resumes and your cultures stay vibrant. You can also vary the fat content by using cream for a thicker, richer kefir, which often boosts the kefir grains growth time due to the extra nutrients.
While these natural ferments provide excellent nutrients, staying energized throughout the day also requires incorporating the right Instant Hydration Ingredients into your routine. Ensuring your body is properly hydrated will help you stay focused while monitoring your kitchen experiments.
Step-by-Step Instructions
Following these steps carefully will help you stabilize your kefir grains growth time and produce consistent results every single morning. I love the ritual of tending to my jars before the kids wake up.
Note: This video is for demonstration purposes and may use a slightly different method.
- Prepare the Jar: Place your active milk kefir grains into a clean glass jar. Make sure the jar is free from soap residue, as chemicals can negatively impact the kefir grains growth time.
- Add the Milk: Pour the fresh milk over the grains. I usually leave about an inch of headspace at the top of the jar. This space allows for the expansion of gases during the kefir grains growth time.
- Secure the Lid: Place your breathable cover over the jar and secure it with a rubber band. This protects the culture while allowing it to breathe. Oxygen levels can slightly influence the kefir grains growth time and flavor profile.
- Find the Right Spot: Place the jar in a spot away from direct sunlight. A warm pantry or a corner of the counter works best. Remember that temperature is the primary driver of kefir grains growth time.
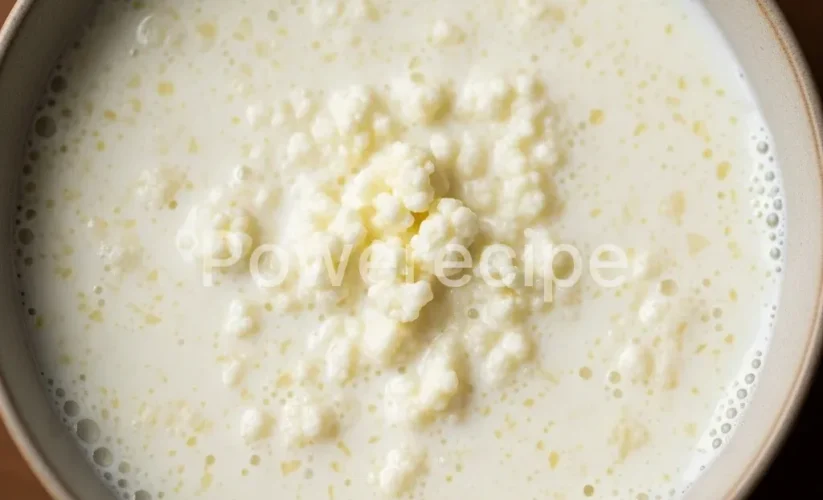
- Wait and Observe: Let the jar sit for 12 to 24 hours. During this period, you are watching for the kefir grains growth time to result in a thickened texture and a pleasant, yeasty aroma.
- Check for Separation: Once you see small pockets of whey (clear liquid) forming at the bottom, the fermentation is complete. If you wait too long, the kefir grains growth time might stall because the grains have run out of food.
- Strain the Grains: Use a plastic or stainless steel mesh strainer to separate the grains from the finished kefir. Be gentle so you don’t damage the clusters, which could affect the future kefir grains growth time.
- Restart the Cycle: Put the grains back into a clean jar with fresh milk immediately. This continuous cycle is what keeps the kefir grains growth time healthy and productive.
Pro Tips for Success
To maximize your kefir grains growth time, you should pay attention to the ratio of grains to milk. If you have too many grains for the amount of milk, they will eat through the lactose too quickly. Consequently, the kefir grains growth time might appear to stop because the environment becomes too acidic too fast.
I find that one tablespoon of grains per two cups of milk is the sweet spot. If your grains grow and you have more than that, simply share them with a friend or add them to your morning smoothie for an extra probiotic boost!
Temperature consistency is your best friend. If your kitchen fluctuates wildly in temperature, consider using a seedling heat mat or placing the jar on top of the refrigerator. A steady warmth of about 70-75°F (21-24°C) provides the most predictable kefir grains growth time.
Furthermore, avoid using reactive metals like aluminum or copper when handling your grains. These metals can leach and harm the delicate balance of bacteria, which ultimately ruins your kefir grains growth time. Stick to glass, wood, or high-quality stainless steel to keep your “babies” happy and growing.
The creamy consistency of a well-balanced kefir batch often reminds me of the rich, velvety texture found in a classic Alfredo Penne Pasta Recipe. Both require careful attention to temperature and dairy quality to achieve a perfectly smooth and delicious finish.
Storage & Reheating Tips
You should never reheat finished kefir or the grains themselves. High heat kills the beneficial bacteria and yeasts, rendering the probiotic benefits useless. If you want to use kefir in a warm recipe, add it at the very end after removing the dish from the heat source.
For the grains, if you need a break from the daily routine, you can slow down the kefir grains growth time by placing them in a jar of fresh milk in the refrigerator. This “hibernation” allows them to stay healthy for up to a week without daily attention.
For longer storage, you can freeze your grains. First, rinse them with cooled, boiled water and pat them dry. Then, coat them in powdered milk and place them in a freezer-safe bag.
This stops the kefir grains growth time completely for several months. When you are ready to start again, thaw them in a jar of fresh milk at room temperature. It may take a few cycles for the kefir grains growth time to return to its normal pace, so be patient during the first few batches after freezing.
What to Serve With This Recipe
Kefir is a versatile companion for many meals. I love serving it alongside a bowl of homemade granola and fresh berries. The tartness of the kefir perfectly balances the sweetness of the fruit.
Moreover, you can use the kefir you’ve made after a successful kefir grains growth time as a base for savory dips. Mix in some garlic, dill, and a pinch of salt for a healthy alternative to ranch dressing. My kids love it with carrot sticks and cucumbers.
If you enjoy baking, use your kefir in place of buttermilk for pancakes or biscuits. The acidity reacts beautifully with baking soda, creating a fluffy texture. Because the kefir grains growth time produces such a rich, complex flavor, it adds a wonderful depth to your baked goods that plain milk simply cannot match.
You can even use it in sourdough starters to give your bread an extra probiotic kick. The possibilities are endless when you have a thriving culture and a consistent kefir grains growth time.
For those who enjoy a bit of tang in their savory dishes, you can even use your finished kefir as a substitute for mayo or sour cream in a hellmanns potato salad recipe. This healthy twist adds a probiotic punch to a beloved family favorite without sacrificing the creamy texture.
FAQs
How can I speed up the kefir grains growth time?
You can speed up the kefir grains growth time by keeping your jar in a slightly warmer environment, ideally around 78°F. Additionally, using higher-fat milk like whole milk or adding a splash of heavy cream provides more nutrients, which can encourage the grains to multiply faster. Frequent feedings every 12 to 18 hours also keep the bacteria in a high-growth phase.
Why are my grains not growing faster?
If your kefir grains growth time seems stalled, check your temperature first. If the house is below 68°F, the grains will work very slowly. Also, ensure you aren’t using chlorinated water to rinse them, as chlorine kills the bacteria. Sometimes, grains just need a few weeks to acclimate to a new environment or a new type of milk before they start showing significant growth.
Does the type of milk affect the kefir grains growth time?
Yes, the type of milk definitely affects the kefir grains growth time. Grains usually grow best in whole, pasteurized cow’s milk because it offers a perfect balance of lactose, proteins, and fats. Skim milk might result in a slower kefir grains growth time because there is less fuel for the culture. Raw milk often produces the healthiest, most robust grains over the long term.
The biological complexity of these cultures involves a symbiotic matrix of bacteria and yeasts that drive the unique fermentation process. Understanding the lifecycle of kefir grains is essential for anyone looking to maintain a healthy, self-sustaining batch for long-term use.
Nutrition Information (per serving)
While the grains themselves aren’t usually consumed, the kefir they produce is incredibly nutritious. The kefir grains growth time ensures that the lactose is converted into lactic acid, making it easier to digest. Here is the approximate nutrition for one cup of homemade whole milk kefir.
| Nutrient | Amount |
|---|---|
| Calories | 150 kcal |
| Total Fat | 8g |
| Protein | 8-10g |
| Carbohydrates | 11g (mostly fermented) |
| Calcium | 30% DV |
| Probiotics | Billions of CFU |