kefir grains growth time
A comprehensive guide to culturing homemade milk kefir using active grains to create a probiotic-rich beverage that supports gut health.
- Prep Time: 10 mins
- Cook Time: 24 hours
- Total Time: 24 hours 10 mins
- Yield: 4 servings
- Category: Beverage
- Method: Fermentation
- Cuisine: American
- Diet: Gluten Free
Ingredients
Scale
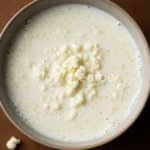
1.5 Tablespoons Active Milk Kefir Grains
3 Cups Fresh Whole Milk
1 Quart size Glass Jar
1 Piece Breathable Cover
Instructions
- Place your active milk kefir grains into a clean glass jar, ensuring it is free from soap residue
- Pour the fresh milk over the grains, leaving about an inch of headspace at the top for gas expansio
- Place the breathable cover (coffee filter or cloth) over the jar and secure it tightly with a rubber band
- Find a spot away from direct sunlight, such as a warm pantry, maintaining a temperature of 70-75°F (21-24°C)
- Let the jar sit for 12 to 24 hours while observing for a thickened texture and yeasty aroma
- Check for completion by looking for small pockets of whey (clear liquid) forming at the bottom of the jar
- Gently separate the grains from the finished kefir using a plastic or stainless steel mesh strainer
- Immediately return the grains to a clean jar with fresh milk to restart the fermentation cycle
Notes
Ideal grain-to-milk ratio is one tablespoon of grains per two cups of milk.
Avoid reactive metals like aluminum or copper which can harm the living culture.
If using raw milk, the grains may grow faster due to natural enzymes.
To take a break, store grains in fresh milk in the refrigerator for up to one week to slow growth.
Never reheat finished kefir as high heat kills the beneficial probiotic bacteria.
Find it online: https://powerecipe.com/kefir-grains-growth-time/